Page is loading ...


© 2011 Inc. All rights reserved.
These operating instructions are protected by copyright. Rights resulting thereof, particularly reprint,
photomechanical or digital postprocessing or reproduction, even in part, are only allowed with the
written consent of Thermo Electron LED GmbH.
This regulation does not apply to reproductions for in-plant use.
The contents of this operating instructions manual may change at any time and without any prior
notice. In case of conflicting translations into foreign languages the German-language version of these
operating instructions shall be binding.
Trademarks
Heratherm™ is a registered trademark of Thermo Scientific.
Thermo Scientific is a brand owned by Thermo Fisher Scientific, Inc.
All other trademarks mentioned in the operating instructions are the exclusive property of the respective man-
ufacturers.
Thermo Fisher Scientific
Robert-Bosch-Straße 1
D - 63505 Langenselbold
Germany
Thermo Electron LED GmbH is an affiliate to:
Thermo Fisher Scientific Inc.
81 Wyman Street
Waltham, MA 02454
USA
Thermo Fisher Scientific Inc. provides this document to its customers with a product purchase to use in the
product operation. This document is copyright protected and any reproduction of the whole or any part of this
document is strictly prohibited, except with the written authorization of Thermo Fisher Scientific Inc.
The contents of this document are subject to change without notice. All technical information in this
document is for reference purposes only. System configurations and specifications in this document supersede
all previous information received by the purchaser.
Thermo Fisher Scientific Inc. makes no representations that this document is complete, accurate or error-
free and assumes no responsibility and will not be liable for any errors, omissions, damage or loss that might
result from any use of this document, even if the information in the document is followed properly.
This document is not part of any sales contract between Thermo Fisher Scientific Inc. and a purchaser. This
document shall in no way govern or modify any Terms and Conditions of Sale, which Terms and Conditions of
Sale shall govern all conflicting information between the two documents.

Thermo Scientific Heratherm 1
C
Chapter 1 Safety Notes.....................................................................................................................1-1
Basic Operating Precautions ............................................................................................................... 1-1
Operational Safety Rules..................................................................................................................... 1-2
Warranty ............................................................................................................................................ 1-2
Explanation of Safety Information and Symbols ................................................................................. 1-3
Safety Notes and Symbols Used Throughout These Operating Instructions ................................... 1-3
Additional Symbols for Safety Information..................................................................................... 1-4
Symbols on the Oven ..................................................................................................................... 1-5
Intended Purpose of the Oven............................................................................................................ 1-5
Correct Use .................................................................................................................................... 1-5
Incorrect Use .................................................................................................................................. 1-6
Standards and Directives .................................................................................................................... 1-6
Chapter 2 Delivery of the Oven........................................................................................................2-1
Packaging ........................................................................................................................................... 2-1
Acceptance Inspection ........................................................................................................................ 2-1
Scope of Supply.................................................................................................................................. 2-2
Chapter 3 Installation........................................................................................................................3-1
Ambient Conditions........................................................................................................................... 3-1
Intermediate Storage........................................................................................................................... 3-2
Room Ventilation............................................................................................................................... 3-2
Use with Air Exhaust Systems............................................................................................................. 3-2
Space Requirements............................................................................................................................ 3-3
Transport ........................................................................................................................................... 3-4
Stacking Kit........................................................................................................................................ 3-5
Installing the Stacking Feet................................................................................................................. 3-5
Installing the Stacking Adapter ........................................................................................................... 3-6
Installing the Anti-tilt Anchor ............................................................................................................ 3-7
Chapter 4 Product Description ........................................................................................................4-1
Heratherm OGS Series Oven Overview.............................................................................................. 4-1
-Heratherm OMS Series Oven Overview............................................................................................ 4-3
Safety Devices..................................................................................................................................... 4-6
Operating Environment ..................................................................................................................... 4-6
Sensing and Control System ............................................................................................................... 4-6
Data Communications & Alarm Interface.......................................................................................... 4-7
AC Power Socket............................................................................................................................ 4-7
Fuses............................................................................................................................................... 4-7
Work Space Components................................................................................................................... 4-8
Inner Chamber ............................................................................................................................... 4-8
Contents

Contents
2 Heratherm Thermo Scientific
Chapter 5 Start-up.............................................................................................................................5-1
Installing the Shelf System.................................................................................................................. 5-1
Initial installation ............................................................................................................................... 5-1
Installing the Shelving .................................................................................................................... 5-1
Preparing the Work Space .................................................................................................................. 5-3
Installation or Removal of the Support Rails (OMS Series only)..................................................... 5-3
Installing and Uninstalling the Rear Air Baffle (OMS Series only).................................................. 5-4
Installing and Uninstalling the Lateral Air Baffles (OGS Series only).............................................. 5-4
Installing the Shelf Support Brackets .............................................................................................. 5-6
Installing the Wire-mesh Shelves .................................................................................................... 5-7
Levelling the Oven.......................................................................................................................... 5-7
Connecting Power.............................................................................................................................. 5-8
Connection to the Power Supply Source......................................................................................... 5-8
Connecting the RS-232 Interface ....................................................................................................... 5-9
Chapter 6 Operation..........................................................................................................................6-1
Preparing the Oven ............................................................................................................................ 6-1
Starting Operation.............................................................................................................................. 6-1
Chapter 7 Handling and Control ......................................................................................................7-1
Powering Up ...................................................................................................................................... 7-5
Switching the Oven Off / Powering Down......................................................................................... 7-5
Temperature Set Value ....................................................................................................................... 7-6
Timer ................................................................................................................................................. 7-7
Stopping a Timer............................................................................................................................ 7-8
Settings............................................................................................................................................... 7-9
Error Log........................................................................................................................................ 7-9
Calibration ................................................................................................................................... 7-10
Temperature Display Unit............................................................................................................ 7-11
Configuration............................................................................................................................... 7-12
Chapter 8 Shut-down ........................................................................................................................8-1
Shutting the Oven Down ................................................................................................................... 8-1
Chapter 9 Cleaning and Disinfection...............................................................................................9-1
Cleaning............................................................................................................................................. 9-1
Cleaning exterior surfaces ............................................................................................................... 9-1
Wipe / Spray Disinfection .................................................................................................................. 9-1
Preparing the manual wipe/spray disinfection................................................................................. 9-2
Predisinfection................................................................................................................................ 9-3
Chapter 10 Maintenance...................................................................................................................10-1
Inspections and checks...................................................................................................................... 10-1
Service Intervals................................................................................................................................ 10-2
Replacing the Door Seal ................................................................................................................... 10-2
Replacing the Power Cord................................................................................................................ 10-3
Returns for Repair ............................................................................................................................ 10-3
Chapter 11 Disposal..........................................................................................................................11-1
Overview of Materials Used.............................................................................................................. 11-1

Contents
Thermo Scientific Heratherm 3
WEEE Conformity .......................................................................................................................... 11-2
Chapter 12 Error Codes.................................................................................................................... 12-1
Chapter 13 Technical Data............................................................................................................... 13-1
Chapter 14 Spare Parts and Accessories....................................................................................... 14-1
Chapter 15 Device Log ..................................................................................................................... 15-1
Chapter 16 Contact........................................................................................................................... 16-1

Contents
4 Heratherm Thermo Scientific

Thermo Scientific Heratherm 1
L
Figure 3-1 Oven Dimensions and Required Clearance........................................................................................... 3-3
Figure 3-2 Lift Points............................................................................................................................................. 3-4
Figure 4-1 Heratherm OGS Series Front View ...................................................................................................... 4-2
Figure 4-2 Heratherm OGS Series Rear View........................................................................................................ 4-3
Figure 4-3 Heratherm OMS Series Front View..................................................................................................... 4-4
Figure 4-4 Heratherm OMS Series Rear View ....................................................................................................... 4-5
Figure 4-5 Sensor Mounting Location - OGS Series and OMS Series.................................................................... 4-6
Figure 4-6 Signal Interfaces and Power Socket....................................................................................................... 4-7
Figure 4-7 Shelf System - OGS Series Oven........................................................................................................... 4-8
Figure 4-8 Shelf System - OMS Series Oven.......................................................................................................... 4-9
Figure 5-1 Sliding the Retaining Spring into the Support Rail............................................................................... 5-1
Figure 5-2 OGS Series - Installing the Shelving ..................................................................................................... 5-2
Figure 5-3 OMS Series - Installing the Shelving..................................................................................................... 5-2
Figure 5-4 Support Rail Installation....................................................................................................................... 5-3
Figure 5-5 Installing the Rear Air Baffle................................................................................................................. 5-4
Figure 5-6 Removing the Bottom Panel................................................................................................................. 5-5
Figure 5-7 Bottom Panel Removed........................................................................................................................ 5-5
Figure 5-8 Removing the Lateral Air Baffle............................................................................................................ 5-6
Figure 5-9 Shelf Support Bracket Installation ........................................................................................................ 5-7
Figure 5-10 Wire-mesh Shelf ................................................................................................................................. 5-7
Figure 5-11 AC Power Supply Socket.................................................................................................................... 5-9
Figure 7-1 Control Panel for Heratherm OGS Series and OMS Series Ovens........................................................ 7-1
Figure 10-1 Door seal replacement (example showing OMH Series oven) ............................................................. 10-3
List of Figures

List of Figures
2 Heratherm Thermo Scientific

Thermo Electron LED GmbH Heratherm 1-1
1
Safety Notes
Basic Operating Precautions
These operating instructions describe Heratherm ovens.
Heratherm ovens have been manufactured to the latest state of the art and been tested
thoroughly for flawless functioning prior to shipping. However, the oven may present
potential hazards, particularly if it is operated by inadequately trained personnel or if it is not
used in accordance with the intended purpose. Therefore, the following must be observed for
the sake of accident prevention:
• Heratherm ovens must be operated by adequately trained and authorized professional
personnel.
• Heratherm ovens must not be operated unless these operating instructions have been fully
read and understood.
• The present operating instructions, applicable safety data sheets, plant hygiene guidelines
and the corresponding technical rules issued by the operator shall be used to create written
procedures targeted at personnel working with the subject matter device, detailing:
• the safety precautions to be taken when processing specific agents,
• the measures to be taken in case of accidents.
• Repair work on the oven must be carried out only by trained and authorized expert
personnel.
• The contents of these operating instructions are subject to change at any time without
further notice.
• Concerning translations into foreign languages, the German version of these operating
instructions is binding.
• Keep these operating instructions close to the oven so that safety instructions and
important information are always accessible.
• Should you encounter problems that are not detailed adequately in these operating
instructions, please contact Thermo Electron LED GmbH immediately for your own
safety.

Safety Notes
Operational Safety Rules
1-2 Heratherm Thermo Electron LED GmbH
Operational Safety Rules
The following rules must be heeded when working with Heratherm ovens:
• Observe the sample weight limits specified for your Heratherm oven as a whole and its
shelving in particular; see “Technical Data” on page 13-1
• Do not load the bottom of the interior workspace to avoid the risk of overheating any
samples placed there.
• Arrange the samples evenly throughout the work space, making sure not to place them
too closely to the interior walls to ensure a uniform temperature distribution.
• Do not load your Heratherm oven with substances that exceed the capabilities of the
available lab apparatus and Personal Protection Equipment to provide sufficient degrees
of protection to users and third parties.
• Check the door seal once a month for proper sealing performance and possible damage.
• Do not process any samples containing hazardous chemical substances that may be
released into the ambient air through defective seals or may cause corrosion or other
defects on parts of the Heratherm oven.
Warranty
Thermo Electron LED GmbH warrants the operational safety and functions of the
Heratherm ovens only under the condition that:
• the oven is operated and serviced exclusively in accordance with its intended purpose
and as described in these operating instructions,
• the oven is not modified,
• only original spare parts and accessories that have been approved by Thermo Electron
LED GmbH are used (third-party spares without Thermo Electron LED GmbH
approval void the limited warranty),
• inspections and maintenance are performed at the specified intervals,
• an installation verification test is performed on commissioning the oven for the first time
and repeated after each inspection and repair activity.
The warranty is valid from the date of delivery of the oven to the customer.

Safety Notes
Explanation of Safety Information and Symbols
Thermo Electron LED GmbH Heratherm 1-3
Explanation of Safety Information and Symbols
Safety Notes and Symbols Used Throughout These Operating Instructions
Indicates a hazardous situation which, if not avoided, will result
in death or serious injuries.
Indicates a hazardous situation which, if not avoided, could result
in death or serious injuries.
Indicates a situation which, if not avoided, could result in damage to
equipment or property.
Is used for useful hints and information regarding the application.

Safety Notes
Explanation of Safety Information and Symbols
1-4 Heratherm Thermo Electron LED GmbH
Additional Symbols for Safety Information
Wear safety gloves!
Wear safety goggles!
Harmful liquids!
Electric shock!
Hot surfaces!
Fire hazard!
Explosion hazard!
Suffocation hazard!

Safety Notes
Intended Purpose of the Oven
Thermo Electron LED GmbH Heratherm 1-5
Symbols on the Oven
Intended Purpose of the Oven
Correct Use
Heratherm ovens are laboratory devices for heating applications, equipped with precision
temperature control.
They are designed for heat treating samples or materials at operating temperatures between
50 °C (122 °F) and 250 °C (482 °F) , including - for example, drying, ageing, analyzing,
decomposing, burn-in, oxidizing, reducing, and preheating.
Heratherm ovens have been designed for installation and operation in the following
environments:
• heat treatment in a reduced or modified atmosphere;
• drying of material.
Observe operating instructions
VDE test mark
CE-conformity mark: confirms conformity according to EU Guidelines
RS 232 interface
PT 100 Sample Sensor - accessory part
Alarm contact

Safety Notes
Standards and Directives
1-6 Heratherm Thermo Electron LED GmbH
Incorrect Use
To avoid the risk of explosion do not load the oven with tissue, material, or liquids that:
• are easily flammable or explosive;
• release vapor or dust that forms combustible or explosive mixtures when exposed to air;
• release poisons;
• create a humid atmosphere;
• release dust;
• exhibit exothermic reactions;
• are pyrotechnical substances;
• exceed the specified hurdle load.
Standards and Directives
The oven complies with the following standards and guidelines:
• IEC EN 61010 - 1, IEC EN 61010 - 2 - 010
• Low Voltage Directive 2006/95/EC
• EMC Directive 2004/108/EC
Additionally, the oven is in compliance with many other international standards, regulations
and directives not listed here. Should you have any questions regarding compliance with
national standards, regulations and directives applicable for your country, please contact
your Thermo Fisher Scientific sales organization.

Thermo Scientific Heratherm 2-1
2
Delivery of the Oven
Packaging
Heratherm ovens are delivered in a rugged packaging box. All packaging materials can be
separated and are reusable:
Packaging materials
Packaging carton: Recycled paper
Foam elements: Styrofoam (CFC-free)
Pallet: Chemically untreated wood
Packaging film: Polyethylene
Packaging ribbons: Polypropylene
Acceptance Inspection
After the oven has been delivered, check the delivery immediately for:
• completeness,
• possible damage.
If components are missing or damage is found on the oven or the packaging, in particular
damage caused by humidity and/or water, please notify the carrier as well as Technical
Support immediately.
Risk of injury
Should sharp edges have formed in damaged areas or elsewhere
on the device, take all necessary precautions to protect
personnel handling the oven. For example, have them wear
protective gloves and other personal protection equipment.

Delivery of the Oven
Scope of Supply
2-2 Heratherm Thermo Scientific
Scope of Supply
Ovens
Quantity of components supplied (pieces) OGS Series OMS Series
Wire-mesh shelf 2 2
Support rail for shelf 0 2
Shelf support brackets 4 4
Power cord 1 1
Clip springs 0 2
Operating manual 1 1
Short reference guide 1 1

Thermo Scientific Heratherm 3-1
3
Installation
Ambient Conditions
The oven must only be operated in a location that meets all of the ambient condition
requirements listed below:
Location Requirements
• Draft-free and dry indoor location.
• Dust loading should be in keeping with the degree of contamination, which is Pollution
Degree 2 according to IEC EN 61010-1. Using the oven in an atmosphere with
electrically conductive dust is prohibited.
• The minimal distance to adjacent surfaces must be observed on all sides (see section
“Space Requirements” on page 3-3).
• The operating room must be equipped with appropriate ventilation.
• Solid, level, fire-proof surface and no flammable materials opposite to the rear panel of the
oven.
• Vibration-proof substructure (floor stand, lab table) capable of bearing the dead weight of
the oven and its accessories (particularly if two devices are stacked).
• The ovens have been designed for an operating height of up to 2000 m above sea level.
• Ambient temperature range from 18 °C to 32 °C / 64.4° F to 89.6° F.
• Relative humidity up to 80% (maximum; preferably 60-70%), non condensing.
• Should condensation exist, wait until the moisture has evaporated completely before
connecting the oven to a power source and powering up.
• Avoid direct exposure to sunlight.
• Devices that produce excessive amounts of heat must not be placed near the oven.
• To avoid drying operation without an appropriate fresh air supply make sure that the air
inlet (which may be equipped with an optional fresh air filter) is not obstructed or blocked
by any adjacent objects.
• Power line voltage variations must not exceed ±10 % of the nominal voltage.
• Transient overvoltages must not exceed the values usually encountered throughout the
power supply network. The nominal transient overvoltage level shall be the surge
withstand voltage according to overvoltage category II of IEC 60364-4-443.

Installation
Intermediate Storage
3-2 Heratherm Thermo Scientific
• Place the oven on a floor stand (option; to be ordered separately), never on the lab floor.
• Consider installing one dedicated upstream circuit breaker per oven to avoid multiple
device failures in case of an electrical fault.
Intermediate Storage
When the oven is placed in intermediate storage, which is permissible for a maximum of
four weeks, make sure that the ambient temperature is between 20°C to 60°C (68°F to
140°F) and the maximum relative humidity does not exceed 90%, non-condensing.
Room Ventilation
Heat dissipating from the oven during continuous operation may cause a change in the
room climate.
Therefore, the oven must only be installed in rooms with sufficient ventilation.
Do not install the oven in room recesses without ventilation.
When several devices are to be placed in the same room, additional ventilation may have to
be provided as necessary.
To avoid any impact of the heat dissipated by the oven on the ambient climate the room
must be vented by means of a laboratory-grade ventilation system that complies with
applicable local and national health and safety regulations and has sufficient capacity.
If excessive temperatures tend to occur in the operating room, be sure to provide a thermal
protection means that cuts out the power supply to mitigate the impact of overtemperature
scenarios.
Use with Air Exhaust Systems
When the oven is connected to an air exhaust system be sure to adjust its air flow so the
temperature distribution pattern throughout the oven's workspace remains unchanged and
precision temperature control is maintained.
Also, be sure to interlock the oven and its exhaust system so both start and run at the same
time. The oven may be unable to overcome the extra flow resistance introduced by the idle
air exhaust system, which may cause the exhaust air to be vented into the surrounding lab
room.
Before using existing piping in the building to exhaust hot air from the oven, be sure that
such exhaust piping is made of heat-resistant material, so it will not overheat, melt and/or
cause a fire.
The oven’s outer surfaces and its air exhaust piping may become hot, so be sure to maintain
the proper spacing from walls and ceilings specified by local building codes and/or fire
protection regulations.

Installation
Space Requirements
Thermo Scientific Heratherm 3-3
Mark hot exhaust air piping with appropriate hot surface warning signs or restrict access to
such piping altogether to avoid the risk of injury through contact with hot surfaces.
Space Requirements
When installing the oven, make sure that the installation and supply connections remain freely
accessible.
The specified side clearances represent minimum distances.
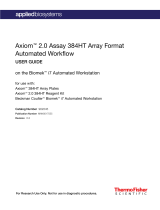
Figure 3-1 Oven Dimensions and Required Clearance
Table 3-1 Heratherm Oven Dimensions
Type A
(mm/inch*)
*Dimensions in inches are rounded equivalents specified for information only. Depth of handle /display (66 mm/2.6 in) not
included in overall depth specified; height of adjustable feet (36 mm/1.4 in) not included in overall height specified.
B
(mm/inch) C
(mm/inch) D
(mm/inch)
OGS 60 / OMS 60 530 / 20.8 565 / 25.2 720 / 28.3 540 / 21.3
OGS 100 / OMS 100 640 / 25.2 565 / 25.2 820 / 32.3 650 / 25.6
OGS 180 / OMS 180 640 / 25.2 738/ 29.1 920 / 36.2 650 / 25.6
Table 3-2 Required Clearances
E
(mm/inch) F
(mm/inch) G
(mm/inch) H
(mm)
80 / 3.2 50 / 2 300 / 12 300 / 12

Installation
Transport
3-4 Heratherm Thermo Scientific
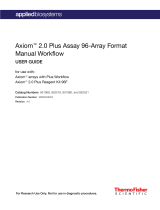
Transport
For transport, do not lift the oven using the doors or components attached to the oven as lift
points.
Figure 3-2 Lift Points
Heavy loads! Lift with care!
To avoid injury through physical strain, such as strain traumata
and slipped discs, do not attempt to lift the oven alone!
To avoid injury through dropped loads, be sure to wear Personal
Protection Equipment, such as safety shoes, when lifting the oven.
To avoid crushing your fingers or hands (particularly in a closing
door) or damaging the oven, do not use any other lift points than
those indicated in the illustration above.
/