Page is loading ...

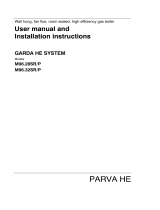
ECOMFORT
PLUS
Installation and
servicing instructions
GB

Ecomfort System Plus 25 HE: Ecomfort Plus 25 HE:
Gas Council number 41-283-10 Gas Council number 47-283-13
Ecomfort Plus 30 HE:
Gas Council number 47-283-14
These appliances comply with the S.E.D.B.U.K. scheme, band “A”
Please refer to commissioning instructions for filling in the log book
Note: All CORGI registered installers carry a CORGI ID Card.
You can check your installer is CORGI Registered by calling 01256 372300
CONTENTS
1 DESCRIPTION OF THE BOILER . . . . . . . . . . . . . . . . . . . . . . . . . . . . . . . . . . . . . . . . . . . . . . . . . . . . . . . . . . . . . . . . . . . . . . . . pag. 3
2 INSTALLATION . . . . . . . . . . . . . . . . . . . . . . . . . . . . . . . . . . . . . . . . . . . . . . . . . . . . . . . . . . . . . . . . . . . . . . . . . . . . . . . . . . . . . . . pag. 7
3 CHARACTERISTICS . . . . . . . . . . . . . . . . . . . . . . . . . . . . . . . . . . . . . . . . . . . . . . . . . . . . . . . . . . . . . . . . . . . . . . . . . . . . . . . . . . . pag. 15
4 USE AND MAINTENANCE (including BENCHMARK) . . . . . . . . . . . . . . . . . . . . . . . . . . . . . . . . . . . . . . . . . . . . . . . . . . . pag. 18
5 FAULT FINDING . . . . . . . . . . . . . . . . . . . . . . . . . . . . . . . . . . . . . . . . . . . . . . . . . . . . . . . . . . . . . . . . . . . . . . . . . . . . . . . . . . . . . . pag. 23
6 REPLACEMENT OF PARTS . . . . . . . . . . . . . . . . . . . . . . . . . . . . . . . . . . . . . . . . . . . . . . . . . . . . . . . . . . . . . . . . . . . . . . . . . . . . pag. 26
7 EXPLODED VIEWS . . . . . . . . . . . . . . . . . . . . . . . . . . . . . . . . . . . . . . . . . . . . . . . . . . . . . . . . . . . . . . . . . . . . . . . . . . . . . . . . . . . pag. 28
SIME COMBINATION BOILERS
Installer checklist
Please remember to carry out the following checks after installation. This will achieve complete customer satisfaction,
and avoid unnecessary service calls. A charge will be made for a service visit where the fault is not due to a manufac-
turing defect.
– Has a correct by-pass been fitted and adjusted?
– Has the system and boiler been flushed?
– Is the system and boiler full of water, and the correct pressure showing on the pressure gauge?
– Is the Auto Air Vent open?
– Has the pump been rotated manually?
– Is the gas supply working pressure correct?
– Is the boiler wired correctly? (See installation manual).
– Has the D.H.W. flow rate been set to the customer requirements?
– Has the customer been fully advised on the correct use of the boiler, system and controls?
– Has the log book provided been completed?
– Has the Aquaguard Filter been cleaned (see 4.9)?
– Has the condensate trap been filled (see section 2)?
IPX4D

3
1.1 INTRODUCTION
“ECOMFORT PLUS” is a boiler that has a
condensing heat exchanger downstream
from the fan to allow the heat contained in
exhaust fumes to be recovered.
The boiler is equipped as standard with
frost protection and circulating pump anti-
jamming system.
The instructions given in this manual are
provided to ensure proper installation and
correct operation of the appliance.
1 DESCRIPTION OF THE BOILER
70
70
70
70
50
30
55
55
22
718
25
12 5
60
335
450
245
165
ø 60/100
90
700
1.2 DIMENSIONS
TABLE 1/a - Connections “ECOMFORT PLUS 25 HE - 30 HE”
R C.H. return 22 mm Compression
M C.H. flow 22 mm Compression
G Gas connection 15 mm Compression
E D.H.W. inlet 15 mm Compression
U D.H.W. outlet 15 mm Compression
S3 Condensation outlet ø 20
TABLE 2 - Minimum clearances
For ventilation For servicing
ABOVE THE APPLIANCE CASING 400 mm 300 mm
AT THE R.H.S. 15 m m 15 m m
AT THE L.H.S. 15 m m 15 m m
BELOW THE APPLIANCE CASING 200 mm 200 mm
IN FRONT OF THE APPLIANCE 100 mm 500 mm
TABLE 1 - Connections “ECOMFORT SYSTEM PLUS 25 HE”
R C.H. return 22 mm Compression
M C.H. flow 22 mm Compression
G Gas connection 15 mm Compression
S3 Condensation outlet ø 20
Fig. 1
245
19 0
ø 80/125
165
55
55
22
30
50
700
450
25
12 5
60
335
70
70
70 70
=
=
R
M
G
EU
S3
718
G
ECOMFORT PLUS SYSTEM 25 HE
ECOMFORT PLUS 25-30 HE
(coaxial duct ø 60/100)
ECOMFORT PLUS 30 HE
(coaxial duct ø 80/125)

4
1.3 TECHNICAL FEATURES
ECOMFORT PLUS SYSTEM 25 HE 25 HE 30 HE
Heat output nominal (80-60°C) kW 25.0 25.0 29.0
Heat output nominal (50-30°C) kW 27.2 27.2 31.5
Heat output minimum (80-60°C) kW 9.6 9.6 11.3
Heat output minimum (50-30°C) kW 10.2 10.2 12.0
Heat input nominal kW 25.5 25.5 29.5
Heat input minimum kW 10.2 10.2 12.0
Efficiency min./nom. output (80-60°C) % 94.2/98.3 94.2/98.3 94.2/98.3
Efficiency min./nom. output (50-30°C) % 100.0/106.8 100.0/106.8 100.0/106.8
Seasonal efficiency rating (SEDBUK) (A) (A) (A)
Termal efficiency (CEE 92/42 directive) ★★★★ ★★★★ ★★★★
Class NOx 3 3 3
Smokes temperature maximum (80-60°C) °C 60 60 60
Smokes temperature minimum (80-60°C) °C 60 60 60
Smokes temperature maximum (50-30°C) °C 40 40 40
Smokes temperature minimum (50-30°C) °C 40 40 40
Smokes flow kg/h 58.0 58.0 61.0
CO2 maximum/minimum G20 % 7.0/2.5 7.0/2.5 7.5/2.8
CO2 maximum/minimum G30/G31 % 8.0/2.8 8.0/2.8 8.8/3.3
Adsorbed power consumption W 150 150 160
Electrical protection grade IP X4D X4D X4D
CE certification n° 1312BT5040 1312BT5040 1312BT5040
Category II2H3+ II2H3+ II2H3+
Type
B22P-52P/C12-32-42-52-82 B22P-52P/C12-32-42-52-82 B22P-52P/C12-32-42-52-82
WEIGHT kg 41 43 43
CENTRAL HEATING
Maximum water head bar 3 3 3
Maximum temperature °C 85 85 85
Water content boiler l 5.0 5.0 5.0
C.H. setting range °C 30/80 30/80 30/80
Expansion vessel capacity l 8 8 8
Expansion vessel pressure bar 1 1 1
DOMESTIC HOT WATER
Minimum/Maximum pressure bar - 0.2/7.0 0.2/7.0
D.H.W. flow rate (EN 625) l/min - 11.7 13.6
Continuous D.H.W. flow rate ∆t 30°C l/min - 11.9 13.8
Continuous D.H.W. flow rate ∆t 35°C l/min - 10.1 11.8
D.H.W. setting range °C - 30/60 30/60
GAS PRESSURE AND NOZZLES
Gas supply pressure G20 mbar 20 20 20
Gas supply pressure G30 mbar 28-30 28-30 28-30
Gas supply pressure G31 mbar 37 37 37
Nozzles quantity n° 12 12 14
Nozzles diameter G20 ø 1.30 1.30 1.30
Nozzles diameter G30/G31 ø 0.77 0.77 0.77
Burner gas pressure min./max. G20 mbar 2.0/11.5 2.0/11.5 2.1/11.7
Burner gas pressure min./max. G30 mbar 4.8/28.5 4.8/28.5 5.0/28.5
Burner gas pressure min./max. G31 mbar 4.8/36.5 4.8/36.5 5.0/36.5
C.H gas consumption G20 m
3
/h 2.70 2.70 3.12
C.H. gas consumption G30/G31 kg/h 2.01 2.01 2.33

1
23
4
5
7
8
9
11
14
15
13
18
19
20
25
2624
17
16
S3
RMG
5
20
19
21
22
23
24
25
26
RMGEU
18
14
15
13
11
12
9
10
7
8
6
5
4
1
2
3
17
S3
16
KEY
1 Post-condenser
2 Smoke stat 95°
3 Fan
4 Main exchanger
5 SM sensor (thermister)
6 Aqua Guard Filter System
7 Safety stat 100°
8 Thermometer sensor
9 Gas valve
10 D.H.W. exchanger
11 Water flow switch
12 Divertor valve
13 Automatic by-pass
14 Circulating pump
15 Auto air vent
16 Expansion vessel
17 Condensation water trap
18 Safety valve
19 Temperature/pressure gauge
20 Boiler drain
21 D.H.W. filter
23 D.H.W. inlet cock
24 Gas cock
25 C.H. flow cock
26 C.H. return cock
R C.H. return
M C.H. flow
G Gas connection
E D.H.W. inlet
U D.H.W. outlet
S3 Condensation outlet ø 20
1.4 FUNCTIONAL DIAGRAM
Fig. 2
ECOMFORT SYSTEM PLUS 25 HE
ECOMFORT PLUS 25 - 30 HE

6
1.5 MAIN COMPONENTS
Fig. 3
KEY
1 Water flow switch
2 Water trap
3 Safety stat 100°
4 Aqua Guard Filter System
5 Main exchanger
6 SM sensor (thermister)
7Fan
8 Smoke stat 95°
9 Smoke pressure switch
10 Positive test point
11 Post-condenser
12 Combustion chamber
13 Ignition/ionization electrode
14 Burner
15 Gas valve
16 Automatic air vent
17 Control panel
18 Negative test point
WATER SENSOR
ECOMFORT SYSTEM PLUS 25 HE
ECOMFORT PLUS 25 - 30 HE

The boiler must be installed in a fixed loca-
tion and only by specialized and qualified per-
son in compliance with all instructions con-
tained in this manual. The boiler should be
installed in accordance with the Gas Safety
Regulations.
It is important that the condensate trap
be filled prior to operating the boiler. The
trap can be filled by pouring water care-
fully into the inner flue connection prior to
installation of the flue. Care should be
taken not to allow any water to enter the
outer flue.
2.1 VENTILATION REQUIREMENTS
Detailled recommendations for air supply
are given in BS5440:2. The following notes
are for general guidance:
– It is not necessary to have a purpose pro-
vided air vent in the room or compart-
ment in which the appliance is installed.
2.2 FIXING THE WALL
MOUNTING BRACKET
– Mark the position of the two wall mount-
ing bracket fixing holes and the flue/air
duct hole on the appropriate wall(s).
– Drill the top two fixing holes using a 10
mm masonry drill and fit the plastic
plugs provided.
– Cut the hole in the wall for the flue/air
duct. The diameter should not be less
than 100 mm (4 in) and must be hori-
zontal. If the hole is not accessible from
the outside of the building, its minimum
diameter should be sufficient to allow
the insertion of the wall liner (130 mm -
5
1
/
4
in diameter) which will be sealed
with mortar.
– Accurately measure the wall thickness,
and note this dimension for later use.
– Secure the wall mounting bracket in
position using the screws provided.
Ensure that it is the correct way up, as
indicated in fig. 4.
2.3 CONNECTING UP SYSTEM
Before proceeding to connect up the boiler,
you are recommended to flush out the sys-
tem in order to eliminate any foreign bodies
that might be detrimental to the operating
efficiency of the appliance. When making
the hydraulic connections, make sure that
the clearances indicated in fig. 1 are
respected. To facilitate the hydraulic con-
nections the boiler is equipped with a valve
pack code 5184817 complete with instruc-
tions sheet. A safety valve set at 3 bar is
fitted to the appliance, the discharge pipe
provided should be extended to terminate
safely away from the appliance and where
a discharge would not cause damage to
persons or property but would be detect-
ed. The pipe should be a minimum of 15
mm Ø and should be able to withstand
boiling water, any should avoid sharp cor-
ners or upward pipe runs where water
may be retained.
The gas connection must be made using
seamless steel or copper pipe
(Mannesmann type), galvanized and with
threaded joints provided with gaskets,
excluding three-piece connections, except
for initial and end connections. Where the
piping has to pass through walls, a suitable
insulating sleeve must be provided. When
sizing gas piping, from the meter to the boil-
er, take into account both the volume flow
rates (consumption) in m
3
/h and the rela-
tive density of the gas in question. The sec-
tions of the piping making up the system
must be such as to guarantee a supply of
gas sufficient to cover the maximum
demand, limiting pressure loss between the
gas meter and any apparatus being used to
not greater than 1.0 mbar for family II
gases (natural gas). An adhesive data badge
is sited inside the front panel; it contains all
the technical data identifying the boiler and
the type of gas for which the boiler is
arranged.
2.3.1 Connection of condensation
water trap
The drip board and its water trap must be
connected to a civil drain through a pipe
with a slope of at least 5 mm per metre to
ensure drainage of condensation water.
The plastic pipes normally used for civil
drains are the only type of pipe which is
appropriate for conveying condensation
to the building’s sewer pipes.
2.3.2 Requirements for
sealed water systems
The heating system design should be based
on the following information:
a)
The available pump head is given in fig. 16.
b) The burner starts when the C.H. flow
reaches 400÷450 l/h. This safety con-
dition is ensured by the flow switch.
c) The appliance is equipped with an inter-
nal by-pass that operates with system
heads (H) greater than 3 m. The maxi-
mum flow through the by-pass is about
2 INSTALLATION
ALTERNATIVE METHODS OF FILLING A SEALED SYSTEM
Fig. 4/a
7
1
2
3
4
KEY
1 Wall mounting bracket
2 Plastic wall plug (2 Off)
3 Woodscrew (2 Off)
4 Washer (2 Off)
Fig. 4

300 l/h. If thermostatic radiator valves
are to be installed, at least one radiator
should be without a thermostatic valve
(usually the bathroom radiator).
d) A sealed system must only be filled by a
competent person using one of the
approved methods shown in fig. 4/a.
The system design should incorporate
the connections appropriate to one of
these methods.
2.4 CHARACTERISTICS OF FEEDWATER
– All recirculatory systems will be subject
to corrosion unless an appropriate
water treatment is applied. This means
that the efficiency of the system will
deteriorate as corrosion sludge accu-
mulates within the system, risking dam-
age to pump and valves, boiler noise
and circulation problems.
–
For optimum performance after installa-
tion this boiler and its associated central
heating system must be flushed in
accordance with the guidelines given in
BS 7593 “Treatment of water in domes-
tic hot water central heating systems”.
– This must involve the use of a propri-
etary cleanser, such as Sentinel X300
or X400, or Fernox Superfloc. Full
instructions are supplied with the prod-
ucts, but for immediate information
please contact GE Betz (0151 420
9563) or Fernox (01799 550 811)
directly.
– For long term protection against corro-
sion and scale, after flushing it is rec-
ommended that an inhibitor such as
Sentinel X100, or Fernox MB-1 or Copal
is dosed in accordance with the guide-
lines given in BS 7593.
Failure to flush and add inhibitor to
the system may invalidate the appli-
ance warranty.
– It is important to check the inhibitor
concentration after installation, system
modification and at every service in
accordance with the manufacturer’s
instructions. (Test kits are available
from inhibitor stockists).
– At every service the Aquaguard Filter
(4.9) should be checked and cleaned.
2.5 COAXIAL DUCT ø 60/100
The air inlet-smoke outlet assembly, code
8096250, is included in the standard sup-
ply of the appliance complete with mounting
instructions.
NOTE: to use only special accessories for
condensing boilers.
2.5.1 Coaxial flue diaphragm
The boiler "25 HE" is supplied of series
with diaphragm ø 87.5 to mount like indica-
ted in figure (fig. 4/b).
ATTENTION: the diaphragm should be
used only when the length of the coaxial
duct is below 1,5 m (only for “25 HE”
model).
2.5.2 Coaxial duct accessories
The accessories to be used for this type of instal-
lation and some of the connecting systems that
may be adopted are illustrated in
fig. 5.
With the pipe bend included in the kit, the
maximum length of the piping should not
exceed 5.0 meter (25 HE) - 3.0 meter (30
Fig. 5
KEY
1a-b Coaxial duct kit code 8096250
2 Extension L. 1000 code 8096150
3 Vertical extension L. 140 with take-off point code 8086950
4 a 90° additional bend code 8095850
4 b 45° additional bend code 8095950
max. 5.0 m (“25 HE” model)
max. 2.5 m (“30 HE” model)
NOTE: Place the duct horizontally.
NOTE: Before installing
accessories, lubricate
the internal part of
gaskets with silicon-
based products. Avoid
using oils and greases.
IMPORTANT:
– Each additional 90° curve installed reduces
the available length by 1.0 metres.
– Each additional 45° curve installed reduces
the available length by 0.50 metres.
ONLY FOR “25 HE” MODEL
Fig. 4/b
8

HE). When the vertical extension code
8086950 is used, the terminal part of
the pipe must always come out horizontal-
ly.
2.6 COAXIAL DUCT ø 80/125
(only for “30 HE” model)
The air inlet-smoke outlet assembly ø
80/125 is supplied in a kit code 8096253
complete with mounting instructions.
With the pipe bend included in the kit, the
maximum length of the piping should not
exceed 5.0 meter.
The diagrams in fig. 5/a illustrate a num-
ber of examples of different coaxial outlets
ø 80/125.
2.7 POSITIONING THE OUTLET
TERMINALS
The outlet terminals for forced-draught
appliances may be located in the external
perimeter walls of the building.
To provide some indications of possible solu-
tions, Table 3 gives the minimum distances
to be observed, with reference to the type
of building shown in fig. 6.
9
C12
C32
C42
2
7
6
4
1
2
max 4 m
3
x
y
x + y = max 3 m
2
1
max 3 m
2
3
Fig. 5/a
KEY
1 Coaxial duct kit code 8096253
2 a Extension L. 1000 code 8096171
2 b Extension L. 500 code 8096170
3 Adapter ø 80/125 code 8093150
4 a 90° additional bend code 8095870
4 b 45° additional bend code 8095970
6
Hinged tile code 8091300
7 Coaxial roof exit terminal L. 1285 code 8091205
IMPORTANT:
– Each additional 90° curve installed reduces the available length by 1.0 metres.
– Each additional 45° curve installed reduces the available length by 0.50 metres.
min. 2,5 m - max. 5 m
min. 4 m - max. 7 m
Only for “30 HE” model

10
Fig. 6
– If the terminal discharges into a pathway or passageway check that combustion
products will not cause nuisance and that the terminal will not obstruct the pas-
sageway.
– Where the lowest part of the terminal is fitted less than 2 m (78 in) above
ground, above a balcony or above a flat roof to which people have access, the
terminal MUST be protected by a purpose designed guard. Terminal guards are
available from Quinnell, Barrett, and Quinnell, Old Kent Road, London. State
model C2, (G.C. Part No 382946).
– Where the terminal is fitted within 850 mm (34 in) of a plastic or painted gut-
ter, or 450 mm (18 in) of painted eaves, an aluminium shield at least 1,500 mm
(59 in) long must be fitted to the underside of the painted surface.
– The air inlet/outlet flue duct MUST NOT be closer than 25 mm (1 in) to com-
bustible material.
– In certain weather conditions the terminal may emit a plume of steam. This is
normal but positions where this would cause a nuisance should be avoided.
Terminal position Minimum spacing
A Directly below an openable window, air vent
or any other ventilation opening 300 mm 12 in
B Below guttering, drain pipes or soil pipes 75 mm 3 in
C/D Below eaves, balconies or carport roof 200 mm 8 in
E From vertical drain pipes or soil pipes 75 mm 3 in
F From internal or external corners 300 mm 12 in
G Above adjacent ground, roof or balcony level 300 mm 12 in
H From a surface facing the terminal 600 mm 24 in
I From a terminal facing the terminal 1,200 mm 48 in
J From an opening in the carport
(eg door, window into dwelling) 1,200 mm 48 in
K Vertically from a terminal on the same wall 1,500 mm 60 in
L Horizontally from a terminal on the same wall 300 mm 12 in
M Horizontally from a vertical terminal to a wall 300 mm 12 in
N Horizontally from an openable window or other opening 300 mm 12 in
P Above an openable window or other opening 300 mm 12 in
Q From an adjacent vertical terminal 600 mm 24 in
TABLE 3

11
2.8 SEPARATE PIPES ø 80
(Optional alternative
twin pipe system)
A special kit may be used to separate the
flue gas outlet from the fresh air intake (fig.
7).
The maximum overall length of the intake
and exhaust ducts depends on the head
losses of the single fittings installed
(excluding the doublers) and must not be
greater than 11.5 mm H
2
O (“25 HE”
model) and 8.0 mm H
2
O (“30 HE” model).
For head losses in the fittings, refer to Table
4.
NOTE: To use only special accessories for
condensing boilers.
2.8.1 Separate pipe accessories
Kit code 8089912 is supplied for this pur-
pose (fig. 8).
2.9 ELECTRICAL CONNECTION
The boiler is supplied with an electric cable.
Should this require replacement, it must be
purchased exclusively from SIME.
The electric power supply to the boiler must
be 230V - 50Hz single-phase through a
fused main switch, with at least 3 mm spac-
ing between contacts.
Respect the L and N polarities and the
earth connection.
NOTE: SIME declines all responsibility for
injury or damage to persons, animals or
property, resulting from the failure to pro-
vide for proper earthing of the appliance.
2.9.1 Electrical board (fig. 12)
Before performing any kind of operation,
disconnect the unit from the power supply
using the bipolar switch of the plant.
Placing the boiler selector in position “OFF”
does not disconnect the electric board
from the power supply.
Remove the three screws (9) fixing the con-
trol board, and pull forward the panel until it
tilts downwards. In order to gain access to
the electrical board components, unscrew
the four screws fixing the control panel
cover.
2.9.2 Room thermostat (fig. 12)
After having removed the jumper, connect
electrically the room thermostat to termi-
nals 1-2 of the junction box (8).
In order to have better room comfort and
temperature control, we suggest you to
use a room thermostat belonging to
Class II, as specified by standard
EN60730.1 (clean contact).
KEY
1 Gasket ø 125/95
2 Fixing screw
3 Flue outlet flange
4 Inlet air diaphragm
115
ø 80
ø 80
110
165
255
100
245
TABLE 4
Accessories ø 80 Head loss (mm H
2
O) “25 HE” model Head loss (mm H
2
O) “30 HE” model
Inlet Outlet Inlet Outlet
90° elbow MF 0.25 0.35 0.30 0.40
45° elbow MF 0.15 0.25 0.20 0.30
Extension L. 1000 (horizontal) 0.20 0.25 0.20 0.30
Extension L. 1000 (vertical) 0.20 0.15 0.20 0.20
Terminal 0.10 0.35 0.10 0.40
Roof outlet terminal * 1.30 0.15 1.50 0.20
* The loss of the roof exit terminal in aspiration concludes the collector code 8091400
1
2
3
4
N° segments Total load loss mm H2O
to remove “25 HE” model
- 0 ÷ 2,0
n° 1 2,0 ÷ 4,0
n° 1 e 2 4,0 ÷ 6,0
da n° 1 a 3 6,0 ÷ 7,0
da n° 1 a 4 7,0 ÷ 8,0
da n° 1 a 6 8,0 ÷ 9,0
da n° 1 a 8 9,0 ÷ 10,0
without diaphragm 10,0 ÷ 11,5
Fig. 8
N° segments Total load loss mm H2O
to remove “30 HE” model
- 0 ÷ 1,0
n° 1 e 2 1,0 ÷ 2,0
da n° 1 a 3 2,0 ÷ 3,0
da n° 1 a 4 3,0 ÷ 4,0
da n° 1 a 6 4,0 ÷ 5,0
da n° 1 a 7 5,0 ÷ 6,0
da n° 1 a 8 6,0 ÷ 7,0
without diaphragm 7,0 ÷ 8,0
Fig. 7

12
8
125
4
67
9
Fig. 12
ATTENTION: After having removed the three screws (9) tilt
the panel downwards to gain access.
KEY
1 Thermohydrometer
2 Time programmer (optional)
4 Main PCB
5 Earth faston
6 Control panel protection
7 Cover (TA)
8 Connector (TA)
9 Fixing screw
IMPORTANT
Before performing any kind of operation, disconnect the unit
from the power supply using the bipolar switch of the plant.
Placing the boiler selector in position “OFF” does not disconnect
the electric board from the power supply.

JUMPERS
JP4
CN1
CN6 (cód. 6299987)
CN7 (cód. 6299924)
CN2 (cód. 6299988)
WHITE
GREY
95 °C SMOKE STAT
TERMINAL
BOARD
100 °C SAFETY STAT
RELAY
Fig. 13
2.9.3 ECOMFORT SYSTEM PLUS 25 HE wiring diagram
NOTE:
– The room thermostat (TA) may be connected to the terminals 1.
– To remote control the boiler connect an external clock to the terminals 1-2 (24 V) of the “TA” connector and set the
built-in clock to “constant” mode (see user instructions for details).
JUMPERS POSITION AND FEATURES
JUMPER POSITION AND FEATURE SUPPLY POSITION
CLOSED OPEN
JP4 - METANO/GPL Ready to function with LPG Ready to function with natural gas Open
13
WATER SENSOR

14
JUMPERS
JP4
CN1
CN6 (cód. 6299923)
CN7 (cód. 6299924)
CN2 (cód. 6299988)
95 °C SMOKE STAT
TERMINAL
BOARD
100 °C SAFETY STAT
Fig. 13/a
2.9.4 ECOMFORT PLUS 25 - 30 HE wiring diagram
NOTE:
– The room thermostat may be connected to the terminals 15-16 (CN1) of the “TA” connector after having removed the
link.
– To remote control the boiler connect an external clock to the terminals 1-2 (24 V) of the “TA” connector and set the
built-in clock to “constant” mode (see user instructions for details).
JUMPERS POSITION AND FEATURES
JUMPER POSITION AND FEATURE SUPPLY POSITION
CLOSED OPEN
JP4 - METANO/GPL Ready to function with LPG Ready to function with natural gas Open
WATER SENSOR

3.1 ELECTRONIC BOARD
The electronic board is manufactured in
compliance with the EEC 73/23 low-volta-
ge directives. It is supplied with 230V. The
electronic components are guaranteed
against a temperature range of 0 up to
+60°C. An automatic and continuous
modulation system enables the boiler to
adjust power to the various system requi-
rements or the user’s needs.
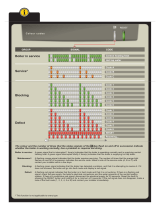
3.1.1 Fault and malfunction signaling
The indicator LEDS signaling irregular
and/or incorrect operation of the equip-
ment are indicated in fig. 14.
3.1.2 Devices
The electronic board is equipped with the
following devices (fig. 15):
– Connector “JP4” (4)
With the connector disconnected, the
boiler is ready to function with METHANE;
with the connector connected with GPL.
ATTENTION: It is essential that the opera-
tions described above be carried out by
authorized technical staff.
3.2 TEMPERATURE SENSOR
Antifreeze system managed by active hea-
ting NTC sensor when water temperature
is 6°C. The heating sensor works also as a
limit thermostat which switches off the bur-
ner when temperature is over 90°C.
When sensor (SM) is interrupted, neither
of the boiler's heating services will func-
tion.
Table 5 shows the resistance values (Ω)
obtained on the heating sensor as the tem-
perature varies.
3 CHARACTERISTICS
Fig. 14
1
2
1045
3
7
8
9
Fig. 15
TABLE 5
Temperature (°C) Resistance (Ω)
20 12.090
30 8.313
40 5.828
50 4.161
60 3.021
70 2.229
80 1.669
KEY
1 Jumper JP2
2 Fuse (1,6 AT)
3 D.H.W. potentiometer
4 Connector “JP4”
5 Rotay switch
7 Block red led
8 C.H. potentiometer
9 Bi-colour led gree/orange
10 Connector “TA”
Bi-colour green led off if power is cut-off.
Bi-colour orange led: C.H. sensor (SM) fault.
Green led flashing: fan/smoke pressure switch.
F
lashing orange led no water circulation.
Flashing red led indicates a problem in the line post-condenser.
Red led on, ignition blocked/safety stat /smoke stat tripped:
turn the rotary switch in the position ( )
to restore functioning
15

16
3.3 ELECTRONIC IGNITION
Ignition and flame detection is controlled by
a sole electrode located on the burner. It
guarantees maximum safety with interven-
tion times, for accidental switching off or
gas failure, within one second.
3.3.1 Operating cycle
Rotate the selector knob to summer or win-
ter, and verify that green LED ( ) lights up
to confirm the presence of voltage.
The burner must be ignited within 10
seconds max.
However, it is possible for ignition failures to
occur, with consequent activation of “locked
out” signal:
– Gas failure
The electrode continues spark discharge
for a maximum of 10 sec. If the burner
does not light, the board - after a 5
second ventilation stop - reactivates
discharge for further 10 seconds. This
cycle will be repeated 5 times, after that,
the lock-out red LED will light up.
This may occur upon first ignition or after
long periods of boiler lay-off when there is
air in the pipes.
It may be caused by the gas cock being
closed or by one of the valve coils having
a break in the winding, so that the valve
cannot open.
– Ignition electrode fails to spark
The electrode continues spark discharge
for a maximum of 10 sec. If the burner
does not light, the board - after a 5
second ventilation stop - reactivates
discharge for further 10 seconds. This
cycle will be repeated 5 times, after that,
the lock-out red LED will light up.
This may be due to a break in the wire of
the electrode or to the wire not properly
fastened to the ignition transformer ter-
minal.
The electrode itself may touch earth or
may be heavily worn out and needs repla-
cing. The electronic board is defective.
When there is a sudden voltage failure, the
burner shuts down immediately; when the
power supply returns, the boiler will start
up again automatically.
3.4 FLOW SWITCH
SAFETY VALVE
A flow switch safety valve (8 fig. 2) interve-
nes, blocking the operation of the burner if
the boiler is without water due to the for-
mation of air bubbles in the heat exchanger
or if the circulator is not working correctly
or because the “Aqua Guard” heating cir-
cuit filter is clogged.
3.5 SYSTEM
AVAILABLE
HEAD
The head available for the heating plant is
shown as a function of the flow in graph in
fig. 16.
To obtain the maximum head available to
the system, turn off the by-pass by turning
the union to the vertical position (fig. 16/a).
0
100
800
700600500400300200
Flow rate (l/h)
Available head (mbar)
500
400
100
200
300
Ecomfort Plus
600
By-pass on
By-pass off
900
1000
110 0
25 HE
30 HE
25 HE
30 HE
Fig. 16
By-pass inserito
By-pass escluso
Fig. 16/a
BY-PASS ON
BY-PASS OFF
D.H.W. FLOW RATE ADJUSTER
(it does not include SYSTEM 25 HE)

3.6 SMOKE PRESSURE
SWITCH
The air pressure switch is factory set to
the values 42-52 Pa (“25 HE” model) and
52-62 Pa (“30 HE” model) to guarantee
boiler functioning even with intake and
flue pipes at the maximum permitted
length.
The value of the signal to the pressure
switch is measured using a special instru-
ment connected to the pressure intake
(10-18 fig. 3).
3.7 ELECTRICITY
CONNECTION
FOR ZONE SYSTEMS
When installing a system of this type, use a
separate electrical line to which room ther-
mostats with their local valves will be con-
nected.
Connect micro switches or relay contacts
on terminals 15-16 of the “TA” connector
of the electronic card after removing the
existing jumper (fig. 17).
L
CR1
CR
Connettore "TA"
Fig. 17
L
N
TA
TA1
VZ
R
VZ1
R1
KEY
TA-TA1 Zone room stat
VZ-VZ1 Zone valve
R-R1 Zone relay
CR-CR1 Relay contact or micro zone valve
NOTE: Relays are used only if the area
valves have no microswitches.
“TA” connector
17

18
SIME SUPPORT
THE BENCHMARK INITIATIVE
All relevant sections of the logbook must be
filled in at the time of installation and there-
after service information on the back page
of the logbook. Commissioning of the boiler
is not complete until the logbook is filled in.
4.1 FILLING THE WATER SYSTEM
– Open the flow and return valves.
– Loosen the automatic air vent cap.
– Open all radiator valves and system air
vents. Fill the system with water using
one of the approved methods described
in section 2.3.2 to about 0.5 bar
greater than the system design pres-
sure. Close all air vents. Do not close
the A.A.V.
– Check the system for water soundness.
–
Completely drain the appliance and heat-
ing system, thoroughly flush the system,
and refill the system design pressure.
–
Before refillimg check and clean the Aqua-
guard filter (4.9).
4.1.1 Flow Rate Adjustment
The DHW flow rate should be set using the
flow rate adjuster (see fig. 16/a) to the
value shown in section 1.3.
4.2 GAS VALVE
The boilers are equipped standard with the
SIT 845 SIMGA/HONEYWELL VK 4105M
/SIEMENS VGU 50 gas valve (fig. 21).
The gas valve is set at two pressure values:
maximum and minimum. According to the
type of gas burnt, these correspond to the
values given in Table 6.
The gas pressures at the maximum and
minimum values, are factory set. Conse-
quently they must not be altered. Only when
you switch the appliance from one type of
gas supply (methane) to another (butane or
propane), it is permitted to alter the opera-
ting pressure.
4.3 GAS CONVERSION
This operation must be performed by
authorised personnel using original Sime
components.
To convert from natural gas to LPG or vice
versa, perform the following operations (fig.
22):
– Close the gas cock.
– Disassemble the burner manifold (3).
– Replace the main nozzles (6) supplied in
a kit, inserting the copper washer (4).
Use a ø 7 spanner to perform this ope-
ration.
–
Remove the “METANO/GPL” connector
link on the card and set it in the posi-
tion corresponding to the gas to be
used (4 fig. 15).
– To set the values of maximum and mini-
mum gas pressure, follow the instruc-
tions given in section 4.5.1.
– After have ultimated the conversion of
the boiler, please stick onto the casing
panel the plate showing the relevant fee-
ding gas which is included into the kit.
NOTE: When reassembling components
which you have removed, replace gas
seals; test all gas connections after
assembly using soapy water or a product
made specifically for the purpose, being
sure not to use open flame.
4.5.1
Adjusting valve pressure
Set maximum and minimum pressure on
gas valves as follows (fig. 22/a):
– Connect the column or a manometer to
the intake downstream of the gas valve.
Disconnect the valve VENT pressure test
point tube (5 fig. 21).
– Remove the cap (1) from the modulator.
– Place the hot tap water potentiometer
knob at the maximum position.
– Turn on the boiler using the four-way
switch and turn on a hot water tap all
the way.
– Remember that rotating clockwise will
increase pressure while rotating anti-
4 USE AND MAINTENANCE
3
4
2
1
5
6
1
2
4
3
5
SIT 845 SIGMA HONEYWELL VK 4105M
KEY
1 Modulator
2 EV1-EV2 coils
3 Pressure inlet upstream
4 Pressure inlet downstream
5 VENT pressure test point
TABLE 6
Burner Modulator Burner Modulator
Type of gas max. pressure mbar current min. pressure mbar current
25 HE 30 HE mA 25 HE 30 HE mA
G20 * 11.5 11.7 130 2.0 2.1 0
G30 28.5 28.5 165 4.8 5.0 0
G31 36.5 36.5 165 4.8 5.0 0
(*) Max. burner pressure is guaranteed only when the supply pressure exceeds the max. burner pressure by at
least 3 mbar.
Fig. 21
Fig. 22
KEY
1 Swivel connection 1/2”
2 Locknut 1/2”
3 Burner manifold
4 Washer ø 6.1
5 Burners
6 Nozzle M6
7 Screw
WARNING: To ensure a perfect seal,
always use the washer (4) supplied
in the kit when replacing nozzles,
even in burner units for which it is
not specified.
1
2
3 4 5
SIEMENS VGU 50

clockwise will diminish it.
– Adjust maximum pressure using the nut
(3) with a wrench to the maximum pres-
sure value indicated in Table 6.
– Do not adjust minimum pressure until
you have adjusted maximum pressure.
– Turn off the supply power to the modula-
tor, and keep the hot water tap turned on.
– Lock the nut (3) in place, turn the screw
/nut (2) to the minimum pressure indi-
cated in Table 6.
– Turn off the boiler and turn it back on
again several times, keeping the hot water
tap turned on at all times and checking
that the maximum and minimum pressu-
re values correspond to the established
values; correct the settings if necessary.
– Adjust, checking that you have restored
the power to the modulator.
– Put the pipe back on the valve VENT
pressure test point.
– Remove the manometer, remembering
to tighten the screw for closing the pres-
sure test point.
– Put the plastic cap (1) back on the modu-
lator and seal with a drop of coloured
sealant if necessary.
4.8 REMOVAL OF OUTER CASING
It is possible to completely disassemble the
shell for an easy maintenance of the boiler
as showed in fig. 21.
4.9 CLEANING AND MAINTENANCE
Preventive maintenance and checking of
efficient operation of equipment and safety
devices must be carried out exclusively by
authorized technical personnel.
4.10 CLEANING THE C.H. WATER FILTER
“AQUA GUARD” (fig. 22)
To clean the filter, close the flow/return val-
ves, turn off the power to the control panel,
remove the casing and empty the boiler
using the drain provided until the hydrome-
ter shows “zero”. Place a container for col-
lection underneath the filter, unscrew the
cap and proceed to clean the filter, remo-
ving impurities and limestone deposits.
Check the seal o-ring before reassembling
the cap with the filter.
1
2
Fig. 21
Fig. 22
Fig. 22/a
3
2
1
KEY
1 Plastic tap
2 Minimum pressure adjusting nut
3 Maximum pressure adjusting nut
SIT 845 SIGMA HONEYWELL VK 4105M
SIEMENS VGU 50
19

20
4.11 CHIMNEY SWEEP FUNCTION
(fig. 23)
To carry out the verification of combustion
in the boiler turn the selector and stop on
the position ( ) until the green/orange led
starts to flash intermittently.
From that moment the boiler will start func-
tioning in heating mode at the maximum
power, with switching off at 80°C and
restarting at 70°C.
Before activating the chimney sweep func-
tion make sure that the radiator valves or
eventual zone valves are open.
The test may be carried out also during hot-
water service functioning.
To do so it is enough, after having activated
the chimney sweep function, to take some
hot water from one or more cocks.
Even in this condition the boiler functions at
the maximum temperature always with the
primary controlled between 80°C and 70°C.
During the entire duration of the testing the
hot water taps must remain open.
After verifying the combustion the boiler
should be switched off by placing the selec-
tor on the OFF position; then return the
selector to the desired function.
ATTENTION: After about 15 minutes, or
once the hot water request has been ful-
filled, the chimney sweep function auto-
matically deactivates.
4.12 BOILER SERVICING
4.12.1 Routine Servicing
To ensure continued efficient operation of
the appliance, it is recommended that it is
checked and serviced at regular intervals.
The frequency of service will depend on the
particular installation and conditions of
usage, but in general once a year should be
adequate.
It is the law that a competent person such
as a CORGi registered engineer, must carry
out any service work.
4.12.2 Combustion Check
Incorporated into the flue elbow or vertical
adaptor is a sampling point.
The grey plastic cap should be unscrewed
and the flue gas sampled using a flue gas
analyser.
During the test the boiler can be operated
in “chimney sweep mode” see 4.11.
The correct CO2 reading can be found in
section 1.3.
4.12.3 Burner inspection
Remove the burner as described in section
6.3.
Inspect the burner and if necessary clean
using a soft brush.
Check the Ignition/ionisation electrode,
check the gap (4mm+/- 0.5mm)
4.12.4 Combustion Chamber
Remove any loose debris from the combu-
stion chamber using a soft brush and a
vacuum cleaner.
Take care not to damage the rear insulation
panel.
4.12.5 Condensate Trap
The condensate trap would not normally
require removal during service, but it can be
checked.
Water should be poured into the inner flue.
Great care must be taken to ensure no
water enters the outer flue.
Check that the water flows freely to the
drain.
Should it require removal, firstly remove
wire clip securing the condensate drain rub-
ber pipe to the condensate trap.
Remove the pipe.
Remove the two screws securing the con-
densate trap bracket.
Clean the trap and refit in reverse order.
4.12.6 Flow Switch
The operation of the flow switch should be
checked at each service.
Remove small cover retaining screw and
remove the cover.
When the pump is running and water is
flowing around the boiler, the actuator lifts
off the microswitch.
Check the operation of the actuator. Ensure
that it is free and that it lifts and returns.
If necessary lubricate the pivot point of the
actuator.
Isolate the boiler.
Drain it using the drain provided.
Remove the microswitch by carefully pulling
it forward off its mounting pins.
Remove the screw securing the mounting
plate, then pull off the plate.
Pull out the actuator pin.
Lubricate the centre “O” ring.
Refit the actuator ensuring that the flat side
of the round section is to the bottom.
Re-assemble remaining parts (see 4.12.7
before refilling the boiler).
4.12.7 Aquaguard Filter
It is recommended that the aquaguard filter
is checked at each service.
See section 4.10.
Spia lampeggiante
verde/arancio
2
4
5
3
Fig. 23
Bi-colour green/orange
flashing led
/