Page is loading ...

BLG-BC1 Series Operating Instructions
Corporate Headquarters: 1080 North 11th Street, San Jose, CA 95112 Phone: (408) 292-2214 Fax: (408) 292-2733
www.mountztorque.com
(Rev 1.1 4/25/17)

BLG-BC1 Series Operating Instructions
Corporate Headquarters: 1080 North 11th Street, San Jose, CA 95112 Phone: (408) 292-2214 Fax: (408) 292-2733
www.mountztorque.com
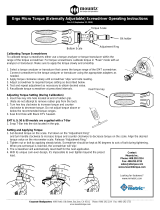
Name of Parts
BLG-4000BC1 (Lever Start type) BLG-5000BC1 (Lever or Push Start) Selectable by the
Switch
Power tool cable
Knurled ground ring
Hanger
Joint ring
FOR/REV switch
FOR: Forward
OFF: Neutral
REV: Reverse
Bit
Switch lever
Torque adjust-
ment scale
Joint shaft collar
Torque adjust-
ment nut
Protective cover
for the torque
adjustment nut
(can be removed
by turning it CCW)
Two-way Start System (Switchable between
Lever Start and Push-to-Start)
Marking between “Lever” and
“Push” start selection.
LP
To change setings,
see page 3
Power tool cable
Hanger
FOR/REV switch
FOR: Forward
OFF: Neutral
REV: Reverse
Driver
connector
Switch lever
Torque
adjustment scale
Bit
Joint shaft collar
Transformer Guide
Model Item # For Use with Electric Screwdriver Models
T-30BL 144300 BLG4000BC1
T-70BL 144400 BLG4000BC1 - BLG5000BC1-HT
T-70BL T-30BL
Page 2

Operating the BLG-4000BC1 Model
1. Attach power tool cable to the BLG-4000 screwdriver and the transformer. Make sure notch at the cable
end aligns with the notch on the driver connector. Tighten knurled ground ring.
2. Plug in power cord to the back of the transformer and power outlet. Flip power switch to “ON” position
located on the front of transformer.
3. Select a bit. Retract the bit collar. Insert the bit and release the retracted collar. To avoid damaging
fasteners, make sure the proper bit is suitable for the head of the fastener.
4. The torque limit is determined by the tension of the coil spring housed in the torque adjustment nut. The
tighter the coil spring is wound the higher the torque limit is raised. See Torque Charts on page 9 to
determine the appropriate torque adjustment setting.
5. Rotate the torque adjustment nut to set the torque limit. Turn clockwise to increase torque and counter
clockwise to decrease torque. The scale adjacent to the Torque Adjustment Nut is a reference guide. The
torque output from the driver can change depending on various fastening factors like friction, type of joint,
and the type material being used like a washer. Verify torque setting with a torque testing system.
6. Turn driver on and check for proper rotation. FOR-clockwise, REV-counterclockwise.
7. To apply torque, squeeze the lever. The driver will automatically stop when the preset torque has been
reached.
8. To remove the screw, turn the FOR/REV switch to REV position.
BLG-BC1 Series Operating Instructions
Corporate Headquarters: 1080 North 11th Street, San Jose, CA 95112 Phone: (408) 292-2214 Fax: (408) 292-2733
www.mountztorque.com
Torque adjustment nut
Operating the BLG-5000BC1 Model
1. Attach power tool cable to the BLG-5000 screwdriver and the transformer. Make sure notch at the cable
end aligns with the notch on the driver connector. Tighten knurled ground ring.
2. Plug in power cord to the back of the transformer and power outlet. Flip power switch to “ON” position
located on the front of transformer.
3. Select a bit. Slide the bit collar forward. Insert the bit and release the collar. To avoid damaging fasteners,
make sure the proper bit is suitable for the head of the fastener.
4. The torque limit is determined by the tension of the coil spring housed in the tool. The tighter the coil spring
is wound the higher the torque limit is raised. See Torque Charts on page 9 to determine the appropriate
torque adjustment setting.
5. Using the “Hex Key wrench”, set the torque by referring to the torque adjustment scale “1 to 8”. Turn
clockwise to increase torque and counter clockwise to decrease torque. The torque adjustment scale
is a reference guide. The torque output from the driver can change depending on various fastening
factors like friction, type of joint, and the type material being used like a washer. Verify torque setting
with a torque testing system.
6. Turn driver on and check for proper rotation. FOR-clockwise, REV-counterclockwise.
7. To apply torque, squeeze the lever (If Push-to-Start setting is set-up for the BLG-5000* model - place
light downward pressure on the nose of the driver). The driver will automatically stop when the preset torque has been
reached.
8. To remove the screw, turn the FOR/REV switch to REV position.
* Note: The BLG-5000 features a two-way start system (switchable between Lever
Start and Push-to-Start)
How to Change BLG-5000 to “Push” Start System
1. Unscrew the “switch lever shaft screw” and then take off the “switch lever”. Using
tweezers, move the selection SW near “P” (push) mark.
* Note: Do not press or hit the SW or you may damage the SW or body case.
Torque
adjustment
scale
Hex Key Wrench
Switch lever
shaft screw
Page 3
Switch lever
Slide switch
between L or P

BLG-BC1 Series Operating Instructions
Corporate Headquarters: 1080 North 11th Street, San Jose, CA 95112 Phone: (408) 292-2214 Fax: (408) 292-2733
www.mountztorque.com
Page 4
Screw Counter Display
Screw Count Display Section/Set Value Display
Section:
In the normal mode, the screw fastening count set value is
displayed first. After starting the count, the remaining
screw fastening count is displayed.
The count decreases with each screw fastening operation
and the remaining screw fastening count is displayed.
Function Display Section:
The symbol corresponding to the set item is displayed in
the setting mode. (See page 5 for the list of setting
functions).
F1 Button:
When this button is pressed for more than 2 seconds in the normal mode, the mode is changed to the “setting mode”.
This button is used for selecting the function in the “setting mode”.
When this button is pressed for more than 2 seconds in the “setting mode”, the buzzer sounds twice and the mode is
changed to the normal mode.
F2 & F3 Buttons:
Using these buttons, the set value can be changed in the function settings.
Some set values are limited depending on the function that is being set.
Pass Light (Green):
When the screw fastening result is “OK”, the green LED lamp turns ON.
Fail Light (Red):
When the screw fastening result is NG (No Good), the red LED lamp turns ON.
Note!
When the lever switch is turned ON, the lamp turns OFF (reset).
When this unit is used in combination with the existing HIOS external screw counter, the driver counter does not synchro-
nized with the external screw counter. So, use them based on the external counter function. Otherwise, turn off the driver’s
counting function before use.
When the output setting for Power HI/LOW is changed, the driver speed changes. In such cases, pay attention to the counter
timer set value and reverse counter timer set value.
Only the T-30BL or the T-70BL power units (transformers) can be used with this driver. Do not connect it to any other power
unit.
F2 Button
F1 Button
F3 Button
Fail Light (Red)
Pass Light (Green)
Function Display Section
Screw Count/Function
Mode Display

Other Operations
List of Function Settings
BLG-BC1 Series Operating Instructions
Corporate Headquarters: 1080 North 11th Street, San Jose, CA 95112 Phone: (408) 292-2214 Fax: (408) 292-2733
www.mountztorque.com
Page 5
The count is to be returned to the default value during
the screw fastening operation.
Pressing the F3 button for 2 seconds or more, resets
the screw fastening count value.
How to check the Screw Counter Timer: set time When the screw is fastened for the time period (seconds)
set using the counter timer:
- For correct operation, the buzzer sounds once.
- For incorrect operation, the buzzer does not sound.
When the buzzer does not sound, increase the set value
gradually and adjust it so that the buzzer sounds once.
Display Setting Function
<Default Value>
Symbol Setting Description
(1) Counter ON/OFF Setting : When selected, the counter function is available.
: When selected, it is used as a normal driver.
(2) Count The screw fastening count value is set.
Setting Range: 1 to 99
(3) Count Timer This function is used to prevent the count for double
tightening operations such as check fastening or
retightening.
Set the operation time while the check fastening is
performed for the tightened screw.
Setting Range: 0.00 to 0.99 seconds
Note: When the screw tightening operation is performed
during this setting and the judgment result is normal,
the buzzer sounds once.
(4) Work - Reset - Timer The buzzer sound time period after the work is
completed is set.
Setting Range: 0.0 to 3.9 seconds
Note: Set it based on the reverse count timer set value.
(5) Reverse Count Timer The time period until the reverse count is performed is
set. Set the work reset timer operation time based on
the time period up to when the reverse count is per-
formed.
Setting Range: 0.1 to 1.0 seconds
Note: It is available when the “Reverse Count Enable”
has been set in the system setting.

List of Function Settings (continued)
BLG-BC1 Series Operating Instructions
Corporate Headquarters: 1080 North 11th Street, San Jose, CA 95112 Phone: (408) 292-2214 Fax: (408) 292-2733
www.mountztorque.com
Page 6
Display Setting Function
<Default Value>
Symbol Setting Description
(6) System Setting Each Buzzer or Reverse Count Enable/Disable is set up.
The setting is performed with a combination of the tenth
digit and single unit digit.
Tenth Digit
0 : Buzzer Enable/Reverse Count Enable
1 : Buzzer Enable/Reverse Count Disable
2 : Buzzer Disable/Reverse Count Enable
3 : Buzzer Disable/Reverse Count Disable
Units Digit
2 : Torque Up Buzzer Disable
3 : Torque Up Buzzer Enable
(7) Over - Time
Short - Time
This sets whether or not the Over Time /Short Time
error is detected.
0 : When selected, neither Over Time or Short
Time Error is detected.
1 : When selected, only the Short Time Error
is detected.
2 : When selected, only the Over Time Error
is detected.
3 : When selected, the both Over Time &
Short Time Errors are detected.
(8) Accumulated Counter The accumulated count of the screw fastening operation
is displayed.
For the accumulated count, all the torque-up operations
are counted regardless of whether the counter is
ON/OFF.
How to understand the display
Units Digit: Numbered in multiples of 100,000 units
Tenths Digit: Numbered in the millions of units

Operation
Changing to the Setting Mode: Press the F1 button for more than 2 seconds in the normal mode. Then “P” will be
displayed in the function display section and the mode will be changed to the setting mode.
Setting Mode: Pressing the F1 button allows you to toggle through each setting mode, which provides you access to change
any settings from “Function List”. Refer to “List of Function Settings” on page 5 for the changing and setting any functions
with the power tool.
BLG-BC1 Series Operating Instructions
Corporate Headquarters: 1080 North 11th Street, San Jose, CA 95112 Phone: (408) 292-2214 Fax: (408) 292-2733
www.mountztorque.com
Page 7
Press it for more than 2 seconds.
(Count)
(Count-Timer)
(Work-Reset-Timer)
(Reserve Count Timer)
(System Setting)
(Over Time-Short Time) (Accumulated Count)

Operation
Changing to the Normal Mode: Press the F1 button for more than 2 seconds in the setting mode. Then the mode will be
changed to the normal mode and the value set for the count will be displayed.
Counter ON/OFF Setting: Pressing of the F3 button toggles between ON and OFF. (Note: F2 button is not to be used.)
Value Setting for Each Function:
1. Pressing the F2 button in the setting mode changes the figure position for setting.
2 . Pressing the F3 button increases the value one by one.
Note : The setting procedure is the same for all the settings except for the Counter ON/OFF Setting. Refer to “List of
Function Settings” on page 5 for the setting range.
BLG-BC1 Series Operating Instructions
Corporate Headquarters: 1080 North 11th Street, San Jose, CA 95112 Phone: (408) 292-2214 Fax: (408) 292-2733
www.mountztorque.com
Page 8
Press it for more than 2 seconds.
(Counter Setting)
(Counter Setting)
(The selected figure position flashes)

Corporate Headquarters: 1080 North 11th Street, San Jose, CA 95112 Phone: (408) 292-2214 Fax: (408) 292-2733
www.mountztorque.com
BLG-BC1 Series Operating Instructions
Torque Reference Charts
These charts are meant to be used as guidelines for setting the torque on the BLG-BC1 Series electric screwdrivers. The
drivers have a torque adjustment scale showing reference numbers. These numbers determine the approximate torque
setting. Refer to the charts to determine the reference number setting for your torque requirement.
How to Read the Torque Charts
Torque ranges (lbf.in) approximate tightening torque, operated with no load at maximum speed. Verify torque setting with a
torque testing system.
BLG-4000BC1
1 2 3 4 5 6
Torque Scale
0.5
1
1.5
2
2.5
3
3.5
4
lbf.in
7
R (Red)
Torque Range
1.8 - 4.8 lbf.in
4.5
5
5.5
8
W (White)
Torque Range
0.9 - 2.7 lbf.in
Page 9
BLG-5000BC1
1 2 3 4 5 6
Torque Scale
1
2
3
4
5
6
7
8
lbf.in
7
S (Silver)
Torque Range
1.7 - 10 lbf.in
9
10
11
8
BLG-5000BC1-HT
1 2 3 4 5 6
Torque Scale
2
4
6
8
10
12
14
16
lbf.in
7
S (Silver)
Torque Range
4.3 - 17 lbf.in
18
8

Corporate Headquarters: 1080 North 11th Street, San Jose, CA 95112 Phone: (408) 292-2214 Fax: (408) 292-2733
www.mountztorque.com
Testing Power Tools:
1. Application Method: Use a torque tester in “Peak Mode” with a rotary torque sensor between the power tool and the actual
application. This is the best way to test since you are using the actual joint as the test station. You will see the actual
torque applied to the fastener. Caution: Variances in tool performance may occur do to the addition of the rotary torque sensor.
2. Simulated Method: Always use a quality joint rate simulator (run down adapter) with a torque tester when testing power
tools in a simulated application. Use Joint rate and Breakaway methods to obtain most accurate torque readings in a
simulated rundown.
Care
1. The BLG-BC1 Series screwdrivers are a precision torque control instrument and should be handled with care at all times.
2. Only use the transformers listed in the Mountz catalog or website for appropriate BLG-BC1 Series driver model (If you have any
questions regarding the appropriate transformer set-up, contact Mountz Customer Service Department).
3. Operate under safe conditions. Do not place in operation where such objects as hair, strings, clothing, etc. can become
tangled in the rotating bit.
4. Keep away from moisture. Never use in high humid, moist or damp environment.
Mountz Calibration & Repair Services
Mountz, The Torque Tool Specialists®, has been a leader in the torque tool industry for more than 50 years. Engineered in the Silicon
Valley and serving the globe, Mountz focuses on delivering high-quality torque products, services, and solutions to ensure customers can
always proceed with confidence. We are committed to forging a safer world through precision and accuracy, and by innovating every day.
Tool Service & Repair Capability
- Torque Wrench Calibration: Click Wrench, Dial Torque Wrench, Beam Wrench, Cam-Over & Break-Over Wrench
- Torque Screwdrivers: Dial, Micrometer, Preset & Adjustable
- Torque Analyzers/Sensors: All brands
- Electric Screwdrivers: All brands
- Air Tools: All brands
Impact Wrenches, Drills, Pulse Tools, Grinders, Percussive Tools,
Air Screwdrivers, Nutrunners, DC Controlled Nutrunners
- Torque Multipliers: All brands
BLG-BC1 Series Operating Instructions
Page 10
Mountz Service Locations
Eastern Service Center
19051 Underwood Rd.
Foley, AL 36535
Phone: (251) 943-4125
Fax: (251) 943-4979
Western Service Center
1080 N.11th Street
San Jose, CA 95112
Phone: (408) 292-2214
Fax: (408) 292-2733
www.mountztorque.com
/