Page is loading ...

QQ190™ RTF
Racing Drone
User Manual V .96
Q1 2017
Page 1

How to get the most from your QQ190™:
PRACTICE, RESEARCH, AND KNOW BEFORE YOU FLY.
To use this manual, pay attention to these icons:
Warning Important Hints and Tips Reference
Resources
We have done our best to make this manual a denitive guide to the QQ190™ Falcon
RTF Racing drone. We also have resources to help you via the following URLS:
help.QQ190™racingdrone.com- An interactive Q&A resource moderated by
professionals.
pids.QQ190racingdrone.com- A place to share PIDs and other settings that you have
found to like ying with, as there is no one tune for everyone.
videos.QQ190racingdrone.com- Tutorial and ying videos.
manual.QQ190racingdrone.com- A link to this manual.
parts.QQ190racingdrone.com- A link to nd replacement parts.
tunes.quadquestions.com- A link to nd the tune library.
Practice, Practice, Practice.
Page 2
Safety warning
Hardware Warning
Good Info

We recommend that you learn how to y using the Velocidrone simulator. You can y
the actual QQ190™ in the simulator before you take the drone out into the real world.
This will help you to prevent crashes, get familiar with the controls, and become a
better pilot before you start ying in the real world.
Before You Begin
Safety warning disclaimer
The QQ190™ is not a toy, but rather a serious machine that demands respect. It is a
racing drone and therefore will cause serious injury if used improperly. It is for this
reason that we recommend that you REMOVE PROPELLERS BEFORE WORKING ON
THIS DRONE. This means that if you are not ying the drone, and have a battery
plugged in, the props need to be removed.
Serious risk of personal injury- Remove props before servicing the
drone
Risk of injuring others- Do not operate the QQ190™ racing drone
around people or property.
Adult supervision required-The QQ190™ is not a toy- Adult supervision required
under the age of 16.
Fire hazard- Electrical and mechanical fire can result in the event of a crash or
misuse.
Lipo battery hazard-ensure that you are following proper charging/
discharging and battery safety protocols when handling LiPo
batteries and chargers- charge batteries in a nonflammable area such as
concrete outdoors. Always supervise batteries when charging.
Make sure that you know and follow your local laws when it comes to flying
FPV Drones- These laws vary by municipality and country. !
Page 3

Video Tutorials
We have created the following video tutorials to make sure that you get full use out of
your QQ190™ Racing Drone.
1. Safety warning disclaimer and general hardware orientation.
2. How to y- the basics
3. Unboxing and initial setup
4. Required gear
5. Quick start guide
6. QQTrictionary- A guide to learning tricks.
More videos will be added according to user demand, so if you don't know something,
or have a question, make sure to post it at ask.quadquestions.com
Watch the video tutorials to learn how to use your QQ190™RTF Racing drone correctly
and safely.
The videos can be found at videos.QQ190racingdrone.com
Page 4

How to get the most from your QQ190™: 2
To use this manual, pay attention to these icons: 2
Resources 2
Before You Begin 3
Safety warning disclaimer 3
Video Tutorials 4
General information 8
Introduction 8
Before First Flight 8
Required Equipment 9
Recommended Equipment Setups: 10
Highlights & Features 11
Electronics 11
Component Identification 14
Main Components 14
Assembly 15
Install a receiver module 16
Spektrum Receiver Installation 18
Frsky X4R-SB install & binding procedure. 18
FrSky Taranis Controller Setup 20
TBS Tango Configuration 21
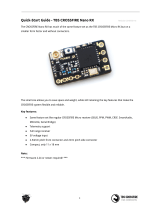
TBS Crossfire Micro Receiver Installation & Binding 22
Initial Setup 22
RC Calibration 23
New or Changed Setup 25
Existing setup (if you have already configured Betaflight) ADVANCED 25
Page 5
Table Of Contents

Installing an HD camera 26
First Flight 27
Propeller Rotation warning 27
Propeller Rotation 27
Installing Propellers 29
Tightening Propellers 30
Installing the Antenna 32
Installing the battery 32
General Controls 33
Flight Modes 34
Assisted Modes 34
Manual modes 34
Reasons to fly in Rate mode 35
Calibrating the Accelerometer 35
Trimming the accelerometer 36
On screen display items 37
Using the OSD menu 37
QQ190™ stick commands 39
Connecting to a computer 40
Installing Betaflight 40
Installing the Software Drivers 40
Connecting your QQ190™ to a computer 41
Programming an arm switch 42
Backing up your tune 43
Backing up your switch settings 44
Flashing new tunes 45
Flying Tips 47
Battery Warnings 47
General Tips & Tricks 48
FPV Best Practices 48
Reset Procedure 50
Page 6

VTX/OSD Reset 50
Betaflight Settings reset 50
Troubleshooting 51
My QQ190™ will not arm 51
My QQ190™ will not stay level 51
My QQ190™ falls out of the sky 51
No Video 51
My QQ190™ Video cuts out or is noisy 52
My QQ190™ Flips upside down and out of control when armed 52
My motors don't spin the right direction 52
My video is showing up on my friend’s video channel 53
I cannot access the OSD Menu 53
GPS does not lock (if equipped) 53
Firmware update failed/ OSD not showing 53
Additional Help Resources 53
Appendix A-OSD Configuration 54
Navigating the OSD Menu 54
OSD Menu Information 54
On Screen Display Sub Menu 54
RSSI 55
RSSI Calibration Procedure: 56
Flight Controller Submenu 58
FPV Camera Submenu 58
Switch Setting Submenu 58
Video Transmitter Submenu 58
Updating via the TBS AGENT configuration software 59
TBS Agent Installation 59
Connecting to TBS Agent 59
Configuration via TBS Agent 59
Page 7

General information
This chapter describes the features of the QQ190™ Racing drone including how to
assemble the drone.
Introduction
The QQ190™ Racing drone is a quadcopter capable of achieving blistering
speeds (over 80 Mph) whilst transmitting a video signal to the pilot on the ground
(you) who operates the drone via FPV (rst person view) equipment. Equipped with a
specialized, angle-adjustable camera, the drone allows you to y as if you are sitting in
the cockpit. Adjusting your camera angle means that the drone can grow with your
piloting skills, allowing more camera tilt as you progress so that you can achieve
higher speeds.
There are 2 camera options available with the QQ190™ Racing Drone; a basic
CMOS camera that is lightweight and small (for those that want the fastest possible
drone), and an upgraded option for those who want more control over their video
settings. The basic CMOS camera offers superb color rendering and brightness in a
small package, whereas the upgrade features a CCD camera for excellent transitions
between light and dark areas at the expense of some color degradation and extra
weight.
Before First Flight
Before rst ight, it is imperative that you understand the controls of the drone,
are familiar with safety protocols, and keep clear of people and property during
operation. It is encouraged that you check with your local laws and regulations to
make sure that you are operating the drone in accordance with law.
The QQ190 RTF racing drone is an advanced racing machine and
is not intended for children under the age of 16 without adult
supervision.!
Page 8

Required Equipment
The QQ190™ racing drone requires additional equipment to get in the air. You will
need a control system and a video receiver. There are a myriad of options available,
and the QQ190™ works with most 5.8GHz video receiver systems and radio control
systems on the market.
Required additional equipment:
• 6+ Channel radio control system with 1-wire protocol receiver (SBUS, PPM,
Spektrum Serial 1024 & 2048, Sum H, Sum D. **PWM receiver modules are not
supported**
• 5.8ghz fpv goggles or video monitor with 5.8GHz receiver
• 1300-1600 mAh 4S Lipo batteries with XT-60 connector
• Lipo battery charger
Page 9

Recommended Equipment Setups:
Beginner setup, available here:<insert Link>
TBS Tango controller
Frsky XJT radio Module
Frsky X4R-SB receiver.
Tattu 1300mAh batteries
TBS battery charger.
Intermediate setup, available here: <Insert Link>
TBS Tango Radio
Frsky xjt module
X4R-SB receiver
TBS battery charger
Advanced Setup , available here: <Insert Link>:
Frsky Taranis
Fatshark Dominator V3 FPV Goggles
TBS Dominator Video Receiver with patch antenna
X4R-SB Receiver
Tattu 1300-1550 Mah 4S Batteries
TBS B6AC Battery Charger
Expert Setup, available here: <Insert Link>:
Frsky Taranis
Fatshark Dominator HDV2 FPV Goggles
TBS Dominator Video Receiver with patch antenna
TBS Crossre Transmitter
TBS Crossre micro Receiver
Tattu 1300-1550 Mah 4S Batteries
TBS B6AC Battery Charger
Page 10

Highlights & Features
•
Supports multiple battery congurations: 3S, 4S, 5S, 6S compatible-The QQ190™
has been engineered for 4S batteries. We recommend 4S 1300-1600mAh 45-75C Lipo
batteries for best results.
•Multiple radio control systems supported- Works with most radio systems
available: Crossre, Spektrum, Frsky & Futaba Sbus, PPM, SumD, SumH
•Pro Tuned & Tested: The QQ190™ has been pro-tuned and tested by top pilots and
inuencers around the world. It comes out of the box with an excellent tune that was
created from scratch by Magnus at SuperFPVBros. Magnus is a world-renowned drone
tuning expert and specialist. We love the stock tune, but a good tune can be
subjective. Because of this, we have made additional tunes and settings available
online and contributed by other top inuencers in the hobby such as Joshua Bardwell,
Typo FPV, Trappy, Team QuadQuestions, Bulbufet, the QQ190™ pilots group, and more.
These tunes are available at tunes.QQ190racingdrone.com
•Carbon Fiber Construction: Advanced nishing techniques that put this QQ190™ in
rst place include; chamfered edges, custom pocketing, small detail engraving,
polishing, and a custom made carbon ber that resists delimitation and breakage
upon even the toughest crashes.
•Center mounted X-Frame design- A true x-frame design that performs incredibly
well. This racing drone ies in a remarkable, acrobatic, and natural way because of it’s
symmetrical shape.
•Full Featured electronics package: The electronics package on the QQ190™ racing
drone features Team Blacksheep architecture. Easily rebuild and repair the drone
without the need to solder by replacing boards with ease. This also means that
components are easily added/upgraded.
•A real world racing drone-While other racing drones that claim to be made for
racing might exist, the QQ190™ has been engineered by experts in the eld of drone
racing, therefore, it is something that is competitive and compatible with many of the
existing racing drone technologies on the market out of the box.
Electronics
The QQ190™ has some advanced technologies onboard that you simply cannot nd in
other RTF racing drones. These technologies include:
TBS FPV Vision
•
Full graphic, Core Pro Programmable On Screen Display (OSD)- Important
information is displayed such as current consumption, ight time, battery
voltage, and more. The information from the OSD is overlaid onto the wireless
video output signal for a information feed similar to what a jet ghter heads
up display looks like.
Main OSD FEATURES INCLUDE:
•
Articial Horizon- see your orientation to the ground by displaying a
graphical display on the video feed.
Page 11

•
Betaight conguration via OSD- Adjust rates, PIDS, settings,
calibration, vtx power, general settings, and lters without the need for
a computer.
•
Sensor OSD readout including-Battery voltage, current draw, power
index, callsign, ight timer, RSSI Level, Link quality, and failsafe count,
•
Upgradeable-Additional OSD features can be unlocked by adding
additional TBS modules to the drone- For example, adding a TBS GPS
unit unlocks; GPS coordinates, satellite acquisition and count, altitude,
distance to home, home direction, and speed (GPS sold separately)
•
Power Adjustable Video Transmitter (VTx) 25-800mW-
TBS Unify VTx features:
•
Adjustable Power-Set the transmission power level via the OSD
without ever taking your goggles off. For example, when ying with
friends, you can turn down the power output to avoid interfering with
others, or when ying indoors, you can turn down the power to avoid
mulipathing interference. (when your own video transmission bounces
off of multiple points and cancels itself out.) Crank the power to
800mW for longer range ying with less people.
•
Pit Mode (in band and out band)- The QQ190™ sports a video
attenuation technology designed to let you power up your video
transmitters during the race without interfering with other racers.
•
CleanSwitch- The QQ190™ doesn't blast out your friends when
powered up or when channels are being changed.
•
Dual camera capability
•
Unlock-able for Hams- The QQ190™ has the ability to crank up the
video transmission power & unlock additional frequencies.
•
Supports all popular 5.8ghz frequency bands and then some- A/B/
Race/E/Airwave/Custom
•
VTX LED Strip - Changes color depending on the band used and
future-proofed for continuing drone racing technology development.
•
Full Featured Flight Controller (FC)-TBS Colibri
Colibri features include:
•
Betaight enabled- Runs Betaight ight controller software for
stable, responsive and cutting edge ight characteristics.
•
BST enabled-BST or Blacksheep Telemetry on board means that you
can easily add additional electronic add-on systems to the QQ190™
such as GPS or Crossre long range systems.
•
ESC Pass-through programming support- The QQ190™ allows you to
connect to your escs all via the ight controller USB connection.
•
Smart ESC Protocol Detection.
•
Bootloader Button for easy rmware update.
Page 12

•
Bus Power-5V for receiver and Flight Controller over internal BUS
System and 3V3 available for Spektrum users.
•
Fast on-board processor-Equipped with the Silicon Labs
STM32F303RCT6 72MHz 256kB MCU/FPU Processor.
•
MPU6000 gyro & accelerometer- A BetaFlight preferred, low noise, 3-
axis Gyroscope/accelerometer sensor for advanced stabilization
control.
•
Extra I/O- Add components such as dataloggers, LEDs, GPS units, and
more with ease due to the fact that there are additional Serial
connections available.
•
Multiple receivers supported-PPM,SBUS, Spektrum, SUMH, SUMD,
Crossre, and more.
•
Crash resistant construction- features tough electrolytic capacitors
and conformal coating (a type of waterproong) to improve crash
resistance.
• 2-in-1 Custom TBS BLHeli-S Powered Electronic Motor Speed Controls (ESCs)
Escs provide precise and accurate power delivery and Speed control to the motors.
ESC Features include:
• Custom designed specically for the QQ190™ RTF
• Silabs Busy Bee Processors-The fastest processor on the market in
it’s class.
• Dedicated PWM Driver
• BLHeli-S enabled
• Fast 8-Bit processing
• Over-Current protection
• 25A Constant, 35A burst- Made for any 5” prop you can throw at it.
(also tested with Racekraft 5051 props) motor testing results will be
published soon.
• Multishot Protocol enabled-The QQ190™ electronics are fast and
other esc protocols cannot keep up with the speed in which the
QQ190 processes information. The Multishot protocol uses a 5-25µs
signal that allows refresh rates of up to 32 KHz, while maintaining 240
steps of resolution.
• Active/regenerative braking-When you reduce throttle the
QQ190™ will actively reduce the motor speed. Active braking makes
the QQ190 feel more responsive and dialed in, especially when
making throttle changes for precise altitude control.
• Lost model/inactivity alarm (sounds by pulsing the motors at high
frequency after a period of inactivity)
• Passthrough programmable- program via the ight controller USB
interface without the need for additional connections.
• 3-Phase brushless motor output
Page 13

Component Identification
Main Components
Page 14
Figure 1.
Enter/

Page 15
Figure 2.
*A Special tool is required for removal
of Powercube nuts and standoffs.
Available at QuadQuestions.com
Figure 3.

Assembly
Unboxing
Verify that you have received all of the included components with your QQ190™ RTF
Racing Drone:
•
1x QQ190™ drone with camera pod (depending on conguration purchased)
•
2x battery straps
•
4x Propellers
•
1x Battery Skid Plate
*
If you ordered the upgraded camera assembly, then it will arrive detached from
the QQ190™ main frame. The camera pod assembly can be attached using the 4x
M3x8 allen screws provided. After installing the camera assembly, you will need to
plug in the camera wire to the bottom of the power cube stack on the left side into
camera port 1 (gure 1). We recommend installing your receiver before nalizing the
camera pod installation.
The QQ190™ is ready to y out of the box, but it requires some extra electronics to get
ying. This is an advanced product designed for the racer in mind and therefore no
radio system for control is included. We have done this on purpose to allow any 6
channel radio system to be used with the QQ190™ Racing Drone provided that it
outputs a PPM or SBUS signal. This means that you can use any high-end radio system
with the drone. QuadQuestions recommends using an Frsky Taranis or TBS Tango for
best results.
Install a receiver module
Follow these steps to get air
worthy:
A.The drone comes pre-wired
with a Jr style connector lead
to connect a common SBUS
receiver via a standard servo
connection. It provides 5V
power via this connection.
The red wire is 5V, white is
signal, and black is ground.
A. The receiver port on the Colibri has 4 wires and outputs signal, 3v3,
ground, and 5V from left to right. The receiver cables provided are made
Page 16
Figure 4.

in such a way that if the included Spektrum wire is installed, 3v3 is
provided automatically. Likewise, the included SBUS receiver wire when
installed provides 5V power for your radio receiver system. We
recommend conrming the power requirements of your receiver before
installing to ensure that the correct voltage is supplied to your receiver
by the QQ190™. You can also direct-solder a receiver to the Colibri ight
controller behind the receiver port. The pinout is shown in gure 5.
B. Once the receiver has been wired into your QQ190™, we recommend that you
bind it to your radio before burying it into the drone. You will need to follow
your manufacturer’s instructions to do this. Make sure that your propellers are
off and then plug in a battery to the QQ190™ to provide power to your receiver
module.
It is important to have the outputs of your radio properly mapped. The TBS Tango
has this completed for you already, If you are a Taranis user, you should have access
to the Taranis QQ190™ model in your QuadQuestions user account available under
my-downloads. The QQ190™ model provided properly outputs the correct
channels within the Taranis settings.
Page 17
Figure 5.

Spektrum Receiver Installation
If you are a Spektrum user, you will have to install the Spektrum receiver wire
that is supplied with your QQ190™ to the receiver port. The QQ190™ is
designed in such a way that you will need to partially disassemble the drone to
install the wire. We recommend that you gain easy access to the receiver port
by rotating the LED diffuser housing out of the way. You can accomplish this by
removing the allen screw from the rear right standoff and rotating the housing
to gain easy access to the receiver plug on the Colibri ight controller. The
other, easier option is to remove the Colibri ight controller from the top of the
Powercube stack if you have access to the TBS nut driver (Available at
QuadQuestions.com.)
The TBS nut driver is made specically so that you don't damage the
Electronics stack when removing boards and is the only recommended
tool for servicing the onboard electronics.
For instructions on how to bind and setup your Spektrum radio, please refer to
the manufacturer’s documentation.
Frsky X4R-SB install & binding procedure.
If you are using the recommended Frsky Taranis or TBS Tango radio with an X4R-SB
receiver, then you can bind the radio to the receiver by performing the following
actions:
Page 18
Figure 6.

1. Wire in the receiver as detailed in gure 7.
2. Wrap the exposed pins on the receiver with electrical tape or an equivalent
insulating material to ensure that any exposed pins will not come in contact with
the carbon ber frame.
If this step is ignored, you risk shorting out the power to the frame which can
cause irreversible damage to the onboard electronics.
3. Before nalizing installation of your receiver, prepare a charged battery and make
sure that your props are removed.
Page 19
Figure 7.

4. Power on your transmitter radio and put it into bind mode. Make sure that The D16
protocol is selected or you will not get a successful bind.
5. Hold down the button on the X4R-SB while plugging the battery into the XT-60
connector on the QQ190™. The red LED on the receiver should blink, indicating a
successful bind.
6. Unplug the battery from the XT-60 connector on the QQ190, and take the radio
out of bind mode.
7. Now plug the battery back into the QQ190™ and check to see that the green light
is glowing on the receiver. If it is, you may now unplug the battery and nish the
installation of the receiver.
8. The X4R-SB tucks in tightly under the camera. We recommend to install it with the
antennas coming out of the front of the QQ190™ and the servo plug sticking out of
the back next to the FPV antenna.
FrSky Taranis Controller Setup
If you are using a Taranis radio, You can use a pre-congured model available at
quadquestions.com/. This model should also be available for download in the “my-
account” section of quadquestions.com
Page 20
Figure 8.
/