Page is loading ...

®
USER GUIDE
Uses only Bayer’s CONTOUR
®
PLUS blood glucose test strips
Blood Glucose Monitoring System
DATE:
CLIENT:
DESCRIPTION:
SCHAWK JOB#:
SKU#:
DIMENSIONS:
PRINTER SPEC:
RELEASE: V-2
LANGUAGE(S): ENGLISH
INTERNAL: R-X
18211 NE 68th Street, E120
Redmond, WA 98052
T: 425-881-5454
BAN#:84721973 Rev. 01/13
Contour PLUS User Guide - South Africa
Alt#1 - 11/29/12 copy changes
Alt#2 - 01/22/13 Screen Changes
January 22, 2013
Bayer HealthCare
Contour PLUS User Guide -English
909948
7610 Parent BAN# 84713040
6.0" (H) 4.5" (W)
PUSG0494 REV G
FONTS:
Helvetica Neue, Helvetica, Zapf Dingbats
COLORS:
Cyan Magenta Yellow Black
NOTE: THIS COLOR PROOF INDICATES COLOR BREAK ONLY AND MAY NOT ACCURATELY REFLECT ACTUAL PRODUCTION COLOR.
Regional Master Template No: M-GDE-USR-0275-R0002
Clinical Trial / Global Master Template No: XXXX
FC: 19 mm BC: 7.5 mm
Footer: 8 mm CE: 5.1 mm (H)
1/3rd of the Cross clear
space has been applied.
7mm min.
84721973_CntrPLUS_UG_EN_FpBp_v2.indd ofc184721973_CntrPLUS_UG_EN_FpBp_v2.indd ofc1 1/22/13 9:44 AM1/22/13 9:44 AM
January 22, 2013

i
ii
WARNINGS
Serious Illness
• Capillary (fingerstick or Alternative Site) blood glucose
testing may not be clinically appropriate when peripheral
flow is decreased. Shock, severe hypotension,
hyperosmolar hyperglycaemia, diabetic ketoacidosis, and
occurrence of severe dehydration are examples of clinical
conditions that may adversely affect the measurement of
glucose in peripheral blood.
1-3
Talk to Your Health Care Professional
• Before changing your medication based on test results,
• If your blood sugar reading is under 2,8 mmol/L, follow
medical advice immediately,
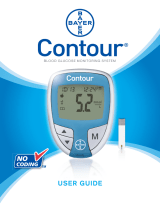
INTENDED USE
Bayer's CONTOUR
®
PLUS blood glucose monitoring system
(meter, test strips and control solution) is intended for
self-testing by persons with diabetes and by health care
professionals to monitor glucose concentrations in venous
whole blood and in fresh capillary whole blood drawn from
the fingertip or palm. It is for the quantitative measurement of
glucose in whole blood from 0,6 mmol/L to 33,3 mmol/L.
It is intended for in vitro diagnostic use only.
The C
ONTOUR PLUS blood glucose monitoring system may be
used as an aid to monitor the effectiveness of an individual’s
personal blood glucose control program. The CONTOUR PLUS
blood glucose monitoring system is not intended for the
diagnosis of or screening for diabetes mellitus and it is not
intended for use on neonates.
IMPORTANT SAFETY INFORMATION
• If your blood sugar reading is over 13,9 mmol/L, wash and
dry your hands well and repeat the test with a new strip. If
you get a similar reading, call your health care professional
as soon aspossible,
• About whether Alternative Site Testing (AST) is appropriate
for you.
Potential Biohazard
• Always wash and dry your hands well with soap and water
before and after handling the meter, lancing device or test
strips.
• All parts of this kit are considered biohazardous and can
potentially transmit infectious diseases, even after you
have performed cleaning and disinfection.
• The MICROLET
®
2 lancing device is intended for self-testing
by a single patient. It must not be used on more than one
person due to the risk of infection.
• Use a new MICROLET
®
lancet each time you test
because it is no longer sterile after use.
• Always dispose of test strips and lancets as medical
waste or as advised by your health care professional.
All products that come in contact with human blood
should be handled as if capable of transmitting infectious
diseases.
• Health care professionals or persons using this system
on multiple patients should follow the infection control
procedure approved by their facility.
• Keep out of reach of children. This kit contains small parts
which could cause suffocation if accidentally swallowed.
• Keep batteries away from children. Lithium batteries are
poisonous. If swallowed, immediately contact your poison
control center.
84721973_CntrPLUS_UG_EN_FpBp_v2.indd i-ii84721973_CntrPLUS_UG_EN_FpBp_v2.indd i-ii 1/22/13 9:41 AM1/22/13 9:41 AM

iii
iv
PRECAUTIONS
• Bayer’s CONTOUR
®
PLUS meter only works with
CONTOUR
®
PLUS test strips and CONTOUR
®
PLUS control
solution.
• Read your CONTOUR
®
PLUS user guide, the
MICROLET
®
2 lancing device package insert and all
instructional materials provided in your meter kit before
testing. Please follow all instructions for use and care
exactly as described to help avoid inaccurate results.
• Examine product for missing, damaged, or broken parts.
If the test strip bottle is open inside a new box of strips,
do not use those strips. Contact Bayer Diabetes Care
Customer Service at 0860 102 672 for replacement parts.
• Always keep the C
ONTOUR PLUS test strips in their original
bottle. Tightly close the bottle immediately after removing
a test strip. The bottle is designed to keep the test strips
dry. Avoid exposing meter and test strips to excessive
humidity, heat, cold, dust, or dirt. Exposure to room
humidity by leaving the bottle open or not storing the
strips in their original bottle can damage your test strips.
This could lead to inaccurate results. Do not use a test
strip that appears damaged or has been used.
• Check the expiry dates on your test strips and control
solution. Do not use the test strips or control solution if
the expiry date printed on the bottle label and carton has
passed. This can cause inaccurate results. For the control
solution, do not use if it has been six months since you
first opened the bottle. It will help to write the six-month
discard date on the control solution label.
• If your control solution test result is out of range, call Bayer
Diabetes Care Customer Service at 0860 102 672. Do not
use the meter for blood glucose testing until you resolve
this issue.
• The meter has been designed to give accurate results at
temperatures between 5°C and 45°C. If you are outside
this range, you should not test. Whenever the meter is
moved from one location to another, allow approximately
20 minutes for the meter to adjust to the temperature of
the new location before performing a blood glucose test.
• Do not perform a blood glucose test when the
CONTOUR
®
PLUS meter is connected to a computer.
• Use only approved equipment from the manufacturer or
certified body such as UL or TUV.
• Bayer’s CONTOUR PLUS meter has been preset and locked
to display results in mmol/L (millimoles of glucose per liter
of blood).
O
Results in mmol/L will always have a decimal point;
O
Results in mg/dL will never have a decimal point.
Example: or
O
Check your display screen to be sure the results are
shown the right way. If not, contact Bayer Diabetes Care
Customer Service at 0860 102 672.
• Bayer’s CONTOUR PLUS blood glucose monitoring system
has a measuring range of 0,6 mmol/L to 33,3 mmol/L. This
means if your blood sugar result is less than 0,6 mmol/L
or more than 33,3 mmol/L your meter is unable to display
a number and will display a flashing “ ” or “ ” in the
center of your meter display screen.
84721973_CntrPLUS_UG_EN_FpBp_v2.indd iii-iv84721973_CntrPLUS_UG_EN_FpBp_v2.indd iii-iv 1/22/13 9:41 AM1/22/13 9:41 AM

v
GETTING
STARTED
TESTING SETUP AND USE TECHNICAL,
SERVICE & CARE
Intended Use, Important Safety Information ..................... i
Precautions .......................................................................iii
Your Meter Features .......................................................... v
Your CONTOUR
®
PLUS Meter ............................................. 2
Getting Ready to Test........................................................ 6
Getting the Blood Drop ................................................... 10
Testing Your Blood .......................................................... 10
Alternative Site Testing (AST) – Palm .............................. 14
Control Solution Testing .................................................. 20
Setting the Time, Date and Sound .................................. 24
Setup for Basic (L-1) and Advanced (L-2) Modes .......... 27
Personalising LO, HI and Reminder Settings ................. 28
Using Marker and Reminder Features ............................ 30
Transferring Results to a Computer ................................ 36
Viewing Results: Basic Mode .......................................... 37
Viewing Results: Advanced Mode .................................. 39
Error Codes and Symbols ............................................... 42
Changing the Batteries ................................................... 46
Caring for Your Meter and Cleaning Your Meter ............. 48
Symptoms of High or Low Blood Glucose ..................... 49
Specifications .................................................................. 50
Service Information ......................................................... 55
Warranty .......................................................................... 56
Supplies........................................................................... 58
Table of Contents
Your Meter Features
Easy: The CONTOUR
®
PLUS blood glucose monitoring system is
about simplicity. You will notice this the first time you use it.
Automatic: Bayer’s C
ONTOUR PLUS meter is designed with
No Coding™ technology, to automatically code itself every
time you insert a test strip. It will also automatically mark a
control solution test.
Enough Blood: The CONTOUR PLUS meter alerts you when
a test strip is under-filled and allows you to add more blood.
Your test strip is designed to easily “sip” the blood into the
sample tip. Do not drop blood directly on the flat surface of the
test strip.
Thank you for choosing Bayer’s CONTOUR PLUS blood glucose
monitoring system. We are proud to be your partner in helping
you manage your diabetes.
CAUTION: Your CONTOUR PLUS meter ONLY works with
CONTOUR
®
PLUS test strips and CONTOUR
®
PLUS control
solution.
84721973_CntrPLUS_UG_EN_FpBp_v2.indd v-184721973_CntrPLUS_UG_EN_FpBp_v2.indd v-1 1/22/13 9:41 AM1/22/13 9:41 AM

2
GETTING
STARTED
3
GETTING
STARTED
Your CONTOUR
®
PLUS Test Strip and MICROLET
®
2 Lancing Device
Your CONTOUR
®
PLUS Meter
Your CONTOUR
®
PLUS Meter
Using the Meter Buttons
• Press and hold the M button until the meter
turnson.
• Press and hold the M button until the meter
turnsoff.
• The ▲ or ▼ scroll buttons on the meter allow you
to scroll. You can hold the ▲ or ▼ button to scroll
continuously through a list.
• Press the M button to select the option that appears.
• To access Setup, with the meter off, press and hold
M for 3 seconds. See page 24.
Press to scroll up
Press and hold
to keep scrolling
Press to
scroll down
Press and hold
to keep scrolling
Press and hold
for On/Off, Enter
or Memory Recall
Data
Port
Up/Down
Scroll Buttons
Test Strip
Port
Memory
Button
Your MICROLET
®
2 Lancing Device
Re-setting Handle
Grip Indent
Lancet Holder
Lancet
Round Protective
Cap
Adjustable
Endcap
Endcap Dial
Release Button
Clear Endcap
(for palm testing)
Your CONTOUR
®
PLUS
Test Strip
Grey Square End
Insert this end into the test strip port
with the grey end facing up
Sample Tip
Blood sample pulled in here
84721973_CntrPLUS_UG_EN_FpBp_v2.indd 2-384721973_CntrPLUS_UG_EN_FpBp_v2.indd 2-3 1/22/13 9:41 AM1/22/13 9:41 AM

4
GETTING
STARTED
5
GETTING
STARTED
Your Meter Overview
Your Meter Overview
Your Meter Display
The picture below shows all the symbols that appear
on your meter display. To view, with the meter off, press
and hold ▲ or ▼. All display segments will appear
for 10 seconds. If you need more than 10 seconds to
check the display, press and hold ▲ or ▼ again.
While all characters are displayed, it is very
important to verify that
is fully displayed. If
there are missing segments, see Error Codes and
Symbols (pages 42 - 45). This may affect the way you
see your results.
Top area on the display presenting date and time.
Pre-meal result marker.
Post-meal result marker.
Identifies a Diary entry.
Indicates a reminder has been set.
Center area on the display that shows either
your test result or any error codes.
The meter is ready to test.
Control solution result marker.
Indicates it is too cold or too hot for your meter
to test accurately.
Indicates Average.
Results are displayed as mmol/L or mg/dL. The
7 appears when viewing 7 day HI–LO summary.
Day/month format.
The batteries are low and need to be changed,
and will remain on display until batteries are
changed.
Appear if the meter is in 12 hour setup.
Indicates sound is turned on.
Icon What it Means
84721973_CntrPLUS_UG_EN_FpBp_v2.indd 4-584721973_CntrPLUS_UG_EN_FpBp_v2.indd 4-5 1/22/13 9:41 AM1/22/13 9:41 AM

6
TESTING
7
TESTING
1. Remove the endcap
from the MICROLET2
lancing device with
your thumb on the grip
indent as shown. Snap
the endcap off from
top to bottom.
WARNING: Potential Biohazard
The MICROLET 2 lancing device is intended for
self-testing by a single patient. It must not be
used on more than one person due to the risk of
infection.
Use a new MICROLET
®
lancet each time you
test because it is no longer sterile afteruse.
Preparing the Lancing Device
Getting Ready to Test
Getting Ready to Test
WARNING
• All parts of the kit are considered biohazardous
and can potentially transmit infectious diseases,
even after you have performed cleaning. See
page 48.
• Always wash your hands well with soap and
water before and after testing, handling the
meter, lancing device, or test strips.
Read your CONTOUR
®
PLUS user guide,
the MICROLET
®
2 lancing device insert and all
instructional materials provided in your meter kit
before testing. Please follow all instructions for use
and care exactly asdescribed.
Examine product for missing, damaged, or broken
parts. If the test strip bottle is open inside a new
box of strips, do not use those strips. Contact
Bayer Diabetes Care Customer Service at
0860 102 672 for replacementparts.
CAUTION: Your C
ONTOUR PLUS meter only
works with CONTOUR
®
PLUS test strips and
CONTOUR
®
PLUS controlsolutions.
Have all the materials you will need ready before you
begin testing. This includes your CONTOURPLUS
meter, CONTOUR PLUS test strips, and the
MICROLET2 lancing device and MICROLET
®
lancets.
You may also need CONTOUR PLUS control solution
to perform a quality control check. CONTOUR PLUS
test strips and CONTOUR PLUS control solutions are
sold separately if not included in the meter kit.
2. Loosen the round
protective cap on a
lancet by rotating it
¼ turn, but do not
removeit. Always use
MICROLET lancets for
the best operation.
Preparing the Lancing Device
Read the MICROLET
®
2 lancing device insert for
complete instructions. For Alternative Site Testing
instructions, see page 14.
84721973_CntrPLUS_UG_EN_FpBp_v2.indd 6-784721973_CntrPLUS_UG_EN_FpBp_v2.indd 6-7 1/22/13 9:41 AM1/22/13 9:41 AM

8
TESTING
9
TESTING
5. Replace the grey
endcap.
Inserting the Test Strip
Preparing the Lancing Device
3. Insert the lancet firmly
into the lancing device
until it comes to a full
stop. This will re-set
the device. You can
also pull and release
the re-setting handle.
4. Twist off the round
protective lancet cap.
Save it for disposing
of the used lancet.
6. The puncture depth
depends on the
endcap setting
and the amount of
pressure applied to
the puncture site.
Rotate the endcap dial
to adjust the puncture
depth.
Inserting the Test Strip
1. Remove a CONTOUR
®
PLUS test strip
from the bottle. Tightly close the
bottle lid immediately after you have
removed the test strip.
HINT: After the test strip is inserted, if you do not
apply blood to the test strip within 3 minutes,
the meter will turn off. Remove the test strip and
reinsert it to begin a test.
This will turn the meter on.
An image of a test strip with
a flashing blood drop
will appear letting you know
the meter is ready to test.
2. Hold the test strip
with the grey square
end facing up toward
themeter.
e
st stri
p
e
the
r
y
ou
h
ave
3. Insert the grey square
end firmly into the
test strip port until the
meter beeps.
84721973_CntrPLUS_UG_EN_FpBp_v2.indd 8-984721973_CntrPLUS_UG_EN_FpBp_v2.indd 8-9 1/22/13 9:41 AM1/22/13 9:41 AM

10
TESTING
11
TESTING
Testing Your Blood
Testing Your Blood
1. Press the endcap firmly
against the fingertip and
press the blue release
button with yourthumb.
Getting the Blood Drop - Fingertip
Testing
2. Stroke your hand
and finger toward the
puncture site to form a
drop of blood. Do not
squeeze around the
puncture site.
3. Test immediately after
a good blood drop
hasformed.
Suggested drop size
4. Immediately touch the tip of
the test strip to the drop of
blood. The blood is pulled
into the test strip through
thetip.
Fingertip Testing
Hold the tip of the
test strip in the
blood drop until
the meter beeps.
Do not press the tip against the skin or place the blood
on top of the test strip or you could get inaccurate
results or errors.
If the first blood drop is
not enough, the meter may
beep twice and display a
strip underfill screen image
.
You have about 30 seconds
to apply more blood onto
the same strip. If you are
not able to apply enough
blood within that time, an
error code will be displayed.
Dispose of the used test
strip as medical waste and
start over with a new strip.
84721973_CntrPLUS_UG_EN_FpBp_v2.indd 10-1184721973_CntrPLUS_UG_EN_FpBp_v2.indd 10-11 1/22/13 9:41 AM1/22/13 9:41 AM

12
TESTING
13
TESTING
NOTE: You can set your meter to use meal marker
options. See Advanced Mode settings (L-2) on
pages 27 - 29. If you want to mark your result you will
need to do it before removing the test strip.
WARNING
You should consult with your health care
professional for glucose values specific to
yourneeds.
• If your blood sugar reading is under 2,8mmol/L,
follow medical advice immediately.
• If your blood sugar reading is over 13,9mmol/L,
wash and dry your hands well and repeat the
test with a new strip. If you get a similar result,
call your health care professional as soon as
possible.
• Always consult your health care professional
before changing your medication based on
testresults.
Testing Your Blood
Expected Test Result Values
5. After a beep, you will see the
meter count down 5 seconds
and your blood test result is
displayed and automatically
stored in the meter memory.
Please do not touch the test
strip during the countdown as
this may result in an error.
6. Remove the test strip to
turn your meter off. Dispose
of the used test strip
as medical waste or as
advised by your health care
professional.
7. Always wash your hands
well with soap and water
before and after testing,
handling the meter, lancing
device, or test strips.
Expected Test Result Values
Blood sugar values will vary depending on food
intake, medication dosages, health, stress, or activity.
Non diabetic plasma glucose concentrations are
normally maintained within a relatively narrow range,
approximately 3,9- 6,1 mmol/L in the fasting state.
4
84721973_CntrPLUS_UG_EN_FpBp_v2.indd 12-1384721973_CntrPLUS_UG_EN_FpBp_v2.indd 12-13 1/22/13 9:41 AM1/22/13 9:41 AM

14
TESTING
15
TESTING
Alternative Site Testing (AST) – Palm
Getting a Blood Drop for Alternative Site
Testing
Alternative Site Testing (AST) – Palm
WARNING
Ask your health care professional if Alternative
Site Testing is right for you.
IMPORTANT:
For Alternative Site Testing, use the clear
endcap. Your C
ONTOUR
®
PLUS meter can be used for
fingertip or palm testing. See the MICROLET
®
2 insert for
complete instructions in Alternative Site Testing.
IMPORTANT: Do not use AST under the following
conditions:
• If you think your blood sugar is low
• When blood sugar is changing rapidly (after a meal,
insulin dose or exercise)
• If you are unable to feel symptoms of low blood
sugar (hypoglycaemic unawareness)
• If you get alternative site blood sugar results that do
not agree with how you feel
• During illness or times of stress
• If you will be driving a car or operating machinery
Alternative Site results may be different from fingertip
results when glucose levels are changing rapidly (e.g.,
after a meal, after taking insulin, or during or after
exercise). Additionally, glucose levels may not rise as
high or fall as low as levels in the fingertip. As such,
fingertip results may identify hypoglycaemic levels
sooner than alternate site results.
Alternative Site Testing is recommended only when it
is more than 2 hours after a meal, diabetes medication
orexercise.
If you do not have a clear endcap to perform AST,
callBayer Diabetes Care Customer Service at
0860 102 672.
1. Wash your hands and
the puncture site with
soap and warm water.
Rinse and dry well.
2. Attach the clear
AST endcap to the
MICROLET
®
2 lancing
device.
3. Select a puncture site
from a fleshy area on
the palm. Avoid veins,
moles, bones and
tendons.
4. Press the clear
endcap firmly against
the puncture site and
then press the blue
release button.
Getting a Blood Drop for Alternative
Site Testing
5. Maintain steady
pressure until a small,
round blood drop
forms.
84721973_CntrPLUS_UG_EN_FpBp_v2.indd 14-1584721973_CntrPLUS_UG_EN_FpBp_v2.indd 14-15 1/22/13 9:41 AM1/22/13 9:41 AM

16
TESTING
17
TESTING
6. Lift the device straight
up and away from the
skin without smearing
the blood.
7. Test immediately after
you have formed a
small, round blood
drop.
Immediately touch the tip of the test strip to the drop
of blood. The blood is pulled into the test strip through
the tip.
Do not test the blood sample from palm if you get:
• Smeared blood
• Clotted blood
• Runny blood
• Clear fluid mixed with the blood
Getting a Blood Drop for Alternative Site
Testing
Getting a Blood Drop for Alternative Site
Testing
If the first blood drop is
not enough, the meter may
beep twice and display a
strip underfill screen image
.
You have about 30 seconds
to apply more blood onto
the same strip. If you are
not able to apply enough
blood within that time, an
error code will be displayed.
Dispose of the used test
strip as medical waste or as
advised by your health care
professional and start over
with a new strip.
Please see Expected Test Result Values on page 13.
8. Hold the tip of the test strip in the blood drop until
the meter beeps. Do not press the tip against the
skin or place the blood on top of the test strip or you
could get inaccurate results or errors.
84721973_CntrPLUS_UG_EN_FpBp_v2.indd 16-1784721973_CntrPLUS_UG_EN_FpBp_v2.indd 16-17 1/22/13 9:41 AM1/22/13 9:41 AM

18
TESTING
19
TESTING
a
b
Removing the Used Lancet
Removing the Used Lancet
Removing the Used Lancet
1. In one hand, hold the
lancing device with
your thumb on the grip
indent. With your other
hand, hold the grey
endcap dial as shown,
and gently snap off the
endcap.
2. Place the round
protective lancet cap
on a flat surface with
the Bayer logo facing
down.
3. With the used
lancet still in the
lancing device, push
the lancet needle
completely into the
middle of the cap.
WARNING: Potential Biohazard
• The lancing device, lancets and test strips are
for single patient use. Do not share them with
anyone including other family members! Do
not use on multiple patients.
5,6
• Always dispose of the used test strip and
lancet as medical waste or as advised by your
health care professional.
• Do not reuse lancets. Use a new
MICROLET
®
lancet each time you test.
4. While pressing the
release button (a), pull
the re-setting handle
(b), and the lancet will
drop into the container
you have selected.
84721973_CntrPLUS_UG_EN_FpBp_v2.indd 18-1984721973_CntrPLUS_UG_EN_FpBp_v2.indd 18-19 1/22/13 9:41 AM1/22/13 9:41 AM

20
TESTING
21
TESTING
Control Solution Testing
Control Solution Testing
Control Solution Testing
1. Remove a test strip from the bottle and firmly snap
the lid closed.
2. Hold the test strip with the
grey square end facing up.
3. Insert the grey square end
into the test strip port on
the meter until the meter
beeps.
4. This will turn the meter on.
An image of a test strip
with a flashing blood drop
will appear letting you
know the meter is ready
to test.
5. Rock the control solution bottle to mix it well.
6. Squeeze a small drop of control solution onto a
clean nonabsorbent surface. Do not apply control
solution to your fingertip or to the test strip
directly from the bottle.
Quality Control
You should perform a control test when:
• Using your meter for the first time.
• You open a new bottle or package of test strips.
• You think your meter may not be working right.
• You have repeated, unexpected blood glucose
results.
Normal, Low or High control solutions are available
and sold separately if not included in the meter kit.
Always use Bayer’s CONTOUR PLUS control solutions.
Other brands could present incorrect results. If you
need help locating Bayer’s CONTOUR PLUS control
solutions, call Bayer Diabetes Care Customer Service
at 0860 102 672.
CAUTION: Check the expiry date on
the test strip bottle and the expiry
date and discard date on the control
solution bottle. DO NOT use expired
materials.
CAUTION: Use only Bayer’s C
ONTOUR
®
PLUS
control solutions (Normal, Low and High)
with Bayer’s CONTOUR
®
PLUS blood glucose
monitoring system. Using any other control
solution or any other combination of control
solution and strips can cause inaccurate
results.
84721973_CntrPLUS_UG_EN_FpBp_v2.indd 20-2184721973_CntrPLUS_UG_EN_FpBp_v2.indd 20-21 1/22/13 9:41 AM1/22/13 9:41 AM

22
TESTING
23
TESTING
If your control test result is out of range, do not
use your meter for blood glucose testing until you
resolve the issue. See “What You Should Do” on
page 45.
IMPORTANT: To ensure accuracy of your blood
glucose test results and accuracy of your control
test results, use only CONTOUR
®
PLUS control
solutions.
9. The meter will count down
for 5 seconds and the
control test result will
display on the meter.
It will be automatically
marked as a control test
and stored in the Diary.
Control test results will not
be included in your blood
glucose averages or the
7day HI-LO summary.
NOTE: The
does not indicate the control test
result is within the specified range. It only marks it
as a control solution test. It will not be included in
your averages.
7. Immediately touch the
tip of the test strip to the
drop of control solution.
The solution is pulled
into the test strip through
the tip.
11. Remove the test strip
and dispose of it as
medical waste or as
advised by your health
care professional.
Control Solution Testing
Control Solution Testing
10. Compare your control test result
with the range printed on the test
strip bottle or the bottom of the test
strip box.
8. Hold it in the drop until the meter beeps.
84721973_CntrPLUS_UG_EN_FpBp_v2.indd 22-2384721973_CntrPLUS_UG_EN_FpBp_v2.indd 22-23 1/22/13 9:41 AM1/22/13 9:41 AM

24
SETUP AND USE
25
SETUP AND USE
Setting the Time, Date and Sound
Setting the Time, Date and Sound
Setting the Time, Date and Sound
Your CONTOUR
®
PLUS meter allows you to set the date,
time, and sound as you like them.
• You can view 12 or 24 hour time;
• month/day or day.month; and
• choose to have your meter beep or not.
To get into setup mode when the meter is off, press
and hold M for 3 seconds. A complete display will
briefly appear, then numbers will flash in the top left
corner of the display.
Setting the Time
With the 24H flashing on
the display, press ▲ or ▼ to
select the 12H (with AM and
PM) or 24H setting.
Press M to set.
The number in the hour
position will now flash. Press
▲ or ▼ until you reach the
current hour.
Press M to set.
The minute will now flash.
Press ▲ or ▼ to select the
current minute.
Press M to set.
If you selected a 12 hour
time setting, the AM or PM
will now flash. Press ▲ or ▼
to select AM or PM.
Press M to set.
Setting the Month and Day Format
d.m will now flash on the
display. Press ▲ or ▼ to
select the format you wish
(m/d for month/day format or
d.m for day.month format).
Press M to set.
Setting the Date
The year will be flashing.
Press ▲ or ▼ to select the
current year.
Press M to set.
The month will now flash.
Press ▲ or ▼ to select
the month.
Press M to set.
The day will now flash. Press
▲ or ▼ to select the day.
Press M to set.
84721973_CntrPLUS_UG_EN_FpBp_v2.indd 24-2584721973_CntrPLUS_UG_EN_FpBp_v2.indd 24-25 1/22/13 9:41 AM1/22/13 9:41 AM

26
SETUP AND USE
27
SETUP AND USE
Setup for Basic (L-1) and
Advanced (L-2) Modes
Setting the Time, Date and Sound
Setting the Sound
The flashing bell symbol will
now appear on the display
along with the word .
This option controls whether
you want to hear the beep
sound during testing.
To turn the beep sound off
during testing, press ▲ or ▼
to display
.
Press M to set.
After setting the sound,
will flash. To keep your meter
in Basic Mode, press M to
set. To change your meter
to Advanced Mode, press ▲
or ▼ to change to , and
press M to set.
If you are using Basic Mode
(L-1 will appear on your
display), you have completed
your meter setup.
Your new C
ONTOUR
®
PLUS meter is pre-set for the Basic
Mode and offers the same easy test procedure in either
the Basic or Advanced Mode.
Setup for Basic (L-1) and
Advanced (L-2) Modes
• 7 day HI and LO summary
• 14 day average
• 480 test result memory
• 7 day HI and LO summary
• 7, 14, and 30 day averages
• 480 test result memory
• Pre- and post-meal markers
• 30 day pre- and post-meal
averages
• Selectable post-meal
reminders 2,5; 2,0; 1,5;
1,0hours.
• Personal HI and LO test
settings
Your meter is pre-set to Basic
Mode. If you have set your
meter to the Advanced Mode,
and want to return to Basic
Mode:
1. Press M to turn your meter on.
Wait to see the flashing test
strip.
2. Press and hold ▲ or ▼ for
3 seconds.
3. L-2 will flash.
4. Press ▲ or ▼ to change
to L-1.
5. Press M to set.
To set your meter to
Advanced Mode, and take
advantage of meal markers
and other functions available
to you:
1. Press M to turn your meter on.
Wait to see the flashing test
strip.
2. Press and hold ▲ or ▼ for
3 seconds.
3. L-1 will flash.
4. Press ▲ or ▼ to change
to L-2.
5. Press M to set.
ADVANCED MODE (L-2)
BASIC MODE (L-1)
84721973_CntrPLUS_UG_EN_FpBp_v2.indd 26-2784721973_CntrPLUS_UG_EN_FpBp_v2.indd 26-27 1/22/13 9:41 AM1/22/13 9:41 AM

28
SETUP AND USE
29
SETUP AND USE
Personalising LO, HI and
Reminder Settings
Personalising LO, HI and
Reminder Settings
Personalising LO, HI and
Reminder Settings
To change the reminder
time for post-meal testing,
press ▲ or ▼ to display the
options available. Select 2,5;
2,0; 1,5 or 1,0 hour(s) to set
your post-meal reminder
(default is 2,0 hours). Press
M to set.
You have now completed
your C
ONTOUR
®
PLUS meter
setup for Advanced Mode!
If you selected Advanced
Mode (L-2 on your display)
you can change your meter’s
personal low and high
blood glucose settings. By
personalising these settings,
your CONTOUR
®
PLUS meter
will help you track these HI
and LO results.
Your HI blood glucose
setting will now flash
(default is 10,0 mmol/L). To
change, press ▲ or ▼ until
you reach your desired HI
setting. Press M to set. (The
range of values for HI is
5,6 - 13,9 mmol/L.)
The LO setting will flash
(default is 4,0 mmol/L). To
change this setting, press
▲ or ▼ until you reach your
desired LO setting, and
then press M to set. (The
range of values for LO is
3,3 - 5,0 mmol/L.)
Post-Meal Test Reminder Setup
84721973_CntrPLUS_UG_EN_FpBp_v2.indd 28-2984721973_CntrPLUS_UG_EN_FpBp_v2.indd 28-29 1/22/13 9:41 AM1/22/13 9:41 AM

30
SETUP AND USE
31
SETUP AND USE
Using Marker and Reminder Features
Using Marker and Reminder Features
If you want to mark the test result
Before you remove your test strip, press ▲ or ▼ to
select the marker you want to set. The marker will flash.
To mark a result with the
pre-meal marker, press M
when the
flashes.
The will then flash. This
feature allows you to set a
reminder to remind you to
run a post-meal test.
The reminder is available
only after setting a pre-meal
marker.
If you want to set the
reminder, press M. The
will appear and stop
flashing.
If you do not want to set the
reminder, press ▲ or ▼ and
the will disappear. Press
M to set.
Using the Markers
If you have set up your
meter in Advanced Mode,
your meter will display
three markers after you
test your blood.
Pre-meal = Marks a
test result that was taken
before a meal.
Post-meal = Marks a
test result that was taken
after a meal.
Diary = The diary marker can be used to mark
any result as being unique or different in some way,
and for which you may want to make notes in your
diary. Seeing a result with this symbol next to it in
the memory will help remind you that there is more
information recorded about this test result.
Please see the following to use these options.
If you do not want to mark the test result
Remove the used test strip to automatically save the
test result in the meter memory with no markers. This
will also turn the meter off.
To mark a result with the post-meal marker, press ▲ or
▼ until the
flashes. Press M to set.
To mark a result with the diary, press ▲ or ▼ until the
flashes. Press M to set.
84721973_CntrPLUS_UG_EN_FpBp_v2.indd 30-3184721973_CntrPLUS_UG_EN_FpBp_v2.indd 30-31 1/22/13 9:41 AM1/22/13 9:41 AM

32
SETUP AND USE
33
SETUP AND USE
Using Marker and Reminder Features
Using Marker and Reminder Features
To Cancel a Reminder
When the reminder sounds,
the meter will automatically
turn on. The reminder will
beep 20 times, and the
display will show the pre-
meal test result you marked
when you set the reminder.
Pressing any button will
silence the reminder.
You can now run another test by placing a test strip in
the test strip port and following the testing instructions
(page 6).
When you have completed
this test and the result is
shown on the display,
will
flash. To mark this test as a
post-meal result, press M.
If you do not want to mark
this test, remove the test
strip to turn the meter off.
Dispose of the used test
strip as medical waste or as
advised by your health care
professional.
When the meter is off, press
M to turn on the meter. The
date and time will appear
along with the
.
Press ▲ or ▼ twice and the
reminder icon will disappear.
Press M to cancel the
reminder.
Using the Reminder Feature
If you decide not to test after the reminder sounds,
press any button to turn your meter off.
The meter will only set one reminder at a time. It will
remember the last reminder set.
NOTE: If sound is turned off, the Reminder sound
will not beep.
84721973_CntrPLUS_UG_EN_FpBp_v2.indd 32-3384721973_CntrPLUS_UG_EN_FpBp_v2.indd 32-33 1/22/13 9:41 AM1/22/13 9:41 AM
/


![LivongoBlood Glucose Monitoring System [PL00497]](http://vs1.manuzoid.com/store/data/001794217_2-3e764f07ad29ea86e9aa74e34fbfeb35-160x210.png)