Page is loading ...

Rimuovere il co-
perchio del
sensore e toglie-
re il circuito
stampato (vedi
punti 1 e 2 del
capitolo “instal-
lazione senza
snodo”)
1
dado
rondella
bloccasnodo corpo dello
snodo
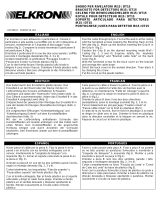
COMPOSIZIONE SNODO
2
Sfondare con un cacciavite, nei
punti indicati, la predisposizione
per il passaggio dello snodo
Inserire il perno
nelle guide dello snodo
come da figura
perno
4Inserire il micro
antisportazione
(opzionale) come
descritto in figura e
far passare i 2 cavi
nel perno dello sno-
do
Inserire il cavo di collega-
mento nello snodo facen-
dolo passare nel perno:
farlo uscire per circa 5 cm.
5
Inserire lo snodo nel sensore
con la base rivolta in modo
tale da permettere (a secon-
da delle esigenze) il fissaggio
a soffitto oppure a parete
(come da figura)
6
a soffitto a parete
7
Inserire la rondella
blocca snodo nel
perno (con la parte
zigrinata rivolta ver-
so il perno) facen-
dola passare attra-
verso il cavo
8
Avvitare il dado sul per-
no senza stringerlo.
Scegliere l’inclinazione
desiderata per il
sensore quindi fissarlo
allo snodo stringendo il
dado
3
INSTALLAZIONE CON SNODO
IS3050-AA
Déposer le
couvercle du
détecteur et ôter
le circuit
imprimé (voir
point 1 et 2 du
chapitre
“installation
sans rotule”)
12
Percer à l’aide d’un tournevis, aux
points indiqués, la préperçage
pour le passage de la rotule
Introduire le goujon dans les
glissières de la rotule tel
qu’illustré par la figure
456
f. au
plafond
78
3
INSTALLATION AVEC ROTULE
écrou
rondelle
arrêt-rotule corps de la
rotule
DESCRIPTION DE LA ROTULE
goujon
Introduire le micro
anti-extraction (en
option) tel que décrit
à la figure et faire
passer les 2 câbles
dans le goujon de la
rotule
Introduire le câble de
raccordement dans la
rotule en le faisant passer
dans le goujon: le faire
sortir d’environ 5 cm.
Introduire la rotule dans le
détecteur en orientant
l’embase de façon à permettre
(selon les exigences) la fixation
au plafond ou encore la fixation
murale (tel qu’illustré à la figu-
re)
f. murale
Introduire la rondelle de
blocage de la rotule
dans le goujon (avec la
partie moletée vers le
goujon) en la faisant
passer à travers le câble
Après avoir choisi la
position désirée, fixer
la rotule au détecteur
en vissant l’écrou sur
le goujon
DS80SP59-001 LBT80169 IS3050-AA

Remove sensor
cover and take
out printed
circuit (see
steps 1 and 2 in
section
“installation
without ball-
jointl”)
1 BALL-JOINT COMPOSITION
2
Using a screwdriver, force ball-joint
passage open, where indicated.
Insert pin in ball-joint
guides as shown
in figure
4Insert anti-tamper
microchip (optional)
as shown in figure
and pass the 2 cables
in the ball-joint pin
Insert connection cable in
ball-joint and pass it
through the pin: pull out
cable for about 5 cm (2
inch).
5
Place ball-joint on sensor with
base positioned in order to
allow ceiling or wall mounting,
according to needs (see figu-
re)
6
CEILING WALL
7
Place ball-joint-
locking washer on
pin (with knurled
part facing the pin)
and pass it through
the cable
8
Select position wanted
and screw nut on pin to
secure ball-joint on
sensor.
3
INSTALLATION WITH BALL JOINT
Nut
ball-joint
locking washer ball-joint
body pin
/