Page is loading ...

JK WINCH / D-RING MOUNTING SYSTEM
Thank you for choosing Rough Country Off road Products
Please read instructions before beginning installation. Check the kit hardware against the parts list and product layout.
Be sure you have all needed parts and know where they go. Also please review tools needed list and make sure you
have needed tools.
If questions exist we will be happy to answer any questions concerning the design, function, and correct use of this prod-
uct.
The installer must verify that the mounting kit does not interfere with the factory air bag sensors, which must not be relo-
cated or modified in any way. The vehicles air bag system may not operate properly if the winch mounting kit is not
mounted in compliance with the vehicle manufacturers recommendations.
Winch mounting should only be performed on vehicles with standard OEM bumpers.
Please note the tightening sequence on the last page. This sequence must be followed to ensure proper fit of
winch plate and winch plate brackets.
Note: If the vehicle is equipped with factory bumper shims, these will not be reused.
INSTALLATION INSTRUCTIONS
1. Place vehicle on a flat surface and set emergency brake.
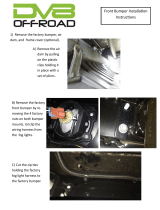
2. Using a small phillips screwdriver, remove the 2 plastic screws on top of the front bumper cover. Retain Stock hard-
ware. See Photo 1.
3. Remove the 4 plastic screws holding the skid plate to the front bumper, using a small Phillips screw driver Retain
stock hardware. See Photo 2.
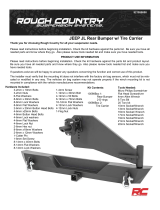
Kit Contents
1– Mounting Plate
2– Front Mounting Brackets
1– Driver Side Mounting Brk
1– Pass Side Mounting Brk
1-Dr side d-ring bracket
1-Pass side d-ring bracket
2-D-rings
Tools Needed
Phillips screw driver
13/16” Socket
7/8” Wrench
9/16” Socket
19mm Socket
18mm Socket
15mm Socket
1/2” Drill Bit
Drill
Cutting Tool
Thread Locker
92117300
Torque Specs
Size Grade 5 Grade 8
5/16” 15 ft/lbs 20 ft/lbs
3/8” 30 ft/lbs 35 ft/lbs
7/16” 45 ft/lbs 60 ft/lbs
1/2” 65 ft/lbs 90 ft/lbs
9/16” 95 ft/lbs 130 ft/lbs
5/8” 135 ft/lbs 175 ft/lbs
3/4” 185 ft/lbs 280 ft/lbs
Photo 1 Photo 2
1- 1162Bag
4– 9/16”x1 1/2” Bolts
6– 9/16” Flat Washers
2– 9/16” Lock Washers
2– 9/16” Lock Nuts
8– 12mm-1.75 Nuts
4– 3/8” x 1 1/2” bolts
4– 3/8” Lock Washers
4– 3/8” Flat Washers

4. Using a 18mm socket, remove the 4 bolts holding the bumper to the frame horn on the driver and passenger side.
See Photo 3.
5. Locate the plug for the fog lights and unplug. Remove bumper. See Photo 4.
Photo 3 Photo 4
6. Using a 15mm socket, remove the nuts holding the impact bar to the front bumper cover. Retain stock hardware.
Separate the impact bar from the bumper cover. See Photo 5.
7. Remove the stock toe hook brackets if equipped. Place the front brackets shown in Photo 6 into the factory frame
horn to check for proper fit. Due to differences in the manufacturing inconsistencies enlarging the holes in the frame
horn may be needed. Enlarge the hole by using a rotary tool, or round file.
8. Place the 2 front bumper brackets into the bumper cover as shown in Photo 6.
9. Find the driver side winch plate bracket. Install the bracket, using the 9/16” x 1.5” bolt, flat washer, and nut. Hand
tighten at this time. Repeat on the passengers side. See Photo 7 & 8.
Photo 5 Photo 6
Photo 7 Photo 8

Photo 12
13. Reinstall bumper, using the studs from the new bumper bracket, and supplied 12mm-1.75 nuts. Tighten using a
19mm socket.
14. Using a 7/8” wrench and 13/16” socket tighten the bolts on the driver and passenger side winch plate bracket from
step 9.
15. Plug the fog light harness back up, that was unplugged in step 5.
16. Reinstall the skid plate using factory hardware.
17. Bolt your winch onto the new winch plate at this time.
18. Before placing the winch plate on the bumper we recommend that you cover the bottom of the grill to keep the plate
from scratching the paint while installing the winch plate to the bumper. See Photo 11
19. Set the winch and winch plate & D-ring Mount on top of the bumper and align the holes. Apply thread locker to the
supplied 3/8”x 1 1/2” bolts washers and lock washers and install. Tighten using a 9/16” socket. Using the 9/16” x1
1/2” bolts, lock washers and flat washers provided, tighten using a 13/16” socket. See Photo 12.
Photo 11
10. If your vehicle does not have tow hook cutouts in the top of the bumper it is necessary to cut access holes in the top
of the bumper. Place the plastic portion of the bumper on a flat working surface. Using a 1/4” drill bit and drill motor,
drill the corners of the formed area as shown in Photo 9.
11. After drilling the corners of the tow hook area, use a utility knife, or ther cutting device to cut the plastic between the
drilled holes as shown in Photo 10.
12. Place the impact bar on the front bumper cover, using the stock hardware. Tighten using a 15mm socket.
Photo 9 Photo 10
20. Install the d-rings on the d-ring mount as shown in Photo 13.
Photo 13

Maintenance Information
1. Failure to securely tighten all bolts on the winch plate, winch, and fairlead can result in product failure, which mat
result in vehicle damage or operator injury. Check that all bolts are securely tightened prior to use.
2. Inspect all nuts and bolts on the winch, winch mount, and related hardware prior to each use. Tighten all nuts that
appear to be loose. Stripped, fractured, or bent bolts or nuts should be replaced.
TIGHTENING SEQUENCE
1. The following sequence must be followed when tightening all the fasteners to ensure proper fit.
2. The sequence is as follows:
• 3/8” rear winch plate bolts using 9/16” socket
• 9/16” front winch plate bolts using 13/16” socket
• Stock front bumper cover bolts using 15mm socket
• Front “Horseshoe” bumper bracket 12mmnuts
• Rear 9/16” winch plate bracket lower bolts using 13/16” socket / wrench
/