Page is loading ...

06-252 S.R. SMITH, LLC 2006 OCT 14
AS-100P ANCHOR
INSTALLATION INSTRUCTIONS
SRS Australia PTY LTD
12 Enterprise St
Richlands QLD 4077
Australia
Phone 07 3812 2283 Fax 07 3812 1187
Info-au@srsmith.com
www.srsmith.com/au
S.R. SMITH, LLC
CORPORATE HEADQUARTERS
P.O. Box 400 • 1017 S.W. Berg Parkway
Canby, Oregon 97013
USA
Phone (503) 266 2231 • Fax (503) 266 4334
www.srsmith.com

2
Introduction
The AS-100P 48mm/1.90in OD x 15.25cm/6in deep universal anchor system can be used for
any of S.R. Smith’s products that require a 48mm/1.9in diameter anchor. A 5cm/2in spacer is
included for products that only require a 10cm/4in deep anchor socket.
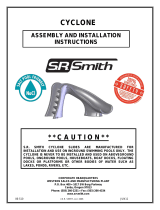
Part List
Item No.
Description
1
Anchor Body
2
Anchor Cap
3
5cm/2in Anchor Spacer
New Construction
Locate the anchor in the correct position on the deck according to the installation instructions for
the product that will be used in the anchor sockets. Cover the hole in the bottom of the anchor
with masking tape. Affix the anchor in place so that it will not move while the concrete is being
poured. Follow the manufacturer’s instructions for mixing the concrete and fill in the area
around the anchor completely. Make sure the top edge of the anchor is flush with the concrete
surface. Check that the anchor is level/plumb and allow the cement/epoxy to cure before
installing the product post in the anchor.
Retrofit Instructions
Tools Needed (not included)
Concrete core drill with 13cm/5in diameter
cutter
Hydraulic cement or anchoring epoxy
Pry bar
Sledge hammer
Phillips head screwdriver
Masking tape
Bonding wire (if required)
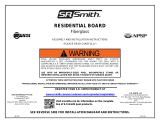
Installation Step 1
Determine the location for the anchor in the concrete. Mark and drill a minimum 13cm/5in
diameter hole at least 18cm/6.5in deep. Use a pry bar or sledge hammer to break the core free
from the base of the hole. Clean any debris from inside the hole, check the depth, and make
sure the anchor fits. See Figure 2
Figure 1 AS-100P Anchor
Figure 2

3
If the concrete thickness is less than the required depth of the hole, proceed to Step 2.
Otherwise, go to Step 3.
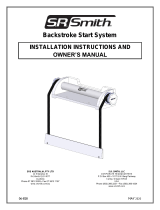
Installation Step 2
If the depth of the concrete is less than the depth of the hole required for installation, remove
base/fill material below the concrete (18cm/7in total depth recommended) sufficient to fit the
anchor. Make the diameter of the hole below the concrete slightly larger than the concrete core
hole. See Figure 3.
CONCRETE
BASE/FILL
MATERIAL
Installation Step 3
Electrically bond the anchor as required by the National Safety Code of Practice or greater
local code by attaching a bonding wire from the bonding grid to the bonding screw on the
anchor body.
Installation Step 4
Cover the hole in the bottom of the anchor with masking tape. Follow the manufacturer’s
instructions for mixing the hydraulic cement or anchoring epoxy and fill in the area around the
anchor completely. Make sure the top edge of the anchor is flush with the concrete surface.
Check that the anchor is level/plumb and allow the cement/epoxy to cure before installing the
product post in the anchor.
Figure 3
/