Page is loading ...

SINGLE POST
BASKETBALL GAME
CORPORATE HEADQUATERS
WESTERN SALES AND MANUFACTURING PLANT
P.O. Box 400 • 1017 SW Berg Parkway
Canby, Oregon 97013
(503) 266-2231 • (503) 266-4334
www.srsmith.com
06-447©S.R. SMITH, LLC 2005
ASSEMBLY AND
INSTALLATION
INSTRUCTIONS

2
INTRODUCTION
The Single Post Basketball Game is designed for use on in-ground pools in shallow water depth areas.
Proper and complete assembly, use and supervision is essential for proper operation and to reduce the risk
of accident or injury.
**IMPORTANT**
Check entire boxes and inside all packing materials for parts. Before beginning
assembly, read the instructions and identify parts using the figures and parts listed in
this document. It is critical that all parts be carefully inspected by the installer prior to
installation to ensure that no damage occurred in transit and that a damaged part is
not used. Proper installation cannot be overstressed, as an improper installation voids
S.R. Smith’s warranty and may affect the safety of the user.
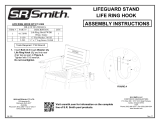
Figure 1

3
SINGLE POST BASKETBALL PARTS LIST
ASSEMBLY INSTRUCTIONS
1. Begin by locating the frame assembly and the
horizontal support tube as shown in FIGURE 1. Attach
the horizontal support tube to the frame assembly with
the stainless steel split tees and hardware as shown in
FIGURE 2
2. Align the two holes in the top of the backboard
with the holes in the horizontal support tube as
shown in FIGURE 3. Insert the 5/16” x 4” cairrage
bolts into each hole in the backboard and through
the horizontal support tube. Thread a hex nut onto
the end of the carriage bolt that passes through the
backside of the horizontal support tube. Do not
tighten the hex nuts all the way down at this point.
ITEM #
PART #
DESCRIPTION
QTY.
1
20-185
Frame Assembly
1 ea.
2
7-182
Horizontal Support Tube
1 ea.
3
2019061
Split “T” Half
2 ea.
4
2020049
3/8”-16 x 2 1/2" S/S Carriage Bolt
2 ea.
5
5-139
3/8”-16 Hex Nut S/S
2 ea.
6
5-656
5/16”-18 x 2” Hex Head Flange Bolt S/S
4 ea.
7
5-662
7/16” x 1” Flat Washer S/S
8 ea.
8
SPG-104A
Basketball Rim, Backboard (and Net Not Shown)
1 ea.
9
05-658
5/16”-18 Hex Flange Nut S/S
4 ea.
10
5-310
5/16”-18 x 4” Carriage Bolt S/S
2 ea.
11
2022650
5/16”-18 Hex Nut S/S
2 ea.
12
5-233
MASONRY ANCHOR, ¼” x 1 ¾ “ SLTD HH FLNG HD S/S
1 ea.
13
05-14-111
1/4 X 5/8 FLAT WASHER S/S
1 ea.
14
AS-100D / 100P
Anchor Socket, 1.90” Diameter x 6” Deep
(Either the Plastic Or Bronze anchor are used for this assembly)
1 ea.
15
8-104
PLASTIC RAIL END PLUG
2 ea.
FIGURE 2
FIGURE 3

4
3. To install the rim to the backboard; align the four holes on the rim
mounting plate with the holes in the backboard as shown in
FIGURE 4. Insert the 5/16” x 2 1/2" bolts through the rim mounting
plate, backboard and frame mounting plate. Be sure that there are
washers between the bolt heads and the rim mounting plate. Place
washers onto the ends of the bolts that pass through the frame
mounting plate. Thread the hex flange nuts onto the ends of the bolts.
4. Now that all of the bolts and nuts are in place, go through and fully
tighten all hardware components in the assembly.
5. The Single Post Basketball units are to be anchored to
the deck using a 6-inch deep AS-100D anchor socket or the
AS-100P plastic anchor socket, with tightening bolt. Install
the anchor in the pool deck 12 inches back from the pool’s
edge as shown in FIGURE 5. Properly bond the anchor
socket using the attached bonding screw and the
appropriate bonding wire per local codes. Allow concrete to
cure before installing Single Post Basketball Unit.
6. Each anchor socket has a removable cap, which needs to be removed before inserting the
assembly. The cap can be removed by inserting a small flat blade screwdriver into the groove between
the anchor socket and the cap and prying up after loosening the Phillips head screw in the center of the
cap. Place the basketball assembly into the anchor socket installed in the pool deck. For the AS-100P’s
use a 1/2” wrench to tighten post into place. Read pages 5 and 6 for more details to install tab.
NOTE: When removing the basketball assembly from the anchors make sure to place the caps in the
anchors.
SAFETY INSTRUCTIONS
• This equipment is intended for use in shallow water depth areas.
• During play, do not wear jewelry (rings, watches, necklaces, etc.)
Objects may entangle in net.
• Do not dive or jump from any part of unit, including backboard support
braces or rim.
• Periodically inspect the rim, backboard and posts to assure there are
no worn parts and that all hardware is properly tightened.
FIGURE 5
FIGURE 4

5
Positioning Tab Installation
To install the positioning tab for your Single-post Basketball it is important to
follow these three easy steps.
1. Using the single post vertical tube, place it in
the anchor and rotate the tube to be
perpendicular to the pool where the desired play
area will be. Mark the hole through the rear
tab of the basketball game on the concrete.
Figure 6
2. Remove the post and use a 3/16” Masonry bit
in a rotary drill and drill about 2 inches straight
down. Figure 7
3. Use a 5/16” Hex socket, screw the
concrete screw (5-233) into the concrete through
the 1/4” flat washer and vertical post tab. Figure 8
**Do Not Over Tighten the Concrete Screw**
FIGURE 7
FIGURE 6
FIGURE 8

6
Positioning Tab Use with AS-100P Anchor
1. Insert the Single post basketball vertical
support into the AS-100P anchor and have
the tab rotated to the side.
2. Tighten the AS-100P wedge to the point that
rotating the pole is difficult.
3. Position the vertical supports tab over the cavity
of the AS-100P’s bolt and press it into
position so the tab fits the cavity.
Note: The concrete anchor screw (5-233) is not needed
for this anchor unless the anchor was not mounted with
the tab cavity perpendicular to the pool edge.
FIGURE 9

7
VOLLEYBALL/BASKETBALL COMBINATION INSTALLATION
1) The Volleyball/Basketball game combination requires the installation of two AS-100P anchor
sockets into the pool deck. Install the anchors in the pool deck at a location where the game will be
played in shallow water depths. Figure 10 shows the layout for positioning the anchor sockets.
Bond anchors as required.
2) Install the eyebolts into the basketball frame and the volleyball post assembly as shown in Figure
11.
D1
D2
D3
12 in. Min
12 in. Min
20 ft. 10 in. Max
ITEM #
PART #
DESCRIPTION
QTY.
1
5-332
3/8-16 x 3 7/8 Stainless Steel Eyebolt
4 ea.
2
5-141
3/8-16 Lock Nut
4 ea.
3
05-608
Nut Cap-Black Rubber
4 ea.
4
20-109
Volleyball Post Assembly
1 ea.
FIGURE 10
FIGURE 11

8
3) Insert the assembled volleyball post and basketball frame into the anchor sockets. To switch
between using the volleyball game and the basketball game you must rotate the basketball frame
180 degrees. For volleyball, the eyebolts on the back of the basketball frame need to be facing the
pool; this position is shown in Figure 6. The procedure for rotating the basketball frame is: 1)
Loosen the setscrews in the expandable collar 2) Rotate the frame to the desired position 3)
Retighten the setscrew in the expandable collar.
4) The volleyball net attaches to the eyebolts in the volleyball post and the basketball frame. When
the volleyball net is in use, be sure that any loose rope from the volleyball net is properly secured
so as to not provide a hazard.
5) Be sure that caps are placed in the anchors when the volleyball post or the basketball frame is
removed.
/