Page is loading ...

Z750R
Z750R ABS
Motorcycle
Assembly & Preparation
Manual


Foreword
In order to ship Kawasaki vehicles as effi-
ciently as possible, they are partially disassem-
bled before crating. Since some of the most
commonly removed parts have a direct bear-
ing on a vehicle’s reliability and safety, consci-
entious pre-sale assembly and preparation be-
comes extremely important. Good setup pro-
cedures can prevent needless warranty claims
and give customers a greater sense of c onfi-
dence in Kawasaki and their Kawasaki Dealers.
This Assembly and Preparation Manual ex-
plains step by step procedures of the following
items for all Kawasaki Z750R and Z750R ABS.
1. Uncrating
2. Assembly
3. Preparation
The selling dealer assumes sole responsibil-
ity for any unauthorized modifications prior to
sale. Refer to your Service Binder for any Ser-
vice Bulletins specifying Factory Directed Mod-
ifications (Special Claims) which must be per-
formed before the vehicle is ready for sale.
Whenever you see the following symbols
heed their instructions! Always follow safe
operating and maintenance practices.
DANGER
DANGER indicates a hazardous situa-
tion which, if not avoided, will result in
death or serious injury.
WARNING
WARNING indicates a hazardous situa-
tion which, if not avoided, could result
in death or serious injury.
CAUTION
CAUTION indicates a hazardous situa-
tion which, if not avoided, could result
in minor or moderate injury.
NOTICE
NOTICE is used to address practices not
related to personal injury.
NOTE
○This note symbol indicates points of particular
interest for m ore efficient and convenient op-
eration.
Kawasaki Heavy Industries, Ltd. accepts no
liability for any inaccuracies or omissions in this
publication, although every possible m easure
has been taken to make it as complete and ac-
curate as possible. All procedures and specifi-
cations subject to change without notice.
© 2010 Kawasaki Heavy Industries, Ltd. Sep., 2010

Table of Contents
Un
crating ......................................................................................
3
Opening Crate ............................................................................. 3
Parts C heck ................................................................................. 5
As
sembly ......................................................................................
5
Handlebar.................................................................................... 5
Handlebar Weight........................................................................ 6
C
lutch Cable................................................................................
6
Rear View Mirrors (Left and Right) .............................................. 7
Seat Under Cover........................................................................ 7
P
reparation ...................................................................................
8
Battery Service ............................................................................ 8
Coolant ........................................................................................ 12
Front Brake Fluid ......................................................................... 15
Rear Brake Fluid ......................................................................... 17
Brake Disc Cleaning.................................................................... 18
Clutch Lever and Cable............................................................... 18
Drive Chain.................................................................................. 19
Front Fork.................................................................................... 21
Rear Shock Absorber .................................................................. 22
Tire Air Pressures........................................................................ 22
Fuel ............................................................................................. 22
Engine Oil (4-stroke) ................................................................... 23
Throttle Grip and Cable ............................................................... 24
Rear Brake Light Switch.............................................................. 24
Idle Speed Adjustment ................................................................ 25
Headlight Aim .............................................................................. 25
Digital Meter ................................................................................ 25
Fastener Check ........................................................................... 28
Standard Torque Table ................................................................ 30
Test Ride the Motorcycle ............................................................. 30
A & P Check List ......................................................................... 30

UNCRATI
NG 3
Uncrating
Opening Crate
WARNING
Crates
have sharp edges and may have
nails or screws that can cause cuts and
injury. Always wear protective gloves,
boots
and eye protection when uncrat-
ing to prevent injury.
WARNING
The
steel crate panel plates and fasten-
ers have sharp edges. Always wear pro-
tective gloves, boo ts and eye protection
wh
en uncrating to prevent injury.
•
Clear a space about 6 m (20 ft) square to give
yourself plenty of space to work.
•
Place the crate upright on its base.
•
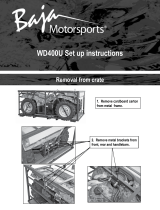
Remove the cardboard cover.
•
Remove the parts box.
NOTICE
When removing the crate bracket from
the motorcycle, be careful not to drop
any parts or the bracket onto the fuel
tank and other components, and not to
scratch the fuel tank or other compo-
nents with the crate bracket.
•
First, remove the lower bolts (D = 12, L = 16)
(2) at the handlebar holder and discard them.
•
Remove the upper bolts (D = 8, L = 12) (2) to
take off the crate bracket and discard them.
A. Upper Bolts (D = 8, L = 12)
B. C
rate Bracket
C. Lower Bolts (D = 12, L = 16)
•
Take out all the bolts and screws and remove
the top and sides of the crate.
NOTE
○Remove the dummy bolts after rolling the ve-
hicle off the crate base.
•
Lift the vehicle upward about 10 cm (4 in.)
and remove the left and right lower support
brackets. Roll the vehicle off the crate base.
A. Lower Support Bracket (Left)
•
Remove a rubber band from the clutch lever
end and discard it.
•
Remove a rubber band and the protective
cover from the clutch cable and discard it.

4 UNCRAT
ING
A. Rubber Band
B. Protective Cover

ASSEMBL
Y5
Parts Check
•
Open the parts box, and check the parts against the illustrations. There may be minor differences
between these illustrations and the actual vehicle parts. In the following charts under Remarks, D
= diameter in millimeters, and L = length in millimeters.
No. Part Name Qty Remarks
1 Weight, Handlebar 1
Weight Screw, Handlebar 1 D = 8, L = 45
Handelebar Clamp Bolt, Socket 2 D = 8, L = 30
Pla
stic Plug, Clamp Bolt
4 D=14.5
2
Rear View Mirror, LH & RH
2
Wiring Clamp, Plastic 1
3 Cover, Seat Under 1
4 Battery Electrolyte, YTX9-BS 1 12 V 8 Ah
5 Owner’s Manual 1
Assembly
Handlebar
Handlebar Installation
•
Remove the dummy bolts (2) from the han-
dlebar clamp and discard them.
A. Dummy Bolts
B. Top Handlebar Clamp
•
Check the handlebar position so that its
punched mark is aligned with the upper rear
edge of the lower handlebar clamp and install
the handlebar clamp bolts (D = 8, L = 30) (2)
at the front.
•
If the handlebar position is not correctly
aligned, set the handlebar to the correct po-
sition.

6 ASSEMB
LY
A.
Top Handlebar Clamp
B.
Handlebar Clamp Bolts (D = 8, L = 30)
C.Punched Mark
D.No Gap
E. Gap
Handlebar Clamp Bolt Tightening
•
Tighten the front handlebar clamp bolts first,
and then the rear handlebar clamp bolts to the
specified torque. There will be a gap at the
rear part of the clamp after tightening.
Torque: 25 N·m (2.5 kgf·m, 18 ft·lb)
•
Push the plastic plugs (4) into the handlebar
clamp bolts.
A. Plastic Plugs
B. Top Handlebar Clamp
Handlebar Weight
•
Install the handlebar weight on the right end
of the handlebar with the screw (D = 8, L =
45) with the non-permanent locking agent and
tighten it.
A. Handlebar Weight (Right)
B. Screw (D = 8, L = 45)
Clutch Cable
•
Apply a light coat of grease on the clutch inner
cable.
•
Line up the slots on the clutch lever and ad-
juster.
•
Fit the tip of the clutch inner cable into the
lever socket, slide the inner cable through the
slots, and release the outer cable into the ad-
juster.
A. Clutch Cable
B. Adjuster
C. Cable Tip
D. Clutch Lever
•
Make sure the clutch cable and the left switch
housing harness are routed in the clamp
(steel) as shown.

ASSEMBL
Y7
A.
Clutch Cable
B.
Left Switch Housing Harness
C. Cable/Wiring Clamp (Steel)
•
Fasten the clutch cable and switch housing
harness with the wiring clamp (plastic) from
the rear of the vehicle.
A. Wiring Clamp (Plastic)
B. Clutch Cable
C. Left Switch Housing Harness
Rear View Mirrors (Left and Right)
•
Slide up the rubber boot.
•
Screw the mounting area of the right rear view
mirror into the holder all the way, and tighten
the lower hexagonal area securely.
•
Tighten the lower and upper hexagonal area
to the specified torque.
Lower Hexagonal Area Torque:
30 N·m (3.1 kgf·m, 22 ft·lb)
Upper Hexagonal Area Torque:
18 N·m (1.8 kgf·m, 13 ft·lb)
A. Lower Hexagonal Area for Tightening
B. Upper Hexagonal Area (Adapter)
C. Rubber Boot
•
Reinstall the rubber boot.
•
Turn the stay to assure visibility to the rear
with the operator sitting on the motorcycle.
•
Adjust the rear view mirror by slightly moving
only the mirror portion of the assembly.
A. Stay
B. Mirror
•
Installation and adjustment of the left side mir-
ror is common with the right side. Follow the
procedure specified for the right side.
Seat Under Cover
•
Install the seat under cover (see the “Coolant”
section in the PREPARATION chapter).
NOTE
○It is recommended that the seat under cover
should be installed after completing the steps
in the “Coolant” section in the PREPARATION
chapter.

8PREPAR
ATION
Preparation
Battery Service
Battery Removal
The battery used in this motorcycle is a sealed
type and never needs to be refilled. Follow the
procedure for activating a new battery to ensure
the best possible battery performance.
•
Insert the ignition key into the seat lock lo-
cated under the left seat cover (rear fairing).
A. Seat Lock
B. Ignition Key
•
Turn the key clockwise while pulling up the
passenger’s seat.
A. Passenger’s Seat
B. Pull up
C. Turn the Key
•
Pull the rider’s seat lock cable ring, and then
remove the rider’s seat by pulling the rear of
it up and backward.
A. Rider’s Seat
B. Seat Lock Cable Ring
•
Remove the seat under cover mounting bolts
(D = 6 , L = 18) (2).
•
Remove the seat bracket mounting bolts (D =
6, L = 14) (4), then move the seat bracket.
A. Seat Under Cover Mounting Bolts (D =
6, L = 18)
B. Seat Bracket Mounting Bolts (D = 6, L
= 14)
C. Seat Bracket
•
Push the stopper and pull the fuse box from
the seat bracket.
•
Take the battery out of the battery case.

PREPARA
TION 9
A.
Stopper
B. Fuse Box
C.
Pull
D. Battery
•
Clean the terminals.
Battery Activation
Electrolyte Filling
•
Make sure that the model name of the elec-
trolyte container matches the model name of
the battery. These names must be the same.
Battery Model Name
ZR750NBF/PBF: YTX9-BS
A.
Model Name of the Electrolyte
B.
Model Name of the Battery
Battery Specifications
Make GS Yuasa
Battery Type YTX9-BS
Battery Capacity
12 V 8 Ah
Electrolyte Capacity 0.40 L
Battery/Electrolyte Set P/No. 26012-0088
NOTICE
Do not remove the aluminum sealing
sheet from the filler ports until just prior
to use. Be sure to use the dedicated
electrolyte container for correct elec-
trolyte volume.
•
Place the battery on a level surface.
•
Chec
k to see that the sealing sheet has no
peeling, tears, or holes in it.
•
Remove the sealing sheet.
NOTE
○The battery is vacuum sealed. If the sealing
sheet has leaked air into the battery, it may
require a longer initial charge.
A. Sealing Sheet
B. Filler Ports
•
Remove the electrolyte container from the
vinyl bag.
•
Detach the strip of caps from the container
and set aside, these will be used later to seal
the battery.
NOTE
○Do not pierce or otherwise open the sealed
cells of the electrolyte container. Do not at-
tempt to separate individual cells.

10 PREPA
RATION
A. Strip of Caps
B. Sealed Cells
•
Place the electrolyte container upside down
with the six sealed cells into the filler ports
of the battery. Hold the container level, push
down to break the seals of all six cells. You
will see air bubbles rising into each cell as the
ports fill.
NOTE
○Do not tilt the electrolyte container.
•
Check the electrolyte flow.
•
If no air bubbles are coming up from the filler
ports, or if the container cells have not emp-
tied completely, tap the container a few times.
NOTE
○Be careful not to have the battery fall down.
A. Air Bubbles
B. Ta
p the Container
•
Keep the container in place. Don’t remove
the container from the battery, the battery re-
quires all the electrolyte from the container for
proper operation.
NOTICE
Removal of the container before it is
completely empty can shorten the ser-
vice life of the battery.
•
After filling, let the battery sit for 20 ∼ 60
minutes with the electrolyte container kept in
place, which is required for the electrolyte to
fully permeate into the plates.
•
Make sure that the c ontainer cells have emp-
tied completely, and remove the container
from the battery.
•
Place the strip of c aps loosely over the filler
ports, press down firmly with both hands to
seat the s trip of caps into the battery (don’t
pound or hammer). When properly installed,
the strip of caps will be level with the top of
the battery.
A. Strip of Caps

PREPARA
TION 11
NOTICE
Once the strip of caps is installed onto
the battery, never remove the caps, nor
add water or electrolyte to the battery.
NOTE
○Cha
rging the battery immediately after filling
can shorten service life.
Initial Charge
•
New
ly activated sealed batteries require an
initial charge.
Standard Charge: 0.9 A × 5 ∼ 10 hours
•
If using a recommended battery charger, fol-
low the charger’s instructions for newly acti-
vated sealed battery.
Kawasaki-recommended chargers:
Battery Mate 150-9
OptiMate PRO 4-S/PRO S/PRO 2
Yuasa MB-2040/2060
Christie C10122S
•
If the above chargers are not available, use
equivalent one.
•
Let battery sit 30 minutes after initial charge,
then check voltage using a voltmeter. (Volt-
age immediately after charging becomes tem-
porarily high. For accurate measuring, let the
battery sit for given time.)
NOTE
○Charging rates will vary depending on how
long th
e battery has been stored, tempera-
ture, and the type of charger used. If voltage
is not at least 12.8 volts, repeat charging cy-
cle.
○To ensure maximum battery life and customer
satisfaction, it is recommended the battery be
load t
ested at three times its amp-hour rating
for 15 seconds.
Re-check voltage and if less than 12.8 volts
repe
at the charging cycle and load test. If still
below 12.8 volts the battery is defective.
Battery Installation
•
Turn
the ignition switch OFF.
•
Place the battery upright on the battery case
with the terminal faces to the rear.
•
Rou
te the battery cables as shown, and first
connect the red capped positive cable to the
(+) terminal, and then negative cable to the
(–)
terminal.
•
Put a light coat of grease on the terminals to
prevent corrosion.
•
Co
ver the terminals with their protective caps.
A. Battery
B. Positive Cable (+)
C. Negative Cable (–)
•
Throw down the battery to a rear side and
route the (+) cable through the guide in the
battery case.
•
Position the (–) negative lead connector at the
rear of the battery.

12 PREPA
RATION
A. Battery
B. Positive Cable (+)
C. Nega
tive Cable (–)
D.
Route the (+) cable through the guide
in the battery case.
•
Install the fuse box, seat bracket, seat under
cover and rider’s and passenger’s seats (see
the “Coolant” section in the PREPARATION
chapter).
NOTE
○It is recommended that the fuse box, seat
bracket, seat under cover and rider’s and pas-
senger’s seats should be installed after com-
pleting the steps in the “Coolant” section in the
PREPARATION chapter.
Coolant
Coolant Level Inspection
•
Situate the motorcycle so that it is perpendic-
ular to the ground.
•
Remove the rider’s and passenger’s seats,
seat under cover, seat bracket and fuse
box (see the “Battery Service” section in the
PREPARATION chapter).
•
Check the coolant level through the coolant
level gauge on the reserve tank located in the
inside of the right seat cover. The coolant
level should be between the F (Full) and L
(Low) level lines.
NOTE
○Check the level when the engine is cold (room
or atmospheric temperature).
A. Reserve Tank
B. F (Full) Level Line
C. L (
Low) Level Line
D. Seat Cover (Right)
•
If the amount of coolant is insufficient, remove
the sub right side cover, right side cover and
right seat cover (rear fairing) and add coolant
into the reserve tank.
Coolant filling
•
Remove the mounting bolt (D = 6, L = 18) and
remove the sub-right side cover by pulling it
out and up to clear the projections.
A. Sub-Right Side Cover
B.Bolt(D=6,L=18)
C. Projections
•
Remove the mounting bolt (D = 5, L = 16)
and flat washer (D = 20) and remove the right
side cover by pulling it outward to clear the
projections.

PREPARA
TION 13
A.
Right Side Cover
B.
Bolt (D = 5, L = 16) and Flat Washer (D
=20
)
C.
Projections
•
Remove the mounting bolt (D = 6, L = 14) and
the screw rivets (2) from the right seat cover
(rear fairing).
•
Remove the right seat cover by pulling it out-
ward to clear the projections.
A. Bolt (D = 6, L = 14)
B. Screw Rivets
C. Seat Cover (Right)
D. Projections
NOTE
○The seat cover (rear fairing) uses the screw
rivets. The screw rivets can be removed by
turning the central pin with the screw driver,
and when installing them, pull the central pin
fully up first, and then push in the central pin
after inserting the screw rivet.
Screw R ivet Removal
A. Screw Rivet
B. Central Pin
C. Turn the screw rivet.
Screw Rivet Installation
A. Screw Rivet
B. Central Pin
C. Push in.
•
Remove the cap from the reserve tank and
add coolant through the filler opening to the F
(Full) level line.
A. Cap
B. F (Full) Level Line
C. L (Low) Level Line
D. Reserve Tank

14 PREPA
RATION
•
Install the cap.
•
Insert the projections of the right seat cover
into the grommets.
A. Cap
B. S
eat Cover (Right)
C. Projections
D. Grommets
•
Reinstall the right seat cover mounting bolt (D
= 6, L = 14) and screw rivets (2), and tighten
the bolt.
•
Reinstall the right side cover, mounting bolt
(D = 5, L = 16) and flat washer (D = 20), and
tighten the bolt.
•
Reinstall the sub-right side cover and mount-
ing bolt (D = 6, L = 18), and tighten the bolt.
NOTE
○A permanent type of antifreeze is installed in
the cooling system when shipped. It is col-
ored green and contains ethylene glycol. It is
mixed at 50% and has the freezing point of
–35°C (–31°F).
Rider’s Seat Installation
•
Reinstall the fuse box to the seat bracket.
•
Route the passenger’s seat lock cable
through the guide of the seat bracket at
the rear as shown.
A. Fuse Box
B. Seat Bracket
C. Pass
enger’s Seat Lock Cable
D.
Rider’s Seat Lock Cables
E.
Clamp (Plastic) – Route the rider’s seat
loc
k cables in the clamp.
•
Reinstall the seat bracket and mounting bolts
(D = 6, L = 14) (4), and tighten them.
•
Install the seat under cover on the seat cover
(rear fairing) and mounting bolts (D = 6, L =
18) (2), and tighten them.
A.
Seat Bracket
B.
Seat Bracket Mounting Bolts (D = 6, L
=14)
C. Seat Under Cover
D.
Seat Under Cover Mounting Bolts (D
=6,L=18)
•
Insert the tab on the front of the rider’s seat
into the slot in the fuel tank bracket.
•
Insert the hooks at the rear of the rider’s seat
into the latches, projections into the holes,
and push down the rear part of the rider’s seat
until the lock clicks.

PREPARA
TION 15
A. Rider’s Seat
B. Tab
C. Sl
ot
D. Hooks
E. Latches
F. P r
ojections
G. Holes
•
Pull up the rider’s seat to make sure it is se-
curely locked.
Passenger’s Seat Installation
•
Insert the tab on the rear of the passenger’s
seat into the slot in the frame.
•
Insert the hook at the front of the passenger’s
seat into the latch, left and right projections
into the holes, and push down the front part
of the passenger ’s seat until the lock clicks.
A. Passenger’s Seat
B. Tab
C. Slot
D. Hook
E. Projections
F. Ho le s
G. Latch
•
Pull up the passenger’s seat to make sure it
is securely locked.
•
Pull out the ignition key from the seat lock.
NOTE
○If there is difficulty removing the ignition key
from th
e seat lock, turn it lightly counterclock-
wise while pulling it out.
Front B
rake Fluid
Front Br ake Fluid Level Inspection
•
With the front brake fluid reservoir held hor-
izontal, check that the fluid level is between
the upper and lower level lines.
A. Front Brake Fluid Reservoir
B. Upper Level Line
C. Lower Level Line
•
If the fluid level in the reservoir is lower than
the lower level line, check for fluid leaks in the
front brake lines and fill the reservoir.
•
Loosen the screws to remove the front brake
fluid reservoir cap and diaphragm.
•
Fill the reservoir to the upper level line with
DOT4 brake fluid, reinstall the diaphragm and
reservoir cap.
•
Tighten the screws to the specified torque.
Torque:
1.5 N·m (0.15 kgf·m, 13 in·lb)

16 PREPA
RATION
WARNING
Brake fluid that is contaminated by
moisture or dirt, mixed or contains air
has a lo
wer boiling point and can cause
the brake to be ineffective or fail, and it
may cause rubber parts to deterioate,
resul
ting in an accident causing injury
or death. Never reuse old brake fluid.
Do not use fluid from a container that
has be
en left unsealed or that has been
open for a long time. Do not mix two
types and brands of fluid for use in the
brak
e. Don’t leave the reservoir cap off
for any length of time to avoid moisture
contamination of the fluid. Don’t add or
cha
nge the fluid in the rain or when a
strong wind is blowing.
NOT
ICE
Bra
ke fluid quickly ruins painted sur-
faces. Wipe up any spilled fluid immedi-
ately.
•
Operate the brake lever several times.
•
If it feels spongy, there might be air in the
brake line.
•
If necessary, bleed the air in the front brake
line.
•
Also check for fluid leakage around the fit-
tings.
Front Brake Line Air Bleeding
•
Loosen the screws to remove the front brake
f
luid reservoir cap and diaphragm, and check
that there is plenty of fluid in the reservoir.
NOTE
○The fluid level must be checked several times,
during the bleeding operation and replenished
as necessary. If the fluid in the reservoir runs
completely out any time during bleeding, the
bleeding operation must be repeated from the
beginning since air will have entered the line.
•
Attach a clear plastic hose to the bleed valve
on the front master cylinder and run the other
end of the hose into a container.
•
With the reservoir cap off, slowly pump the
brake lever several times until no air bubbles
can be seen rising up through the fluid from
the holes at the bottom of the reservoir. This
bleeds the air from the brake master cylinder
end of the line.
•
Pump the brake lever a few times until it
becomes hard and then, holding the lever
squeezed, quickly open (turn counterclock-
wise) and close the bleed valve. Then release
the lever. Repeat this operation until no more
air can be seen coming out into the plastic
hose.
A. Hold the brake lever applied.
B. Quickly open and close the bleed valve
on the front master cylinder.
C.
Release the brake lever.
•
Tighten the bleed valve to the specified
torque.
Torque:
7.8 N·m (0.80 kgf·m, 69 in·lb)
•
Attach a clear plastic hose to the bleed valve
on each front brake caliper and run the other
end of the hose into a container.
•
With the reservoir cap off, slowly pump the
brake lever several times until no air bubbles
can be seen rising up through the fluid from
the holes at the bottom of the reservoir. This
bleeds the air from the brake master cylinder
end of the line.
•
Pump the brake lever a few times until it
becomes hard and then, holding the lever
squeezed, quickly open (turn counterclock-
wise) and close the bleed valve. Then release
the lever. Repeat this operation until no more
air can be seen coming out into the plastic
hose.

PREPARA
TION 17
A. Hold the brake lever applied.
B. Quickly open and close the bleed valve
on the front brake caliper.
C. Release the brake lever.
•
Repeat the previous step one more time for
the other front disc brake.
•
When air bleeding is finished, check that the
fluid level is between the upper and lower
level lines.
•
Reinstall the diaphragm and reservoir cap.
•
Tighten the screws to the specified torque.
Torque: 1.5 N·m (0.15 kgf·m, 13 in·lb)
•
Tighten the bleed valve(s) to the specified
torque.
Torque: 7.8 N·m (0.80 kgf·m, 69 in·lb)
•
Apply the brake forcefully for a few seconds,
and check for fluid leakage around the fittings.
Rear Brake F luid
Rear Brake Fluid Level Inspection
•
With the rear brake fluid reservoir held hor-
izontal, check that the fluid level is between
the upper and lower level lines.
A. Reservoir Cap Stopper Screw
B. Upper Level Line
C. Lo
wer Level Line
D. Rear Brake Fluid Reservoir
•
If the fluid level in the reservoir is lower than
the lower level line, check for fluid leaks in the
brake line, and fill the reservoir.
•
Loosen the reservoir cap stopper screw to re-
move the reservoir cap and diaphragm.
•
Fill the reservoir to the upper level line with
DOT4 brake fluid, reinstall the diaphragm and
reservoir cap.
NOTICE
Brake fluid quickly ruins painted sur-
faces. Wipe up any spilled fluid immedi-
ately.
NOTE
○First, tighten the rear brake fluid reservoir cap
clockwise by hand until slight resistance is felt
indicating that the cap is seated on the reser-
voir body, then tighten the cap an additional
1/6 turn while holding the brake fluid reservoir
body.
A. Rear Brake Fluid Reservoir
B. Reservoir Cap
C. Clockwise
D. 1/6 turn

18 PREPA
RATION
•
Operate the brake pedal several times.
•
If it feels spongy, there might be air in the
brake line.
•
If necessary, bleed the air in the rear brake
line.
•
Also check for fluid leakage around the fit-
tings.
Rear B
rake Line Air Bleeding
•
Loosen the reservoir cap stopper screw to
remove the rear brake reservoir cap and di-
aphr
agm, and check that there is plenty of
fluid in the reservoir.
NOTE
○The fluid level must be checked several times,
during the bleeding operation and replenished
as necessary. If the fluid in the reservoir runs
completely out any time during bleeding, the
bleeding operation must be repeated from the
beginning since air will have entered the line.
•
Attach a c lear plastic hose to the bleed valve
on the rear brake caliper and run the other
en
d of the hose into a container.
•
With the reservoir cap off, slowly pump the
brake pedal several times until no air bub-
bl
es can be seen rising up through the fluid
from the holes at the bottom of the reservoir.
This bleeds the a ir from the rear brake master
c
ylinder end of the line.
•
Pump the brake pedal a few times until it
becomes hard and then, holding the pedal
p
ushed down, quickly open (turn counter-
clockwise) and close the bleed valve. Then
release the pedal. Repeat this operation until
no more air can be seen coming out into the
plastic hose.
A.Hold the brake pedal applied.
B.Quickly open and close the bleed valve
on the rear brake caliper.
C.Release the brake pedal.
•
When air bleeding is finished, check that the
fluid level is between the upper and lower
level lines.
•
Tighten the bleed valve to the specified
torque.
Torque: 7.8 N·m (0.80 kgf·m, 69 in·lb)
•
Reinstall the diaphragm and reservoir cap.
NOTE
○First, tighten the rear brake fluid reservoir cap
clockwise by hand until slight resistance is felt
indicating that the cap is seated on the reser-
voir body, then tighten the cap an additional
1/6 turn while holding the brake fluid reservoir
body.
•
Tighten the reservoir cap stopper screw.
•
Apply the brake forcefully for a few seconds,
and check for fluid leakage around the fittings.
Brake Disc Cleaning
•
Clean the front and rear brake discs using
oilless solvent.
WARNING
An anticorrosive treatment applied to
the brake discs will increase braking
distance and can cause an accident
resulting in serious injury or death. Re-
move the anticorrosive treatment using
an oilless solvent.
Clutch Lever and Cable
Clutch Lever Free Play Inspection
•
Check that the clutch lever has the specified
amount of free play as shown in the figure.
Clutch Lever Free Play:
2 ∼ 3 mm (0.08 ∼ 0.12 in.)
/