Page is loading ...

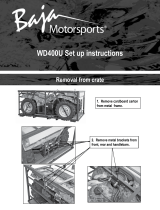
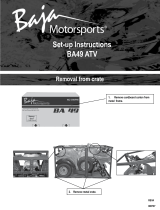
1. Removecardboardcarton
from metal frame.
2. Removemetal bracketsfrom
front, rearand handlebars.

Hardware box
3. Remove metal frame and hardware box.
@
4. Remove metal brackets holding
rear axle to metal frame.
5. Remove Rearshock pinto release bottom
of shock from metal shipping crate.
2

Front bumper
Rear view mirrors
Wheel covers
Handlebar cover
Tirepressure
gauge adaptor
Tirepressuregauge
Handlebar bolts
Spark
Alien wrench
Open end wrench
Grease fittings
piug remover
Pliers

Holein rearfork
6. Attachfront shocksto leftand
righta-armsusingboltsprovided.
Grease fitting
7. Inrearfork thereare2greaseholes;
oneontherightandtheotheronthe
left.Installthegreasefittingsintothese
holesusinganopenendwrench.
8. Attachrearshockto axlewith
rearshockpinandcotterpin.
4

9. Removemetal plate,unscrewbolts. ]
11.Placethe ignitionswitch
intoslot onhandlebarcover.
10.Securethe handlebars using
the handlebar boltsprovided
Approximate
handlebar
position
12.Attach handlebar cover
bysnapping intoplace.

13. Attach left and right
rearview mirrors.
14. Attach wheel covers
to all four wheels
15. Fill all tires to recommendedpressure
of 25PSIusing air pressureadapter, check
PSi using tire pressuregauge.

16. Install front bumperwith bolts
locatedinbumperassembly.
Battery located
seat.

BATTERYiNSTALLATiON
iNiTiAL SERVICEAND iNSTALLATiONOF BATTERY:
Thefollowing procedureisverydangerous andshould be performed
withutmostcareand attention.Wearprotectiveeye wear,rubbergloves,
and havewateravailable should electrolytecome incontact withyour
skin or eyes. KEEPALL CHILDRENAWAYFROMTHEAREAWHILE THiS
PROCEDUREiS BEINGPERFORMED.
POISON- CAUSESSEVEREBURNS
Contains sulfuricacid.
Avoid contact with skin, eyes, or clothing
To prevent accidents, rinse empty container with water.
ANTIDOTE:
E×ternai - flushwithwater
Internal - Call physicianimmediately.Drink largequantities of wateror
milk.
Follow with milk of magnesia, beateneggsor vegetable.
Eyes - Flush with water for 15 minutes and get prompt medical attention.
KEEPOUT OFREACHOFCHILDREN.

Note:The following pageisfor vehicleswith battery's containingseparateelectrolytepack.Most
batteries will comewith the electrolytealready sealed intothe battery.
_g the battery:
Placebattery onlevelsurface.Remove sealingtape from top.
(seefigure 20)
Takethe electrolytecontainerout ofthe plasticbag.
Place electrolyte container upside down with the sealed silver
mouths of the electrolyte bottles inline with the six filler
holes of the battery. (see figure 21)
Push the container down strongly enough to break the silver
seals.
As electrolyte startsflowing into battery,air bubbles will
come up from the mouths of the plastic electrolyte bottles.
Leave bottles upside down in battery holes until electrolyte is
completely drained.
Never leave children unattended around battery.
If air bubbles ceaseto float to the top of the electrolyte
bottles, tap lightly on top.
DO NOTremove container from batterywhile it is draining.
Never cut or pierce electrolyte container.
After all the electrolyte has drained from the bottles into
the battery, pullplastic electrolyte bottles gently out of the
battery.
Discard empty electrolyte bottles inawaste areathat is
inaccessibleto children and animals.
After filling, let battery stand for at least 30 minutes before
charging. This allows the electrolyte to penetrate plates for
optimum performance and ensures longer battery life.
After 30 minutes the battery is ready for its initialcharge.
Place cap strip loosely over the filling holes as shown inthe
picture. (seefigure 23)
Figure 20
Figure 21
Figure 23
9

Howto InitiallyCharge the battery_:
1. Connect the red positive(+) cable to the red positive(+)
pole of the battery.
(see figure 24)
2. Connect the black negative (-) cable to the black negative
(-) pole of the battery. (seefigure 25)
Note: The red positive (+)cable has a larger diameter
than the black negative y cable.
.
Charging rate: Charge battery @0.7Amps for
5~ 10 hours.
• After charging iscomplete, pressdown firmly with
both hands to seat the caps, (Do not pound or
hammer). The battery is now sealed. (seefigure 26 )
• install battery intobattery compartment. The battery
terminals should be facing the front (see figure 27)
• Oncebatteryisfirmly seatedinbatterycompartment
attachthered positive wire to the red positiveterminal
on the battery.(seefigure 28)
• Then attach the black negative wire to the black
negative terminal on the battery.
(see figure 28)
• install the battery bracket (see figure 28)
Figure 24
Figure 25
Figure 26
NEVERREMOVETHE STRIPOFCAPS
NORADDANY WATERORELECTROLYTE.
Battery bracket
Red
Figure 27
Black -
Figure 28
10

17. Fill enginewith correct amount of oil. Refer
to owners manual for oil types and quantity.
18. Fill gastank as specified
inowners manual.
!!WARNING!!
19. Refer to ownersmanual for
properstarting instructions.
This engine may be shippedwith packing
oil. Thisoil should be drained and replaced
with new engine oil as described inthe
ownersmanual. Never attempt to start the
engine without first replacing engine oil
with properamount and grade as
described inthe owners manual.
11
/