Page is loading ...

K6
December ’05 Printed in Japan (TK) 19
99505-01066-01E
FOREWORD
This motorcycle has been designed and produced utilizing Suzuki’s most modern
technology. The finest product, however, cannot perform properly unless it is cor-
rectly assembled and serviced. This set-up manual has been produced to aid you in
properly assembling and servicing this motorcycle.
Please review this set-up manual carefully before performing any work. Take spe-
cial care to properly perform the required assembly and servicing marked by either
a Warning or a Caution. Failure to follow the directions in either of these two (2) cat-
egories could lead to serious problems. # and areas are
denoted to emphasize certain areas and carry the following meanings:
#
Indicates a potential hazard that could result in death or injury.
Indicates a potential hazard that could result in motorcycle damage.
This set-up manual is based on a motorcycle of standard specification. Some minor
differences from this manual may be found in other specifications.

1
PREPARATION
WORKSHOP
#
A: Packed motorcycle
B: Working space
SELF PROTECTION
#
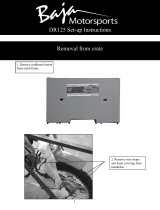
UNCRATING THE MOTORCYCLE
Remove the carton.
#
A: Crate
Remove the bolts of the bracket.
A: Bolt
The workshop where the machine is assembled
should be clean, spacious, and have a level
floor.
The technician should wear protective clothing
such as leather gloves, a long sleeve shirt, eye
protection and safety shoes as shown in the
illustration when handling metal crates.
Metal crates may have sharp edges and may
cause injury.

2
Remove the bolts from the crate.
A: Bolt
Lift the steel frame to separate it from the base of the
crate.
Carefully remove the various component parts pack-
aged around the motorcycle.
#
A: Steel frame
B: Crate base
Handling crates requires two operators.
Be careful not to scratch the motorcycle.

3
LOCATION OF PARTS
Check all the components which have been removed from the base of the crate.
Parts listed above are installed respectively into the positions as follows.
Item Part Name Q’ty Remarks
A
Windscreen 1
Stepped Allen screw 4 5 × 18 mm
Rubber cushion (with nut) 4 L:14.0
B
Handlebars assembly 1
Clamp 2
Allen bolt 4 8 × 30 mm
Burring washer 4 OD:13.0 ID:8.5
Plastic cap 4
OD:11.0
For handlebar
clamp bolt
Screw 1
5 × 44 mm
For left switch
Screw 1
5 × 25 mm
For left switch
Screw 1
5 × 29 mm
For throttle
assembly
Choke lever 1
Strap 2 L:140
C
Holder 2 For master cylinder
Flange bolt 4 6 × 22 mm
D
Cable guide 1
Flange bolt 1 6 × 12 mm
Item Part Name Q’ty Remarks
E
Handlebar balancer
weight
2 Right and Left
Screw 2 6 × 105 mm
Flange rubber cushion 2
Spacer 2 L:50.0
Washer 2
OD:16.0 ID:6.5
T:4.0
Rubber cushion 2
Spacer nut 2 6 mm
F
Rear view mirror 2 Right and Left
Allen bolt 4 6 × 16 mm
Plastic cap 4 OD:10.0
G Warning label set 7
For
E-19 CC selection
H Warning label set 4
For
E-19 CD selection
I
Battery electrolyte
container
1
J Owner’s manual 1
OD : Outside diameter (mm)
ID : Inside diameter (mm)
L : Length (mm)
T : Thickness (mm)
T
L
OD ID
NOTE:
The parts shown as Item G and H in the above table are supplied for limited markets.
B
E
G,H
A
F
D
C
EC
F
G,H

4
RIGHT LEFT
The photographs shown indicates the parts dis-
mounted from the motorcycle in addition to the items
shown in the preceding page.
A: Front brake master cylinder
B: Throttle assembly
C: Left switch
Choke cable
D: Clutch master cylinder
AA
BB
FF
GG
HH
JJ
II
D
C
EE
C
D

5
Before assembling the motorcycle, thoroughly
understand the “Safety Check Out” described on
page 32.
After completion of assembly, carefully check the
motorcycle referring to the “Safety Check Out”,
then deliver the motorcycle to the customer.
ASSEMBLY
LEFT RIGHT
REMOVING THE BRACKET
Remove the bolts to take off the front brake and clutch
master cylinder from the bracket.
A: Front brake master cylinder
B: Clutch master cylinder
C: Bolt
D: Bracket
Remove the bracket from the handlebar mounting
position.
A: Bracket
B: Bolt
Keep the position of front brake and clutch
master cylinder with its cap facing upwards
until it is installed.
NOTE:
The bolts are no longer needed and these may
be discarded.
Be careful not to scratch the fuel tank.
NOTE:
The bracket and bolts are no longer needed
and these may be discarded.

6
HANDLEBARS
Loosen the throttle housing retaining screws.
Insert the throttle assembly onto the handlebars.
A: Throttle assembly
B: Handlebars
Install the handlebars assembly using the two clamps,
four Allen bolts and washers.
A: Clamp
B: 8 × 30 mm Allen bolt
C: Burring washer OD:13.0 mm ID:8.5 mm
D: Punch mark
E: Dot mark
F: Plastic cap OD:11.0 mm
Tighten the handlebar clamp bolts to the specified
torque.
" Handlebar clamp bolt: 23 N·m (2.3 kgf-m)
After installing the handlebars, fit the plastic cap on the
head of each bolt.
A: 8 × 30 mm Allen bolt
B: 8 × 30 mm Allen bolt
C: Plastic cap OD:11.0 mm
D: Punch mark
NOTE:
Install the burring washer in the direction as
shown in the illustration.
The punch mark on the clamps shows front
side.
Align the dot mark on the handlebars with the
mating surface of the front side of left clamp.
NOTE:
To install the handlebars correctly, first tighten
the bolt
A of the front side with specified
torque and then tighten the bolt
B of the rear
side.
Make sure that the clamp has no clearance at
the front side as shown in the illustration.
FORWARD

7
#
A: Front brake hose
B: Throttle cables
C: Right switch wiring harness
D: Clutch hose
E: Left switch wiring harness
F: Choke cable
THROTTLE
Insert the boss of the throttle lower housing into the
hole on the handlebars.
Tighten the throttle assembly with two screws.
#
A: Boss
B: Hole
C: 5 × 29 mm screw
FRONT BRAKE MASTER CYLINDER
Install the front brake master cylinder onto the handle-
bars.
Align the dot mark on the handlebars with the master
cylinder-to-holder fitting surface.
Tighten the master cylinder mounting bolts to the
specified torque.
" Front brake master cylinder mounting bolt:
10 N·m (1.0 kgf-m)
A: Holder
B: Front brake master cylinder
C: 6 × 22 mm flange bolt
D: 6 × 22 mm flange bolt
E: Dot mark
The line drawings on page 29, 30 and 31 show
the proper routing of the control cables, hose
and wirings.
Refer to them in addition to following the
instructions carefully.
Check to ensure that the throttle operates
freely and closes automatically.
NOTE:
To install the holder correctly, first tighten the
bolt
C of the upper side with specified torque
and then tighten the bolt
D of the lower side.

8
A: Bolt
B: Holder
C: Front brake master cylinder
D: Handlebars
Connect the front brake light switch lead wires coupler
to the brake light switch.
A: Front brake light switch
B: Lead wire coupler
FRONT BRAKE HOSE
Install the brake hose to the brake hose guide.
A: Front brake hose
B: Front brake hose guide
LEFT SWITCH
A: Choke cable
B: Holder
NOTE:
Install the holder in position according to the
mark “UP”.
Make sure that the holder has no clearance at
the upper side as shown.
Check for brake fluid leakage.
NOTE:
Check the choke cable is fitted into the recess
of holder.

9
Insert the choke cable into the hole of lower housing.
Insert the choke cable end into the recess in the choke
lever.
A: Choke cable end
B: Hole
C: Lower housing
D: Choke lever
Insert the boss of lower housing into the hole on the
handlebars.
Install the left switch upper housing and tighten the left
switch assembly with the two screws.
Fasten the choke cable holder on the front screw.
A: Boss
B: Hole
C: 5 × 44 mm screw
D: 5 × 25 mm screw
E: Cable holder
CLUTCH MASTER CYLINDER
Install the clutch master cylinder onto the handlebars.
Align the dot mark on the handlebars with the master
cylinder-to-holder fitting surface.
Tighten the master cylinder mounting bolts to the
specified torque.
" Clutch master cylinder mounting bolt:
10 N·m (1.0 kgf-m)
A: Holder
B: Clutch master cylinder
C: 6 × 22 mm flange bolt
D: 6 × 22 mm flange bolt
E: Dot mark
NOTE:
Before installing the cable, grease its cable
end.
NOTE:
To install the holder correctly, first tighten the
bolt
C of the upper side with specified torque
and then tighten the bolt
D of the lower side.

10
A: Bolt
B: Holder
C: Clutch master cylinder
D: Handlebars
Connect the clutch lever position switch lead wires to
the clutch lever position switch.
A: Clutch lever position switch
B: Lead wire
RIGHT
CLAMP
Clamp the handlebar right switch wiring harness and
front brake hose union with strap.
A: Strap L:140.0 mm
B: Front brake hose union
C: Right switch wiring harness
LEFT
Clamp the handlebar left switch wiring harness and
choke cable with strap.
A: Strap L:140.0 mm
B: Choke cable
C: Left switch wiring harness
NOTE:
Install the holder in position according to the
mark “UP”.
Make sure that the holder has no clearance at
the upper side as shown.
Check for clutch fluid leakage.
NOTE:
Cut the remaining of the strap as shown in the
photograph.
OUTSIDE
NOTE:
Cut the remaining of the strap as shown in the
photograph.
OUTSIDE

11
CABLE GUIDE
Pass the clutch hose, choke cable and left switch wir-
ing harness through the cable guide.
Install the cable guide to the front fork upper bracket.
A: Cable guide
B: 6 × 12 mm flange bolt
C: Clutch hose
D: Left switch wiring harness
E: Choke cable
F: Front fork upper bracket
HANDLEBAR BALANCER
(RIGHT AND LEFT)
Assemble the handlebar balancer parts as shown.
A: 6 × 105 mm screw
B: Balancer weight
C: Flange rubber cushion
D: Spacer L:50.0 mm
E: Washer OD:16.0 mm ID:6.5 mm T:4.0 mm
F: Rubber cushion
G: 6 mm spacer nut
With the screw not tightened, insert the balancer sub-
assembly into the handlebar end all the way, then
tighten the screw securely.
#
A: Balancer assembly
1. Lift the front of motorcycle by using a hoist.
2. Raise the rear of motorcycle.
3. Pull the crate base forward, then balance the
motorcycle.
Check to ensure that the throttle operates
freely and closes automatically.

12
Place the motorcycle on the center-stand, then remove
the hoist hook.
WINDSCREEN
Remove the screws.
A: Meter assembly
B: Stepped Allen screw
Remove the boss and hook of meter assembly.
Disconnect the meter assembly coupler to take off the
meter assembly.
A: Meter assembly
B: Boss
C: Hook
D: Meter assembly coupler
While pulling the meter panel, fit the rubber cushion to
the meter brace.
A: Meter panel
B: Meter brace
C: Hole
D: Rubber cushion (with nut)

13
Set the windscreen between the rubber cushion and
meter panel.
A: Windscreen
B: Meter panel
C: Meter brace
D: Rubber cushion (with nut)
Tighten the screws to fix the windscreen to the meter
panel.
A: Windscreen
B: Meter panel
C: Meter brace
D: Rubber cushion (with nut)
E: 5 × 18 mm stepped Allen screw
Connect the meter assembly coupler.
Install the rubber boot.
Install the meter assembly.
A: Meter assembly coupler
B: Rubber boot
C: Meter assembly
D: Boss
E: Hook
Tighten the screws.
A: Meter assembly
B: Stepped Allen screw
C: Hook

14
REAR VIEW MIRROR
Install the rear view mirror to the front fairing.
Fit the plastic cap on the head of each bolt.
A: Rear view mirror assembly
B: 6 × 16 mm Allen bolt
C: Water drain hole
D: Plastic cap
REMOVING THE TAPE
Remove the tape from the muffler.
A: Muffler
B: Tape
FRONT REAR
BRAKE DISC
To prevent brake squeaking and pad contamination,
carefully clean the front and rear brake disc plates with
alcohol or other non-petroleum based solvent.
This will remove the rust-preventive coating and dirt.
NOTE:
Align the mirror in the position so as to secure
rear view.

15
WARNING LABEL
(FOR E-19 CC AND E-19 CD SELECTION)
Select the appropriate language label for your country.
A: For E-19 CC selection
B: For E-19 CD selection
Stick the label selected for your country.
C: Warning label (General warning)
D: Warning label (Windscreen)
E: Side fairing
F: Fuel tank
OWNER’S MANUAL
Store the owner’s manual in place.
A: Owner’s manual
B: Document tray
NOTE:
For E-19 CC selection: seven kinds of labels,
English, French, German, Spanish, Portu-
guese, Dutch, and Italian, are supplied together
with M/C.
For E-19 CD selection: four kinds of labels,
Finnish, Norwegian, Danish and Swedish, are
supplied together with M/C.

16
SERVICING
BATTERY
The battery is located under the seat.
Remove the seat using the key.
A: Seat lock
B: Seat
Remove the rubber band.
Remove the battery from the motorcycle.
A: Rubber band
Filling electrolyte
Remove the aluminium tape sealing the battery elec-
trolyte filler holes.
A: Aluminium tape
B: Electrolyte filler hole

17
Remove the caps from the electrolyte container.
A: Caps
B: Sealed area
With just enough force to break the nozzle seal of elec-
trolyte container, push each nozzle of the electrolyte
container into the battery’s electrolyte filler ports and
hold the container firmly so that it does not fall.
Take precaution not to allow any of the fluid to spill.
A: Electrolyte containers
Make sure air bubbles are coming up in each electro-
lyte container, and leave in this position for about 20
minutes.
A: Air bubbles
NOTE:
Use the removed caps as the sealed caps of
battery filler holes.
Do not remove or pierce the sealed areas of the
electrolyte container.
NOTE:
If no air bubbles are coming up from a filler
port, tap the bottom of the container two or
three times.
Never remove the container from the battery.

18
After confirming that the electrolyte has entered the
battery completely, remove the electrolyte containers
from the battery.
Wait for around 20 minutes.
Insert the caps into the filler holes, pressing in firmly so
that the top of the each caps does not protrude above
the upper surface of the battery’s top cover.
A: Caps
Charge the battery with a battery charger.
After charging the battery, install the battery in the
motorcycle as follows.
Never use anything except the specified battery
electrolyte.
Once the sealing cap has been installed in the
battery, do not remove the sealing cap.
For charging the battery, make sure to use the
charger specially designed for MF battery.
Otherwise, the battery may be overcharged
resulting in shortened service life.
Do not remove the cap during charging.
Position the battery with the cap facing upward
during charging.
When attaching the wiring harness battery
leads to the battery terminals, observe the cor-
rect polarity.
NOTE:
The terminal bolts and nuts are attached to the
battery.

19
Remove the frame covers.
A: Frame cover
B: Stepped Allen screw
C: Boss
1. Reinstall the battery in the motorcycle.
2. First connect the
+ lead to the + positive terminal
of the battery.
3. Cover
+ terminal with rubber boot.
4. Connect the
- lead to the - negative terminal of
the battery.
5. Fix the battery with rubber band.
6. Reinstall the frame cover.
A: + lead
B: - lead
C: Rubber boot
D: Rubber band
Reinstall the seat.
Insert the seat hook into the seat hook retainer and
push the seat down firmly.
A: Seat assembly
B: Seat hook
C: Seat hook retainer
/