Page is loading ...

Phone: (844) LEDONE6 | Fax: 1-510-217-9461 | Web: www.ledonecorp.com
`
MW Troffer Retrofit Kit Series Installation Guide
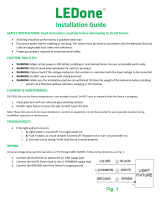
SAFETY INSTRUCTIONS: Read instructions carefully before attempting to install fixture.
• All wiring should be performed by a qualified electrician.
• Disconnect power before installing or servicing. This fixture must be wired in accordance with the National Electrical
Code and applicable local codes and ordinances.
CAUTION: Risk of fire
• WARNING: Make certain power is OFF before installing or maintaining fixture. No user serviceable parts inside.
• WARNING: Luminaire wiring and electrical parts may be damaged when drilling for installation of LED retrofit kit.
Check for enclosed wiring and components.
• WARNING: Install this kit only in luminaires that have the construction features and dimensions shown in the
photographs and/or drawings and where the input rating of the retrofit kit does not exceed the input rating of the
luminaire.
o Only those open holes indicated in the drawings may be made or altered as a result of kit installation. Do
NOT leave any other open holes in an enclosure of wiring or electrical components.
o Do NOT make or alter any open holes in an enclosure of wiring or electrical components during kit
installation.
• WARNING: To prevent wiring damage or abrasion, do NOT expose wiring to edges of sheet metal or other sharp
objects to lamp holder lead wires by employing applicable connectors.
• WARNING: This fixture is ONLY suitable for indoor recessed ceiling application.
CLEANING & MAINTENANCE:
CAUTION: Be sure the fixture temperature is cool enough to touch. Do NOT clean or maintain while the fixture is energized.
1. Clean glass lens with non-abrasive glass cleaning solution.
2. Do NOT open fixture to clean the LED. Do NOT touch the LED.
Note: These instructions do not cover all details or variation in equipment, nor do they provide for every possible situation during
installation, operation or maintenance.
TROUBLESHOOTING:
1. Check that the line voltage at fixture is correct. Refer to wiring directions.
2. Be sure the fixture is grounded properly.
WATTAGE & COLOR TEMPERATURE SELECTION:
1x4 and 2x2

Phone: (844) LEDONE6 | Fax: 1-510-217-9461 | Web: www.ledonecorp.com
`
INSTALLATION:
To mount in an insulated or non-insulated ceiling exposed flat tee grid ceiling follow the steps below.
• Remove the existing fixture frame, clear out inside of existing housing. May need to remove ballast. (Fig. 1)
• Install the bracket in the existing housing between the housing and tee-grid bar. (Fig. 2)
• Slide the bracket to both sides and make it fixed. (Fig. 3)
• Install the flat bottom side to one of the brackets. Fix the supplemental supports and connect the circuit. (Fig. 4)
• Close the retrofit fixture and secure the latch. Notice the fixture should be completely secure. (Fig. 5)
• Installed completely. (Fig. 6)
MW Troffer Retrofit Kit Series Installation Guide
2x4

Phone: (844) LEDONE6 | Fax: 1-510-217-9461 | Web: www.ledonecorp.com
`
MW Troffer Retrofit Kit Series Installation Guide
0-10V DIMMABLE WIRING:
Universal voltage driver permits operation at 120V through 277V, 50/60Hz. For 0-10V dimming, follow the wiring instructions in Fig 7.
1. Connect the BLACK fixture lead to the (+) LINE supply lead.
2. Connect the WHITE fixture lead to the (-) COMMON supply lead.
3. Connect the GROUND wire from fixture to supply ground. DO NOT connect the GROUND of the dimming fixture to the
output.
4. Connect the VIOLET fixture lead to the (V+) DIM lead.
5. Connect the GREY fixture lead to the (V-) DIM lead.
6. The driver comes with dimmable leads. If it is unused, make sure the leads are properly capped (if applicable).
/