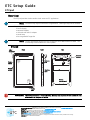
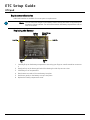
ETC ad Portable Access Device
The ETC ad Portable Access Device is a powerful tool that provides wireless and wired access to ETC applications. With its intuitive interface and robust features, it's designed to enhance your lighting control and programming experience. Use it to remotely control your lighting fixtures, create and edit lighting cues, and collaborate with other lighting professionals. The device comes equipped with a long-lasting battery, ensuring uninterrupted use during your productions or events.
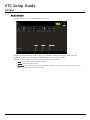
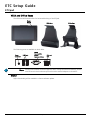


-
 1
1
-
 2
2
-
 3
3
-
 4
4
-
 5
5
-
 6
6
-
 7
7
-
 8
8
-
 9
9
-
 10
10


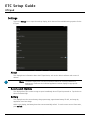
ETC ad Portable Access Device
The ETC ad Portable Access Device is a powerful tool that provides wireless and wired access to ETC applications. With its intuitive interface and robust features, it's designed to enhance your lighting control and programming experience. Use it to remotely control your lighting fixtures, create and edit lighting cues, and collaborate with other lighting professionals. The device comes equipped with a long-lasting battery, ensuring uninterrupted use during your productions or events.
Ask a question and I''ll find the answer in the document
Finding information in a document is now easier with AI
Related papers
-
ETC ETCpad Setup Manual
-
-
-
-
-
-
ETC Desire D60X User manual
-
-
-
Other documents
-
Zebra TC53/TC58 Product Reference Guide
-
Zebra MC3300ax Product Reference Guide
-
Zebra TC8300 User guide
-
Zebra TC72 User guide
-
Zebra MC3300x Product Reference Guide
-
Zebra TC72/TC77 User guide
-
Honeywell Dolphin CT40 User manual
-
-
HP ElitePad 1000 G2 Healthcare Tablet User guide
-
Zebra TC52 Product Reference Guide