Page is loading ...

Quick
Start
Guide
Fill in for your records:
Serial Number:
Purchase Date:
This guide is intended to assist with
initial setup and operation of your
Lectrosonics product.
For a detailed user manual, down-
load the most current
version at:
www.lectrosonics.com/manuals
Handheld Transmitter
HH
06 March 2013
U.S. Patent 7,225,135

LECTROSONICS, INC.2
Capsule and Battery Installation
A common threaded mount allows the
use of a variety of different capsules
from different manufacturers. Capsules
are attached with a right-hand thread
A mic capsule is
threaded onto the body
of the transmitter in the
direction shown.
Do not overtighten it.
The lower housing opens
by rotating it in the direction
shown. After the threads are
disengaged, pull the housing
downward until it engages the
detent that holds it open.
The threaded interface is a 1.25”
opening with 28 threads per inch and
three contact rings
To remove the windscreen
from the mic capsule, line
up the blue wrench (that
was included with your
unit) with the flat notches
on the lower threaded area
of mic capsule.
To remove the batteries, pull the eject lever
outward. the battery tips will move outward,
making them easier to grasp.
To insert batteries, close
the eject lever and insert
the upper contacts
first (closest to the mic
capsule). Polarity is
marked o the label in the
bottom of the battery
compartment.
Do not touch the contacts between the mic capsule
and transmitter body. When necessary, the contacts
can be cleaned with a cotton swab and alcohol.

www.lectrosonics.com 3
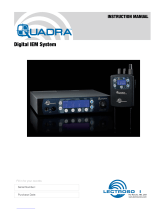
Controls and Functions
UP/DOWN Buttons for
Menu Item Selection
Power Button
Modulation
LEDs
Enter Menu and
Select Item
Previous
Screen
Side Button
Setup Switch
Powering On
Press and hold the Power Button for
several seconds until a countdown on
the LCD is completed. The countdown
from 1 through 3 will appear on the
LCD, followed by a display of the model,
firmware version, frequency block and
compatibility mode.
Hold
for
Rf On
...3
HH
V1.00
Blk 24
Hybrid
When you release the button, the unit will be
operational with the RF output turned on and
the Main Window displayed.
5
623.400
-40
-20
0
A
The Main Window
NOTE: If the Power Button is
released before the countdown is
completed, the unit will boot up in the
“standby” mode with the RF output
turned off.
Powering Off
Press and hold the Power Button for
several seconds and observe the count-
down on the LCD. The countdown on the
LCD will progress from 3 to 1 and the
power will then be turned off. This can be
done from any menu or screen.
Powering
O . . .
1
NOTE: If the Power Button is
released before the countdown
is completed, the unit will remain
turned on and the LCD will return
to the same screen or menu that
was displayed previously.
Standby Mode
A brief push of the Power Button turns
the unit on and places it into a “standby”
mode (not transmitting). This allows the
transmitter to be set up without the risk
of creating interference for other wireless
systems that are operating in the vicinity.
A notice will appear briefly confirming
that the RF output of the transmitter is
turned off, followed by the Main Window.
A symbol will blink as a reminder that the
RF output is turned off.
Rf
Off
5
623.400
-40
-20
0
A
MUTE
Symbol blinks when
RF output is turned
OFF

LECTROSONICS, INC.4
With the unit turned on, a brief push of
the Power Button will reveal a menu al-
lowing you to choose between Resume,
Rf On?, and Pwr Off?. Use the UP/
DOWN buttons to select one of these
menu items, then press the MENU/SEL
button to confirm this action.
Resume
Pwr Off
Rf On?
Backlit
• Resume: Continue operating in
the same condition as before.
• Rf On?: Begin transmitting the RF
signal.
• Pwr Off?: Turns off the transmitter.
The unit can also be turned off from any
menu or screen on the LCD by holding
the power button in for the duration of
the countdown.
Battery Condition
An icon on the Main Window indicates
the remaining power of the transmitter
batteries. This battery gauge is most
accurate with the typical voltage drop
across the life of alkaline and dry cell
lithium batteries.
5
623.400
-40
-20
0
A
Battery Gauge
Rechargeable batteries give little or no
warning when nearing depletion. If you
use rechargeable batteries in the HH,
we recommend trying fully charged
batteries first, noting the length of time
that the batteries will run the unit, and
in the future using somewhat less than
that time to determine when the battery
needs to be replaced. The Venue and
other receivers from Lectrosonics offer a
timer function to assist in this process.
Navigating Menus
and Screens
The Main Window displays the following
information:
5
623.400
-40
-20
0
A
TB
Hex Code for
Operating
frequency
Icon indicates whether RF
output is turned on or off
Battery condition
Operating
frequency
in MHz
Audio level
Function of the
side button
1) Press the MENU/SEL button to
enter the setup menu. Use the UP/
DOWN buttons to highlight the
menu item.
2) Press the MENU/SEL button to en-
ter the setup screen for that item.
Use the UP/DOWN buttons to
select the desired value or mode.
Gain
Freq.
ProgSw
Rolloff
-40
-20
0
Gain
25
3) Press the MENU/SEL button to
save this setting and return to the
previous screen.
4) Press the BACK button to return to
the Main Window.
Gain
This setting is very important since it will
determine the audio signal to noise ratio
and dynamic range that the wireless
system will deliver. Gain must be set
according to the individual voice, the mic
capsule in use and the handling tech-
nique of the user. LEDs in the control
panel facilitate accurate gain adjustment.
NOTE: See “About Setting
Audio Gain” pg 6.
Gain
Freq.
ProgSw
Rolloff

www.lectrosonics.com 5
Freq.
The operating frequency is normally
determined using the scanning func-
tion in the receiver or with coordination
software. The frequency is shown on the
transmitter LCD display in MHz and with
a hexadecimal code that is used on most
Lectrosonics receivers.
Gain
Freq.
ProgSw
Rolloff
Button
The Side Button on the housing can be
set to Power, Talkback, Cough or a Mute
function, or be bypassed (none).
Rolloff
A sharp low frequency rolloff filter
protects against breath pops and can be
used to adjust the frequency response to
suit personal preferences. The slope is
typically 36 dB/octave and varies slightly
as the turnover point is selected.
Gain
Freq.
ProgSw
Rolloff
Rolloff
70 Hz
Compat
The HH can be used with earlier Lec-
trosonics wireless and IFB systems and
systems from other manufacturers by
selecting the correct Compatibility Mode.
The receiver must be set to the same
mode.
Compat
StepSiz
TxPower
Phase
Compat
Hybrid
The available modes are as follows:
• Hybrid Digital Hybrid
receivers
• Mode 3 (other brand con-
tact the factory)
• 200 Mode Earlier Lectroson-
ics receivers
• 100 Mode 100 Series Lectro-
sonics receivers
• Mode 6 (other brand con-
tact the factory)
• IFB Mode Lectrosonics IFB
receivers
Tuning
The frequency can be adjusted in
100 kHz or 25 kHz steps to match the
receiver. 100 kHz is the standard incre-
ment for Lectrosonics wireless systems,
but 25 kHz increments may be needed
for use with systems from other manu-
facturers or when frequency coordination
requires it.
Compat
StepSiz
TxPower
Phase
TxPower
Output power can be set to 100 mW
to extend operating range (which can
also suppress noise and dropouts
to some extent) or set to 50 mW
to extend the operating life of the
batteries.
Compat
StepSiz
TxPower
Phase
Gain
Freq.
ProgSw
Rolloff
(none)
Power
Talkback
Cough
Mute

LECTROSONICS, INC.6
Backlgt
The LCD includes a backlight that il-
luminates the display for easier viewing
in dim lighting conditions. It is set to
come on when any button on the control
panel is pressed, then stay on for either
30 seconds or 5 minutes, or to stay on
all the time.
Compat
Tuning
TxPower
Backlgt
Backlit
On
30 sec
5 min
Rf On?
The transmitter output can be switched
on or off with this menu item. This is
useful, for example, when the transmitter
is in the “standby” mode during setup,
allowing it to be turned on for normal
operation without having to cycle the
power.
StepSiz
TxPower
Phase
Rf On?
Rf On?
No
Ye s
This menu item can also be used to
change the transmitter to the “standby”
mode with the RF output turned off for
additional setup.
Default
The default setting simple returns the
transmitter back to the factory settings
and any of the menu items can be read-
justed from that default point.
About Setting Audio Gain
The two bicolor Modulation LEDs (located
at the bottom of the control panel) provide a
visual indication of the audio signal level enter-
ing the transmitter.
The modulation
LEDs are oriented
and labeled to be
read when holding
the mic capsule in
front of your mouth.
The gain should
be set so that the
-20 LED just turns
red on the loudest
peak.
The LEDs will glow either red or green to
indicate modulation levels as shown in
the following table.
Signal Level -20 LED -10 LED
Less than -20 dB Off Off
-20 dB to -10 dB Green Off
-10 dB to +0 dB Green Green
+0 dB to +10 dB Red Green
Greater than +10 dB Red Red
It is best to go through the following
procedure with the transmitter in the
“standby” mode so that no audio will
enter the sound system, which could
cause feedback.
1) With fresh batteries in the trans-
mitter, power the unit on into
“standby” (no transmission) mode.
2) Press the MENU/SEL button once
to enter the setup menu. Use the
UP/DOWN buttons to select Gain.
Press the MENU/SEL button again
to enter the setup screen.
3) Hold the microphone the way it will
be used in actual operation.

www.lectrosonics.com 7
4) Speak or sing at the same voice
level that will actually be used dur-
ing the program, while observing
the modulation LEDs. Use the UP/
DOWN buttons to adjust the gain
until the –20 dB LED starts to
flicker red and the –10 dB glows
green.
5) Once the audio gain has been set,
the signal can be sent through
the sound system for overall level
adjustments, monitor settings, etc.
To do this, the unit must be set to
transmit (see Powering On and
Off, and the Standby Mode on
page 7).
NOTE: Full modulation is
achieved when the -20 LED first
turns red. 30 dB of clean limiting
is available above this point.
Mute and Talkback Functions
A special button (the Side Button) on the
outside of the housing can be configured
to provide a mute or talkback function, or
to be inoperative.
The Side Button Setup Switch on the
control panel opens a setup screen to
select the function of the Side Button.
Side Button
Press the Side
Button Setup
Switch to enter
the setup
screen for the
Side Button
Side Button
Setup Switch
Button
None
Mute
Ta lkBk
Use the UP/DOWN arrows to select
the desired function and then press the
MENU/SEL button to return to the Main
Window.
Mute is a “push on/push” off function
that toggles on and off each time the
Side Button is pressed. The mute func-
tion defeats the audio in the transmitter,
so it works in all compatibility modes and
will all receivers.
Talkback is a “push to talk” function that
is active only while the button is pressed.
The talkback function provides a com-
munication channel when used with a
receiver equipped with this function,
such as a Venue Wideband receiver
with firmware Ver. 2.4 or higher. When
pressed and held in, the side switch
re-directs the audio output to a differ-
ent audio channel on the receiver. As
soon as the switch is released, audio is
returned to the program channel.
NOTE: The Talkback function is
only available in the 400/Hybrid
compatibility mode. It will not
allow you to enable Talkback in
any other mode..
Main Window Displays for Mute
and Talkback Functions
The function of the Side Button is dis-
played in the LCD Main Window.
5
623.400
-40
-20
0
A
5
623.400
-40
-20
0
A
TB
5
623.400
-40
-20
0
A
MUTE
No Function
Talkback Audio Mute
When the Side Button is pressed, the
function will be active and the LCD will
display an indication.
5
623.400
-40
-20
0
A
TB
Talkback active
Reverse video
5
623.400
A
MUTE
<–MUTE–>
Mute active (MUTE
blinks)
Reverse video

®
LIMITED ONE YEAR WARRANTY
The equipment is warranted for one year from date of purchase against defects in
materials or workmanship provided it was purchased from an authorized dealer. This
warranty does not cover equipment which has been abused or damaged by careless
handling or shipping. This warranty does not apply to used or demonstrator equipment.
Should any defect develop, Lectrosonics, Inc. will, at our option, repair or replace any
defective parts without charge for either parts or labor. If Lectrosonics, Inc. cannot
correct the defect in your equipment, it will be replaced at no charge with a similar new
item. Lectrosonics, Inc. will pay for the cost of returning your equipment to you.
This warranty applies only to items returned to Lectrosonics, Inc. or an authorized
dealer, shipping costs prepaid, within one year from the date of purchase.
This Limited Warranty is governed by the laws of the State of New Mexico. It states the
entire liablility of Lectrosonics Inc. and the entire remedy of the purchaser for any
breach of warranty as outlined above. NEITHER LECTROSONICS, INC. NOR
ANYONE INVOLVED IN THE PRODUCTION OR DELIVERY OF THE EQUIPMENT
SHALL BE LIABLE FOR ANY INDIRECT, SPECIAL, PUNITIVE, CONSEQUENTIAL,
OR INCIDENTAL DAMAGES ARISING OUT OF THE USE OR INABILITY TO USE
THIS EQUIPMENT EVEN IF LECTROSONICS, INC. HAS BEEN ADVISED OF THE
POSSIBILITY OF SUCH DAMAGES. IN NO EVENT SHALL THE LIABILITY OF
LECTROSONICS, INC. EXCEED THE PURCHASE PRICE OF ANY DEFECTIVE
EQUIPMENT.
This warranty gives you specific legal rights. You may have additional legal rights which
vary from state to state.
/