Page is loading ...

La Crosse Technology, Ltd. Page 1
330-2315 FAQS
The links below will work in most PDF viewers and link to the topic area by clicking the
link. We recommend Adobe Reader version 10 or greater available at:
http://get.adobe.com/reader
TABLE OF CONTENTS
330-2315 FAQS
................................................................................................................. 1
Batteries
............................................................................................................................ 2
HARDWARE: Sensors and Station .............................................................................................................. 2
POWER: What are the power requirements for this station? ........................................................................ 3
Power Cord Input: Will this station work in other countries? ....................................................................... 3
Weather Station Factory Restart
...................................................................................... 3
Battery Change ................................................................................................................... 3
Compatible Sensors ........................................................................................................... 4
How do I view my HI and LO Temperature/Humidity Readings? ................................................................. 4
How do I reset my HI | LO Readings? ......................................................................................................... 4
What is Feels Like and Dew Point Temperature? ........................................................................................ 4
How do I interpret Current Wind Readings? ....................................................................... 5
How do I interpret the Wind History Readings? .......................................................................................... 5
How do I Reset Wind History? ............................................................................................ 5
How do I interpret the Rain Readings? ....................................................................................................... 5
How do I reset the Rain Readings? ............................................................................................................. 6
ALERTS: How do I set Alerts on my station? ............................................................................................... 6
What happens when an alert value is reached? ......................................................................................... 6
How do I silence or turn off an alert? .......................................................................................................... 7
Troubleshooting ......................................................................................................................................... 7
How do I change batteries in my sensors without losing data? ................................................................... 7
How do I delete sensor ID numbers? ......................................................................................................... 7
DASHES TEMP/HUMIDITY: Why does my thermo-hygro sensor show dashes on the station? .................... 7
Why don’t my temperature/humidity readings match the weather report? .................................................. 8
TEMP ACCURACY: Why does my thermo-hygro sensor read inaccurately? ................................................ 8
What does a reading of “HI” or “LO” mean? ............................................................................................... 8
TEMP INTERMITTANT: Why does my temp/humidity reading come and go? .............................................. 9
Humidity shows dashes but temperature works ................................................................. 9
Why am I going through batteries quickly? ................................................................................................. 9
How do I change between Fahrenheit and Celsius? ................................................................................... 9
Why are my wind cups not spinning? ....................................................................................................... 10
Can I replace my wind cups and/or wind vane? ........................................................................................ 10
0.00 WIND READING: Why do I only see 0.00 for wind speed? ............................................................... 10
DASHES FOR WIND: Why are there dashes for wind and rain readings? .................................................. 10

La Crosse Technology, Ltd. Page 2
WIND INTERMITTANT: Why do my wind and rain readings come and go? ............................................... 11
WIND ACCURACY: Why is my wind speed inaccurate? ............................................................................ 11
LOW RAIN: Why is my rainfall reading low? .............................................................................................. 12
HIGH RAIN: Why is my rainfall reading high? ............................................................................................ 12
How can I clean the rain sensor? .............................................................................................................. 12
MOUNTING: Where do I mount/position my sensors? .............................................................................. 12
SOUTHERN HEMISPHERE: Mounting the Multi-sensor ......................................................13
What is Distance/Resistance/Interference? .......................................................................13
Weather Station
...............................................................................................................14
LOW BATTERY: What do the battery icons mean?.................................................................................... 14
WEEKDAY: How do I correct the day of the week? ................................................................................... 14
Does this station have 12 hour and 24 hour time options? ........................................................................ 14
How do I manually set the time? ............................................................................................................... 14
BACKLIGHT: Does this station have a backlight? ..................................................................16
Why are my Forecast Icons inaccurate? ............................................................................16
Why does the station show different color trees? ..................................................................................... 17
GET CONNECTED: Weather Underground ............................................................................................... 17
REQUIREMENTS: Connect to Weather Underground
....................................................17
Video Connecting your Weather Station ...........................................................................17
Step by Step Instructions ...................................................................................................17
Troubleshooting Connection to Weather Underground ....................................................21
Station was Connected to WiFi and Connection was Lost ................................................22
Station never connected to Weather Underground ..........................................................22
Moving your station to a Different WiFi Network ...............................................................23
BATTERIES
• Good fresh batteries are important for best performance in your sensors and as
backup in your weather station.
• Batteries with an expiration date of 2020, were manufactured in 2010.
• We recommend batteries with an expiration date no more than 6 years in advance of
the current year for best performance.
• A minimum voltage of 1.48 v per battery is required for best performance.
• Lithium batteries may be used in outdoor sensors. Alkaline batteries for the station.
HARDWARE: SENSORS AND STATION
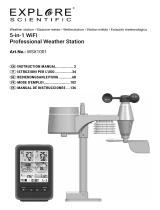
This 330-2315 weather station comes with:
•
TX233RW
Multi-sensor that reads, Wind Speed, Wind Direction and Rainfall.
•
TX233TH
Thermo-hygro sensor that reads Temperature and Humidity.

La Crosse Technology, Ltd. Page 3
POWER: WHAT ARE THE POWER REQUIREMENTS FOR THIS STATION?
•
TX233RW:
3-AA batteries
•
TX233TH
: 2-AA batteries
•
330-2315:
5 volt power cord (required) and 3-AA batteries for optional backup of your
time and date. Battery operation only will not Wi-Fi data. Power cord is required.
Note:
Batteries are not included. 5 Volt power cord is included.
POWER CORD INPUT: WILL THIS STATION WORK IN OTHER COUNTRIES?
• Your power cord input is 100-240V 0.3A 50/60Hz, and can work in other countries if
the proper plug adapter is used (not included).
• As a standalone station-, you can use this anywhere.
Note:
We cannot guarantee that all “connected” features will work in another country.
WEATHER STATION FACTORY RESTART
The factory reset will return your station to its default settings. This will clear all previous
recorded history, so you may want to write down data before taking this step.
1. Bring the Multi-sensor and Thermo-hygro sensor within 10 feet of your station.
2. Check that both sensors have fresh batteries.
3. Hold the
LIGHT
and
ALERTS
buttons together for 5 seconds to reset your station,
clear all records, clear all sensor IDs, and return all settings to default.
4. Your station will fully populate, then return to a normal display and search for
outdoor sensors. (You may want to bring sensors closer and check/change
batteries).
5. While searching for the outdoor sensors the Wind Speed, Outdoor
Temperature/Humidity and Rainfall totals will show dashes.
6. Once connected to the outdoor sensors (allow 3 minutes) the Wind Speed, Outdoor
Temperature/Humidity, and Rainfall will show current readings.
Note:
In the absence of wind or rain, these readings will show 00’s, indicating sensor
connection.
BATTERY CHANGE
After a battery change in a sensor, you can search for the sensor again:
1. In normal mode press and release the SENSOR button to view individual sensor ID’s
for up to 15 seconds.
2. When you see the sensor’s ID number, press and release the + button to search for
that sensor.

La Crosse Technology, Ltd. Page 4
• If this fails to connect the sensors to the station, bring the sensors about 10 feet from
the station and complete a Factory Restart.
COMPATIBLE SENSORS
• TX233TH Thermo-hygro
• TX233RW Rain | Wind
• These 915MHz sensors will read to this Weather station.
HOW DO I VIEW MY HI AND LO TEMPERATURE/HUMIDITY READINGS?
Your high and low temperature and humidity readings are recorded with time and date of
occurrence. Each time a new high or low reading is recorded, that reading with time and
date of occurrence will show.
To view your HI | LO records, simply press and release the TEMP button.
Viewing order:
• Outdoor HI Temperature
• Outdoor LO Temperature
• Outdoor HI Humidity
• Outdoor LO Humidity
• Indoor HI Temperature
• Indoor LO Temperature
• Indoor HI Humidity
• Indoor LO Humidity
• Feels Like HI
• Feels Like LO
• Dew Point
Note:
Feels Like temperature and Dew Point do not have a time/date of occurrence.
HOW DO I RESET MY HI | LO READINGS?
Your HI | LO Temperature /humidity readings are reset individually.
1. Press and release the TEMP button to view the history reading you wish to reset.
2. Hold the MINUS button for 5 seconds to reset that value to current temperature or
humidity and current time/date. This is the new HI or LO record.
3. Press and release the LIGHT button to exit.
WHAT IS FEELS LIKE AND DEW POINT TEMPERATURE?
Feels Like temperature indicates both Wind Chill and Heat index on stations with wind
speed

La Crosse Technology, Ltd. Page 5
•
Feels Like Temperature shows Wind Chill:
When the temperature is below 50°F, and
generally a 5 mph sustained wind speed, the Feels like Temperature is showing Wind
Chill.
•
Feels Like temperature shows Heat Index:
When the temperature is above 80°F, the
Feels like temperature is showing the Heat Index.
•
Feels Like temperature shows Current Temperature:
When temperature is between
51°F and 80°F, the Feels like temperature will remain the same as the outdoor
temperature regardless of humidity or wind speed.
HOW DO I INTERPRET CURRENT WIND READINGS?
Wind Speed Readings-Updates Every 30 seconds
•
Current Speed:
Top wind speed every 30 seconds
•
Top Speed:
Highest instantaneous reading in the past 60 minutes. Updates, when a
higher wind speed has occurred.
•
Wind Direction
– The wind direction shown in the compass rose, can be shown in
degrees or in letters. Use the program menu to choose how to view your wind
direction.
Note:
Wind direction indicates where the wind is coming from. If the wind direction shown
on your station is showing south, the wind is coming from the south. When you listen to a
weather report they will use terms like “wind is from the west at 7 mph”.
HOW DO I INTERPRET THE WIND HISTORY READINGS?
In addition to the one-hour history, which is constantly shown on the station, you can view
wind speed history at 24 hours, 7 days, current month, and current year.
Wind History:
Press and release the
WIND
button to view the maximum wind history values.
• One Hour: past 60 minute period (default record no time stamp)
• 24-hour: Past 24 hour period, from last record
• 7 Days: Past 7-day period, from last record
• Month: Defined by Calendar Month i.e. January 1 - January 31
• Year: Defined by Calendar Year i.e. January 1 - December 31
HOW DO I RESET WIND HISTORY?
1. While viewing individual values, hold the
MINUS
button for five seconds to reset the
value.
2. Wind Speed, time and date stamp will reset to current.
HOW DO I INTERPRET THE RAIN READINGS?
Press and release the
RAIN
button to view rain history:
• One Hour: past 60 minute periods
• Last 24 Hours: Total rain that occurred from now, back 24 hours.
• Day: 24 hr. period from 12:00am - 11:59pm. With time stamp
• 7 Days: Past 7-day period, from last record

La Crosse Technology, Ltd. Page 6
• Month: Defined by Calendar Month i.e. January 1 - January 31
• Year: Defined by Calendar Year i.e. January 1 - December 31
• Total: running total since station was powered up.
HOW DO I RESET THE RAIN READINGS?
Your rainfall readings are reset individually.
1. Press and release the RAIN button to view the history reading you wish to reset.
2. Hold the MINUS button for 5 seconds to reset that rain value to zero.
3. Press and release the LIGHT button to exit.
ALERTS: HOW DO I SET ALERTS ON MY STATION?
There are 10 programmable alerts to set on this station. Each alert is defaulted to OFF until
you choose to set and arm the alert.
Alerts:
• Outdoor LOW Temperature
• Outdoor HIGH Temperature
• Outdoor LOW Humidity
• Outdoor HIGH Humidity
• Indoor LOW Temperature
• Indoor HIGH Temperature
• Indoor LOW Humidity
• Indoor HIGH Humidity
• 24 Hour Rainfall
• HIGH Wind speed (Current speed)
You will need to arm each alert you wish to set.
1. Hold the ALERTS button for 3 seconds to enter alert set mode. The Outdoor LOW
temperature and OFF will show.
2. Use the PLUS or MINUS button to arm the alert if you wish to set the value.
3. Press and release the ALERTS button and the alert value will flash. Use the PLUS or
MINUS button to adjust the value.
4. Press and release the ALERTS button to move to the next alert.
5. Continue steps 2-4 to view or set all of the alerts.
Note:
To skip one or more alerts, simply press and release the ALERTS button until you
see the alert you wish to set. The follow steps 2-4 above.
WHAT HAPPENS WHEN AN ALERT VALUE IS REACHED?
• When armed alert value is reached, station will beep 5 times each minute, until out of
the alert range.
• The flashing alert icon will indicate the type of alert.
• Press any button to stop the alert from sounding.
• The alert icon will continue flashing while value while value is in alert range.

La Crosse Technology, Ltd. Page 7
HOW DO I SILENCE OR TURN OFF AN ALERT?
Silence Alert Beeps:
To silence an active alert press any button. The alert will stop
beeping but the icon will flash.
Disarm Alerts:
1. Hold the ALERTS button 3 seconds to enter alert set mode.
2. Press and release ALERTS button until you see the alert you wish to disarm.
3. Press the PLUS or MINUS button to disarm the alert. The alert text goes from ON to
OFF.
4. Press the LIGHT button to exit.
TROUBLESHOOTING
HOW DO I CHANGE BATTERIES IN MY SENSORS WITHOUT LOSING DATA?
We designed this station for convenience, so that a simple change of batteries does not
lose data or require you to power down your station.
• If you have a low battery icon on your station, you need to replace the batteries in the
sensor indicated.
• Simply install fresh batteries into your sensor then search for your sensor.
To search for a sensor:
• In normal mode press and release the SENSOR button to view individual sensor ID’s
for up to 15 seconds.
• When you see the sensor’s ID number, press and release the + button to search for
that sensor.
HOW DO I DELETE SENSOR ID NUMBERS?
In the rare event you need to replace your sensor, you will first need to delete the old
sensor ID from your station.
1. Remove batteries from your old sensor.
2. Press and release the SENSOR button to view your sensor ID number.
3. While viewing your sensor ID, hold the MINUS button for 5 seconds to delete your old
sensor ID. Dashes will show for the ID number.
4. Your station will automatically begin searching for the new sensor.
5. Install batteries in your new sensor and allow up to three minutes for your new sensor
readings and ID to appear on your station.
DASHES TEMP/HUMIDITY: WHY DOES MY THERMO-HYGRO SENSOR SHOW
DASHES ON THE STATION?
Dashes indicate the connection is lost between your station and the outdoor sensor.

La Crosse Technology, Ltd. Page 8
• My first thought is always to check that my batteries are good. If it has been working
and now is not, low batteries are the most common connection problem.
• Next, check your distance, resistance and interference. If everything was working
previously at the same location, this is likely not the issue. However sometimes there is
new growth on trees or bushes that causing another barrier. Radio Frequency (RF)
signal does not travel well through foliage due to the moisture content.
• Occasionally adding a new wireless electronic device to the home will cross the signal
path for the sensor. If this occurs try moving your station a few feet or turning the
station 90 degrees for a better angle to receive the sensor signal.
• When you have good batteries, and good location, hold the SENSOR button for three
seconds to search for your sensors. If you regain connection while the sensor is
mounted, great. If you do not regain connection, bring the sensor within 10 feet of the
station and search again.
WHY DON’T MY TEMPERATURE/HUMIDITY READINGS
MATCH THE WEATHER REPORT?
• Your temperature and humidity readings are from you sensor at your location. Your
local reporting station can be miles away so readings will differ.
TEMP ACCURACY: WHY DOES MY THERMO-HYGRO SENSOR READ
INACCURATELY?
• The thermo-hygro sensor reads the environment. If your sensor reads high during the
day but not at night it is a mounting problem.
• Press and release the SENSOR button to view the thermo-hygro sensor ID number.
Compare to the barcode on your sensor to be sure they match.
•
Side-by-side test
: Bring the thermo-hygro sensor in the house and place it next to
your station for 2 hours.
• Compare indoor and outdoor temperature. The temperatures should be within 4
degrees to be within tolerance. The humidity should be within 14% to be within
tolerance.
• If the sensor reads correctly when next to your station then try a different location
outside.
• Look for heat sources such as sunlight, door or window frames, or reflected heat that
may cause inaccurate readings.
• If your temperature is reading low, and location is not an issue, you may have a bad
sensor.
WHAT DOES A READING OF “HI” OR “LO” MEAN?
• If your outdoor temperature reading shows “HI” or “LO”, check that your batteries are
good.
• Overpower or underpowered batteries can cause this reading.
• If batteries are good, replace the outdoor sensor.
• If your temperature is fine but your humidity is reading “HI” or “LO” or dashes, your
humidity may be below 10% Relative Humidity. Your sensor does not read below 10%
humidity.

La Crosse Technology, Ltd. Page 9
TEMP INTERMITTANT: WHY DOES MY TEMP/HUMIDITY READING COME AND
GO?
• RF (radio frequency) communication may come and go occasionally. This can be
normal in some environments (e.g. moister climates).
• If a sensor goes out, please wait 2-4 hours for it to reconnect on its own. Please be
patience – these stations can reconnect on, after many hours out.
• RF (radio frequency) communication is not always 100% on. Certain temporary
conditions can cause it to go out for a time (e.g. 100% humidity).
If a miss happens:
• If sensor loses connection to the weather station for any reason, the weather station
will show dashes after 30 minutes.
• The weather station will search for 5 minutes every hour to reconnect with sensor.
• Be sure you have good batteries. Manually search for your sensor.
Try this:
• Bring your sensor within 10 feet of your station and make sure it is connected to the
station.
• After 15 minutes move the sensor into the next room with a wall between the sensor
and the station for 1 hour.
• If there is no loss of signal in that hour, move the sensor just outside.
• Continue moving the sensor back to its original location.
• If you lose connection, look for sources of interference.
HUMIDITY SHOWS DASHES BUT TEMPERATURE WORKS
• The humidity low range is 10% RH. If your local humidity is below 10% you will see this
reading.
• If temperature is working the sensor is working
• Press and release the SENSOR button to view sensor ID. Compare with ID sticker in
the battery compartment of the sensor.
WHY AM I GOING THROUGH BATTERIES QUICKLY?
• Test a new set of batteries. Write down the date of installation and the voltage of the
batteries.
• When the batteries fail, please note the date and voltage again. This is helpful in
determining the problem.
• Check for leaking batteries, which may damage the sensor.
HOW DO I CHANGE BETWEEN FAHRENHEIT AND CELSIUS?
• On your sensor, open the battery cover and press the F/C button. This will change the
temperature display on the sensor only.
• On your station enter the program menu to select Fahrenheit or Celsius temperature
display on the station.

La Crosse Technology, Ltd. Page 10
WHY ARE MY WIND CUPS NOT SPINNING?
• Check for debris or ice preventing cups from moving.
• Check mounting location. Look for obstructions that prevent the wind from reaching
the sensor.
• In most cases, the wind sensor needs to be 4-6ft above the highest point on the roof in
order to clear nearby obstructions and read accurately.
• A 50-foot clearance in all directions is best.
• Push down firmly on the center of the cups to reseat them.
• Cups are replaceable.
CAN I REPLACE MY WIND CUPS AND/OR WIND VANE?
You may have a bad storm with hail or debris that will damage your wind cups. These are
easily replaced.
Replace wind cups:
1. Loosen the screw on side of cups
2. Remove cups
3. Install new cups
4. Tighten screw
Note:
The screw in the wind cups will fit on the flat side of the metal stem on the sensor.
Replace directional vane:
1. Loosen the screw on side of vane
2. Remove direction vane
3. Install new vane
4. Tighten screw
Note:
The directional vane attached to the stem on the sensor. The screw will tighten to
the flat side of the stem for a secure fit.
0.00 WIND READING: WHY DO I ONLY SEE 0.00 FOR WIND SPEED?
The 0.00 means your multi-sensor is connected to your station.
• Check that the cups spin freely. Something may be preventing movement.
• Are your wind cups unbroken? After a storm it is good to check this.
• Check that your wind direction changes.
DASHES FOR WIND: WHY ARE THERE DASHES FOR WIND AND RAIN
READINGS?
Dashes indicate the connection is lost between your station and the multi-sensor sensor.
• My first thought is always to check that my batteries are good. If it has been working
and now is not, low batteries are the most common connection problem.
• Next, check your distance, resistance and interference. If everything was working
previously at the same location, this is likely not the issue. However sometimes there is

La Crosse Technology, Ltd. Page 11
new growth on trees or bushes that causing another barrier. Radio Frequency (RF)
signal does not travel well through foliage due to the moisture content.
• Occasionally adding a new wireless electronic device to the home will cross the signal
path for the sensor. If this occurs try moving your station a few feet or turning the
station 90 degrees for a better angle to receive the sensor signal.
• When you have good batteries, and good location, hold the SENSOR button for three
seconds to search for your sensors. If you regain connection while the sensor is
mounted, great. If you do not regain connection, bring the sensor within 10 feet of the
station and search again.
WIND INTERMITTANT: WHY DO MY WIND AND RAIN READINGS COME AND
GO?
• RF (radio frequency) communication may come and go occasionally. This can be
normal in some environments (e.g. moister climates).
• If a sensor goes out, please wait 2-4 hours for it to reconnect on its own. Please be
patient – these stations can reconnect on, after many hours out.
• RF (radio frequency) communication is not always 100% on. Certain temporary
conditions can cause it to go out for a time (e.g. 100% humidity).
If a miss happens:
• If multi-sensor loses connection to the weather station for any reason, the weather
station will show dashes after 30 minutes.
• The weather station will search for 5 minutes every hour to reconnect with multi-
sensor.
• Be sure you have good batteries. Manually search for your sensor.
Try this:
• Bring your multi-sensor within 10 feet of your station and make sure it is connected to
the station.
• After 15 minutes move the multi-sensor into the next room with a wall between the
sensor and the station for 1 hour.
• If there is no loss of signal in that hour, move the multi-sensor just outside.
• Continue moving the multi-sensor back to its original location.
• If you lose connection, look for sources of interference.
WIND ACCURACY: WHY IS MY WIND SPEED INACCURATE?
• What are you comparing your wind speed to? Your local reporting station is miles from
your location and should not be used for comparison.
• Check the unit of measure (MPH, or KMH).
• Check to see if your station receives the same repetitive wind speed recording from
the sensor multiple times.
• Confirm the direction is working correctly.
• Check that the cups turn freely.
• Check for obstructions that prevent clear wind flow to the cups.
• Check mounting. In most cases, the wind sensor needs to be 6 feet or more above the
highest point on the roof in order to clear nearby obstructions and read accurately. A
50-foot clearance in all directions is best.

La Crosse Technology, Ltd. Page 12
• It is helpful to send pictures of the sensor mounting, if you need to contact customer
support.
LOW RAIN: WHY IS MY RAINFALL READING LOW?
• Low rain readings indicate the rain sensor and weather station are connected.
• Check that the rocker tips freely.
• Check the funnel and the inside of the rain sensor for insect nests or debris that may
cause loss of rocker motion.
• Be sure to mount the rain sensor level by checking the bubble level on top of the
sensor.
Complete Tip Test:
Write down the Total Rain reading or reset the Rain Total to 0.00. With Rain Sensor
mounted slowly pour water into the funnel to tip the rocker of the rain sensor 10 times.
Wait at least 2 minutes for all the rain to collect. Repeat three times.
• Compare these tests. If they are the same, then your rain is reading correctly. If the rain
readings are different, repeat the test 3 times to avoid human error. Then look for
causes such as mounting too tight or debris clogging the funnel.
HIGH RAIN: WHY IS MY RAINFALL READING HIGH?
• Check for sources of RF (radio frequency) interference such as other wireless rain
sensors, ham radios or electric transformers.
• Keep the weather station six feet from cordless phones or wireless routers etc.
Complete a Tip Test:
Write down the Total Rain reading or reset the Rain Total to 0.00. With Rain Sensor
mounted slowly pour water into the funnel to tip the rocker of the rain sensor 10 times.
Wait at least 2 minutes for all the rain to collect. Repeat three times.
• Compare these tests. If they still read high then contact support.
HOW CAN I CLEAN THE RAIN SENSOR?
1. Remove rain funnel (pull flat side firmly upward).
2. Gently remove debris or insects inside the rain sensor.
3. Clear debris from drain vents.
4. Clear debris from the rain funnel.
5. Reinstall the rain funnel.
Note:
Do not oil the rain sensor.
MOUNTING: WHERE DO I MOUNT/POSITION MY SENSORS?
First, set everything up in the house to be sure it works before mounting the sensors
outside.
TX233TH Thermo-hygro sensor:

La Crosse Technology, Ltd. Page 13
Option 1
Install one mounting screw into a wall leaving some extended.
Place the transmitter onto the screw; gently pull the transmitter down to lock the screw
into place.
Option 2
Insert the mounting screw through the front of the transmitter and into the wall.
Tighten the screw to snug (do not over tighten).
Mount the temperature/humidity sensor on a north-facing wall or in any well-shaded
location. Sun will make it read high.
Under an eave or deck rail is preferred.
Be sure the TH sensor is mounted vertically to drain moisture.
Avoid mounting under a metal roof and use stainless screws for best transmission.
The maximum wireless transmission range to your station is over 330 feet (100 meters)
in open air.
TX233RW Multi-sensor:
For most accurate wind speed and rainfall readings, mount the Multi-sensor in an open
area clear for 50 feet in all directions.
Mount with the solar panel facing south so the wind direction is correct.
See N, S, E W, embossed on the top of the sensor.
Use the bubble level on the top of the sensor to ensure it is level, for accurate rainfall
readings.
The maximum wireless transmission range to the station is over 330 feet (100 meters)
in open air, not including walls or trees.
Cups should be on the top of the sensor.
Attach to mounting surface with screws through the mounting bracket.
With the mounting bracket, the sensor can attach from the bottom or from the side.
Note:
you will occasionally need to clear debris from the rain sensor.
Use your own mounting pole:
Insert your own mounting pole (1.25 or less diameter) into the sensor.
Tighten screws
Mounting bracket would not be used.
SOUTHERN HEMISPHERE: MOUNTING THE MULTI-SENSOR
• For the system to work correctly, the Multi-Sensor’s solar panel must face south for
correct wind direction readings. Not to worry, the sensor should still get plenty of
sunlight even in the southern hemisphere and facing south.
• The wind directional vane is not reversible.
• Keep in mind, that the solar panel does not run the sensor on its own; it simply extends
the life of your batteries. So be sure to face it south so your direction is correct!
WHAT IS DISTANCE/RESISTANCE/INTERFERENCE?
Distance:
• The maximum transmitting range in open air is over 400 feet (121.92 meters) between
each sensor and your weather station.
• Consider the signal path from your weather station to each sensor as a straight line.

La Crosse Technology, Ltd. Page 14
• Consider the distance the weather station is from other electronics in the home.
Resistance:
• Each obstacle: walls, windows, vegetation, stucco, concrete, and large metal objects
will reduce the effective signal range by about one-half.
• Mounting your sensors on a metal fence can significantly reduce the effective signal
range.
Interference:
• Consider electronics in the signal path between the sensors and your weather station.
• Simple relocation of the sensors or the weather station may correct an interference
issue.
• Windows can reflect the radio signal.
• Metal will absorb the RF (radio frequency) signal.
• Stucco held to the wall by a metal mesh will cause interference.
• Transmitting antennas from: ham radios, emergency dispatch centers, airports, military
bases, etc. may cause interference.
• Electrical wires, utilities, cables, etc. may create interference if too close.
WEATHER STATION
LOW BATTERY: WHAT DO THE BATTERY ICONS MEAN?
• A battery icon will appear near the word WIND when you need to change batteries in
your wind sensor.
• A battery icon will appear near the word OUTDOOR when you need to change
batteries in your thermo-hygro sensor.
• See how to change batteries under troubleshooting.
WEEKDAY: HOW DO I CORRECT THE DAY OF THE WEEK?
• The day of the week will set when the Year, Month, and date are set. If your day of the
week is incorrect yet the month and date are correct, please go the program menu and
check the YEAR setting.
DOES THIS STATION HAVE 12 HOUR AND 24 HOUR TIME OPTIONS?
• Yes, you can select 12 hour or 24 hour time format in the program menu.
HOW DO I MANUALLY SET THE TIME?
• The
SET
button will move through the program menu.
• The
+/-
buttons will adjust values.
• Press the
LIGHT
button at any time to exit.
Program Menu:
1. BEEP ON/OFF
2. Time zone (-12 to +12)

La Crosse Technology, Ltd. Page 15
3. Auto DST ON/OFF (Daylight Saving Time)
4. Hour
5. Minutes
6. 12h/24h hour format
7. Year
8. Month
9. Date
10. Temperature (C/F)
11. Wind degree or direction (letters) select
12. Wind speed select (mph/kmh)
13. Rainfall unit select (in/mm)
Program Menu:
1. Hold the
SET
button two seconds to enter time set mode.
2. BEEP ON will show. Press the
+ / -
buttons to turn the beep sound OFF.
3. Press the
SET
button to confirm adjustments and move to Time Zone.
4. TIME ZONE -5H will show. Press the
+ / -
buttons to select your time zone.
• -4H =Atlantic
• -5H =Eastern
• -6H =Central
IMPORTANT:
North American time zones are
• -7h =Mountain negative numbers.
• -8H = Pacific
• -9H =Alaskan
• -10H = Hawaiian
5. Press the
SET
button to confirm adjustments and move to AUTO DST (Daylight Saving Time
Indicator) ON/OFF.
6. AUTO DST ON and will show. Press the
+ / -
buttons to disable the daylight saving time
indicator (OFF).
7. Press the
SET
button to confirm adjustments and move to set the hour.
8. The Hour will show. Press the
+ / -
buttons to adjust the hour.
9. Press the
SET
button to confirm adjustments and move to set the minutes.
10. The Minutes will show. Press the
+ / -
buttons to adjust the minutes.
11. Press the
SET
button to confirm adjustments and move to 12 or 24-hour time format.
12. 12Hr FORMAT will show. Press the
+ / -
buttons to change to 24 hour time format.
13. Press the
SET
button to confirm adjustments and move to set the year.
14. YEAR and the four-digit year will show. Press the
+ / -
buttons to adjust the year.
15. Press the
SET
button to confirm adjustments and move to set the month.
16. MONTH will show. Press the
+ / -
buttons to adjust the month.
17. Press the
SET
button to confirm adjustments and move to set the date.
18. DATE and a number will show. Press the
+ / -
buttons to adjust the date.
19. Press the
SET
button to confirm adjustments and move to select Fahrenheit or Celsius.
20. TEMP °F will show. Press the
+ / -
buttons to change to Celsius.
21. Press the
SET
button to confirm adjustments and choose your Wind Direction display in
numbers or cardinal direction (N, S, E, W).
22. WIND DIR will show and wind direction in numbers or letters will show below the compass
rose. Press the
+ / -
buttons to how to display your wind direction.
23. Press the
SET
button to confirm adjustments and select wind speed in MPH or KMH.

La Crosse Technology, Ltd. Page 16
24. WIND MPH (miles per hour) will show. Press the
+ / -
buttons if you prefer KMH (kilometers
per hour).
25. Press the
SET
button to confirm adjustments and move to select rain in Inches or Millimeters.
26. RAIN IN (inches) will show. Press the
+ / -
buttons to change to “MM” millimeters).
27. Press and release the SET button to confirm and exit.
28.
Note:
Press the LIGHT button at any time to exit.
BACKLIGHT: DOES THIS STATION HAVE A BACKLIGHT?
A/C adapter:
The backlight is on continuously when operating the station with the 5-volt
a/c adapter.
Note:
When the Adapter is NOT in use, the Hi/Low/Off light feature is not available.
Try this exercise in a dim room. The station has a bright, dim and OFF setting for the
backlight. Wait 15 seconds after pressing the LIGHT button to see if backlight stays on.
This will assure it is not in OFF mode.
1. Be sure the AC cord is correctly inserted to the station and the outlet.
2. Remove the batteries.
3. Press the LIGHT button. If the backlight comes on and the display is active
your AC cord works.
4. Wait 15 seconds to see if the back light stays on.
5. If the backlight goes out after 15 seconds, repeat #3.
WHY ARE MY FORECAST ICONS INACCURATE?
Your station predicts weather condition of the next 12-hours based on the change of
atmospheric pressure with 70-75% accuracy.
Note
: As weather conditions cannot be 100% correctly forecasted we are not responsible
for any loss caused by an incorrect forecast.
Forecast Icons:
Sunny
Partly Sunny
Cloudy
Rain
T-Storm
Snow
Note:
The “snow” icon appears when the temperature is below 32°F (0°C) and the forecast
is rainy or stormy.
Your station calibrates barometric pressure based on its location over time to generate
an accurate, personal forecast. Please allow 7-10 days for barometer calibration.
The forecast station samples the barometric pressure every twelve minutes. These
samples are averaged hourly and daily then stored in nonvolatile memory. The three
hour pressure icon change is based off of the last four average hourly readings.
IMPORTANT
: As your station builds memory, it will compare the current average
pressure to the past forty day average pressure for increased accuracy. The longer
your station operates in one location the more accurate the forecast icons will be.

La Crosse Technology, Ltd. Page 17
WHY DOES THE STATION SHOW DIFFERENT COLOR TREES?
The trees and foliage color will change seasonally. Programmed dates in your station tell
the trees when to change automatically.
GET CONNECTED: WEATHER UNDERGROUND
REQUIREMENTS: CONNECT TO WEATHER UNDERGROUND
• Weather Underground account with Personal Weather Station (PWS) ID and Password,
(you can set this up through the Weather Connect App).
• Mobile device with WiFi service (do not use 3G or 4G network) that can download the
Weather Connect App.
Note:
Cannot connect via computer
• High speed Internet service and router required
Weather Connect Mobile Application (free available online):
• iOS App Store, search: Weather Connect
• Android Play Store, search: Weather Connect
VIDEO CONNECTING YOUR WEATHER STATION
•
Video support at:
https://www.youtube.com/watch?v=87unKfbxd9c
• Start at 7:54 minutes for video instructions.
Tips:
• For your security, this app will
only
work on protected WiFi networks.
• Open public networks that require a browser sign in will not work.
STEP BY STEP INSTRUCTIONS
Spring: March 20th – Jun 20th Summer: Jun 21st – Sep 20th
Autumn: Sep 21st – Dec 20th Winter: Dec 21st – Mar 19th

La Crosse Technology, Ltd. Page 18
1.
Be sure your weather station is plugged in
with the provided power cord.
2.
Double check that your phone is using the
same WiFi network that the station will be on.
3.
Download the Weather Connect mobile app from the Apple Store or Google Play.
4.
Launch the App
5.
Choose Option 1-Create a New PWS ID. (A Personal Weather Station (PWS) ID from
Weather Underground). Press the REGISTER A PWS button and the App will take you
through setting up a Weather Underground account and creating a PWS ID.

La Crosse Technology, Ltd. Page 19
6.
Login into your existing Weather Underground account or create one.
7.
Chose a name for your weather station.
8.
Then press the green button for your GPS location (Latitude and Longitude).
9.
Agree to Weather Undergrounds Terms of Service.
10.
Press the green Register PWS button.
11.
You will be presented with your PWS ID and password from Weather Underground.
Note:
Write these down as they are saved temporarily on your mobile device. Be
sure your device is on the correct network then press the green CONTINUE button.

La Crosse Technology, Ltd. Page 20
12.
Press the green SET DEVICE WIFI button.
13.
Enter your WiFi network password. The WiFi icon on your display should be solid.
Note:
A solid WiFi icon only indicates that you are connected to the Internet (time
and date will set). It does
not
indicate connection to Weather Underground.
14.
Select your weather station from the list (There should only be 1).
15.
Enter your PWS ID and password from Weather Underground if not already
entered. Press the green Save button.
/