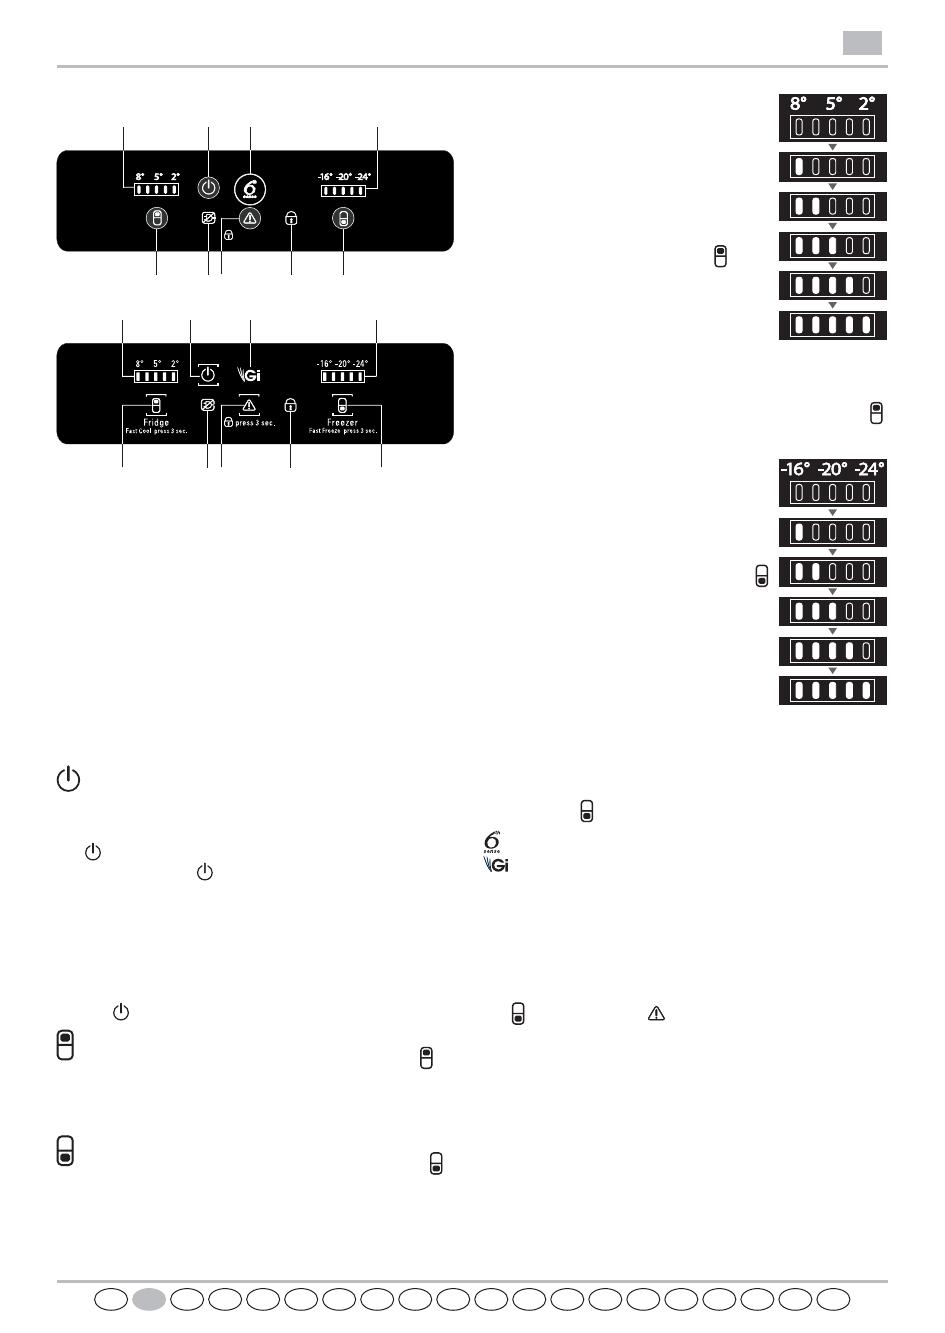
Whirlpool WBA34983 DFC W Program Chart

Type
Program Chart
1
2
3
4
5
6
8
9
11
14
15
3a
3b
on - off
16
19
17
10
13
18
7
12
1. Control panel
Refrigerator Compartment
2. Refrigerator compartment light ( LED system)
3. Fan
3a. ON/OFF fan button
3b. cover of fan
4. Shelves / Shelf area*
5. Bottle rack*
6. Multi-flow cold air system
7. Sensor cover
8. Cooler compartment (best for meat and fish)*
9. Rating plate with commercial name
10. Fruits and vegetables crisper
11. Crisper divider*
12. Doors reversibility kit
13. Door trays
14. Bottle holder*
15. Egg tray*
16. Door seals
Freezer Compartment
16. Door seals
17. Upper basket for freezing fresh food or to store
frozen food
18. Ice tray and/or cold accumulator*
19. Storage baskets for frozen food items
Anti-bacterial protection
- Antibacterial filter* in the fan (3)
- Antibacterial additives* in the material of Crisper (10)
- Door seals are made of material able to inhibit
bacterial growth (16)
* Available on selected models
Notes:
- In case of power failure the cold accumulator helps
to keep optimal storage temperature longer.
- All shelves and door trays are removable.
- The internal temperatures of the appliance may be
affected by the ambient temperature, frequency of
door opening, as well as location of the appliance.
Temperature setting should take into consideration
these factors.
- The appliance accessories are not dishwasher safe.
- After inserting food, ensure that compartment doors
closes properly, especially the freezer door.
TO INCREASE STORAGE
The freezer compartment can be used without the
baskets to increase storage and for large products.
You can place the food products directly on the racks.
HOW TO START THE APPLIANCE
After plugging the appliance to the mains, it starts the
operation automatically.
After starting the appliance, wait at least 4-6 hours
before placing food into the appliance.
When the appliance is connected to the power
supply, the display lights up and all the icons appear
on the display for approximately 1 second.
The default (factory) values of the freezer and
refrigerator compartment settings light-up.
FAN
The Fan improves temperature distribution inside the
refrigerator compartment, allowing better preservation
of stored food.
By default, the fan is switched on.
It is advisable to keep the fan switched on, so that the
“6th Sense Fresh Control” / ”Green Intelligence
ProFresh” function can work properly and also when
the ambient air temperature is above 27-28°C or if
you notice drops of water on the glass shelves or in
sever humidity conditions.
Please note that when the fan is switched on it will not
continuously work.
The fan will start/stop working depending on the
temperature and/or humidity level inside the fridge.
It is therefore absolutely normal if the fan does not
move even if the fan is switched on.
Note: Do not obstruct the air intake area with
food items.
To guarantee the right performance at lower ambient
temperature (colder than 18°C) and to minimize
Energy Consumption, turn off the fan.
To turn off the fan press the button (3a).
If the appliance has the fan it can be equipped with
the antibacterial filter.
Remove it from the box placed in the crisper drawer
(10) and insert into the cover of fan (3b).
The replacement procedure is attached with the filter.
PRODUCT SHEET
EN
UAROBGRUHUSKCZPLFIDKNOSEGRITPTESNLFRGBDE
CONTROL PANEL
A. Fridge temperature LEDs
B. On/Stand-by icon/button
C. “6th Sense Fresh Control” /
“Green Intelligence ProFresh” icon
D. Freezer temperature LEDs
E. Fridge temperature / Fast Cool (press 3 sec.)
button
F. Black Out icon
G. Reset button / Alarm icon
H. Key Lock button
I. Freezer temperature / Fast Freeze (press 3 sec.)
button
FUNCTIONS
On/Stand-by
This function turns On/Stand-by both the
refrigerator and freezer compartments.
To put the product in Stand-by, press & hold the
On/Stand-by button for 3 seconds. All the icons
turn off except
On/Stand-by icon back light to
indicate that the appliance is in Stand-by. When
the appliance is in Stand-by, the light inside the
refrigerator compartment does not work.
Remember that this operation does not
disconnect the appliance from the power supply.
To switch the appliance on again, simply press
the
On/Stand-by button.
Fridge Temperature
To adjust the Fridge Temperature, press the
Fridge °C button. The Fridge Temperature can be
adjusted between +2°C and +8°C, as shown by
the Fridge Temperature LEDs.
Freezer Temperature
To adjust the Freezer Temperature, press the
Freezer °C button. The Freezer Temperature can
be adjusted between -16°C and -24°C, as shown
by the Freezer Temperature LEDs.
Fast Cool
Using Fast Cool function it is
possible to increase the cooling
in the refrigerator compartment.
The use of this function is
recommended when placing a
very high quantity of food in the
refrigerator compartment.
Press & hold for 3 sec. the
Fridge °C button to activate Fast
Cool function.
When activated, the Fast Cool
indication will be displayed by
the Fridge Temperature LEDs as
shown in the beside sequence.
The function is automatically disabled after 6
hours, or can be manually disabled by pressing
Fridge °C button.
Fast Freeze
The use of this function is
recommended when placing a
very high quantity of food to be
frozen in the freezer compartment.
24 hours before freezing fresh
food, press & hold for 3 sec. the
Freezer button to activate the Fast
Freeze function.
When activated, the Fast Freeze
indication will be displayed by the
Freezer Temperature LEDs as
shown in the beside sequence.
After 24 hours place the food
to be frozen in the upper basket of freezer
compartment.
The function is automatically disabled after
48 hours, or can be manually disabled by
pressing
Freezer °C button.
/
“6th Sense Fresh Control” /
“Green Intelligence ProFresh”
This function allows optimum storage conditions
(regarding temperature and humidity) to be
quickly reached inside the appliance. The
fan must also be switched on for it to work
properly. The “6th Sense Fresh Control” / “Green
Intelligence ProFresh” is activated by default.
To manually deactivate the function, press the
Freezer °C and Alarm buttons for 3 sec.:
you will hear an acoustical signal and “6th Sense
Fresh Control” / “Green Intelligence ProFresh”
icon will turn off again as confirmation that the
feature has been deactivated.
The function can be reactivated by repeating
the same procedure: you will hear an acoustical
signal and ˝6th Sense Fresh Control” / ˝Green
Intelligence ProFresh” icon will turn on again as
confirmation that the feature has been activated.
After a power blackout or exit from Stand-by to
normal mode, the “6th Sense Fresh Control” /
“Green Intelligence ProFresh” status resets to
default i.e. active.
PRODUCT SHEET
EN
Fridge
Fast Cool press 3 sec.
Fas t Freeze pres s 3 sec.
F reezer
pres s 3 s ec.
F
H
E
G
BA
C
D
I
F
H
E
G
BA
C
D
I
UAROBGRUHUSKCZPLFIDKNOSEGRITPTESNLFRGBDE
Smart Display
This option function can be used to save energy.
To activate the Smart Display, press
Fridge °C
and
Freezer °C buttons at the same time for 3
seconds until the acoustic signal sounds.
Two seconds after activation of the Smart Display,
the display goes off, except the “6th Sense Fresh
Control” / “Green Intelligence ProFresh” indicator.
To adjust the temperature or use other functions,
it is necessary to activate the display by pressing
any button. After about 15 seconds without
performing any action, the display goes off again
and only the “6th Sense Fresh Control” / “Green
Intelligence ProFresh” indicator remains visible.
When function is deactivated the normal display
is restored. The Smart Display is automatically
disabled after a power failure. Remember that
this function does not disconnect the appliance
from the power supply, but only reduce the power
consumed by external display.
Note: The declared appliance energy
consumption refers to operation with the Smart
Display function activated.
When the “6th Sense Fresh Control” / “Green
Intelligence ProFresh” is deactivated and the
Smart display will be activated: all LEDs on the
display will turn off.
Key Lock
This function prevents anyone from inadvertently
changing settings or switching off the appliance.
To lock the keys, press Stop Alarm button
for
3 seconds until the display shows the Key Lock
indicator
and an acoustic signal confirms the
function has been selected. After 3s. indicator
goes off.
When activated, pressing the other buttons
(except Stop Alarm button) activates an audible
signal and on display flashes the Key Lock
indicator
. Any alarm can be deactivated when
Key Lock function is active.
To unlock the keys, follow the same procedure
until the display shows the Key Lock indicator
and an acoustic signal confirms the function has
been disengaged. After 1s. indicator
goes off.
PRODUCT SHEET
EN
MALFUNCTION AND ALARM INDICATIONS:
ALARMS
TABLE
Signal Cause Cure
Door open
alarm
The acoustical alarm is activated
and the alarm icon flashes
The door has remained
open for more than
2 minutes
Close the door
Temperature
alarm
The acoustical alarm is activated,
5 Freezer Temperature LEDs
blinks and the alarm icon
remains on
The inside temperature is
not adequate
Press the button
; the acoustical
alarm stops, 5 Freezer Temperature
LEDs blinks and the red light
remains on until a temperature
< -10°C is reached
Long black-
out alarm
The acoustical alarm is activated,
the light remains on and the
light flashes.
Prolonged power failure,
able to cause the inside
temperature to increase
to 0°C
Press the button
; the acoustical
alarm stops
Malfunction The acoustical alarm is activated,
3 central Fridge Temperature
LEDs flashes on the display and
the alarm icon
remains on
Product malfunction Contact the After-sales Service and
specify the number of LEDs’ flashes
Door open alarm
The Alarm icon lights up blinking and the
acoustic alarm sounds.
The alarm is activated when the refrigerator’s
door is left open for more than 2 minutes. To
disengage the door alarms close the door or
press once
Stop Alarm to mute the acoustic
alarm.
Temperature alarm
The acoustic alarm sounds and all the 5 Freezer
Temperature LEDs blinks.
The alarm is activated when:
The appliance is connected to the power supply
after prolonged disuse
The freezer compartment temperature is too
high
The quantity of foods loaded into the freezer
exceeds that indicated on the rating plate
The freezer door has been left open for a long
time
To mute the alarm buzzer press
Reset button
just once.
• The
Alarm Icon is automatically turned-off
as soon as the freezer compartment reaches
a temperature below -10°C and the Freezer
Temperature LEDs stop blinking and shows the
chosen setting.
UAROBGRUHUSKCZPLFIDKNOSEGRITPTESNLFRGBDE
PRODUCT SHEET
EN
Black Out Alarm
After a power blackout, your product is designed
to automatically monitor the temperature in
the freezer when electricity is resupplied. If the
temperature in the freezer rises above freezing
level, the
Black Out icon lit the Alarm Icon
blinks and the acoustical alarm sounds when
electricity is re-supplied. To reset the alarm press
the
Reset button just once.
In case of Black Out Alarm, the following actions
are recommended:
If the food in the freezer is unfrozen but still
cold, all the food in the freezer should be moved
to the fridge compartment and eaten within the
next 24 hours.
If the food in the freezer is frozen, this indicates
the food was thawed and then refrozen when
electricity was re-supplied which degrades
taste, quality and nutritional value and also
could be unsafe. It is recommended to not
consume the food but to dispose of the entire
content of the freezer.
The Black Out Alarm is designed to provide
guidance on food quality in the freezer in the
event of electricity black out. This system
does not guarantee food quality or safety
and consumers are advised to use their own
judgment in evaluating food quality in freezer and
refrigerator compartments.
CLEANING
Regularly clean the appliance using a cloth and a
solution of warm water, with some soft detergent
suitable for cleaning the inside of the refrigerator
compartment.
Do not use abrasive detergents or tools.
To ensure continuous and correct flow of defrost
water, regularly clean the inside of the draining hole
on the back of the refrigerator near the fruit and
vegetable drawer, using the tool provided .
Before carrying out any cleaning or maintenance
operation, unplug the appliance or disconnect it from
the power supply.
DEFROSTING THE
REFRIGERATOR COMPARTMENT
Refrigerator compartment defrosting is completely
automatic.
Droplets of water on the rear wall inside the
refrigerator compartment indicate that the automatic
defrost phase is in progress. The defrost water is
automatically run into a drain hole and collected in a
container, where it evaporates.
DEFROSTING THE
FREEZER COMPARTMENT
The freezer should be defrosted once
or twice a year or when excessive
frost is present (3 mm thickness).
The formation of frost is normal.
The amount and rate at which frost
accumulates depends on room
conditions and how often the door is open.
To defrost the unit, switch off the whole appliance and
remove all food products.
Leave the freezer door open to allow the frost to melt.
Pull out the defrost water drain and place a container
under the drain (see figure).
When the operation is completed, put back the
defrost water drain.
Clean the inside of the freezer. Rinse and dry
thoroughly. Switch the whole appliance, back on and
store the food inside.
LED’s LIGHTING
If the inside LED light is not working, it must be
replaced by service.
Important:
The refrigerator compartment light switches on when
the refrigerator door is opened. After 10 minutes of
door opening the light switches off.
5019 620 00030 Printed in Italy 05/13
UAROBGRUHUSKCZPLFIDKNOSEGRITPTESNLFRGBDE
  • Page 1 1
  • Page 2 2
  • Page 3 3
  • Page 4 4

Whirlpool WBA34983 DFC W Program Chart

Type
Program Chart

Ask a question and I''ll find the answer in the document

Finding information in a document is now easier with AI