Whirlpool WBA43282 NF IX User guide
- Category
- Fridge-freezers
- Type
- User guide
This manual is also suitable for

Gebrauchsanweisung
Instructions for use
Mode d’emploi
Gebruiksaanwijzing
Istruzioni per l’uso
Brugsanvisning
Bruksanvisning
Käyttöohje
Manual de utilização
Instrucciones para el uso
Instrukcje użytkowania
Használati utasítás
ИнструкциЯ за употреба
Návod k použití
Návod na použitie
Инструкции по эксплуатации


1

2
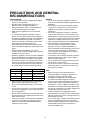
• This appliance is intended to be used in
household and similar applications such as
- staff kitchen areas in shops, offices and other
working environments;
- farm houses and by clients in hotels, motels
and other residential type environments;
- bed and breakfast type environments;
After unpacking the appliance, make sure it is
not damaged and that the door closes properly.
Any damage must be reported to the dealer
within 24 hours of delivery of the appliance.
Wait at least two hours before switching the
appliance on, to ensure that the refrigerant
circuit is fully efficient.
Installation and the electrical connection
must be carried out by a qualified technician
according to the manufacturer’s instructions
and in compliance with the local safety
regulations.
Clean the inside of the appliance before using
it.
The packing material is 100% recyclable and
bears the recycling symbol. For disposal, comply
with the local regulations. Keep the packing
materials (plastic bags, polystyrene parts, etc.)
out of the reach of children, as they are a potential
source of danger.
The appliance is manufactured using recyclable
material.
This appliance is marked in compliance with
European Directive 2002/96/EC on Waste
Electrical and Electronic Equipment (WEEE). By
ensuring the correct disposal of this appliance,
you can help prevent potentially negative
consequences for the environment and the health
of persons.
The symbol
on the appliance, or on the
accompanying documents, indicates that this
appliance should not be treated as domestic
waste but must be taken to a special collection
centre for the recycling of electrical and electronic
equipment.
When scrapping the appliance, make it unusable
by cutting off the power cable and removing the
doors and shelves so that children cannot easily
climb inside and become trapped.
Scrap the appliance in compliance with local
regulations on waste disposal, taking it to a special
collection centre; do not leave the appliance
unattended even for a few days, since it is a
potential source of danger for children.
For further information on the treatment,
recovery and recycling of this product, contact
your competent local office, the household
waste collection service or the shop where you
purchased the appliance.
This appliance does not contain CFCs. The
refrigerant circuit contains R134a (HFC) or R600a
(HC) (see the rating plate inside the appliance).
Appliances with Isobutane (R600a): isobutane is
a natural gas without environmental impact, but is
flammable. Therefore, make sure the refrigerant
circuit pipes are not damaged.
This product may contain Fluorinated Greenhouse
Gases covered by the Kyoto Protocol; the
refrigerant gas is inside a hermetically sealed
system.
Refrigerant gas: R134a has a Global Warming
Potential of (GWP) 1300.
• This appliance has been designed for
preserving food and is manufactured in
compliance with Regulation (CE) No.
1935/2004.
• This appliance has been designed,
manufactured and marketed in compliance
with:
- safety objectives of the “Low Voltage” safety
objectives of the “Low Voltage” Directive
2006/95/CE (which replaces 73/23/CEE and
subsequent amendments);
- the protection requirements of Directive
“EMC” 2004/108/EC.
Electrical safety of the appliance
can only be guaranteed if it
is correctly connected to an
approved earthing system.

3
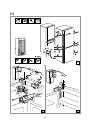
• The appliance must be handled and installed
by two or more persons.
• Be careful not to damage the floors (e.g.
parquet) when moving the appliance.
• During installation, make sure the appliance
does not damage the power cable.
• Make sure the appliance is not near a heat
source.
• To guarantee adequate ventilation, leave a
space on both sides and above the appliance.
The distance between the rear of the appliance
and the wall behind the appliance should be
50mm. A reduction of this space will increase
the Energy consumption of product.
• Keep the appliance ventilation openings free.
• Do not damage the appliance refrigerant circuit
pipes.
• Install and level the appliance on a floor
strong enough to take its weight and in a place
suitable for its size and use.
• Install the appliance in a dry and well-ventilated
place. The appliance is arranged for operation
in places where the temperature comes within
the following ranges, according to the climatic
class given on the rating plate. The appliance
may not work properly if it is left for a long time
at a temperature outside the specified range.
• Make sure the voltage specified on the rating
plate corresponds to that of your home.
• Do not use single/multi adapters or extension
cords.
• For the water connection, use the pipe supplied
with the new appliance; do not reuse that of the
previous appliance.
• Power cable modification or replacement must
only be carried out by qualified personnel or by
After-sales Service.
• It must be possible to disconnect the appliance
from the power supply by unplugging it or by
means of a mains two-pole switch installed
upstream of the socket.
• Do not store explosive substances such as
aerosol cans with a flammable propellant in this
appliance.
• Do not store or use petrol, flammable liquids
or gas in the vicinity of this or other electrical
appliances. The fumes can cause fires or
explosions.
• Do not use mechanical, electric or chemical
means other than those recommended by the
Manufacturer to speed up the defrost process.
• Do not use or place electrical devices inside the
appliance compartments if they are not of the
type expressly authorised by the Manufacturer.
• This appliance is not intended for use by
persons (including children) with reduced
physical, sensory or mental capabilities, or
lack of experience and knowledge, unless they
have been given supervision or instruction
concerning use of the appliance by a person
responsible for their safety.
• To avoid the risk of children becoming trapped
and suffocating, do not allow them to play or
hide inside the appliance.
• Do not swallow the contents (non-toxic) of the
ice packs (in some models).
• Do not eat ice cubes or ice lollies immediately
after taking them out of the freezer since they
may cause cold burns.
• Before carrying out any maintenance or
cleaning operation, unplug the appliance or
disconnect it from the power supply.
• All appliances equipped with an automatic
ice-maker and water dispenser must be
connected to a water supply that only delivers
drinking water (with mains water pressure of
between 0.17 and 0.81 Mpa (1.7 and 8.1 bar)).
Automatic ice-makers and/or water dispensers
not directly connected to the water supply must
be filled with drinking water only.
• Use the refrigerator compartment only for
storing fresh food and the freezer compartment
only for storing frozen food, freezing fresh food
and making ice cubes.
• Do not store glass containers with liquids in the
freezer compartment since they may break.
• Avoid storing unwrapped food in direct contact
with internal surfaces of the refrigerator or
freezer compartments.
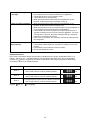
SN From 10 to 32 From 50 to 90
N From 16 to 32 From 61 to 90
ST From 16 to 38 From 61 to 100
T From 16 to 43 From 61 to 110

4
• Do not block the air outlet area (on the back
wall) with food products
• If the freezer is provided with a flap, it is
possible to maximize the storage volume by
removing the flap (by bending it).
• All shelves, flaps and pull-out baskets are
removable.
• The internal temperatures of the appliance
may be affected by the ambient temperature,
frequency of door opening, as well as location
of the appliance. Temperature setting should
take into consideration these factors.
• Unless otherwise specified the appliance
accessories are not dishwasher safe.
• After inserting food, ensure that compartments
doors closes properly, especially the freezer
door.
• The bigger distance at the backside of
appliance to the wall, the higher is energy-
saving.
You can increase storage capacity in the freezer
compartment by:
• removing the baskets / flaps (by bending it) to
allow the storage of big products.
• placing the food products directly on the freezer
shelves.
• removing the Twist Ice Maker (separately) or
together with the docking station.
This function allows optimum storage conditions
(regarding temperature and humidity) to be quickly
reached inside the appliance. The fan must
also be switched on for it to work properly. The
“6th Sense Fresh Control” / “Green Intelligence
ProFresh” is activated by default.
To manually deactivate the function, press the
Freezer °C and Eco Night buttons for 3 sec.:
you will hear a acoustical signal and “6th Sense
Fresh Control” / “Green Intelligence ProFresh”
icon will turn off as confirmation that the feature
has been deactivated.
The function can be reactivated by repeating
the same procedure: you will hear acoustical
signal and “6th Sense Fresh Control” / “Green
Intelligence ProFresh” icon will turn on again as
confirmation that the feature has been activated.
After a power blackout or exit from Stand-by to
normal mode, the “6th Sense Fresh Control” /
“Green Intelligence ProFresh” status resets to
default i.e. active.
Eco Night function allows to concentrate the
energy consumption of the product during off-
peak time (usually coinciding with night time),
when energy is available in large quantity and it
costs less than during the day (only in specific
countries using multiple-rate system based on off-
peak times - check your rate plan with your utility
company).
To activate the function, press the Eco Night
button at the starting moment of the off-peak
rate (depending on your specific rate plan). For
example, if the off-peak rate starts at 8 p.m., you
have to press the button at that time.
When the
Eco Night icon is ON, the function
is active. After you activate the function, the
product automatically starts to adapt the energy
consumption to the time, i.e. consuming less
energy during the day then during the night.
In order to work in a correct way,
the function must be active both during the night
and the day.

5
The feature remains active until you deactivate
it (or if a blackout occurs, or if the product is
switched off). To deactivate the function, press the
Eco Night button. When the
Eco Night icon
is OFF the function is not active.
appliance energy consumption is declared
with Eco Night function disabled.
This function turns On/Stand-by both the
refrigerator and the freezer compartments. To
put the product in Stand-by, press & hold the
On/Stand-by button for 3 seconds. All the icons
turn off except On/Stand-by icon back light to
indicate that the appliance is in Stand-by. When
the appliance is in Stand-by, the light inside the
refrigerator compartment does not work.
Remember that this operation does not disconnect
the appliance from the power supply.
To switch the appliance On again, simply press
and hold for 3 seconds the On/Stand-By
button.
After a power blackout, your product is designed
to automatically monitor the temperature in
the freezer when electricity is resupplied. If the
temperature in the freezer rises above freezing
level, the
Black Out icon lit the
Alarm icon
blinks and the acoustical alarm sounds when
electricity is re-supplied. To reset the alarm press
the
Reset Alarm button just once.
In case of Black Out Alarm, the following actions
are recommended:
• If the food in the freezer is unfrozen but still
cold, all the food in the freezer should be
moved to the fridge compartment and eaten
within the next 24 hours.
• If the food in the freezer is frozen, this indicates
the food was thawed and then refrozen when
electricity was re-supplied which degrades
taste, quality and nutritional value and also
could be unsafe. It is recommended to not
consume the food but to dispose of the entire
content of the freezer.
The Black Out Alarm is designed to provide
guidance on food quality in the freezer in the event
of electricity black out.
This system does not guarantee food quality or
safety and consumers are advised to use their own
judgment in evaluating food quality in freezer and
refrigerator compartments.
The
Alarm icon lights up blinking and the
acoustic alarm sounds. The alarm is activated
when the door is left open for more than 2 minutes.
To disengage the door alarms close the door, or
press once
Stop Alarm button to mute the
acoustic alarm.
The acoustic alarm sounds and all the 5 Freezer
Temperature LEDs blinks. The alarm is activated
when:
• The appliance is connected to the power
supply after prolonged disuse
• The freezer compartment temperature is too
high
• The quantity of foods loaded into the freezer
exceeds that indicated on the rating plate
• The freezer door has been left open for a long
time
To mute the alarm buzzer press
Reset button
just once.
The
Alarm Icon is automatically turned-off
as soon as the freezer compartment reaches
a temperature below -10°C and the Freezer
Temperature LEDs stop blinking and shows the
chosen setting.
The Fan improves temperature distribution inside
the refrigerator compartment, allowing better
preservation of stored food.
By default, the fan is switched on. It is advisable to
keep the fan switched on, so that the “6th Sense
Fresh Control” /”Green Intelligence ProFresh”
function can work properly and also when the
ambient air temperature is above 27 ÷ 28°C or if
you notice drops of water on the glass shelves or
in sever humidity conditions.
Please note that when the fan is switched on it will
not continuously work.
The fan will start/stop working depending on the
temperature and/or humidity level inside the fridge.
It is therefore absolutely normal if the fan does not
move even if the fan is switched on.
To guarantee the right performance at lower
ambient temperature (colder than 18°C) and to
minimize Energy Consumption, turn off the fan.
To turn off the fan press the button of fan.
If the appliance has the Fan it can be equipped
with the .
The replacement procedure is included in the filter
box.
Remove it from the box placed in the crisper
drawer and insert into the cover of fan.

6
This function prevents anyone from inadvertently
changing settings or switching off the appliance.
To lock the keys, press Stop Alarm button for
3 seconds until the display shows the Key Lock
indicator and an acoustic signal confirms
the function has been selected. After 3 seconds
indicator goes off.
When activated, pressing the other buttons
(except Stop Alarm button) activates an audible
signal and on display flashes the Key Lock
indicator . Any alarm can be deactivated when
Key Lock function is active.
To unlock the keys, follow the same procedure
until the display shows the Key Lock indicator
and an acoustic signal confirms the function has
been disengaged. After 1second indicator goes
off.
This optional function can be used to save energy.
To activate the Smart Display, press Fridge °C
and Freezer °C buttons at the same time for 3
seconds u ntil an audible signal sounds.
Two seconds after activation of the Smart Display,
the display goes off, except the “6th Sense Fresh
Control”/ “Green Intelligence ProFresh” icon.
To adjust the temperature or use other functions,
it is necessary to activate the display by pressing
any button.
After about 15 seconds without performing any
action, the display goes off again and only the
“6th Sense Fresh Control”/ “Green Intelligence
ProFresh” icon remains visible.
When function is deactivated the normal display
is restored. The Smart Display is automatically
disabled after a power failure.
Remember that this function does not disconnect
the appliance from the power supply, but only
reduce the power consumed by external display.
Activation and deactivation procedure see the
Instruction for use.
The declared appliance energy consumption
refers to operation with the Smart Display function
activated.
When the “6th Sense Fresh Control” / “Green
Intelligence ProFresh” is deactivated, than the
Smart display will be activated - all LEDs on the
display will turn off.

The water tank is made of antibacterial material. This prevents and reduces the
proliferation of bacteria.
An internal container, with an active carbon filtered ensures water filtration.
To fill the tank: rotate the water inlet towards you and fill with water, using a jug or
other suitable container. Once the tank is full, close the water inlet by moving it back to
its original position.
any other liquid may impair product performance.
After filling the tank, the water may not be immediately available. This is because the
filtering process may require a few minutes (depending on the amount of water in the
tank).
To dispense water: with the refrigerator door closed, press the water dispenser tab
with the glass.
If for safety reason water delivery must be prevented, simply press the stop at the
back of the tab. To release water delivery move the stop back to its original position.It
is recommended to drink the supplied water from the dispenser in 6 hours.
Periodically clean the water tank with running water. Twice a year it is recommended
to keep healthy the unit using specific products based on diluted chlorine that not
modify the material properties and rinse with current water.
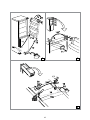
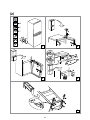
To clean the tank, proceed as follows:
- (fig. 3) release and remove the top door tray
- (fig. 4) release and remove the water tank by lifting it and pulling towards you. Place
the tank on a flat surface, remove and wash the top cover.
- (fig. 5a -5b) remove the internal container and the filter, and wash
them separately.
(no detergent or sharp tools). To clean the disk filter, first remove it
from the container.
- (fig. 6) for a more thorough cleaning, remove the valve cap (the fitting
connecting the tank to the refrigerator) by rotating it anticlockwise.
Clean the cap. Important: do not pull on the valve body (fig. 7).
- (fig. 8) replace the valve cap by rotating clockwise.
- (fig. 9) fit the tank back in place by placing it between the lateral
guides of the door and pushing it in position, ensuring that the valve
is back in its original seat. Check that the there are no gaps between
the rubber seal of the tank and the door.
Filter replacement is not covered by product warranty. To order more water filter
cartridges, please contact your after-sales service.
The first time you use the water dispenser or after a long period left not used wash the tank and the
filter with water. The water dispenser provides fresh, filtered water, without the need of opening the
refrigerator door. This will reduce the number of times the door is opened, thus also reducing energy
consumption of the product.
The water filter should be removed from the foil bag (found in the crisper drawer (item 7). Follow the
instructions provided with the filter.
If the filter is left dry for an extended period of time, its performance may be reduced.
Immerse the filter in water for a few seconds to reinstate optimum performance.
Tank
To fill the tank, rotate the cap
in the direction of the arrow
Stop
Activation
device
Water
drip tray
7

8
The refrigerator compartment is the ideal storage
location for ready meals, cakes and pastries,
preserved food, condensed milk, hard cheese, fruit
and vegetables sensitive to cold as well as tropical
fruit.
The natural circulation of air in the refrigerator
compartment results in zones with different
temperatures. It is coldest directly above the
vegetable drawers and at the rear wall. It is
warmest at the top front of the compartment.
Insufficient ventilation results in an
increase in energy consumption and reduction of
the refrigerating performance.
• Use recyclable plastic, metal, aluminum and
glass containers and cling film to wrap foods.
• Always use closed containers for liquids and for
food that may give off or be tainted by odor or
flavor transfer or cover them.
• Foods which give off a large amount ethylene
gas and those that are sensitive to this gas,
such as fruit, vegetables and salad, should
always be separated or wrapped so as not
to reduce the storage life; for example do
not store tomatoes together with kiwi fruits or
cabbage.
• Do not store food too close together to enable
sufficient air circulation.
• To ensure bottles do not tip over: move the
bottle holder.
• On the fridge shelves: baked products, ready
meals, fruit and vegetables sensitive to cold,
small packages.
• In the cooler compartment: dairy products,
meat and sausage.
• In the fruits and vegetables crisper: vegetables,
salad, fruit.
• In the door (from top to bottom): butter, cheese,
eggs, tubes, small bottles, milk, juice cartons.
You can store frozen food, make ice cubes and
freeze fresh food in the freezer compartment
The maximum number of kilograms of fresh food
that can be frozen within a 24-hour period is
indicated on the rating plate (…kg/24h)
Do not re-freeze defrosted food.
Put the frozen products into the freezer and
classify them. The storage date should be
indicated on the packs, to allow use within expiry
dates preservation.
When purchasing frozen food products:
• Ensure that the packaging is not damaged
(frozen food in damaged packaging may have
deteriorated). If the package is swollen or has
damp patches, it may not have been stored
under optimal conditions and defrosting may
have already begun.
• When shopping, leave frozen food purchases
until last and transport the products in a
thermally insulated cool bag.

9
You can remove the complete Twist Ice Maker
(press and hold (1) the leveler on the left and push
it (2) towards you) or you can just remove the ice
cube tray by pulling it (3) towards you.
or
Fill the tray with potable water (maximum level =
2/3 of the overall capacity).
or
Place again the Twist Ice Maker in its seat, or
reinsert the ice cube tray within the Twist Ice
Maker. Take care not to spill water.
Wait until the ice cubes are formed (it is
recommended to wait for about 4 hours, with the
Fast Freeze option active).
Twist Ice Maker is removable. It can be
placed in horizontal position anywhere in the
freezer compartment or taken out of the appliance
when ice-making is not required.
Make sure that the storage bin is in place under
the ice tray. If not, slide into place.
Twist one of levers firmly in the clockwise
direction until the tray twists slightly. The ice
cubes fall into the storage bin.
Repeat Step 2 for the other half of the tray, if
necessary. You can make ice cubes (see the
chapter “HOW TO MAKE ICE CUBES”) and
store them in the storage bin and pull it towards
you.
To get ice, slightly lift up the storage bin and
pull it towards you.
if you prefer, you can remove the entire
Twist Ice Maker from the appliance, to take the
ice cubes wherever is convenient for you (for
example: directly on the table).
or

10
There is no need to disconnect the appliance from
the power supply if you will be away for less than
three weeks. Use up perishable food, freeze other
food.
Remove all the food if you are going away for three
weeks or more.
Empty the ice bucket.
Fix some wooden or plastic wedges to the upper
part of both doors with adhesive tape and leave
the doors open enough for air to circulate inside
both compartments. This will prevent odour and
mould from setting in.
Take out all internal parts.
Wrap them well, and fix them together with
adhesive tape so that they do not bang together
or get lost.
Screw the adjustable feet so that they do not
touch the support surface.
Close and fix both doors with adhesive tape
and, again using adhesive tape, fix the power
cable to the appliance.
In the event of a power failure, call the local office
of your electricity supply company and ask how
long it is going to last.
Bear in mind that a full appliance will stay
cold longer than a partially filled one.
If ice crystals are still visible on the food, it may be
frozen again, although flavour and aroma may be
affected.
If food is found to be in a poor condition, it is best
to throw it away.
For power failures lasting up to 24 hours.
Keep both doors of the appliance closed. This
will allow the stored food to stay cold as long as
possible.
For power failures lasting more than 24 hours.
Empty the freezer compartment and arrange
the food in a portable freezer. If this type
of freezer is not available and, likewise, no
artificial ice packs are available, try to use up
the food, which is more easily perishable.
Empty the ice bucket.
• Install the appliance in a dry, well
ventilated room far away from any heat
source (e.g. radiator, cooker, etc.) and in
a place not exposed directly to the sun.
If required, use an insulating plate.
• To guarantee adequate ventilation,
leave a space on both sides and above
the appliance. The distance between
the rear of the appliance and the wall
behind the appliance should be 50mm.
A reduction of this space will increase
the Energy consumption of product.
• Insufficient ventilation on back of the
product increases energy consumption
and decreases cooling efficiency.
• The internal temperatures of the appliance
may be affected by the ambient temperature,
frequency of door opening, as well as
location of the appliance. Temperature setting
should take into consideration these factors.
• Allow warm food and drinks to cool
down before placing in the appliance.
• Do not obstruct the fan with food items.
• After placing the food check if the
door of compartments closes properly,
especially the freezer door.
• Reduce to a minimum door opening.
• When thawing frozen food, place them in the
refrigerator. The low temperature of the frozen
products cools the food in the refrigerator.
• For appliances with special compartments
(Fresh Food Compartment, Zero
Degrees Box, …) they can be
removed when not in use.
• Positioning of the shelves in the refrigerator
has no impact on the efficient usage of
energy. Food should be placed on the
shelves in such way to ensure proper
air circulation (food should not touch
each other and distance between
food and rear wall should be kept).
• You can increase the storage capacity of
frozen food by removing the flap and / or
basket (according to the Product Sheet),
maintaining the same energy consumption.
• The condenser (the coil placed in the rear of
the appliance) should be cleaned regularly.
• Damaged or leaky gasket must be
replaced as soon as possible.

11
Before any cleaning or maintenance operation,
unplug the appliance from the mains or disconnect
the electrical power supply.
Periodically clean the appliance with a cloth and a
solution of lukewarm water and neutral detergent
specifically for refrigerator interiors.
Never use detergents or abrasives.
Never clean refrigerator parts with flammable
fluids.
The fumes can create a fire hazard or explosion.
Clean the outside of the appliance and the door
seal with a damp cloth and dry with a soft cloth.
Do not use steam cleaners.
Clean the condenser using a vacuum cleaner,
proceeding as follows: remove the front plinth and
proceed to clean the condenser.
• The buttons and control panel display must
not be cleaned with alcohol or alcohol-derived
substances, but with a dry cloth.
• The refrigeration system pipes are located
near the defrost pan and can become hot.
Periodically clean them with a vacuum cleaner.
• To remove or insert the glass shelf move up the
front part of the shelf to pass the stopper.
To ensure continuous and correct flow of defrost
water, regularly clean the inside of the draining
hole on the back of the refrigerator near the fruit
and vegetable drawer, using the tool provided .
The light system inside the refrigerator
compartment uses LEDs light, allowing a better
lightning as well as very low energy consumption.
If the LED light system does not work, please
contact the Service to replace it.
The refrigerator compartment light
switches on when the refrigerator door is opened.
If the door is kept open for more then 10 minutes
the light will be automatically switched off.

12
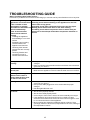
Performance problems often result from little things you can find and fix yourself without tools of any kind.
- Levelling the appliance
and installing it on an even
surface
- Separating and avoiding
contact between the
appliance and furniture.
- Checking if the internal
components are correctly
placed.
- Checking if bottles and
containers are not in
contact with each other.
• Is the power cable plugged into a live socket with the proper
voltage?
• Have you checked the protection devices and fuses of the electrical
system in your home?
• This is normal in hot, damp weather. The pan can even be half full.
Make sure the appliance is level so that the water does not overflow.
• This is normal in hot weather and when the compressor is running.
• Have you checked the protection devices and fuses of the electrical
system in your home?
• Is the power cable plugged into a live socket with the proper
voltage?
• Has the light bulb burnt out?
• Is the condenser (back the appliance) free of dust and fluff?
• Are the door properly closed?
• Are the door seals properly fitted?
• On hot days or if the room is warm, the motor naturally runs longer.
• If the appliance door has been left open for a while or if large
amounts of food have been stored, the motor will run longer in order
to cool down the interior of the appliance.
• Motor running time depends on different things: number of door
openings, amount of food stored, temperature of the room, setting of
the temperature controls.

13
In the event of operation alarms, they will also be displayed in the Fridge Temperature LEDs, (e.g.
Failure1, Failure 2, etc...) call After-sales Service and specify the alarm code. The acoustic alarm
sounds, the Alarm icon lights up and the 3 central LEDs in the Fridge Temperature LEDs blinks
according to failure code described below:
Legend:
Led off Led flashing
Error 2
RC Set points blink on/off at 0,5 sec. Blinks ON 2 times
then remain off for 5 seconds. Pattern repeats.
x2
Error 3
RC Set points blink on/off at 0,5 sec. Blinks ON 3 times
then remain off for 5 seconds. Pattern repeats.
x3
Error 6
RC Set points blink on/off at 0,5 sec. Blinks ON 6 times
then remain off for 5 seconds. Pattern repeats.
x6
• Are the appliance controls correctly set?
• Has a large amount of food been added to the appliance?
• Check that the door is not opened too often.
• Check that the door close properly.
• Make sure that air flow vents inside the compartment are not
blocked, as this prevents the circulation of cold air.
• Make sure that air flow vents inside the compartment are not
blocked, as this prevents the circulation of air.
• Make sure that the food is properly packaged. Dry any dampness on
food containers before placing them in the appliance.
• Check that the doors are not opened too often. When the door is
opened, humidity from the room air enters the appliance. The more
often the door is opened, the faster humidity builds up, especially
when the room itself is very humid.
• If the room is very humid, it is normal for moisture to build up inside
the refrigerator.
• Check that food packages are not blocking the door.
• Check that the internal parts or automatic ice maker are not out of
position.
• Check that the door seals are not dirty or sticky.
• Ensure the appliance is level.

14
Switch the appliance on again to see if the
problem has been solved. If it has not, disconnect
the appliance from the power supply and wait for
about an hour before switching on again.
If, after performing the checks described in
the Troubleshooting Guide and switching the
appliance on again, your appliance still does not
work properly, contact the After-sales Service,
explain the problem.
• the model and appliance serial number (stated
on the rating plate),
• the nature of the problem,
• the Service number (the number after the word
SERVICE on the data plate on the inside of the
appliance),
• your full address,
• your telephone number and area code.
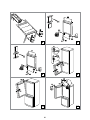
The direction of door opening can be changed. If
this operation is performed by After-sales Service
it is not covered by the warranty.
If the mains lead of this appliance is fitted with a BS 1363A
13amp fused plug, to change a fuse in this type of plug use
an A.S.T.A. approved fuse to BS 1362 type and proceed as
follows:
Remove the fuse cover () and fuse (B).
Fit replacement 13A fuse into fuse cover.
Refit both into plug.
The fuse cover must be refitted when changing a fuse and if
the fuse cover is lost the plug must not be used until a correct replacement is fitted.
Correct replacement are identified by the colour insert or the colour embossed in words on the base of
the plug.
Replacement fuse covers are available from your local electrical store.
The information given in respect of Great Britain will frequently apply, but a third type of plug and socket is
also used, the 2-pin, side earth type.
If the fitted plug is not suitable for your socket outlet, please contact After-sales Service for further
instruction. Please do not attempt to change plug yourself. This procedure needs to be carried out by
a qualified technician in compliance with the manufactures instructions and current standard safety
regulations.

15

16

17

18
Page is loading ...
Page is loading ...
Page is loading ...
Page is loading ...
Page is loading ...
-
 1
1
-
 2
2
-
 3
3
-
 4
4
-
 5
5
-
 6
6
-
 7
7
-
 8
8
-
 9
9
-
 10
10
-
 11
11
-
 12
12
-
 13
13
-
 14
14
-
 15
15
-
 16
16
-
 17
17
-
 18
18
-
 19
19
-
 20
20
-
 21
21
-
 22
22
-
 23
23
-
 24
24
-
 25
25


Whirlpool WBA43282 NF IX User guide
- Category
- Fridge-freezers
- Type
- User guide
- This manual is also suitable for
Ask a question and I''ll find the answer in the document
Finding information in a document is now easier with AI
Related papers
-
Whirlpool SW6 AM2Q W Owner's manual
-
Whirlpool WTV4598 NFC IX AQUA Program Chart
-
KitchenAid KRCB 6060 User guide
-
Whirlpool WBA34983 DFC W Program Chart
-
-
-
KitchenAid KRCB 6020 Owner's manual
-
Whirlpool WME1664 A+DFCXAQUA Installation guide
-
Whirlpool WTV4597 NFC IX Program Chart
-
Whirlpool WTV4595 NFC TS Program Chart
Other documents
-
Bauknecht KGE 582 A3+ IO Program Chart
-
TOTALCOOL ECO-ICE Portable Ice Maker User guide
-
HOTPOINT/ARISTON UH8 F2D XI 2 User guide
-
-
Bauknecht GKN 172 A2+ Program Chart
-
-
KitchenAid KRMB 1830 Owner's manual
-
Bauknecht KRA 175 OPTIMA User guide
-
Bauknecht KGE KLIFF Program Chart
-
Amana AUF1027TIGS User guide