Trendnet TV-IP751WC User guide
- Category
- Digital Video Recorders (DVR)
- Type
- User guide
This manual is also suitable for

TRENDnet User’s Guide
Cover Page

© Copyright 2012 TRENDnet. All Rights Reserved.
TRENDnet User’s Guide
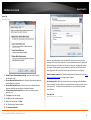
Table of Contents
i
Contents
Chapter 1 ...........................................................................................2
Network IP Cameras ..................................................................................................2
PTZ Cameras..............................................................................................................2
Chapter 2 ...........................................................................................4
SecurView Pro Installation .........................................................................................4
SecurView Pro Server Setup Wizard ...........................................................................5
Note: This user name and password is used for broadcast server login.......................5
SecurView Pro Terminology .......................................................................................7
Structure Pane...........................................................................................................8
Broadcast Server Connections....................................................................................9
Chapter 3 .........................................................................................10
Server Recording Properties.....................................................................................10
Server Communication Properties............................................................................12
Server Watchdog.....................................................................................................13
Server User Management ........................................................................................15
Chapter 4 .........................................................................................16
Setting up an IP Camera...........................................................................................16
Scheduled Recording Configuration .........................................................................27
Digital Input Configurations and Events....................................................................29
Live view pop up by motion and events....................................................................32
Chapter 5 .........................................................................................33
Digital PAN-TILT-ZOOM on live view.........................................................................33
PTZ Control Panel for optical zoom ..........................................................................33
Save Presets and Tours for PTZ Cameras ..................................................................34
PTZ control – Point to click PTZ ................................................................................34
PTZ control – Shortcut Keys .....................................................................................35
Video Adjustments ..................................................................................................35
Audio Adjustments ..................................................................................................35
Video Frame Export.................................................................................................35
Exclusivity Mode (Windows lock out feature)...........................................................37
Enable Video Transfer Properties.............................................................................38
Video Transfer Defaults ...........................................................................................39
Layouts....................................................................................................................39
Layout Sequence .....................................................................................................39
Map Module............................................................................................................41
Archive Backup Wizard ............................................................................................41
Chapter 6 .........................................................................................44
How to playback video.............................................................................................44
Export Video............................................................................................................45
Export Snapshots.....................................................................................................47
Quick snapshot save and current visible frame save.................................................48
Chapter 7 .........................................................................................49
Upgrading SecurView Pro software to a newer version ............................................49

© Copyright 2012 TRENDnet. All Rights Reserved.
TRENDnet User’s Guide
SecurView Pro
2
Chapter 1
Network IP Cameras
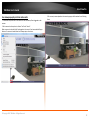
What is a network (IP) camera?
Network camera, IP addressable camera, IP Camera, all referring to the same type of
cameras, is a digital camera that can be directly connected to the Internet through a
network cable or Wireless connection. Network cameras send already digitized and
compressed video streams. Network Cameras are the fastest growing trend in the
Surveillance industry. Here are some of the benefits of IP cameras:
· Existing local network infrastructure could be used for the installation.
· Comparably less cabling required compared with an analog CCTV installation.
· Network cameras have built-in motion detectors and compression engines,
which enable the DVR Server to use a minimum of its computer resources;
therefore, the same computer can also be used for other tasks.
· There are Network (IP) cameras with very high resolution (1.3 Mega pixels and
more). Analog cameras are incapable of achieving such resolution.
· Network (IP) camera installations are highly scalable and upgradeable. There is
no need to buy and install additional video capture boards for the DVR system
in the event you want to add a camera or increase performance of the system.
· Any analog camera can be converted to a network camera by using a Network
(IP) server.
· There is no geographical limitation for the installation.
· Effective off site recording (either by itself or in addition to onside recording)
eliminates the possibility of destruction of the video medium due to deliberate
actions or an accident (fire, flooding, etc.).
· Some of the network cameras also can be used as a webcam to serve as an
advertising engine for a business.
MPEG4/H.264 IP cameras:
Without compromising image quality, an H.264 encoder can reduce the size of a digital
video file by more than 75% compared with the Motion JPEG format. This means that
much less network bandwidth and storage space are required for a video frame. A
higher video quality can be achieved with less bit rate.
· Better Average Bandwidth and Storage Reduction over MJPEG
· High-quality megapixel video stream at 20fps can be as low as 2 Mbps
· High resolution and bandwidth efficiency
PTZ Cameras
What are PTZ Cameras?
PTZ camera is the camera with the mechanical assembly for Panning, Tilting and
Zooming the camera. There are many types of PTZ cameras available and their cost
varies based on Speed, Zoom capacity, Manufacturer, etc. Network PTZ cameras does
not require any addition wiring or devices, since PTZ commands are being send over
TCP/IP network; therefore, making installation process much simpler and eliminating a
lot of compatibility and configuration issues.

© Copyright 2012 TRENDnet. All Rights Reserved.
TRENDnet User’s Guide
SecurView Pro
3
· Through the software, 32 cameras can be managed, configured, and adjusted,
without the need to be at the server site.
· Right mouse click on any camera to show a list of various options like camera
setup, recording settings, user management, and etc.
· Right mouse click on any camera to access archive playback, freeze function,
digital PTZ, screen arrangement, video transfer options and more.
· Use the wizards for easy navigation and step-by-step setup.

© Copyright 2012 TRENDnet. All Rights Reserved.
TRENDnet User’s Guide
SecurView Pro
4
Chapter 2
SecurView Pro Installation
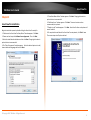
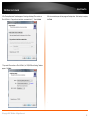
Begin the installation process by double clicking the SecurView Pro setup file.
1. “Welcome to the SecurView Pro Setup Wizard” window appears. Click Next.
2. Please read and accept the Software License Agreement. Then click Next.
3. Select the installation destinalation and then click Next. Changing the location is
optional but not recommended.
4. The “Select Components” window appears. Select the desired options to install,
choose the desired language and then click Next.
5. “Select Start Menu Folder” window appears. Click Next. Changing the location is
optional but not recommended.
6. “Additional Icons” window appears. Click Next. These are shortcuts and are
recommended, but optional.
7.”Ready to install” window appears. Click Next. SecurView Pro Server and options will
now be installed.
8. To complete the installation of the SecurView Pro setup wizard, click Finish. Leave
“Run server setup wizard” option checked.

© Copyright 2012 TRENDnet. All Rights Reserved.
TRENDnet User’s Guide
SecurView Pro
5
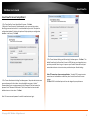
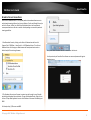
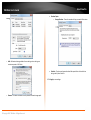
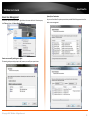
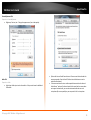
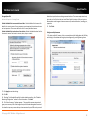
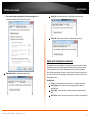
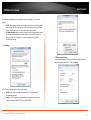
SecurView Pro Server Setup Wizard
1. The “SecurView Pro Server Setup Wizard” appears. Click Next.
2. When the “Server Properties” window appears, enter your machines unique
Identifying name and server title. It is recommended that you check “Compact the
configuration database” (checking this option will help optimize your configuration
database in the future). Click Next
2. The “Server Administration Settings” window appears. Setup the administrator user
name and password in this window. Leave the default user name as “admin”
(Recommended), enter a unique password in the “Password” field and reenter the
password in the “Password Confirmation” field. You will have the chance to add
additional users at a later time. Click Next
Note: This user name and password is used for broadcast server login.
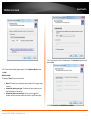
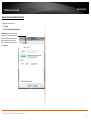
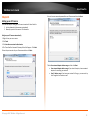
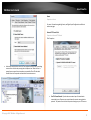
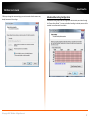
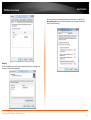
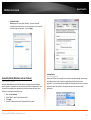
3. The “Server Network Settings and Port settings” window appears. Click Next. The
default firewall port that SecurView Pro uses is 60554 but you can change that to any
port that you would like as long as it is open on your firewall. Please check with your
network administrator or internet service provider about your firewall settings
Allow TCP connections from remote applications: To enable TCP to accept remote
connections can be disabled or enable at any time from the SecurView Pro server
settings.
TCP Port: 60554 is the default port and it can be changed to your preferences.

© Copyright 2012 TRENDnet. All Rights Reserved.
TRENDnet User’s Guide
SecurView Pro
6
.
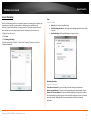
4. The "Server Execution Mode" window appears. Select Application Mode and then
click Next.
Application Mode.
The following “Startup” option can be selected:
· Manual: That means you will physically have to double click the program to get
it started.
· Automatically with any user logon: The software will open up when any user
logs into Windows on that machine.
· Automatically with current user logon: The user currently logged into
Windows, will be the user that activates SecurView Pro upon Windows login.
5. The “Server Execution Control” window appears. Click Start Server Application and
then click Next.
6. Click Finish to exit the wizard.End of Server Installation.
Default Install
Directory of
Database

© Copyright 2012 TRENDnet. All Rights Reserved.
TRENDnet User’s Guide
SecurView Pro
7
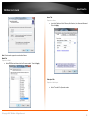
SecurView Pro Terminology
Panel – Panel, window
Toggle- To alternate between two or more electronic, mechanical, or computer-related
options, usually by the operation of a single switch or keystroke
Toolbar- The toolbar that you see at the top of your screen gives you various options
such as open, save and various screen manipulations, at the click of a button.
Open Configuration- This button on the toolbar allows you to open previous
SecurView Pro configurations. It is most useful if you are exporting
configurations from one machine to another.
Save Configuration- This button on the toolbar allows you to save any
changes that you have just made to your DVR, it will continue to save to the
same file unless you click on File and Save As then you can save to a different
file or even to a floppy.
Structure Pane - This button toggles whether you see or don’t see the
structure pane on the left side of your SecurView Pro window. The structure
pane is most useful when you are looking at cameras from multiple locations
and multiple SecurView Pro servers. We will discuss the structure pane later on
in this chapter.
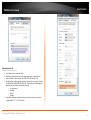
Structure Filter Pane – This button toggles whether you see or don’t see the
structure pane on the left side of your Luxriot window. The structure pane is
most useful when you are looking at cameras from multiple locations and
multiple Luxriot servers. We will discuss the structure pane later on in this chapter.
Events - This button toggles the events window. The events window gives you
important notifications such as, when you are connecting to a server
successfully. It lets you know if you have input improper user names and
passwords and gives you error codes when needed.
PTZ Control - This button toggles the PTZ control pane. If you do not have a
pan-tilt-zoom camera connected to your system then this button does no
need to be pressed.
Video amplification- This button toggles the video amplification pane. When
this button is pressed a pane will come up from which you will be able to
adjust the brightness, contrast, saturation, sharpness, and hue for any
camera.
Audio- This button toggles Audio pane control. Audio pane enables you to
listen to Audio from different cameras.
Full Screen - This button toggles full screen mode. In full screen, none of the
panes will be seen and the cameras will be expanded to their maximum size
to fill the full screen of your monitor.
Open Archive – This button opens archive viewer window. You will be able
to view archived data of your connected DVR.
Emergency Recording – On activation of emergency recording mode for a
device, the footage is recorded at full frame rate during specific period of
time and then is automatically returned to regular recording settings.
Manage Maps – This button toggles map module window for managing and
viewing cameras on Google or previously added maps.
Save Current Frame as – This button allows you to save currently rendered
video frame into file. Frame from selected screen will be saved only.

© Copyright 2012 TRENDnet. All Rights Reserved.
TRENDnet User’s Guide
SecurView Pro
8
Wizards- The wizard’s icon on the toolbar gives you a shortcut to various
server, and camera options and configurations. You can also access these
features through the right click menus in the software.
Views- These buttons on the toolbar allow you to manipulate your views and camera
layouts to your own preference.
Screen Footer- The screen footer button on the toolbar allows you to display
various information underneath each camera window. It can display current
frame time, image resolution, and average image size per frame and average
frame rate per second. The screen footer is the text below each camera
Stream Selection- The stream selection button allows you to pick which
camera you would like to view in the selected camera window. This can also
be done through the right click menus and by dragging the desired camera
from the structure pane to the desired display window, or right click on any
camera window and select stream.
Show Motion- The show motion toolbar button toggles whether or not you
want the motion outlined on the selected camera screen. Note: Motion
detection must be setup before this feature can be activated
Maximize- When pressed the maximize button puts the selected camera into
a single view, if pressed again it will return to the previous view. This can also
be accomplished by double clicking on the camera of choice.
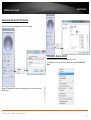
Structure Pane
The structure pane is the control center. This is where you will setup all of your
cameras as well as your server.

© Copyright 2012 TRENDnet. All Rights Reserved.
TRENDnet User’s Guide
SecurView Pro
9
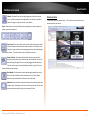
Broadcast Server Connections
SecurView Pro Broadcast Server - is a separate product to broadcast video streams to
multiple web-browsing platforms (e.g. Internet Explorer, Firefox, and Google Chrome) as
well as for iPhone, Android, etc. SecurView Pro Broadcast Server will resample and
recompress video stream for web or mobile client depending on connection speed and
viewing capabilities.
1. Start Broadcast Server by clicking on the Start or Windows Icon and then click
Program Files→ TRENDnet -> SecurView Pro -> DVR Broadcast Server. This will start
Broadcast Server for Viewing over Web browser and Smartphone devices such as
Android and/or iPhone through browser.
2. The Broadcast Server icon will appear in system tray and through it you will be able
test/configure Broadcast Server operation. To open the Broadcast Server, Right click on
the icon → Open Web Applica�on or enter the IP address of the server followed by port
8080.
For Example: http://192.xxx.xxx.xxx:8080
Also you can enter Broadcast domain for access over the Internet.
Use the previously set SecurView Pro software user name and password to login to
broadcast server.

© Copyright 2012 TRENDnet. All Rights Reserved.
TRENDnet User’s Guide
SecurView Pro
10
When logged into the server via the browser on a PC or Mac, you can click on any
cameras to the left in structure pane. The IP cameras will be displayed in main screen as
separate windows that can be resized and moved anywhere within the window.
Chapter 3
Server Recording Properties
1. Right click on your server
2. Click Tasks.
3. Click Recording Properties.
· Directories
o Priority- Choose which of your drives records first. Check and then
highlight (by clicking one time) the drive you wish to customize in this
portion
o Quota - Chose the amount of space you would like to designate for storage
on that particular hard drive. NOTE: NEVER, choose 100% for the C Drive.
This may cause your machine to eventually crash due to not available
virtual memory for page. The reasonable quota is 85-90% of the drive
capacity to avoid the effects of fragmentation issues and also to allow the
highly loaded DVR to effectively enforce recording quotas

© Copyright 2012 TRENDnet. All Rights Reserved.
TRENDnet User’s Guide
SecurView Pro
11
o Add - Add external storage address for recording such as sharing on a
remote computer or NAS drive.
o Remove- This button removes currently selected network storage path.
· Duration Quota
o Storage Duration - Chose the numbers of days you would like to store.
· Statistics - Check on used spaced and available space left on the hard drives
being used by SecurView Pro.
4. Click Apply to save settings.

© Copyright 2012 TRENDnet. All Rights Reserved.
TRENDnet User’s Guide
SecurView Pro
12
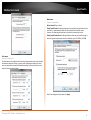
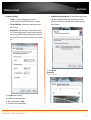
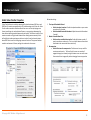
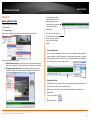
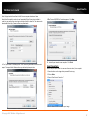
Server Communication Properties
1. Right click on your server
2. Click Tasks.
3. Click TCP Communication Properties.
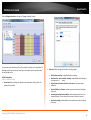
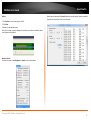
Connections- Here you can see at
all times who is connected to your
server. The IP address, user name
and connection time can all be
seen. Click refresh at any time for
an updated list.

© Copyright 2012 TRENDnet. All Rights Reserved.
TRENDnet User’s Guide
SecurView Pro
13
Server Watchdog
Your Server Watchdog performs an important operation, protecting your software from
improperly working due to system problems. Configuring your watchdog is not
necessary, if you chose to enable it during installation. The default settings will work
well, however if you are having frequent restarts, adjusting it may become vital.
1. Right click on your server
2. Click Tasks.
3. Click Manage Watchdog.
4. In order to select the “Disable”, “Enable” and “Properties” buttons, left click on
“Software Watchdog”.
State
Properties > State
· State- Start or Stop running Watchdog.
· Start Watchdog with Server- Will begin the Watchdog application when server
is started.
· Enable Watchdog-Will keep Watchdog running at all times.
Watchdog Operation
Properties > Operation
Grace Interval Seconds- The grace period given when starting the application.
Reboot Interval Minutes- The amount of time Watchdog will allow between reboots.
Number of Failure to Reboot- The amount of failed attempts to fix whatever problem
has been detected, by restarting only the SecurView Pro application. Once this number
has been reached, Watchdog will now reboot Windows and the SecurView Pro
application.

© Copyright 2012 TRENDnet. All Rights Reserved.
TRENDnet User’s Guide
SecurView Pro
14
Performance
Properties > Performance
This tab allows you to configure which environment performance counters and variables
will determine necessity of server or system restart. Watchdog will attempt to restart
server or system after any specified threshold exceeding; There are also visible current
values of the environment variables.
Maintenance
Properties > Maintenance
Restart Intervals- Days or Hours.
Enable Periodic Restart- Enabling this feature will restart the Server Application at times
specified. It is recommended to restart the Server Application to Refresh system
resources. The Watchdog Server-Restart will go virtually unnoticed by the user.
Enable Periodic Restart Hours- Enabling this feature allows the user to define a range in
hours during which maintenance restarts are allowed (e.g. from 7:00PM to 11:20PM).
Note: If any changes have been made, click Apply.

© Copyright 2012 TRENDnet. All Rights Reserved.
TRENDnet User’s Guide
SecurView Pro
15
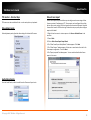
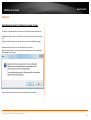
Server User Management
To start the “Server Security Wizard”, right-click on the server within the Structure pane,
click Tasks and then click Server Security Wizard.
Create users or modify existing users rights
This wizard guides you step by step to add, remove, or modify user permissions.
System/User Permissions
As you see SecurView Pro system permissions provides Global Scope permissions for
better user management.

© Copyright 2012 TRENDnet. All Rights Reserved.
TRENDnet User’s Guide
SecurView Pro
16
Chapter 4
Setting up an IP Camera
There are two ways of setting up an IP camera to work with SecurView Pro:
1. Let the software find the cameras automatically
2. Manually input all of the camera’s IP information
Configure your IP Cameras automatically
1. Right click on your server name
2. Click Tasks
3. Click Auto discover network video devices.
4. The “SecurView Pro Automatic Discovery Wizard “will appear. Click Next.
5. Insert the port number for your IP cameras and then click Next.
6. Insert the user name and password for each IP camera and then click Next.
7. Select Scan network adapter address range and then click Next.
· Scan network adapter address range: If you select this option, choose network
adapters for searching your network.
· Scan IP address range- If you know your network’s IP range, you can search by
the IP range for the cameras as well.

© Copyright 2012 TRENDnet. All Rights Reserved.
TRENDnet User’s Guide
SecurView Pro
17
8. SecurView Pro will now begin scanning your network and specified ports for any IP
cameras. Once it is finished it will give you a list of the cameras that it found and give
you an option to add them to SecurView Pro.
Configure your IP Cameras manually
1. Right click on your server name
2. Click tasks
3. Choose “Camera setup Wizard”.
4. Select “Network Devices (IP Camera, Video Server)”.
5. Click Next.
6. For “Device title”, type in a name for the IP Camera.
7. Click Properties.

© Copyright 2012 TRENDnet. All Rights Reserved.
TRENDnet User’s Guide
SecurView Pro
18
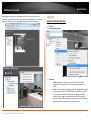
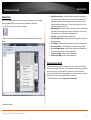
Note: The tabs under properties are described below
Model Tab
Properties > Model
· Select TRENDnet and then select the IP camera model. Then click Apply.
Access Tab
Properties > Access
· Input the IP address of the IP Camera, Port Number, User Name and Password.
Then click Apply.
Video Input Tab
Properties > Video Input
· Select “Trendnet” for Operation mode.

© Copyright 2012 TRENDnet. All Rights Reserved.
TRENDnet User’s Guide
SecurView Pro
19
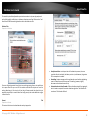
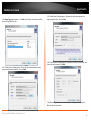
Video Configuration Tab
Properties > Video Configuration
· Color Mode- Color or black and white
· Resolution: Quality of the picture. The higher quality you choose the more
space it will take. Options include 704 x 450, 352 x 240 and 176 x 112.
· Encoding: Choose the encoding type that is supported by your camera. Options
include Default, MJPEG, MPEG-4 and H.264. Depending on the Encoding type
selected, you may be able to adjust the following;
o I-Frame Interval
o Bit Mode
o Quality
o Bit Rate
· Frame Rate: Here you may adjust the frame rate for the ip camera. Options
include Default, 1, 2, 3, 5, 10, 15 and 30.
Page is loading ...
Page is loading ...
Page is loading ...
Page is loading ...
Page is loading ...
Page is loading ...
Page is loading ...
Page is loading ...
Page is loading ...
Page is loading ...
Page is loading ...
Page is loading ...
Page is loading ...
Page is loading ...
Page is loading ...
Page is loading ...
Page is loading ...
Page is loading ...
Page is loading ...
Page is loading ...
Page is loading ...
Page is loading ...
Page is loading ...
Page is loading ...
Page is loading ...
Page is loading ...
Page is loading ...
Page is loading ...
Page is loading ...
Page is loading ...
Page is loading ...
-
 1
1
-
 2
2
-
 3
3
-
 4
4
-
 5
5
-
 6
6
-
 7
7
-
 8
8
-
 9
9
-
 10
10
-
 11
11
-
 12
12
-
 13
13
-
 14
14
-
 15
15
-
 16
16
-
 17
17
-
 18
18
-
 19
19
-
 20
20
-
 21
21
-
 22
22
-
 23
23
-
 24
24
-
 25
25
-
 26
26
-
 27
27
-
 28
28
-
 29
29
-
 30
30
-
 31
31
-
 32
32
-
 33
33
-
 34
34
-
 35
35
-
 36
36
-
 37
37
-
 38
38
-
 39
39
-
 40
40
-
 41
41
-
 42
42
-
 43
43
-
 44
44
-
 45
45
-
 46
46
-
 47
47
-
 48
48
-
 49
49
-
 50
50
-
 51
51


Trendnet TV-IP751WC User guide
- Category
- Digital Video Recorders (DVR)
- Type
- User guide
- This manual is also suitable for
Ask a question and I''ll find the answer in the document
Finding information in a document is now easier with AI
Related papers
-
Trendnet TV-IP522P User guide
-
Trendnet TV-IP751WIC Quick Installation Guide
-
Trendnet Security Camera SecurView PoE Dome Internet Camera User manual
-
Trendnet TV-IP110WN User guide
-
-
Trendnet TV-IP121W User guide
-
Trendnet TV-IP121WN User guide
-
Trendnet TV-IP212W User guide
-
Trendnet TV-IP312WN User guide
-
Trendnet TV-IP312 Owner's manual