Philips NPX645/INT User manual
- Category
- Data projectors
- Type
- User manual


Introduction �������������������������������������������������3
Dear customer ...............................................................3
About this user manual ..............................................3
What’s in the box ..........................................................3
Customer service centre ............................................3
1 General safety information ��������������� 4
Setting up the product .............................................. 4
Repairs ............................................................................ 4
Power supply .................................................................5
2 Overview ������������������������������������������������5
Top view ...........................................................................5
Front view ....................................................................... 6
Side view ......................................................................... 6
Rear view ........................................................................ 6
Remote controls .......................................................... 6
3 Initial setup ������������������������������������������� 8
Place the projector...................................................... 8
Connect the Android TV Dongle ............................ 8
Connect to power supply ......................................... 8
Prepare the remote controls ................................... 9
Power on and set up the projector ....................... 9
Set up Android TV ......................................................10
4 Use Android TV ������������������������������������11
Navigate Android TV ...................................................11
Configure Android TV ................................................ 12
Use a wired keyboard/mouse ................................12
Use a Bluetooth device ............................................ 12
Cast content to Android TV ..................................... 12
5 Connect to playback devices ����������� 13
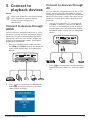
Connect to devices through HDMI .......................13
Connect to devices through AV ............................. 13
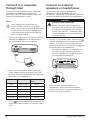
Connect to a computer through VGA .................. 14
Connect to external speakers or headphones 14
6 Play videos from storage devices ��� 15
7 Change settings ����������������������������������16
Change Android TV settings ...................................16
Change projector settings .......................................18
8 Maintenance����������������������������������������19
Cleaning .........................................................................19
Update software .........................................................19
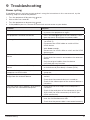
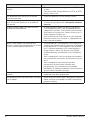
9 Troubleshooting ��������������������������������� 21
10 Appendixes ����������������������������������������� 23
Technical data ............................................................ 23
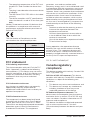
CE statement .............................................................. 23
FCC statement ............................................................ 24
Canada regulatory compliance ............................ 24
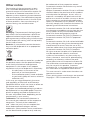
Other notice ................................................................. 25
Table of contents

Introduction 3
Introduction
Dear customer
Thank you for purchasing this projector.
We hope you enjoy this product and the many
functions it offers!
About this user manual
The quick start guide supplied with this product
allows you to start using this product quickly
and easily. Detailed descriptions can be found
in the following sections of this user manual.
Read the entire user manual carefully. Follow
all safety instructions in order to ensure proper
operation of this product (see General safety
information, page 4). The manufacturer
accepts no liability if these instructions are not
followed.
Symbols used
Notice
This symbol indicates tips that will help
you use this product more effectively
and easily.
DANGER!
Danger of personal injury!
This symbol gives warning of danger
of personal injury. Physical injury or
damage can result from improper
handling.
CAUTION!
Damage to the product or loss of data!
This symbol gives warning of damage
to the product and possible loss of
data. Damage can result from improper
handling.
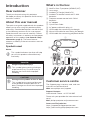
What’s in the box
a NeoPix Ultra 2+ projector (NPX645/INT)
b Lens cover
c Android TV Dongle (NeoViu D1)
d Android TV remote control with 2 AAA
batteries
e Projector remote control with 2 AAA
batteries
f AC adapter
g Quick Start Guide
h AC power cable with plug x 4
i HDMI cable for connecting the dongle
j Micro-USB cable for connecting the dongle
k HDMI cable for connecting playback device
OK
Quick Start
Guide
Quick Start
Guide
Quick Start
Guide
Quick Start
Guide
a
b
c
de
f
g
h
Customer service centre
The Support page, warranty card, and user
manuals can be found here:
Web: www.philips.com/support
Support Contacts:
International Phone: +41 215 391 665
Please ask your provider for international call
costs!
Mail: philips.projector.eu@screeneo.com
Access our FAQ websites:
https://support.philipsprojection.com
https://community.philipsprojection.com

4 Philips · NeoPix Ultra 2+
1 General safety
information
Take note of all warning and safety notes
indicated. Do not make any changes or settings
that are not described in this user manual.
Incorrect operation, and improper handling can
lead to physical injury, damage to the product
or loss of data.
Setting up the product
This product is for indoor use only. Place the
product securely on a stable, flat surface.
To help avoid possible injuries to persons or
damage to the product itself, position all cables
in such a way that no one will trip over them.
Do not operate the product in damp rooms.
Never touch the mains cable or the mains
connection with wet hands.
Never operate the product immediately after
moving it from a cold location to a hot location.
When the product is exposed to such a change
in temperature, moisture may condense on the
crucial internal parts.
The product must have sufficient ventilation
and must not be covered. Do not put the
product in closed cabinets, boxes, or other
enclosures when in use.
Protect the product from direct sunlight,
heat, intense temperature fluctuations and
moisture. Do not place the product in the
vicinity of heaters or air conditioners. Observe
the information on temperature listed in the
technical data (see Technical data, page 23).
Prolonged operation of the product causes the
surface to become hot. In case of overheating,
the product automatically switches to standby
mode.
Do not allow liquids to leak into the product.
Turn off the product and disconnect it from the
mains supply if liquids or foreign substances
leaked into the product. Have the product
inspected by an authorised service centre.
Always handle the product with care. Avoid
touching the lens. Never place heavy or sharp
objects on the product or on the power cable.
If the product gets too hot or emits smoke,
shut it down immediately and unplug the
power cable. Have your product checked by
an authorised service centre. Keep the product
away from open flames (e.g. candles).
DANGER!
Risk of explosion with incorrect type
of batteries!
There is a risk of explosion if the wrong
battery type is used.
Do not expose the batteries (battery pack or
embedded batteries) to excessive heat such as
sunshine, or open fire.
Under the following conditions, a layer of
moisture can appear inside the product which
can lead to malfunctions:
• if the product is moved from a cold to a
warm area;
• after a cold room is heated;
• when the product is placed in a damp
room.
Proceed as follows to avoid any moisture
buildup:
1 Seal the product in a plastic bag before
moving it to another room, in order for it to
adapt to room conditions.
2 Wait one to two hours before you take the
product out of the plastic bag.
The product should not be used in a very dusty
environment. Dust particles and other foreign
objects may damage the product.
Do not expose the product to extreme
vibrations. This may damage the internal
components.
Do not allow children to handle the product
without supervision. The packing materials
should be kept out of the hands of children.
For your own safety, do not use the product
during thunderstorms with lightning.
Repairs
Do not repair the product yourself. Improper
maintenance can result in injuries or damage to
the product. The product must be repaired by
an authorised service centre.
Please find the details of authorised service
centres on the warranty card supplied with this
product.
Do not remove the type label from this product,
as this will void the warranty.

Overview 5
Power supply
Use only a power adapter which is certified for
this product (see Technical data, page 23).
Check whether the mains voltage of the power
supply matches the mains voltage available at
the setup location. This product complies with
the voltage type specified on the product.
The power outlet shall be installed near the
product and shall be easily accessible.
CAUTION!
Always use the button to turn the
projector off.
Turn off the product and unplug from the
power outlet before cleaning the surface
(see Cleaning, page 19). Use a soft, lint-
free cloth. Never use liquid, gaseous or easily
flammable cleaners (sprays, abrasives, polishes,
alcohol). Do not allow any moisture to reach
the interior of the product.
DANGER!
Risk of eye irritation!
This product is equipped with a high
power LED (Light Emitting Diode),
which emits very bright light. Do not
look directly into the projector lens
during operation. This could cause eye
irritation or damage.
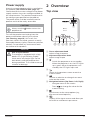
2 Overview
Top view
NeoPix
Ultra 2+
heg f d c
a
b
a Focus adjustment knob
Adjust image sharpness.
b Keystone adjustment knob
Adjust image shape.
c
• Switch the projector on or to standby.
• When the projector is on, the LED lights
up in green. When the projector is on
standby, the LED lights up in red.
d
Return to the previous screen or exit the
current screen.
e
Confirm a selection or change the current
value on the screen.
f Navigation buttons (Up, Down, Left, Right)
• Navigate items on the screen.
• Press / to change the value for the
current setting
.
g
Quick access to the setup options (e.g.
picture and sound options).
h
Display all the input sources and allow you
to switch to a different input source.

6 Philips · NeoPix Ultra 2+
Front view
ab
a Projection lens
b Front IR sensor
Side view
MICRO SDAV HDMI 1 HDMI 2USB DC
ab c d e f g
a
3.5 mm audio output; connect to external
speakers or headphones.
b
3.5 mm audio/video input; connect to the
analogue audio jacks and/or composite
video jack on a playback device.
c MicroSD card slot
Connect to a microSD card for media
playback.
d 1
Connect to an HDMI output on a playback
device.
e 2
Connect to an HDMI output on a playback
device.
f USB port
Connect to a USB storage device for media
playback.
g
Connect to the AC adapter.
Rear view
a b
a VGA port
Connect to the VGA port on a computer.
b Rear IR sensor
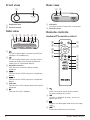
Remote controls
Android TV remote control
OK
a
b
c
d
e
f
g
h
l
j
i
k
a
Access the voice command or search
function (Google Assistant).
b
Confirm a selection or entry, or turn an
option on or off.
c
Display installed apps and access the app
store.
d +/-
Increase or decrease the volume.

Overview 7
e
Quick access to the Netflix service.
f
Quick access to the Amazon Prime Video
service.
g
Enable or disable the remote control.
h
Return to the previous screen or exit the
current screen.
i
Access the Android TV home screen.
j Navigation buttons (Up, Down, Left, Right)
• Navigate items on the screen.
• Press / to move backward or forward
in the current video
.
k LED indicator
• Each time you press a button on the
remote control, the LED lights up briefly
then off.
• Blue light indicates the remote control is
enabled and you can use it to navigate
the Android TV user interface.
• Red light indicates the remote control
is disabled and you cannot use it to
navigate the Android TV user interface.
• The LED flashes quickly when the
remote control's batteries are low.
l
Switch the projector on or to standby.
Projector remote control
OK
a
b
c
d
e
f
g
h
j
i
k
a
Display all the input sources and allow you
to switch to a different input source.
b
Confirm a selection or change the current
value on the screen.
c
View or change the picture mode.
d
• Access the Android TV home screen when
the input source is NeoViu D1.
• Access the projector home screen when the
input source is not NeoViu D1.
e /
Increase or decrease the volume.
f
Start, pause or resume media playback.
g /
Skip to the previous or next video file.
h
Return to the previous screen or exit the
current screen.
i Navigation buttons (Up, Down, Left, Right)
• Navigate items on the screen.
• Press / to change the value for the
current setting
.

8 Philips · NeoPix Ultra 2+
j
Quick access to the setup options (e.g.
picture and sound options).
k
Switch the projector on or to standby.
3 Initial setup
Notice
Make sure all devices are disconnected
from their power supplies before
establishing or changing any
connections.
Place the projector
Place the projector on a flat surface such as a
table in front of the projection surface.
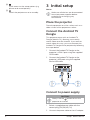
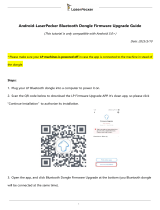
Connect the Android TV
Dongle
This projector comes with an Android TV
Dongle (NeoViu D1), allowing you to easily
watch videos over the internet. If you want to
watch videos this way, you must connect the
Android TV Dongle to the projector by following
the steps below.
1 Connect the Android TV Dongle to the
projector's HDMI 1 port using the supplied
HDMI cable.
2 Connect the Android TV Dongle to the
projector's USB port using the supplied
Micro-USB cable
.
MICRO SDAV HDMI 1 HDMI 2 USB DC
Front
Rear
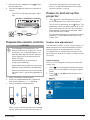
Connect to power supply
CAUTION!
Always use the button to turn the
projector on and off.
1 Select a supplied power cable with the
correct plug (EU/UK/US/CH).
2 Connect the power cable to the AC adapter.

Initial setup 9
3 Connect the AC adapter to the socket
on the projector.
4 Connect the power cable to an electrical
socket.
• The LED on the projector lights up in
red.
a
c
d
MICRO SDAV HDMI 1HDMI 2USB DC
b
Prepare the remote controls
CAUTION!
The improper use of batteries can
lead to overheating, explosion, risk of
fire and injury. Leaking batteries can
possibly damage the remote control.
Never expose the remote control to
direct sunlight.
Avoid deforming, dismantling or
charging the batteries.
Avoid exposure to open fire and water.
Replace empty batteries immediately.
Remove the batteries from the remote
control if not in use for long periods of
time.
1 Open the battery compartment.
2 Insert the supplied batteries (type AAA)
with correct polarity (+/- ) indicated.
3 Close the battery compartment.
• When using a remote control with infrared
signals, point the remote control at the IR
sensor on the projector, and make sure
there is no obstacle between the remote
control and the IR sensor.
Power on and set up the
projector
1 Press to turn on the projector. The LED
on the projector turns from red to green.
• To turn off the projector, press twice. The
projectors enters standby mode and its LED
turns from green to red. To fully shut down
the projector, disconnect the power cable
from the electrical socket.
• The distance between the projector and the
projection surface determines the actual
screen size.
Screen size adjustment
The projection screen size (or size of images) is
determined by the distance between the lens
of the projector and the projection surface.
This projector has a projection distance of 80
cm to 200 cm, and thus creates a screen size of
20" to 65".
Digital zooming
You can use the digital zooming to reduce the
screen size.
1 Press on the projector remote control to
access the setup options and go to Digital
Zoom.
2 Press / or the OK button to adjust the
screen size.

10 Philips · NeoPix Ultra 2+
Screen height adjustment
To adjust the screen height when placing
the projector on a flat surface, turn the angle
adjustment knob located at the bottom of the
projector.
MI
C
R
O
S
DA
UX
H
DMI
1
HDMI 2
USB
D
C
MICRO SDAV HDMI 1 HDMI 2 USB DC
Image focus adjustment
To adjust image focus, turn the focus
adjustment knob at the top of the projector.
NeoPix
Ultra 2+
Image shape adjustment
To adjust image shape, turn the keystone
adjustment knob at the top of the projector.
NeoPix
Ultra 2+
Set up Android TV
When you turn on the projector with the
Android TV Dongle connected for the first time
or after Android TV was reset to its factory
default settings, Android TV will start and
prompt you to set it up by making some basic
settings.
After the setup, Android TV will sign in to
your Google account and connect to a Wi-Fi
network.
What you need
• A Wi-Fi internet connection
• A Google account
Step 1: Pair the remote control
with the Android TV Dongle
Follow the on-screen instructions to pair the
Android TV remote control with the Android TV
Dongle.
After the pairing, the Welcome screen appears
and you can use this remote control to navigate
the on-screen user interface of Android TV and
initiate voice commands or search queries.
Step 2: Select the display
language
To select the display language for Android TV,
press the down or up navigation button on
the remote control to select your preferred
language and press the OK button to confirm.
Note: The default display language is English
(United States) and not all languages are
available.
Step 3: Set up your Android TV
There are 2 options to set up your Android TV:
• Quick Start with an Android phone
• Set up with the Android TV remote control
Set up with Quick Start
1 When your Android TV says, “Quickly set
up your TV with your Android phone?”, use
the Android TV remote control to choose
Continue.
2 Ensure your Android phone has the Google
app installed and is connected to a Wi-
Fi network.
3 On your phone, open the Google app
and sign in if you haven't already.

Use Android TV 11
4 Type or say “set up my device.”
5 Follow the instructions on your phone until
you get a code. Enter the code on your
Android TV.
6 On your phone, tap the name of your
Android TV when it shows up.
7 To finish setup, follow the instructions on
your Android TV screen.
Tip: After the setup, your Android TV
automatically signs in to your Google Account
and connects to the same Wi-Fi network as
your phone.
Set up with the Android TV remote control
1 When your Android TV says, “Quickly set up
your TV with your Android phone?”, use the
Android TV remote control to choose Skip.
2 Connect your Android TV to a Wi-Fi
network. Note: Your Android TV may need
some time to update after it is connected to
the internet.
3 Choose Sign in.
4 Sign in to your Google Account.
5 To finish setup, follow the on-screen
instructions.
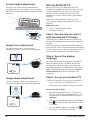
4 Use Android TV
You will see the Android TV home screen similar
to the one below after completing the setup.
The Android TV home screen is the jumping-off
point for starting all activities on your Android
TV entertainment device. On this screen, you
can browse for shows and movies to watch.
You’ll also find the shows and movies you’ve
started, suggested videos, and personalized
recommendations.
Android TV offers you various features, such as:
• Watch a wide range of movies and shows
from across your favourite apps.
• Stream music from music apps.
• Get apps from Google Play.
• Play online games from Google Play
Games.
• Voice input for commands and universal
search across multiple services.
Tip:
Every time you turn on the projector with
the Android TV Dongle correctly connected,
Android TV will automatically start. If it doesn't
or you want to return to it, press on the
projector remote control to bring up the input
source list, and then select HDMI1 NeoViu D1.
Navigate Android TV
You can use the dedicated Android TV remote
control to navigate the on-screen user interface
of Android TV and initiate voice commands or
search queries.
• Press on the remote control to
enable or disable the remote control.
• Press on the remote control to access
the Android TV home screen.
• Press on the remote control to display

12 Philips · NeoPix Ultra 2+
the installed apps and access the app store.
• Press on the remote control to access
voice search function.
Configure Android TV
On the home screen (press ), you can
navigate to select in the upper right corner
of the screen and access various Android TV
related settings, e.g. apps/privacy/security
management, picture and sound settings (see
Change Android TV settings, page 16).
Use a wired keyboard/
mouse
• Connect the USB plug of your wired mouse
or keyboard to the USB port attached to the
Micro-USB cable
.
• Use the keys on the keyboard for screen
navigation, selection and text input, just like
the keyboard operation with a computer.
• Use the wheel and left button on the
mouse for navigation and selection. Press
the right button on the mouse to return to
the previous screen.
Use a Bluetooth device
You can pair a Bluetooth device (keyboard,
mouse, gamepad, speaker, etc.) with the
Android TV Dongle. After completing the
pairing, you can use the Bluetooth device with
your Android TV.
To pair a Bluetooth device, follow the steps
below:
1 On your Android TV, go to the home screen.
2 Select in the upper right corner of the
screen.
3 Select Remotes & Accessories and then
Add accessory. On your screen, you’ll see a
list of nearby Bluetooth devices.
4 Put your Bluetooth device in pairing mode.
The device will be added to the on-screen
list.
5 Select your Bluetooth device.
6 When your Android TV says, “Pair with this
device?”, choose Pair. The device will be
paired within a few seconds.
Cast content to Android TV
Your Android TV has Chromecast built-in. This
allows you to cast content (e.g. videos, photos
and music) from a mobile device (Android or
iOS device) to your Android TV.
Important: You can only cast from the latest
version of a Chromecast-enabled app or a
Chrome browser on a device connected to the
same Wi-Fi network as your Android TV.
To start casting, follow the steps below:
1 Connect your device to the same Wi-Fi
network as your Android TV.
2 Open the app that has the content you
want to cast.
3 In the app, find and select Cast .
4 On your device, select the name of your
Android TV.
5 When Cast changes color, you’re
successfully connected.
To stop casting, on your device, select Cast
and then Disconnect.
Notice
For better casting performance, use a
5GHz Wi-Fi network.
Copy-protected (DRM) content cannot
be cast.
Tip: For more tips about using Android TV, visit
https://support.google.com/androidtv.
Google, Google Play, YouTube, Android TV and
other marks are trademarks of Google LLC.
Google Assistant is not available in certain
languages and countries.

Connect to playback devices 13
5 Connect to
playback devices
Notice
Make sure all devices are disconnected
from their power supplies before
establishing or changing any
connections.
Connect to devices through
HDMI
You can connect a playback device (e.g. a Blu-
ray player, gaming console, camcorder, digital
camera or PC) to the projector through HDMI
connection. With this connection, images are
shown on the projection screen, and audio is
played on the projector.
1 Using the supplied HDMI cable, connect
the HDMI 1 or HDMI 2 port on the projector
to the HDMI output port on the playback
device.
MICRO SDAV HDMI 1 HDMI 2 USB DC
2 Press on the projector remote control
to bring up the input source list, and then
select HDMI1 or HDMI2.
Connect to devices through
AV
You can connect a playback device (e.g. a DVD
player, gaming console, camcorder or digital
camera) to the projector through AV connection.
With this connection, images are shown on the
projection screen, and audio is played on the
projector.
1 Using a RCA cable with 3.5 mm plug (not
included in the box), connect the AV jack
(3.5 mm) on the projector to the analogue
audio output jacks (red and white) and/or
composite video output jack on a playback
device.
MICRO SDAV HDMI 1 HDMI 2USB DC
2 Press on the projector remote control to
display the input source list, and then select
AV.

14 Philips · NeoPix Ultra 2+
Connect to a computer
through VGA
You can connect a computer (e.g. a desktop
or laptop) to the projector through VGA
connection. With this connection, images are
shown on the projection screen.
Notice
Many laptops do not activate the
external video output automatically
when you connect a second display such
as a projector. Check your laptop user
manual to find out how to activate the
external video output.
1 Using a VGA cable (not included in the box),
connect the VGA port on the projector to
the VGA output port on a computer.
VGA
2 Adjust your computer's screen resolution
to the correct setting and switch the VGA
signal to an external monitor. The following
resolutions are supported:
Resolution Image refresh
rate
VGA 640 x 480 60 Hz
SVGA 800 x 600 60 Hz
XGA 1024 x 768 60 Hz
WXGA 1280 x 768 60 Hz
HD 1280 x 720 60 Hz
FULL HD 1920 x 1080 60 Hz
3 Press on the projector remote control to
display the input source list, and then select
VGA.
Connect to external
speakers or headphones
You can connect external speakers or
headphones to the projector. With this
connection, audio from the projector is played
through the external speakers or headphones.
DANGER!
Danger of hearing damage!
Before connecting the headphones,
turn down the volume on the projector.
Do not use the projector over a longer
time at high volume – especially when
using headphones. This could lead to
hearing damage.
1 Using a 3.5 mm audio cable, connect the
jack on the projector to the analogue audio
input (3.5 mm jack, or red and white jacks)
on external speakers. Or connect the jack
on the projector to headphones.
• The internal speakers of the projector
are deactivated automatically when
external speakers or headphones are
connected to the projector.
MICRO SDAV HDMI 1 HDMI 2USB DC
2 After connecting the speakers or
headphones, press the volume control
buttons on a remote control to adjust the
volume to the desired level.

Play videos from storage devices 15
6 Play videos from
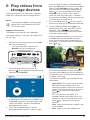
storage devices
Using the projector, you can access and play
video files stored on a local storage device.
Notice
The projector supports a USB storage
device that is formatted for FAT16 or
FAT32 file system.
Supported file formats
The following file formats are supported:
.dat/.mpg/.mpeg/.ts/.trp/.tp/.vob/.mp4/.mkv/.
avi/.flv/.3gp
1 Connect a USB storage device to the USB
port on the projector.
• Or insert a MicroSD card into the
MicroSD slot on the projector.
MICRO SDAV HDMI 1HDMI 2 USB DC
microSD
2 Go to the projector home screen by
pressing on the projector remote control
and then select MOVIE.
3 Select USB to open the USB storage device
or TF to open the MicroSD card. Note: Only
supported video files are displayed on the
screen. All folders and files are ordered
alphabetically by name.
4 Press the navigation buttons on the
projector remote control to select a video
file or a folder. To open a selected folder,
press the OK button. To return to the parent
folder, select Up Folder on the screen. To
exit the current folder and storage device,
press on the remote control or select
RETURN on the screen. If you select a
video file and wait more than 3 seconds,
the projector will begin playing a preview of
the video from the beginning.
5 Press the OK button or on the remote
control to start playing a selected video file.
6 During video playback, press on the
remote control to start, pause or resume
playback. Press / on the remote
control to skip to the previous/next video
file in the current folder.
While a video file is playing, you can press
the OK button on the remote control to
bring up the control bar at the bottom of
the screen. To instantly hide the control bar,
press or .
While the control bar is visible, press /
on the remote control to select an option
and then press OK to confirm the action or
change the value. To close the dialog box of
an option, press .
The following options are available on the
control bar:
• Play/Pause: Plays or pauses the video.
• FB: Rewinds the video quickly. The
rewinding speeds range from 2X to 32X.
When you move to the point you want,
press to start playing at normal
speed.
• FF: Fast-forwards the video. The
forward speeds range from 2X to 32X.
When you move to the point you want,
press to start playing at normal
speed.
• Prev�: Skips to the previous video in the
current folder.
• Next: Skips to the next video in the

16 Philips · NeoPix Ultra 2+
current folder.
• Stop: Stops playing the video and
returns to the list of video files in the
current folder.
• Repeat: Toggles between the repeat
options. If Repeat None is selected, the
projector will stop playing videos after
the last video file in the current folder
has been played. If Repeat 1 is selected,
the projector will play the current video
continuously. If Repeat ALL is selected,
the projector will cycle through all
the video files in the current folder
continuously.
• Set A/Set B/None: Use this option to
loop a segment of the video. To set the
start point for the loop, press the OK
button when you see Set A. Then Set
B appears and you can press the OK
button again to set the end point of the
loop. After these 2 steps, the video will
start playing in this loop. To deactivate
the loop, press the OK button when you
see None.
• Playlist: Select this option to pull up the
list of all video files in the current folder
in order to switch to another video or
view the list without having to stop the
playback.
• Info: Displays the information about the
current video including resolution and
size.
• Slow Forward: Plays the video in slow
motion with a speed between 2X and
16X. Press to return to the normal
playing speed.
• Step Forward: Freezes the video and
allows you to play it frame by frame by
pressing the OK button.
• Aspect Ratio: Toggles between the
available aspect ratios (16:9, 4:3 and
Auto).
7 To stop playing a video file and return to
the list of files in the current folder, press
on the remote control.
7 Change settings
This section helps you change the settings of
the following two systems:
• Android TV
• Projector
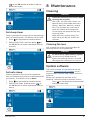
Change Android TV settings
1 On the home screen (press ), use the
Navigation buttons on the remote control
to select in the upper right corner and
then press the OK button to access various
setting options.
2 Use
the Navigation buttons and the OK
button to select and change settings.
Wi-Fi settings
Go to Network & Internet to connect the
projector to a Wi-Fi network. Use the pop-up
virtual keyboard or voice input to input letters
and digits.
Google account settings
Go to Accounts & Sign In to sign in or add a
Google account.
Language settings
Go to Device Preferences - Language to select
a language for on-screen menus.
Date and time settings
Go to Device Preferences - Date & time to
access the following settings.
• Automatically update date and time, or
manually set date, time and time zone.
Keyboard settings
Go to Device Preferences - Keyboard to access
various settings for keyboard.
Bluetooth settings
Go to Remotes & Accessories to pair the
projector with the projector's remote control,
or a Bluetooth keyboard/mouse/gamepad/
speaker.
Apps settings
Go to Apps to access the following settings.

Change settings 17
• View all the installed and system apps, and
the storage used by each app.
• Set various permissions for the installed
apps, e.g. location, contacts, camera,
microphone, phone and SMS.
• Set security and restrictions for app
installation.
• Check an app's version, storage used,
cache size, etc.
• Clear an app's cache, disable or uninstall
an app, view an app's permissions, etc.
Display settings
Go to TV settings - Display to access the
following settings.
• Screen resolution: Select a screen
resolution to best support your video.
• Screen position: Scale down the projection
image.
Sound options
Internal speaker
Go to Device Preferences - Sound to access the
following settings.
• System Sound: Turn the system sound on or
off.
• Surround Sound: Enable or disable
surround sound. You can let Android TV
automatically select the formats supported
by the projector or manually select the
formats.
Audio output
Go to TV settings - Audio Output to access the
setting below.
• Dolby DRC Mode: Select a DRC (Dynamic
Range Compression) mode for reducing
dynamic range of sound output. You can
therefore watch movies without having to
constantly readjust the volume with the
remote control.
Display Netflix activation code
• Go to TV settings - Netflix ESN to display
the Netflix activation code.
Factory reset Android TV Dongle
1 Go to Device Preferences - About - Factory
reset and select Factory reset.
2 Follow the on-screen instructions to start
factory resetting the Android TV Dongle.
Notice
A factory reset erases all your personal
information and downloaded apps and
you can't reverse this action.
Other system settings
Go to Device Preferences to access the
following settings.
• About: View information about, update, or
reset the Android TV Dongle.
• Storage: Check the total, used and
available space of the internal storage and
removable storage.
• Home screen: Customize and organize the
home screen.
• Google Assistant: Select the active Google
account and customize Google Assistant's
behaviour.
• Chromecast built-in: View information
about Chromecast.
• Screen saver: Set the type of screen saver
and how soon to activate the screen saver
or put the Android TV Dongle to sleep.
• Location: Check your location status and
view the recent location requests.
• Usage and Diagnostics: Choose whether
you want the Android TV Dongle to
automatically send diagnostic information
to Google.
• Accessibility: Configure a variety of
accessibility options, including captions
and text to speech.
• Reboot: Restart the Android TV Dongle.

18 Philips · NeoPix Ultra 2+
Change projector settings
Picture settings
1 Press
on the projector remote control.
2 Select a picture option, and then press /
or the OK button to change the value.
• Picture Mode: Select predefined color
settings for picture or video display.
Select User to customize the following
settings:
• Contrast: Set color contrast.
• Brightness: Set color brightness.
• Color: Set color saturation.
• Sharpness: Set image sharpness.
• Color Temperature: Set the color
temperature.
• Aspect Ratio: Set the screen aspect
ratio.
• Noise Reduction: Set the noise
reduction level. This option is enabled
only when you play a video or use
Android TV.
Sound settings
1 Press
on the projector remote control.
2 Select a sound option, and then press /
or the OK button to change the value.
• Sound Mode: Select predefined sound
settings for your video or music. Select
User to customize the following settings:
• Treble: Set the treble level.
• Bass: Set the bass level.
• Auto Volume: Turn this on to reduce
sudden changes in volume.
Language settings
1 Press
on the projector remote control.
2 Select OSD Language, and then press the
navigation buttons on the remote control to
select your desired language for on-screen
menu.
Restore default settings
1 Press
on the projector remote control.
2 Select Restore Factory Default, and then
press
the OK button
�
3 Press to start restoring the projector to its
factory default settings. The projector will
turn off after the restoration.
Rotate/flip projection screen
1 Press
on the projector remote control.
2 Select Panel Flip Rotation, and then press

Maintenance 19
/ or the OK button to rotate or flip the
projection screen.
Set sleep timer
Select a period of time after which the projector
turns off automatically. The default value is Off.
1 Press
on the projector remote control.
2 Select Sleep Timer, and then press / or
the OK button to select a period of time (in
minutes).
Set auto sleep
Select a period of time so that the projector
turns off automatically after the selected period
of inactivity. The default value is Never.
1 Press
on the projector remote control.
2 Select Auto Sleep, and then press / or
the OK button to select a period of time (in
hours).
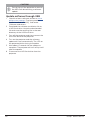
8 Maintenance
Cleaning
DANGER!
Follow the following instructions when
cleaning the projector:
Use a soft, lint-free cloth. Never use
liquid or easily flammable cleansers
(sprays, abrasives, polishes, alcohol,
etc.). Do not allow any moisture to
reach the interior of the projector.
Do not spray the projector with any
cleaning fluids.
Wipe over the surfaces gently. Be
careful that you do not scratch the
surfaces.
Cleaning the lens
Use a soft brush or lens cleaning paper for
cleaning the lens of the projector.
DANGER!
Do not use any liquid cleaning agents!
Do not use any liquid cleaning
agents for cleaning the lens, to avoid
damaging the coating film on the lens.
Update software
The latest software for the projector can be
found on www.philips.com/support for you
to get the best features and support from the
projector.
Before you update the software of the
projector, check the current software version:
• Press
on the projector remote control
and then select Info
.

20 Philips · NeoPix Ultra 2+
CAUTION!
Do not turn off the projector or remove
the USB flash drive during a software
update.
Update software through USB
1 Check the latest software version on www.
philips.com/support. Find your product
(model number: NPX645), and locate
‘Software and drivers’.
2 Download the software installation file to
a USB flash drive. Unzip the downloaded
file and save the resulting file in the root
directory of the USB flash drive.
3 Turn off the projector and then connect the
USB flash drive to the projector.
4 Turn on the projector and the software
update will start automatically. The LED on
the projector blinks during the update.
5 Wait about 15 seconds for the update to
complete. The projector will turn off by itself
after the update.
6 Disconnect the USB flash drive from the
projector.
Page is loading ...
Page is loading ...
Page is loading ...
Page is loading ...
Page is loading ...
Page is loading ...
-
 1
1
-
 2
2
-
 3
3
-
 4
4
-
 5
5
-
 6
6
-
 7
7
-
 8
8
-
 9
9
-
 10
10
-
 11
11
-
 12
12
-
 13
13
-
 14
14
-
 15
15
-
 16
16
-
 17
17
-
 18
18
-
 19
19
-
 20
20
-
 21
21
-
 22
22
-
 23
23
-
 24
24
-
 25
25
-
 26
26


Philips NPX645/INT User manual
- Category
- Data projectors
- Type
- User manual
Ask a question and I''ll find the answer in the document
Finding information in a document is now easier with AI
Related papers
-
Philips PPA1002 User guide
-
Philips NPX640-INT User guide
-
Philips NeoPix Prime One Home Projector User guide
-
-
-
Philips NPX643/INT User manual
-
-
-
-
Other documents
-
 HOMATICS Box R 4K User guide
-
 SDMC Amlogic S905Y4 User manual
-
HSNI 9597484 User guide
-
 LASERPECKER Bluetooth Dongle Operating instructions
-
SDMC S905X4 4K Android TV OTT Box User guide
-
BenQ TH690ST Important information
-
-
 Heng Yu CK103A User manual
-
 Heng Yu Electronic Manufacturing CK82A User manual
-
Anker Nebula Mars User manual


