HP DesignJet 2000CP User manual
- Category
- Print & Scan
- Type
- User manual

58%
14%
8%
20%
1584
4998
325
425
488
2000
18
C4704A/C4703A
HP DesignJet 2500/2000CP Printer
User’s Guide

Printed in Europe
All rights are reserved. No part of
this document may be
photocopied, reproduced, or
translated to another language
without the prior written consent
of Hewlett-Packard Company.
3M™ is a registered trademark of
3M Company.
Adobe™ is a trademark of Adobe
Systems Incorporated which may
be registered in certain
jurisdictions.
Adobe PageMaker™ and Adobe
Photoshop™ are trademarks of
Adobe Systems Incorporated
which may be registered in
certain jurisdictions.
IEEE-1284 compatible, HP-GL,
and
HP-GL/2 are trademarks of
Hewlett-Packard Company.
Macintosh is a product of Apple
Computer Inc.
Microsoft® and MS-DOS® are
registered trademarks of
Microsoft Corporation.
Microsoft Windows is a
registered trademark of Microsoft
Corporation
PANTONE® and PANTONE
MATCHING SYSTEM® are
licensed trademarks of Pantone.
Inc. PANTONE®
1
Colors
generated by the HP DesignJet
2000CP/2500CP printers are
four-color process simulations
and may not match PANTONE-
identified solid color standards.
Use current PANTONE Color
Reference Manuals for accurate
color. PANTONE Color
simulations are only obtainable
on this product when driven by
qualified Pantone-licensed
software packages. Contact
Pantone. Inc. for a current list of
qualified licensees.
PostScript® is a registered
trademark of Adobe Systems
Incorporated.
QuickDraw™ is a trademark of
Apple Computer Inc.
UNIX® is a registered trademark
in the United States and other
countries, Iicensed exclusively
through X/Open Company
Limited.
"WingDings
TM
in TrueType®
format is a product of Microsoft
Corporation. WingDings is a
trademark of Microsoft
Corporation and TrueType® is a
registered trademark of Apple
Computer, Inc."
Notice
The information contained in this
document is subject to change
without notice and should not be
construed as a commitment by
Hewlett-Packard Company.
Hewlett-Packard assumes no
responsibility for any errors
that may appear in this
document nor does it make
expressed or implied warranty
of any kind with regard to this
material, including, but not
limited to the implied
warranties of merchantability
and fitness for a particular
purpose.
The Hewlett-Packard Company
shall not be liable for incidental
or consequential damages in
connection with, or arising out of
the furnishing. performance. or
use of this document and the
program material which it
describes.
Safety Symbols
The product is marked with this
symbol when it is necessary for
you to refer the instruction
manual in order to protect against
damage to the product.
Hazardous voltage symbol.
WARNING
The Warning symbol calls
attention to a procedure, practice,
or the like, which, if not correctly
performed or adhered to, could
result in personal injury. Do not
proceed beyond a Warning
symbol until the indicated
conditions are fully understood
and met.
CAUTION
The Caution symbol calls
attention to an operating
procedure, practice, or the like,
which, if not correctly performed
or adhered to, could result in
damage to or destruction of part
or all of the product. Do not
proceed beyond a Caution
symbol until the indicated
conditions are fully understood
and met.
1.Pantone. Inc.’s check–
standard trademark for
color. ©Pantone. Inc. 1988
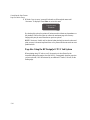
HP DesignJet Printers - Year 2000 Compliance
=
================================
All HP DesignJet printer products including all
the HP software, hardware, firmware and
accessories for the HP DesignJet printers are
Year 2000 Compliant. HP DesignJet printers will
function with all the reliability and quality
associated with Hewlett-Packard as the transition
is made into the 21st century.
“Year 2000 Compliant Products” are products able to accurately process date
data (including, but not limited to, calculating, comparing and sequencing
dates, from, into and between the twentieth and twenty-first centuries,
including leap year calculations, when used in accordance with its product
documentation, and provided all other products used in combination with the
product properly exchange data with it.
HP has made every effort to ensure the accuracy of out product testing.
However, because each customer’s enviroment is different from HP’s lab-
oratory test enviroment, it is the customer’s responsibility to validate the
Year 2000 readiness of these products in their own enviroment. Therefore,
information about the Year 2000 staus of HP products is provided “as is”
without warranties of any kind.
HP makes no representation or warranty respecting the accuracy or reliability
of information about non-HP products. Such information, if any, was
provided by the manufacturers of those products and customers are urged to
contact the manufacturer directly to verify Year 2000 readiness.
For further information on how HP is preparing for the approaching
millenium visit the HP Year 2000 Program web site:
http://www.hp.com/year2000/

1
User’s Guide
HP DesignJet 2500CP/
2000CP Printer
C4704-90241 English

Finding Information
ii
Finding Information
This User’s Guide contains:
n A comprehensive explanation of all the printer’s features and specific
information directly associated with the HP DesignJet CP Ink System (Imaging
ink)
n Specific information directly associated with the HP DesignJet CP Ink System
UV (UV Pigmented ink)
n Information on using the Take Up Reel.
The Assembly Instructions contain:
Step by step instructions for unpacking the printer and installing the Legs.
The Take Up Reel Setup and Assembly Instructions contain
Step by step instructions for installing and setting up the Take Up Reel.
The Setup Guide contains:
n Detailed information on setting up your printer for the first time, including:
– initial installation of the ink system components
– loading media
– connecting your printer to a computer or network
– setting up your printer software
The Quick Reference Guide contains:
n Information that you are most likely to need at the printer on a
day–by–day basis, such as how to navigate through the front-panel menu, load
media, and replace ink systems.
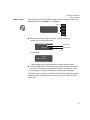
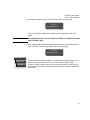
CD-Rom
When this symbol is displayed it indicates that there is video footage available
which gives you more information on the subject. Refer to the CD “Installing and
using HP DesignJet Printers” or “A User’s Introduction” which is only in English.

Finding Information
iii
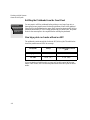
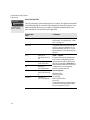
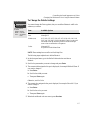
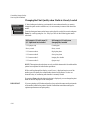
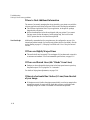
Where to find the most commonly needed information
To find how to … Go to …
Install the printer ÏThe Setup Guide.
Connect the printer ÏThe Setup Guide.
Choose media ÏPage 3-2, Choosing Media in this guide.
Load media ÏPage 3-13, Loading Roll Media in this guide or the quick
reference guide.
Load the Take Up Reel ÏPage 3-19, Loading Media onto the Take Up Reel accessory
Replace ink system components ÏPage 4-11, Removing and Replacing Ink Systems in this guide.
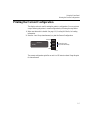
See the printer’s current configuration ÏPage 8-5, Viewing the Current Configuration of the Front-
Panel Settings.
Turning on the Take up Reel ÏPage 8-12, Turning on the Take Up Reel
Make selections in the front-panel menu ÏPage 2-14, Navigating the Menu System.
Clear a media jam ÏPage 11-44, Clearing a Media Jam
Solve image quality problems ÏPage 11-5, Solving Image-Quality Problems
How to Solve Ink System Problems ÏPage 11-31, Solving Ink System Problems
Interpret a front-panel message ÏChapter 12, Front-Panel Messages.
Order accessories ÏPage 13-18, Ordering Accessories
To find any other information
Go to the index at the back of this manual.

Table of Contents
iv
Table of Contents
Welcome 1-1
A Five-Minute Guide To Your Printer 1-2
Your Printer’s Main Features 1-2
Connections 1-7
Memory 1-7
Software Applications and Drivers 1-8
Front View of Printer 1-9
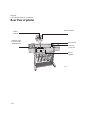
Rear View of printer 1-10
Using the Front Panel 2-1
The Front Panel 2-2
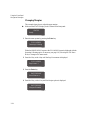
Standby Mode 2-6
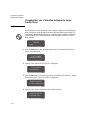
Printing the Current Configuration 2-7
Entering the Menu System 2-8
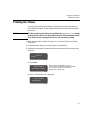
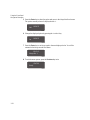
Printing the Menus 2-9
Printing Other Internal Prints 2-12
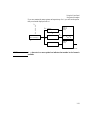
Navigating the Menu System 2-14
Menu Graphics Used in This Manual 2-15
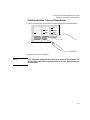
Navigation Examples 2-16
Selecting the Full Menu Mode 2-16
Changing the Color Calibration Setting in the Image Quality Menu 2-18
Changing the Merge Setting in HP-GL/2 Settings 2-21
Changing Margins 2-24
Changing the Drying Time 2-26
Other Types of Front-Panel Display Information 2-28
Working with Media 3-1
Choosing Media 3-2
Some Important Points about Media Types 3-3
Supported Media Types 3-4
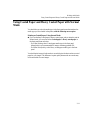
Using the Ink System UV Outside 3-5
Laminating the Media after Printing 3-5
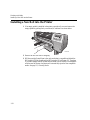
Applying the Overlaminate to a Finished Print 3-5
Installing the Final Print 3-6
Media Types 3-8
HP Commercial Names of Media Types 3-8

Table of Contents
v
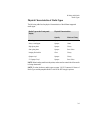
Physical Characteristics of Media Types 3-9
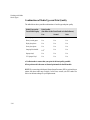
Combinations of Media Type and Print Quality 3-10
Using Coated Paper and Heavy Coated Paper with Normal Mode 3-11
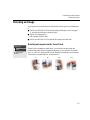
Handling Your Media 3-12
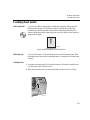
Loading Roll Media 3-13
Loading Media onto the Take Up Reel accessory 3-19
Unloading Media from the Take Up Reel accessory 3-26
Removing a Roll from the Printer 3-30
Installing a New Roll into the Printer 3-32
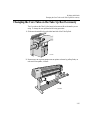
Changing the Core Tube on the Take Up Reel 3-35
Loading sheet media 3-39
Unloading Sheet Media 3-42
Compensating for Badly Cut Media 3-27
Adjusting Skew Tolerance 3-27
Drying time (With a Take Up Reel) 3-44
Drying Time (Without a Take Up Reel) 3-46
Working with Ink Systems 4-1
About the Ink System 4-2
The HP DesignJet CP Ink Systems 4-2
Main Features of the HP DesignJet CP Ink System 4-2
What is an Ink System? 4-3
How to Identify the HP DesignJet CP Ink System UV Components 4-4
Identifying the Ink System in the Printer 4-4
When Does the Ink System Refill the Printheads? 4-5
Obtaining Optimum Refill Performance using non-HP media. 4-6
Refilling the Printheads from the Front Panel 4-8
How big a print can I make without a refill? 4-8
Monitoring the Ink Level 4-9
When should I Replace an Ink System? 4-10
Removing and Replacing Ink Systems 4-11
Working with multiple Ink Systems 4-12
Handle Ink Systems with Care 4-12
Replace the Ink System 4-13
After replacing the Ink System 4-23
Removing and Storing Partially Used Ink Systems 4-24
Handle the Ink Systems with Care 4-24
Storing the Ink System in the HP DesignJet CP Ink System Storage Container 4-25
Removing the Ink System from the HP DesignJet CP Ink System Storage
Container 4-29

Table of Contents
vi
Controlling the Page Format 5-1
Page Format 5-2
Do You Need to Adjust the Page Size in the Front Panel? 5-4
Adjusting the Page Size in the Front Panel 5-5
Page Size and Clipped Images 5-7
Page Size and Nesting (Roll Media Only) 5-7
Page Size and Accuracy 5-8
Page Size Using the HP DesignJet CP UV Ink System 5-10
Selecting the Ink Emulation Mode 5-11
Adjusting Margins for Roll and Sheet Media 5-12
Margins and Automatic Cutting 5-14
Print Margins using the HP DesignJet CP UV Ink System 5-14
Rotating an Image 5-15
Rotating an Image from the Front Panel 5-15
What is Rotated? 5-16
How Does Rotate Interact with Your Software? 5-17
Printing a Mirror Image 5-19
Changing the Scale of a Printed Image 5-20
Controlling the Overall appearance of a Print 6-1
Ways of Controlling the Print’s Appearance 6-2
Changing Pen Widths and Colors Using the Internal Palettes 6-3
To Select a Palette 6-4
Viewing Current Config. Settings 6-5
Viewing the Colors Available For a Palette 6-6
To Change the Palette Settings 6-7
Changing the Treatment of Overlapping Lines
(Merge) 6-9
Printing Color Images in Monochrome 6-10
Switching between Color and Monochrome 6-11
Printing Speeds and Print Quality 6-12
Print quality settings 6-14
Changing the print quality 6-16
Managing Your Prints 7-1
Managing Pages Currently being Printed or Drying 7-2
Cancelling a Page 7-2
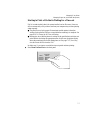
Cutting a Page before Drying is Complete
(Roll Media Only) 7-3

Table of Contents
vii
Pausing while Printing a Series of Pages 7-4
Managing Pages not yet Printed (the Queue) 7-5
What is the Queue? 7-5
Starting to Print a File that is Waiting for a Time-out 7-7
Identifying a Job in the Queue 7-8
Viewing the Size of a Page in the Queue
(Non-Postscript) 7-8
Prioritizing a Job in the Queue 7-9
Deleting a Job from the Queue 7-9
Making Copies of a Job in the Queue 7-10
Avoiding Media Waste by Nesting Pages 7-11
When Does the Printer Try to Nest Pages? 7-13
Which Pages Qualify for Nesting? 7-13
Which Pages Cannot be Rotated? 7-13
Turning Nesting On or Off and Choosing the Nesting Method 7-14
What Happens to Nesting if You Turn Queueing Off? 7-14
How Long does the Printer Wait for Another File? 7-15
Getting the Best from Nesting (Nesting and Margins) 7-16
Nesting and the Rotate Feature 7-16
Reconfiguring Your Printer 8-1
Viewing the Current Overall Configuration of the Printer 8-2
Viewing the Current Configuration of the Front-Panel Settings 8-5
To Change the Front-Panel Settings 8-5
Recalibrating the Printer for Accuracy 8-6
When to Recalibrate the Printer 8-6
To Recalibrate the Printer 8-6
To Restore the Factory’s Calibration 8-7
Changing the Graphics Language 8-8
To Change the Graphics Language Setting 8-8
Graphics Language and Networks 8-9
Changing the Interface Settings 8-10
To Change the I/O Time-out Setting 8-10
Upgrading Your Printer with More Memory 8-11
Turning on the Take Up Reel 8-12
Controlling Image Quality 9-1
Selecting the Ink Emulation Mode 9-2
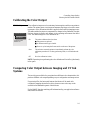
Calibrating the Color Output 9-3

Table of Contents
viii
Comparing Color Output between Imaging and UV Ink Systems 9-3
Performing a Image Quality Test 9-4
Servicing the Printheads 9-5
Aligning Printheads 9-5
Refilling Printheads 9-5
Checking Printheads 9-6
Media Test Print 9-7
How to perform the Media Test Print 9-8
Changing the Print Quality when Media is Already Loaded 9-10
Maintaining Your Printer 10-1
Cleaning the Printer 10-2
Cleaning the Printer Exterior and Inside the Doors 10-2
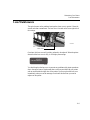
Lens Maintenance 10-3
Replacing the Lens Cover 10-4
Normal Printer Use 10-6
Storing and Moving Your Printer 10-7
Selecting Transport Mode 10-7
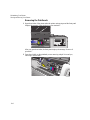
Removing the Printheads 10-8
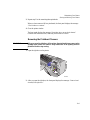
Removing the Printhead Cleaners 10-9
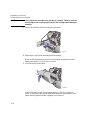
Removing the Ink Cartridges 10-11
Switching off and Disconnecting the Printer 10-13
Troubleshooting 11-1
A Note About Troubleshooting 11-2
Where to Find Help in Solving Problems 11-3
Finding the Source of Your Problem 11-4
Solving Image-Quality Problems 11-5
How to Proceed with the Image Quality Print Diagnosis 11-5
If the Color is Not as Expected 11-6
Some General Information About the Image Quality Test 11-7
Identifying the Printhead Components 11-7
How to Use the Image Quality Print 11-8
Printing the Image Quality Print 11-8
Analyzing the Image Quality Test Results 11-10
Solving the Problems 11-11
No Printing Defects Found in the Image Quality Print 11-22
Solving Color Accuracy problems 11-23
Color Consistency problems 11-23

Table of Contents
ix
Configuration 11-24
Media 11-24
Where to Find Additional Information 11-26
If There are Slightly Warped Lines 11-26
If There are Blurred Lines (Ink “Bleeds” from Lines) 11-26
If there is a horizontal line 2 inches (5.5 cms) from the start of your image. 11-26
There are Smears and/or Scratching on Your Printed Media. 11-27
Solving Media-Handling Problems 11-28
The Front Panel Keeps Indicating that Media Is Misaligned or Incorrectly
Positioned 11-28
Prints Do Not Feed Out Properly From the Printer 11-28
The Automatic Cutter does not Cut Immediately after a Print has Finished 11-28
The Automatic Cutter does not Work 11-29
The Cutter is Jammed 11-30
A Sheet is Ejected when You Switch On the Printer 11-30
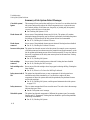
Solving Ink System Problems 11-31
Missing Ink System 11-31
Ink System Error 11-31
Summary of Ink System Defect Messages 11-32
If the Replace Ink System Key does not Work 11-34
If Brand New Printheads have Problems 11-34
If there is a Failure after Refilling Printheads 11-34
Printhead Alignment Errors 11-35
Printhead Checks 11-37
Using the Replace Ink System Key 11-37
Checking Ink Systems 11-38
If You Have Problems Reseating a Printhead 11-41
Cleaning Electrical Contacts 11-42
Clearing a Media Jam 11-44
Solving Communication Problems 11-45
If there is a Problem Communicating between Your Computer and the Printer 11-
45
Solving Problems with Image Position or Content 11-46
If the Print is Completely Blank 11-46
If the Output Contains Only a Partial Print 11-46
If the Image is Clipped 11-47
If a Long-Axis Print Is Clipped 11-47
If the Entire Image is in One Quadrant of the Correct Printing Area 11-48
If the Image Is Unexpectedly Rotated 11-48
If the Print Is a Mirror Image of Your Graphic 11-48

Table of Contents
x
If the Print Is Inaccurate 11-48
If the Print is Distorted or Unintelligible 11-49
If One Image Overlays Another on the Same Sheet 11-49
If Pen Settings Seem to have No Effect 11-49
If the Printer Produces a Black and White Print When You Expected a Color Print
11-49
If the Printer has Printed a Different Print than the One You were Expecting 11-50
Solving Front-Panel Problems 11-51
If the Replace Ink System Key Does Not Work 11-51
If None of the Front-Panel Keys Work 11-51
If Page Format/Rotate does not Work 11-51
If a Display Message will not Clear 11-51
If a “System Error” Message Is Displayed 11-52
If an “Out Of Memory/Data Was Lost” Message Is Displayed 11-52
Problems with the Take Up Reel 11-53
Solving Miscellaneous Problems 11-54
If the Printer does not Print 11-54
If the Printer Seems Too Slow 11-54
If the Printer Waits Too Long to Print a Nest 11-55
If the Bail (Black Metal Bar) does not Lower All the Way 11-55
The Media coming from the Printer is Fed Back into the Printer causing a Media
Jam. 11-55
Getting Help 11-56
What to Do Before You Call 11-56
Front-Panel Messages 12-1
Message Explanations and Actions 12-2
STATUS Messages 12-17
Reference 13-1
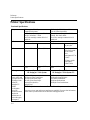
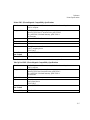
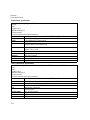
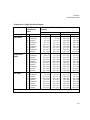
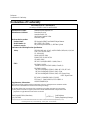
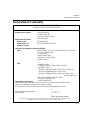
Printer Specifications 13-2
Interface Specifications 13-10
Interface Cables 13-11
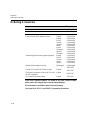
Regulatory Notices 13-12
Glossary G-1
Index I-1


Welcome
A Five-Minute Guide To Your Printer
1-2
A Five-Minute Guide To Your Printer
Your Printer’s Main Features
Your printer is an E/A0-size inkjet printer designed for printing high-quality, large-
format color or monochrome images. Some major features of the printer are:
n Large capacity ink system
n True 600 dpi print resolution.
n A choice of HP media designed to provide the best image quality with your
printer.
n An easy-to-use front-panel interface with a two-line display, giving you access
to a comprehensive set of printer functions.
n Available as an optional accessory is the Take Up Reel. This enables long
unattended prints
2500CP Only n Built-in Adobe PostScript Level 3 Raster Image Processor.
n Automatic color calibration to improve color consistency between jobs.
n Ink emulation allowing the printer to print jobs intended for devices using
standard pre-press color gamuts.
n PostScript queueing and nesting to reduce media waste.
n Large and very-complex PostScript file printing.

Welcome
A Five-Minute Guide To Your Printer
1-3
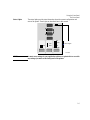
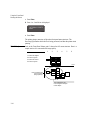
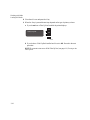
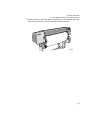
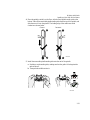
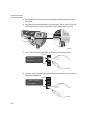
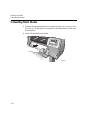
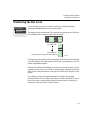
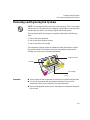
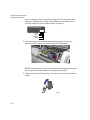
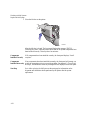
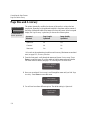
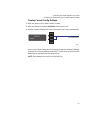
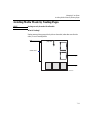
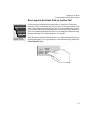
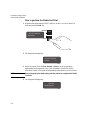
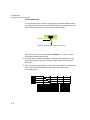
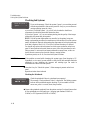
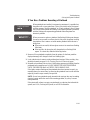
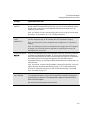
The Take Up Reel Accessory
Available with your printer as an option is the Take Up Reel. The Take Up Reel
consists of the left and right hand assemblies, sensor assembly, spindle assembly,
core tube and a media weight. As the media is fed out of the printer (1) it travels
down the front of the printer, around the Media Weight (2) and then onto the Core
Tube (3). The Core Tube turns, reeling in the printed media.
C472372

Welcome
A Five-Minute Guide To Your Printer
1-4
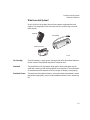
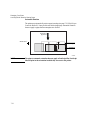
The HP DesignJet CP Ink Systems
There are two HP DesignJet CP Ink Systems designed together with your HP
DesignJet 2500CP or 2000CP printer.
Both Ink Systems include three-components; printhead, printhead cleaner and ink
cartridge to provide large-capacity ink, unattended printing, ease-of-use, reliability
and low-cost. Plus both Ink Systems offer true 600 dpi and new advanced dithering
algorithms for exceptional image quality prints.
Each 600-dpi thermal inkjet printhead applies ink droplets onto the media and has a
reservoir which holds enough ink for several prints. The printer automatically refills
the printhead from the ink cartridge whenever the ink volume in the printhead
reservoir becomes low.
The printer uses the printhead cleaners to clean and maintain the printheads, to
ensure best possible image quality, and to seal the printheads when not in use
ensuring the long life.
You can change Ink Systems as easy as 1—2—3 with the modular design. If you do
change one ink set for another, HP offer an Ink System Storage Container to store
partially used printheads and printhead cleaners.
Main Features of the HP DesignJet CP Ink System
The HP DesignJet CP Ink System is the ink system that you received with your HP
DesignJet CP printer. It is also referred to as Imaging ink. It is designed to deliver
clear, sharp, brilliant images with precise performance every time.
Main Features of the HP DesignJet CP Ink System UV
The HP DesignJet CP Ink UV can be purchased separately from your local Hewlett-
Packard dealer. It is also referred to as UV Pigmented ink. The HP DesignJet CP
Ink UV prints bright, colorful, outdoor lightfast signs and posters with a HP
Outdoor Durability Warranty.
The HP DesignJet CP Ink UV is designed to work together with the HP DesignJet
CP printers to create clear prints that are lightfast and durable with lamination, even
outdoor in direct sunlight, for up to one year, guaranteed.
The UV Pigmented inks provide resistance to ultra violet light. Protecting your
prints from fading and enhancing the durability of signs and posters.

Welcome
A Five-Minute Guide To Your Printer
1-5
Color Calibration (2500CP)
Automatic color calibration improves color consistency between prints. The printer
prints a test target image and measures the image color with a sensor to generate a
color calibration value that is applied to the PostScript imaging process.
Ink emulation (2500CP)
Ink emulation lets your printer accept CYMK PostScript files that use printing
industry standard color gamuts, enabling the printer to emulate commercial printing
presses for proofing.
PostScript queueing and nesting (2500CP)
PostScript queueing enables files to be reprinted quickly. PostScript nesting reduces
media waste by storing jobs and then positioning them to use the maximum width
of the media roll, reducing your printing costs.
Large/Complex PostScript file printing (2500CP)
The printer uses a built-in hard disk drive as extended memory for PostScript
rendering, enabling the printer to process almost any PostScript file you want to
print.
Multiple copies of prints (2500CP)
The built-in hard disk drive allows enhanced print management, enabling the
printer to print multiple copies of an image without re-rendering and nesting of
prints.
Print Resolution
Print resolution can be set to true 600 dots per inch (Best print quality) or 300 dots
per inch (Normal or Fast print quality mode). You can choose between the three
levels of print quality- Best, Normal or Fast - either from your software or from the
printer’s front panel.

Welcome
A Five-Minute Guide To Your Printer
1-6
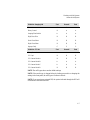
Media
You can print on roll media or sheet media up to EA0-size in width-91cm (36
inches).The following media types are supported for HP DesignJet CP Ink (imaging
ink) which is high image quality for indoor use:
n Coated paper
n Heavyweight coated paper
n High-gloss photo paper
n Semi-gloss photo paper
n Imaging film-Backlit
n Opaque vinyl
For detailed information on Hewlett-Packard media, see pages 3-4 of this manual
and the Media Guide for the HP DesignJet CP Printers provided with your printer.
The following media types are supported for HP DesignJet CP Ink UV
(UVPigmented Ink)
n HP Heavyweight Coated paper
n Opaque Vinyl
User Interface
The printer’s front panel includes an easy-to-use interface with a two-line display,
giving you access to a comprehensive set of printer functions and to a number of
useful internal prints. See Chapter 2, Using the Front Panel, for a short tutorial to
teach you how to navigate through the menus and a description of internal prints.
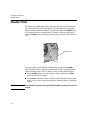
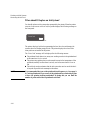
Standby Mode
The printer has a standby mode where, after 15 minutes of inactivity, the printer
goes into a sleep mode (low-power usage mode). The printer “wakes up” whenever
you press the Standby button on the printer or there is any I/O activity such as
receipt of a file. See page1-9, Front View of Printer, for the switch location and
page 2-6, Standby Mode, for more information about this function.

Welcome
A Five-Minute Guide To Your Printer
1-7
Connections
2500CP Only The 2500CP printer comes with an HP JetDirect network interface card, for LAN
connections, as well as a parallel interface for a direct connection to your computer.
See the Setup Guide for information on connecting your printer to a computer or
network.
2000CP Only Your printer comes with a Modular IO (MIO) slot which can be used to connect a
networking card.
Memory
2500CP Only The 2500CP printer comes with 32MB of memory plus 4 MB of internal printing
memory. You can this expand memory up to a maximum of 68 MB by adding 4-
MB, 8-MB, 16-MB or 32-MB memory SIMMS. In addition to this memory, the
printer has an internal hard disk drive used as extended memory for PostScript
rendering and print management.
For part numbers see page 13-19, Memory Modules
2000CP Only Your printer comes with 4 MB of memory plus 4 MB of internal printing memory.
You can expand the memory up to a maximum of 68 MB by adding additional 8-
MB, 16-MB, and 32-MB memory expansion modules.
For part numbers see page 13-19, Memory Modules

Welcome
A Five-Minute Guide To Your Printer
1-8
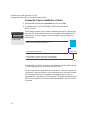
Software Applications and Drivers
To make sure that your printer prints exactly what you were expecting - in terms of
size, position, orientation, color and quality - use the correct driver for the
combination of your application software and your printer, and make sure that it is
configured correctly.
Many software applications include their own drivers. A set of Software
Application Notes is provided with this printer for the most popular applications. If
you find your own application in these notes, use the information they contain as a
guide to configuring the software for your printer.
Three types of drivers are supplied with the 2500CP printer:
n HP DesignJet PostScript® drivers for Macintosh® (QuickDraw™)
n HP DesignJet PostScript® drivers for Microsoft® Windows™ applications
n AutoCAD Drivers for DOS and Windows
Two types of drivers are supplied with the 2000CP printer:
n HP-GL/2 Windows Drivers
n AutoCAD Drivers for DOS and Windows
Some printer functions behave differently when the printer receives a PostScript file
as opposed to files formatted in other printer languages (HP-GL/2 or RTL).
Throughout this manual, references to “PostScript files” mean files sent to the
printer using the HP DesignJet PostScript driver supplied with the printer and
installed by you on your Macintosh or PC.
If you don't know whether your application sends PostScript files consult your
software documentation.
It is strongly recommended that you install and use the AutoCAD drivers to print
from AutoCAD. More CAD-orientated functionality is provided with these drivers,
they are also faster than HP-GL/2 or PostScript windows drivers.
Page is loading ...
Page is loading ...
Page is loading ...
Page is loading ...
Page is loading ...
Page is loading ...
Page is loading ...
Page is loading ...
Page is loading ...
Page is loading ...
Page is loading ...
Page is loading ...
Page is loading ...
Page is loading ...
Page is loading ...
Page is loading ...
Page is loading ...
Page is loading ...
Page is loading ...
Page is loading ...
Page is loading ...
Page is loading ...
Page is loading ...
Page is loading ...
Page is loading ...
Page is loading ...
Page is loading ...
Page is loading ...
Page is loading ...
Page is loading ...
Page is loading ...
Page is loading ...
Page is loading ...
Page is loading ...
Page is loading ...
Page is loading ...
Page is loading ...
Page is loading ...
Page is loading ...
Page is loading ...
Page is loading ...
Page is loading ...
Page is loading ...
Page is loading ...
Page is loading ...
Page is loading ...
Page is loading ...
Page is loading ...
Page is loading ...
Page is loading ...
Page is loading ...
Page is loading ...
Page is loading ...
Page is loading ...
Page is loading ...
Page is loading ...
Page is loading ...
Page is loading ...
Page is loading ...
Page is loading ...
Page is loading ...
Page is loading ...
Page is loading ...
Page is loading ...
Page is loading ...
Page is loading ...
Page is loading ...
Page is loading ...
Page is loading ...
Page is loading ...
Page is loading ...
Page is loading ...
Page is loading ...
Page is loading ...
Page is loading ...
Page is loading ...
Page is loading ...
Page is loading ...
Page is loading ...
Page is loading ...
Page is loading ...
Page is loading ...
Page is loading ...
Page is loading ...
Page is loading ...
Page is loading ...
Page is loading ...
Page is loading ...
Page is loading ...
Page is loading ...
Page is loading ...
Page is loading ...
Page is loading ...
Page is loading ...
Page is loading ...
Page is loading ...
Page is loading ...
Page is loading ...
Page is loading ...
Page is loading ...
Page is loading ...
Page is loading ...
Page is loading ...
Page is loading ...
Page is loading ...
Page is loading ...
Page is loading ...
Page is loading ...
Page is loading ...
Page is loading ...
Page is loading ...
Page is loading ...
Page is loading ...
Page is loading ...
Page is loading ...
Page is loading ...
Page is loading ...
Page is loading ...
Page is loading ...
Page is loading ...
Page is loading ...
Page is loading ...
Page is loading ...
Page is loading ...
Page is loading ...
Page is loading ...
Page is loading ...
Page is loading ...
Page is loading ...
Page is loading ...
Page is loading ...
Page is loading ...
Page is loading ...
Page is loading ...
Page is loading ...
Page is loading ...
Page is loading ...
Page is loading ...
Page is loading ...
Page is loading ...
Page is loading ...
Page is loading ...
Page is loading ...
Page is loading ...
Page is loading ...
Page is loading ...
Page is loading ...
Page is loading ...
Page is loading ...
Page is loading ...
Page is loading ...
Page is loading ...
Page is loading ...
Page is loading ...
Page is loading ...
Page is loading ...
Page is loading ...
Page is loading ...
Page is loading ...
Page is loading ...
Page is loading ...
Page is loading ...
Page is loading ...
Page is loading ...
Page is loading ...
Page is loading ...
Page is loading ...
Page is loading ...
Page is loading ...
Page is loading ...
Page is loading ...
Page is loading ...
Page is loading ...
Page is loading ...
Page is loading ...
Page is loading ...
Page is loading ...
Page is loading ...
Page is loading ...
Page is loading ...
Page is loading ...
Page is loading ...
Page is loading ...
Page is loading ...
Page is loading ...
Page is loading ...
Page is loading ...
Page is loading ...
Page is loading ...
Page is loading ...
Page is loading ...
Page is loading ...
Page is loading ...
Page is loading ...
Page is loading ...
Page is loading ...
Page is loading ...
Page is loading ...
Page is loading ...
Page is loading ...
Page is loading ...
Page is loading ...
Page is loading ...
Page is loading ...
Page is loading ...
Page is loading ...
Page is loading ...
Page is loading ...
Page is loading ...
Page is loading ...
Page is loading ...
Page is loading ...
Page is loading ...
Page is loading ...
Page is loading ...
Page is loading ...
Page is loading ...
Page is loading ...
Page is loading ...
Page is loading ...
Page is loading ...
Page is loading ...
Page is loading ...
Page is loading ...
Page is loading ...
Page is loading ...
Page is loading ...
Page is loading ...
Page is loading ...
Page is loading ...
Page is loading ...
Page is loading ...
Page is loading ...
Page is loading ...
Page is loading ...
Page is loading ...
Page is loading ...
Page is loading ...
Page is loading ...
Page is loading ...
Page is loading ...
Page is loading ...
Page is loading ...
Page is loading ...
Page is loading ...
Page is loading ...
Page is loading ...
Page is loading ...
Page is loading ...
Page is loading ...
Page is loading ...
Page is loading ...
Page is loading ...
Page is loading ...
Page is loading ...
Page is loading ...
Page is loading ...
Page is loading ...
Page is loading ...
Page is loading ...
Page is loading ...
Page is loading ...
Page is loading ...
Page is loading ...
Page is loading ...
Page is loading ...
Page is loading ...
Page is loading ...
Page is loading ...
Page is loading ...
Page is loading ...
Page is loading ...
Page is loading ...
Page is loading ...
Page is loading ...
Page is loading ...
Page is loading ...
Page is loading ...
Page is loading ...
Page is loading ...
Page is loading ...
Page is loading ...
Page is loading ...
Page is loading ...
Page is loading ...
Page is loading ...
Page is loading ...
Page is loading ...
Page is loading ...
Page is loading ...
Page is loading ...
Page is loading ...
Page is loading ...
Page is loading ...
Page is loading ...
Page is loading ...
Page is loading ...
Page is loading ...
Page is loading ...
Page is loading ...
Page is loading ...
Page is loading ...
Page is loading ...
Page is loading ...
Page is loading ...
Page is loading ...
Page is loading ...
Page is loading ...
Page is loading ...
Page is loading ...
Page is loading ...
Page is loading ...
Page is loading ...
Page is loading ...
Page is loading ...
Page is loading ...
Page is loading ...
Page is loading ...
Page is loading ...
Page is loading ...
-
 1
1
-
 2
2
-
 3
3
-
 4
4
-
 5
5
-
 6
6
-
 7
7
-
 8
8
-
 9
9
-
 10
10
-
 11
11
-
 12
12
-
 13
13
-
 14
14
-
 15
15
-
 16
16
-
 17
17
-
 18
18
-
 19
19
-
 20
20
-
 21
21
-
 22
22
-
 23
23
-
 24
24
-
 25
25
-
 26
26
-
 27
27
-
 28
28
-
 29
29
-
 30
30
-
 31
31
-
 32
32
-
 33
33
-
 34
34
-
 35
35
-
 36
36
-
 37
37
-
 38
38
-
 39
39
-
 40
40
-
 41
41
-
 42
42
-
 43
43
-
 44
44
-
 45
45
-
 46
46
-
 47
47
-
 48
48
-
 49
49
-
 50
50
-
 51
51
-
 52
52
-
 53
53
-
 54
54
-
 55
55
-
 56
56
-
 57
57
-
 58
58
-
 59
59
-
 60
60
-
 61
61
-
 62
62
-
 63
63
-
 64
64
-
 65
65
-
 66
66
-
 67
67
-
 68
68
-
 69
69
-
 70
70
-
 71
71
-
 72
72
-
 73
73
-
 74
74
-
 75
75
-
 76
76
-
 77
77
-
 78
78
-
 79
79
-
 80
80
-
 81
81
-
 82
82
-
 83
83
-
 84
84
-
 85
85
-
 86
86
-
 87
87
-
 88
88
-
 89
89
-
 90
90
-
 91
91
-
 92
92
-
 93
93
-
 94
94
-
 95
95
-
 96
96
-
 97
97
-
 98
98
-
 99
99
-
 100
100
-
 101
101
-
 102
102
-
 103
103
-
 104
104
-
 105
105
-
 106
106
-
 107
107
-
 108
108
-
 109
109
-
 110
110
-
 111
111
-
 112
112
-
 113
113
-
 114
114
-
 115
115
-
 116
116
-
 117
117
-
 118
118
-
 119
119
-
 120
120
-
 121
121
-
 122
122
-
 123
123
-
 124
124
-
 125
125
-
 126
126
-
 127
127
-
 128
128
-
 129
129
-
 130
130
-
 131
131
-
 132
132
-
 133
133
-
 134
134
-
 135
135
-
 136
136
-
 137
137
-
 138
138
-
 139
139
-
 140
140
-
 141
141
-
 142
142
-
 143
143
-
 144
144
-
 145
145
-
 146
146
-
 147
147
-
 148
148
-
 149
149
-
 150
150
-
 151
151
-
 152
152
-
 153
153
-
 154
154
-
 155
155
-
 156
156
-
 157
157
-
 158
158
-
 159
159
-
 160
160
-
 161
161
-
 162
162
-
 163
163
-
 164
164
-
 165
165
-
 166
166
-
 167
167
-
 168
168
-
 169
169
-
 170
170
-
 171
171
-
 172
172
-
 173
173
-
 174
174
-
 175
175
-
 176
176
-
 177
177
-
 178
178
-
 179
179
-
 180
180
-
 181
181
-
 182
182
-
 183
183
-
 184
184
-
 185
185
-
 186
186
-
 187
187
-
 188
188
-
 189
189
-
 190
190
-
 191
191
-
 192
192
-
 193
193
-
 194
194
-
 195
195
-
 196
196
-
 197
197
-
 198
198
-
 199
199
-
 200
200
-
 201
201
-
 202
202
-
 203
203
-
 204
204
-
 205
205
-
 206
206
-
 207
207
-
 208
208
-
 209
209
-
 210
210
-
 211
211
-
 212
212
-
 213
213
-
 214
214
-
 215
215
-
 216
216
-
 217
217
-
 218
218
-
 219
219
-
 220
220
-
 221
221
-
 222
222
-
 223
223
-
 224
224
-
 225
225
-
 226
226
-
 227
227
-
 228
228
-
 229
229
-
 230
230
-
 231
231
-
 232
232
-
 233
233
-
 234
234
-
 235
235
-
 236
236
-
 237
237
-
 238
238
-
 239
239
-
 240
240
-
 241
241
-
 242
242
-
 243
243
-
 244
244
-
 245
245
-
 246
246
-
 247
247
-
 248
248
-
 249
249
-
 250
250
-
 251
251
-
 252
252
-
 253
253
-
 254
254
-
 255
255
-
 256
256
-
 257
257
-
 258
258
-
 259
259
-
 260
260
-
 261
261
-
 262
262
-
 263
263
-
 264
264
-
 265
265
-
 266
266
-
 267
267
-
 268
268
-
 269
269
-
 270
270
-
 271
271
-
 272
272
-
 273
273
-
 274
274
-
 275
275
-
 276
276
-
 277
277
-
 278
278
-
 279
279
-
 280
280
-
 281
281
-
 282
282
-
 283
283
-
 284
284
-
 285
285
-
 286
286
-
 287
287
-
 288
288
-
 289
289
-
 290
290
-
 291
291
-
 292
292
-
 293
293
-
 294
294
-
 295
295
-
 296
296
-
 297
297
-
 298
298
-
 299
299
-
 300
300
-
 301
301
-
 302
302
-
 303
303
-
 304
304
-
 305
305
-
 306
306
-
 307
307
-
 308
308
-
 309
309
-
 310
310
-
 311
311
-
 312
312
-
 313
313
-
 314
314
-
 315
315
-
 316
316
-
 317
317
-
 318
318
-
 319
319
-
 320
320
-
 321
321
-
 322
322
-
 323
323
-
 324
324
-
 325
325
-
 326
326
-
 327
327
-
 328
328
-
 329
329
-
 330
330
-
 331
331
-
 332
332
-
 333
333
-
 334
334
-
 335
335
-
 336
336
-
 337
337
-
 338
338
-
 339
339
-
 340
340


HP DesignJet 2000CP User manual
- Category
- Print & Scan
- Type
- User manual
Ask a question and I''ll find the answer in the document
Finding information in a document is now easier with AI
Related papers
-
HP DesignJet Z3100 Photo Printer series User guide
-
-
-
-
-
-
-
-
-

