Page is loading ...

INSTRUCTION / INSTALLATION SHEET
12” Enclosure w/ Screw-on Cover
(P/N EN1200)
IS-0508 Rev. A
301Fulling Mill Road, Suite G
Middletown, PA 17057
Phone (800) 321-2343 / Fax (717) 702-2546
www.onqlegrand.com
©Copyright 2011 by Legrand All Rights Reserved. Page 1 of 2
1. Introduction
The Legrand EN1200 12” Enclosure is very similar to our other (14”, 20”, 28” and 42”) enclosures, but 2” shorter in height than our 14” enclosure,
and only available with a screw-on cover. It is UL listed for Communications Installations and should not be used with Security Products.
2. Enclosure Installation
Locate the enclosure centrally in the house to minimize the length of cable runs and in a climate controlled area. Temperature must be from 0°C
(32°F) to 50°C (122°F). Humidity is to be controlled to not condense in the enclosures. The enclosure must be located to assure that the electrical
outlet, if installed in the enclosure, is installed in compliance to all NEC wiring requirements. This is particularly important if the enclosure is located
in a basement and may be subject to flooding.
CAUTION: For any limitations on enclosure locations, consult local electrical and building codes before installing enclosures.
NOTE: The enclosure is not weather proof and should not be located outside or where temperature changes and humidity may allow
condensation in the enclosure.
NOTE: The enclosure is not fire rated and should not be mounted in fire rated walls.
The enclosure may be either surface mounted or recess mounted between studs installed on 16 inch centers.
Surface Mounting-
Typical surface mounting is on a 3/4 inch plywood back board.
A. Securely mount plywood with rear access knockouts accessible, if needed.
B. If cable access is to be through the back of enclosure, remove wire access knockouts
from rear of enclosure. (See Figure 1).
C. Position enclosure in desired location and mark top of center keyhole opening located on
the top center of enclosure (See Figure 1).
D. Install mounting wood screw at mark. Head must be ½” clearance from the back.
E. Hang enclosure on screw and mark four (4) mounting holes and wire access holes on
plywood. (See Figure 1). Also mark top and bottom of enclosure.
F. If cable access is from the rear, remove enclosure and cut access holes in plywood for
cables.
Note - Access hole may be a large slot, provided it does not extend beyond the
enclosure. Remove all rough edges to prevent cable damage.
G. Attach enclosure to wall using wood screws. Remove the top centering screw to avoid interference with modules.
Note - It may be easier to rough-in cable and feed cables through plywood prior to
attaching the enclosure.
.
Recessed mounting-
There are two methods for recess mounting the enclosure. In half inch drywall installations
the enclosure may be mounted to the front of the studs. Bend out the side tabs on each
side to 90 degrees (see Figure 2). Position the enclosure to the desired height and fasten
using standard screws into the slots in the tabs.
Alternatively you may position the enclosure to the desired height and fasten to the sides of
the studs using the slots in the tabs. Do not fully tighten until enclosure is positioned for the
desired depth. Drywall depth marks are embossed on the sides of the enclosure (see
Figure 3). Enclosure should be snug prior to drywall installation, however it may be
adjusted to assure it is flush with the wall after trim out.
Enclosure Ground Cable – (see Figure 3)
The ground cable is to be routed from the enclosure to the house electrical
ground. The ground screw is located inside the bottom of the enclosure.
3. Running Power To Enclosure
AC power needs to be run to the Enclosure when installing any module that
requires AC or DC power to operate. A low-voltage UL listed, Class 2, plug-in
power supply is required when using these modules. Low voltage power options
are available from your Legrand distributor.
Remove knock-out in the bottom of the Enclosure. Install a single-gang metal
outlet box (see Figure 3).
Run a length of nonmetallic power cable to the Enclosure for connection of a
standard 15 amp, 120 volt power receptacle (Available as a kit from Legrand
as P/N F7526).
Note: Separation of circuits must be maintained and electrical wiring must comply with the National Electric Code (NFPA 70), Canadian
Electric Code, and all applicable state or local codes.
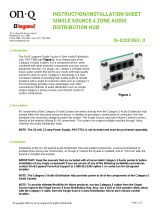
Mounting Tabs
Figure 2
Figure 1
Mounting
Holes
Rear Access Knockouts
Figure 3
Keyhole
opening
Drywall
depth
marks

INSTRUCTION / INSTALLATION SHEET
12” Enclosure w/ Screw-on Cover
(P/N EN1200)
IS-0508 Rev. A
301Fulling Mill Road, Suite G
Middletown, PA 17057
Phone (800) 321-2343 / Fax (717) 702-2546
www.onqlegrand.com
©Copyright 2011 by Legrand All Rights Reserved. Page 2 of 2
Figure 4
4. Cable Rough-In
All applications and cabling to and from the enclosure are low voltage class 2 or communication cables. All code and good wiring practices should be
maintained, such as maintaining separation from power and using proper cable retention. The next section describes rough-in at the enclosure.
NOTE: The enclosure must be grounded. Use a minimum of 14 AWG copper wire to connect the ground lug to earth ground. Electric
ground shall be considered at the same potential as earth ground.
A. Telephone Rough-In
1) Install Category cable (depending on application) from the enclosure to the telephone company network interface device (NID). Label
cable near entry to the enclosure and at outlet location.
2) Install Category cable (depending on application) from the enclosure to each of the outlet locations. Label cable near entry to the
enclosure and at outlet location.
3) Position and secure cables to comply with codes and good wiring practices to ensure cables are not damaged during construction.
NOTE: We recommend running a second Cat 5e cable from the telephone network interface to the Enclosure for future data applications.
B. Coax Rough-In
1) Install Quad Shield RG6 cable from the enclosure to the outlet locations. Route the cable through the appropriate upper access hole with
approximately three feet of excess. Label cable near entry to the enclosure and at outlet location.
2) Install 2-5 Quad Shield solid copper center conductor RG6 cables from the enclosure to any planned dish antenna location. Route the
cables through one of the upper access hole with approximately three feet of excess. Label cables near entry to the enclosure and
antenna location.
3) Install Quad Shield RG6 cable from the enclosure to any media center input and video outlets. Route the cable through one of the upper
access hole with approximately three feet of excess. Label cable near entry to the enclosure and outlet location.
4) Position and secure cables to comply with codes and good wiring practices to ensure cables are not damaged during construction.
C. Other Cable Rough-In
1) For local area network (LAN) and other data connections, install Category 5e cable from the enclosure to the desired outlets.
2) For Audio and other low voltage applications, install appropriate cable per the application instructions.
5. Cover Installation
NOTE: Only use On-Q/Legrand Covers with the enclosure. Covers must be
matched to the proper size enclosure.
A. Partially install the top two (2) screws in the enclosure.
B. Hang the screw-on cover on the two partially installed screws using the keyhole
openings in the cover. The cover should hang freely and fit up against the
enclosure; if not, check to see if cables are outside the enclosure or check to see if
cables are being pinched.
C. Install the remaining two screws with lock washers, and tighten.
D. Remove the top two screws and reinstall with lock washers. Tighten the screws.
NOTE: Screws must be installed with lock washers to ensure proper cover
grounding. The screws and lock washers must be installed to ensure the cover is
electrically grounded to the enclosure. (See Figure 4)
NOTE: READ AND UNDERSTAND ALL INSTRUCTIONS
Follow all warnings and instructions marked on product. For use only with
compatible products. Follow manufacturers installation instructions for all
modules and support products
IMPORTANT SAFETY INSTRUCTIONS
When using your enclosure and installed low voltage products such as telephone equipment, basic precautions should always be followed to reduce the
risk of fire, electric shock and injury to persons, including the following:
1. Read and understand all instructions.
2. Follow all warnings and instructions marked on the product.
3. Do not use this product near water, ie. near a bath tub, kitchen sink, or laundry tub, in a wet basement, or near a swimming pool.
4. Never push objects of any kind in to this product through cabinet slots as they may touch dangerous voltages.
5. Never touch un-insulated telephone wires or terminals unless the telephone line has been disconnected at the network interface.
6. Separation must be maintained between power-limited, non-power-limited, telco, and coax circuits, as well as between any current-
carrying and dead-metal parts, by a minimum spacing of 1/4” inch.
7. Use caution when installing or modifying telephone lines, and never install them during a lightning storm.
8. Never install telephone jacks in wet locations unless they are specifically designed for such installations.
9. Receptacle box employed must be UL Listed and appropriate per the enclosure installation, i.e. flush-mount vs. surface mount.
10. Enclosure covers must be installed prior to the application of energized services.
11. Low-voltage modules must be supplied power via the use of a UL Listed, Class 2 plug-in power supply.
12. Unused cable entry holes require a knock-out seal to reduce the risk of electric shock, installed prior to the application of energized
services.
13. Any unused 110VAC receptacles must be covered.
/