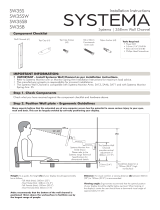
Atdec VF-AT-W Installation guide

Category
Flat panel wall mounts
Type
Installation guide

Atdec VF-AT-W is an adjustable wall-mounted arm designed to provide ergonomic positioning for computer displays. It offers flexible height adjustment, tilt, and swivel capabilities, allowing you to customize your viewing experience and reduce strain on your neck and back. Its sturdy construction supports displays up to 17.6 lbs and features a cable management system to keep your workspace tidy.

Atdec VF-AT-W is an adjustable wall-mounted arm designed to provide ergonomic positioning for computer displays. It offers flexible height adjustment, tilt, and swivel capabilities, allowing you to customize your viewing experience and reduce strain on your neck and back. Its sturdy construction supports displays up to 17.6 lbs and features a cable management system to keep your workspace tidy.

VF-AT-W
Component Checklist
Focus | Articulated Arm | Wall
M4x10/12/16mm (x4)
Phillips Head
Mounting Screws
Primary Arm
Cable Cover
Secondary Arm
Cable Cover
End CapArm Assembly
Wall Plate
5mm
Allen Key
Nylon Anchor
Plug (x2)
M4 x 12mm
Countersunk
Screw (x2)
M6 x 50mm
Countersunk
Screw (x2)
2.5mm
Allen Key
Display Mounting
Screws
HARDWARE
! IMPORTANT - Install Focus Articulated Arm Wall as per installation instruction.
! This product supports a maximum load of 8kg (17.6lbs).
! The manufacturer accepts no responsibility for incorrect installation.
IMPORTANT INFORMATION:
Step 1. Check Components
Check what you have received against the component checklist and hardware above.
Step 2. Position Wall Plate
As a guide, it is recommended that the bottom of the Wall Plate be positioned approximately 140mm (5 1/2”)
above the desktop.
For further Ergonomic Guidelines, please refer to the end of the document.
Note: The Focus
Articulated Arm Wall
provides vertical
adjustment of 128mm.
Tools Required:
• Power Drill
5.5mm (1/4”) Drill Bit
8mm (5/16”) Drill Bit
Phillips Head Screwdriver
128mm (5”)
140mm (5 1/2”)
Installation Instructions
Step 3. Installing the Wall Plate
Step 4. Mount Arm Assembly
3.1 Choose the appropriate installation procedure depending on your wall type.
4.1 Unlock the Locking Dial before
inserting the Arm Assembly into the
Wall Plate.
4.2 Slide the Arm Assembly to the
preferred height and lock to secure
the arm.
Lock
Unlock
4.3 Secure the End Cap
with the supplied M4x12mm
Countersunk Screws and
2.5mm Allen Key.
2.5mm Allen Key
End Cap
Wall Plate
Nylon
Anchors
Timber
Stud
8mm (5/16”)
Hole
5.5mm
(1/4”) Hole
M6 x 50mm
Countersunk
Screw
M6 x 50mm
Countersunk
Screw
Wall Plate
Arm Assembly
Locking Dial
Locking Dial
Wall Plate
M4x12mm
Countersunk Screw
Masonry
Timber Stud
Step 5. Mount Display
Step 6. Adjust Height
M4 Phillips Head
Mounting Screws
Option 1: 75x75mm Hole Pattern Option 2: 100x100mm Hole Pattern
Note: Extend Arms to
achieve 100x100mm
hole pattern.
5.1 Unlock Lock Dial ensuring both Screen
and Arm Assembly are supported.
5.2 Lift/Lower Screen to the desired height.
Move both Screen and Arm assembly together.
Step 7. Cable Management
7.1 After plugging in your cables, install the Cable Covers.
A. Insert Cable Covers up
into Lock Slots.
B. Push Cable Covers away
from Elbow Joint to secure
in place.
Elbow Joint
‘click
‘click
Lock Slot
5.3 Lock the Lock Dial firmly.
Note: Ensure enough cable
slack is given to allow for
movement.
Tighten
Loosen
TILT
(screen angle up/down)
Tighten
Loosen
PORTRAIT/LANDSCAPE
95º
Max.
PAN
(screen angle left/right)
15°
HORIZONTAL SIGHT LINE (d)
CENTRE OF SCREEN
10°-20°
(h)
Max.
454mm
(17
7
/
8
”)
Installation Complete
No portion of this document or any artwork contained herein should be reproduced in any way without the express written consent of Atdec Pty Ltd.
Due to continuing product development, the manufacturer reserves the right to alter specifications without notice. Published 29
.11.13 ©
Step 6.2. Insert Cable Stops
Ergonomic Guidelines
Many experts believe that the extended use of any computer screen has the potential to cause serious injury to your eyes,
neck and back. This can be largely avoided by correctly positioning your display.
Viewing angle: Ergonomists recommend that the optimal position
of your display should be slightly below eye level. When looking at
the display’s centre the user should have a downward visual angle
of approximately 10°-20°.
Height: As a guide, the height (h) of your display should
approximately be as follows:
- Tall Male (Max): 560mm (22”)
- Short Male (Min): 368mm (14.5”)
- Tall Female (Max): 520mm (20.5”)
- Short Female (Min) 356mm (14”)
Distance: For visual comfort, a viewing distance (d) between
500mm (20”) to 750mm (29.5”) is recommended.
Tilt Angle: Angular adjustments to reduce reflection on your
monitor should range between 5° forward tilt to 15° backward tilt.
  • Page 1 1
  • Page 2 2
  • Page 3 3
  • Page 4 4

Atdec VF-AT-W Installation guide

Category
Flat panel wall mounts
Type
Installation guide

Atdec VF-AT-W is an adjustable wall-mounted arm designed to provide ergonomic positioning for computer displays. It offers flexible height adjustment, tilt, and swivel capabilities, allowing you to customize your viewing experience and reduce strain on your neck and back. Its sturdy construction supports displays up to 17.6 lbs and features a cable management system to keep your workspace tidy.

Ask a question and I''ll find the answer in the document

Finding information in a document is now easier with AI