Page is loading ...

AF-AT-W Page 1 of 4
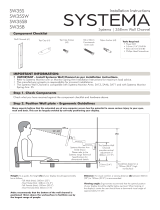
B
VESA
head
(x1)
C
End Cap
(x1)
D
Wall Plate
(x1)
Arm Assembly
(x1)
O
Security Screw
M4 x 16mm
(x1)
I
Nylon Anchor
Plug
(x2)
J
Countersunk
Screws
M4 x 12mm
(x2)
K
Countersunk
Screws
M6 x 50mm
(x2)
G
2.5mm
Allen key
(x1)
H
5mm
Allen key
(x1)
L
Mounting
screws
M4 x 10mm
M
Mounting
screws
M4 x 12mm
N
Mounting
screws
M4 x 16mm
E
Primary arm
cable cover
(x1)
F
Secondary arm
cable cover
(x1)
Installation Guide
AF-AT-W
Wall Mounted Monitor Arm
COMPONENT CHECKLIST
IMPORTANT INFORMATION
! Please ensure this product is installed as per these installation instructions.
! This product is compatible with the range of AF Poles and arms.
! The manufacturer accepts no responsibility for incorrect installation.
! Curved monitors, deep devices (such as all-in-one PCs) and offset VESA locations exert additional leverage that can exceed the
capacity of the mount even though the monitor weight may be within the stated range. Please contact Atdec if you would like further
information.
REQUIRED TOOLS
WEIGHT RANGE
• Phillips Head Screwdriver
Flat Monitors
0 - 8kg
(0 - 17.6lbs)
Curved Monitors
0 - 5.5kg
(0 - 12lbs)

AF-AT-W Page 2 of 4
Note: The wall-mounted
arm provides vertical
adjustment of 128mm.
128mm (5”)
140mm (5 1/2”)
v
1. Position Wall Plate
2. Choose the appropriate installation procedure depending on your wall type
3. Mount Arm Assembly
Wall Plate
Nylon
Anchors
8mm (5/16”)
Hole
M6 x 50mm
Countersunk
Screw
Locking Dial
Wall Plate
Locking Dial
2.5mm Allen Key
End Cap
M4x12mm
Countersunk Screw
Timber
Stud
5.5mm
(1/4”) Hole
M6 x 50mm
Countersunk
Screw
Wall Plate
As a guide, it is recommended
that the bottom of the
Wall Plate be positioned
approximately 140mm (5 1/2”)
above the desktop.
Masonry
3.1 Unlock the Locking Dial before
inserting the Arm Assembly into the
Wall Plate
3.2 Slide the Arm Assembly to the preferred
height and lock to secure the arm
3.3 Secure the End Cap with the
supplied M4x12mm Countersunk
Screws and 2.5mm Allen Key
Timber Stud

AF-AT-W Page 3 of 4
100mm
100mm
4. Install VESA monitor head
VESA monitor
head
Screen
M4x10/12/16mm
Phillips Head Mounting
Screws
5. Mounting Monitor
VESA monitor head
Arm Assembly
5.2 OPTIONAL SECURITY SCREW
Ensure the Monitor is supported, then loosen the Monitor
head screw with the 5mm Allen Key and tilt screen up before
installing the M4 x 16mm Security Screw into the Security
Screw hole
Note: Support Screen
when adjusting tilt.
5.1 Insert VESA monitor head into
the receptacle in the Arm Assembly
5mm Allen Key
Phillips Head
Screwdriver
Loosen
Tighten
Security Screw
Hole
M4 x 16mm
Security Screw
Monitor head
screw
6.1 After plugging in your cables,
install the Cable Covers.
6.2 Lift/Lower Screen to the desired
height. Move both Screen and Arm
assembly together.
6.3 Lock the Lock Dial firmly.
6. Adjusting Height
4.1 Install VESA monitor head as shown

AF-AT-W Page 4 of 4
7. Cable Management
Lock Slot
Elbow Joint
‘click’
‘click’
7.1 After plugging in your cables, install the Cable Covers.
Insert Cable Covers up into Lock Slots.
Note: Ensure enough cable slack
is given to allow for movement.
7.2 Push Cable Covers away from Elbow Joint to secure in place.
atdec.com | atdec.co.uk | atdec.com.au
No portion of this document or any artwork contained herein should be reproduced in any way without
the express written consent of Atdec Pty Ltd. Due to continuing product development, the manufacturer
reserves the right to alter specifications without notice. ©20191024A
8. Adjusting the Display Bracket
Portrait/ Landscape Tilt (Screen angle up/down) Pan (Screen angle left/right)
No Allen Key
necessary
No Allen Key necessaryNote: Support Screen when
adjusting tilt.
100mm
100mm
5mm Allen Key
Tighten
Loosen
VESA 75 x 75 / 100 x 100mm
/