Page is loading ...

Quick Check® 200 Series
User’s Guide

Disclaimer
Hand Held Products, Inc. (“Hand HeldProducts”) reserves the right to make
changes in specifications and other information contained in this document
without prior notice, and the reader should in all cases consult Hand Held
Products to determine whether any such changes have been made. The
information in this publication does not represent a commitment on the part of
Hand Held Products.
Hand Held Products shall not be liable for technical or editorial errors or
omissions contained herein; nor for incidental or consequential damages
resulting from the furnishing, performance, or use of this material.
This document contains proprietary information that is protected by copyright. All
rights are reserved. No part of this document may be photocopied, reproduced,
or translated into another language without the prior written consent of Hand
Held Products.
© 2001-2005 Hand Held Products, Inc. All rights reserved.
Web Address: www.handheld.com
Microsoft
®
Visual C++
®
, Windows
®
95, Windows
®
98, Windows
®
2000, Windows
CE
®
, and Windows NT
®
are either registered trademarks or trademarks of
Microsoft Corporation in the United States and/or other countries.
Other product names mentioned in this document may be trademarks or
registered trademarks of other companies and are the property of their respective
owners.
The CE mark on the product indicates that the system has been tested
to and conforms with the provisions noted within the 89/336/EEC
Electromagnetic Compatibility Directive and the 73/23/EEC Low Voltage
Directive.
For further information please contact:
Hand Held Products, Inc.
Nijverheidsweg 9
5627 BT Eindhoven
The Netherlands
Hand Held Products shall not be liable for use of our product with equipment (i.e.,
power supplies, personal computers, etc.) that is not CE marked and does not
comply with the Low Voltage Directive.

Statement of Agency Compliance
This device complies with part 15 of the FCC Rules. Operation is subject to the
following two conditions: (1) this device may not cause harmful interference, and
(2) this device must accept any interference received, including interference that
may cause undesired operation.
FCC Class A Compliance Statement
This equipment has been tested and found to comply with the limits for a Class A
digital device, pursuant to part 15 of the FCC Rules. These limits are designed
to provide reasonable protection against harmful interference when the
equipment is operated in a commercial environment. This equipment generates,
uses, and can radiate radio frequency energy and, if not installed and used in
accordance with the instruction manual, may cause harmful interference to radio
communications. Operation of this equipment in a residential area is likely to
cause harmful interference, in which case the user will be required to correct the
interference at his own expense.
Caution: Any changes or modifications made to this device that are not
expressly approved by Hand Held Products may void the user's authority to
operate the equipment.
Note: To maintain compliance with FCC Rules and Regulations, cables
connected to this device must be shielded cables, in which the cable shield
wire(s) have been grounded (tied) to the connector shell.
Canadian Notice
This equipment does not exceed the Class A limits for radio noise emissions as
described in the Radio Interference Regulations of the Canadian Department of
Communications. (ICES-003)
Le present appareil numerique n'emet pas de bruits radioelectriques depassant
les limites applicables aux appareils numeriques de la classe A prescrites dans
le Reglement sur le brouillage radioelectrique edicte par le ministere des
Communications du Canada. (ICES-003)


i
Table of Contents
1. About This Manual..................................................................... 1
Conventions........................................................................................................ 1
QC200 “Low Battery” Warning ........................................................................1
2. Overview...................................................................................... 3
Unpacking .......................................................................................................... 4
Charging the Battery.......................................................................................... 4
Command Code “Quick Start” ..........................................................................5
3. Detailed Operation...................................................................... 7
Using the QC200................................................................................................ 9
Power ON/OFF..................................................................................................9
Reflectance Scale Calibration.......................................................................... 10
Initial Power Up Default Settings ....................................................................10
4. Configuration/Programming.................................................... 13
Codes/Symbology Options................................................................................ 13
“Application”/Model Options.......................................................................... 16
Model Selections: ..................................................................................... 17
“Tests” Options................................................................................................ 17
“Config.” Options............................................................................................ 19
5. Symbol Testing & Scan Results................................................ 21
Test Result Details............................................................................................ 23
Dimensional Parameters.......................................................................... 23
Reflectance Parameters............................................................................ 25
Format Parameters .................................................................................. 26
6. Printer Printout Samples.......................................................... 29
7. Special Functions ..................................................................... 33
Reflectometer Mode.......................................................................................... 33
Command Code Programming......................................................................... 33
8. Quick Check Maintenance....................................................... 37
Battery Charging..............................................................................................37
Scanner Tip Cleaning.......................................................................................37
Reflectance Calibration Page Replacement..................................................... 37
Troubleshooting................................................................................................ 38

ii
9. Single Scan To Result (SSTR).................................................. 39
10. Printer Information.................................................................. 41
Saving Data...................................................................................................... 41
Reviewing printouts.......................................................................................... 41
Using a printer ................................................................................................. 44
Print your work ................................................................................................ 44
Save data when a printer is not connected....................................................... 45
Review data from the last scan:........................................................................ 45
Print or delete stored data: .............................................................................. 45
Stop printing..................................................................................................... 46
Using the QCP and QCHSP............................................................................. 46
Setup the QCP or QCHSP:............................................................................... 47
Install or replace the QCP or QCHSP paper roll:........................................... 47
Remove ribbon cartridge from the QCP or QCHSP........................................ 49
Connect the QCP or QCHSP to the Quick Check............................................ 50
Perform a QCP or QCHSP self-test:................................................................ 50
Troubleshooting the QCP or QCHSP .............................................................. 50
Turn on and off the QCSSP.............................................................................. 52
Setup the QCSSP.............................................................................................. 52
Install or replace the QCSSP paper roll:......................................................... 52
Perform a QCSSP self-test ............................................................................... 53
Troubleshooting the QCSSP............................................................................. 53
11. Customer Support..................................................................... 57
Obtaining Factory Service ...............................................................................57
Online Product Service and Repair Assistance........................................58
Technical Assistance ........................................................................................ 58
Online Technical Assistance..................................................................... 59
Limited Warranty .............................................................................................59

1
1. About This Manual
This manual contains information on the Quick Check
®
200 Series.
• Quick Start Command Code
• Detailed Operation
• Configuration / Programming
• Symbol Testing / Scan Results
• Printer Printouts
• Special Functions
• Quick Check Maintenance
• Single Scan to Result (SSTR)
Conventions
This manual uses several special symbols to refer to the controls on the
instrument. The following table shows the symbols and their descriptions.
Symbol Description
POWER or Scroll [<>] or
Select
Represents a button on the Quick Check
unit
-Specs- or OK-to-Scan Shows the LED display on the Quick
Check unit
♦
Indicates steps to follow to perform a
procedure
QC200 “Low Battery” Warning
The Quick Check
®
200 Series dynamically checks the condition of its battery
when turned on and during menu cycles. If any test falls below a specified limit,
the LCD will show “Low Battery” (and the unit “beeps” five times) as a warning
that the battery’s charge may be deteriorating. The QC200’s microprocessor
“sets” a system “flag” or “pointer” that indicates a degraded condition was
measured for that particular test. With this “flag” set, further cycling of the menu

2
or attempts to scan will automatically bring about additional “Low Battery”
indications.
This testing sequence has a power drain than normal scan or single menu
functions. This protects the user by insuring a low battery indication before total
unit power failure occurs, thus preserving proper unit operation. It is possible for
an intermittent “false” low to be detected and reported due to variations in battery
condition, temperature, component efficiency and rapid cycle time. When “Low
Battery” is indicated, the operator should turn their QC200 off, allow one or two
minutes for the battery to recover and then turn it back on. This sequence clears
the Low Battery “flag” or “pointer”. If the “Low Battery” indication returns
immediately on power up, then the unit should be recharged. If not, the QC200
can continue to be used.
The QC200 can be recharged before the warning is seen. Alternately, it can be
left connected to the charger when not in use. To extend battery life, battery
manufacturers recommend you fully charge the unit, use it till the “Low Battery”
indication is seen repeatedly, and then fully recharge before continued use.

3
2. Overview
The Quick Check
®
200 Series is one of the Hand Held Products family of Quick
Check bar code quality assurance devices. The Quick Check
®
200 Series is fully
portable and compatible with all major bar code symbologies. It is effectively two
instruments in one, both an easy-to-use Pass/Fail quick tester and a powerful
measuring tool for detailed testing and analysis of those same symbols.
Testing criteria within the Quick Check
®
200 Series is based on the American
National Standard X3.182-1990 “Bar Code Print Quality Guideline.” The Quick
Check family of bar code verifiers was designed specifically to fully implement
this guideline guaranteeing symbol compliance to the standard. They provide a
baseline in measurement accuracy against which all verifiers, new and old,
should be judged.
The QC200 series determines print quality, wide to narrow ratios, print contrast
and reflectance parameters, decodes and verifies character format as called for
by application specifications. The quality information from the Quick Check
®
200
Series is presented through an easy to read liquid crystal display (LCD), light
emitting diodes (LEDs), audible tones and through its optional accessory printer.
The knowledge gained using the Quick Check
®
200 Series measurement modes
is invaluable in educating the user about the critical optical characteristics of bar
code symbols.
The Quick Check
®
200 Series can verify the quality of:
• EAN/UPC family of symbols with or without addendum
• Code 39 with or without check character
• Interleaved 2 of 5 with or without check character
• Codabar/USS Codabar with or without check character
• Code 128 with all modes and characters displayed
• MSI Code
• Code 16K
• IATA 2 of 5
• Regular 2 of 5

4
Unpacking
When you first receive your Quick Check
®
200 Series unit, you should carefully
unpack it. Before attempting to use the instrument, inspect the contents of the
package for any shipping damage. If there is evidence of shipping damage,
please keep ALL packing materials and contact the delivery carrier AS SOON AS
POSSIBLE for claim procedure. Confirm that you have the following items:
QC200 Series model number ordered.
AC Charger
User’s Guide
Manual Pack with:
Test Symbols
Warranty Card
Gauge Ruler
“X” Dimension Ruler
Please fill out the Warranty Card immediately. Also make a note of the serial
number of the unit and the date purchased.
Charging the Battery
NOTE: The battery you received with your Quick Check
®
200 unit may be
discharged. Prior to initial use, the batteries should be charged for at least six (6)
hours. The Quick Check
®
200 unit is designed to operate only using the supplied
NiCad rechargeable battery pack. It is not intended to be powered directly from
an adapter or AC outlet. The Quick Check
®
200 Series verifier is designed to
make maximum use of its battery power. As a result, the unit will operate for a
minimum of one (1) hour on a properly charged battery pack.
!!! WARNING!!!
DO NOT CONNECT YOUR QUICK CHECK TO ITS CHARGER OR PRINTER
UNLESS A BATTERY PACK IS INSTALLED. TO DO SO WILL DAMAGE THE
UNIT AND VOID ITS WARRANTY!! ALL UNITS HAVE HAD A PACK
INSTALLED AT THE TIME OF MANUFACTURE.
USE ONLY A HAND HELD PRODUCTS SUPPLIED NICAD TYPE
RECHARGEABLE BATTERY PACK. USE OF OTHER PACKS OR BATTERIES
AND ATTEMPTS TO RECHARGE THESE BATTERIES COULD CAUSE THE
BATTERIES TO EXPLODE, CAUSING DAMAGE TO THE UNIT AND
POSSIBLE PERSONAL INJURY!! DAMAGE CAUSED BY ATTEMPTS TO
RECHARGE OTHER THAN THE SPECIFIED HAND HELD PRODUCTS QC200

5
SERIES BATTERY PACK WILL VOID ANY AND ALL QUICK CHECK
®
200
SERIES WARRANTIES.
To charge the batteries:
1. Plug the AC charger into the power jack on the end of the Quick Check unit.
2. Plug the AC charger power unit into an appropriate VAC wall outlet.
3. Charge the batteries for a minimum of six (6) hours.
After allowing the proper battery charge time, your Quick Check will be ready for
operation.
If you experience any problems during this set up procedure, carefully review the
above steps and try again. If you still have problems, contact your dealer or
Hand Held Products for assistance.
Command Code “Quick Start”
The Quick Check
®
200 Series is a complete, self-contained handheld bar code
verifier. Though we recommend you become thoroughly familiar with the device
and this manual before use, those familiar with bar code verification can easily
set-up and use the QC200 within a matter of minutes (after it has been unpacked
and initially charged) following the next steps:
1. Carefully unpack and inspect the unit. (See section titled UNPACKING for
details)
2. Plug the QCAC charger into the QC200 and an AC wall outlet and charge
the unit for a minimum of six hours. (See sectional titled CHARGING THE
BATTERY for details)
3. After charging, turn the unit on by pressing and releasing the POWER
button. You should hear four beeps indicating the unit is ready.
4. Next, select one of the following pre-printed “Quick Start” Command Codes
appropriate for your use of the QC200, carefully place the tip of the QC200
on the Command Code of choice and scan the code.
5. The unit will respond with four beeps and return to the start up, ready to
scan state.
6. You have now totally programmed your QC200 and are ready to scan your
sample codes. After each scan, the custom LCD display will show decode,
symbology type, PCS or ANSI grade, bar growth/shrinkage indication and
any parameter areas where errors exist. If the code has passed all tests,
one beep will be heard and the green LED will flash. If errors have been
found, three beeps will be heard, the red LED will flash and one or more of
the parameter areas will be lit on the LCD (DIM, REF and /or FMT) to show
in what test criteria area(s) the fault exists.
Detailed information on proper scanning techniques and unit use can be found
throughout this manual. If you have any problems during your “Quick Start,”

6
please refer to the rest of this manual or call Hand Held Products’ Customer
Support.
NOTE: Display Orientation (Right Handed vs. Left Handed) and Printer Interface
selection ARE NOT set using the Command Code. Factory default settings for
these are “Right Handed” and “QCHSP”.
.

7
3. Detailed Operation
The Quick Check
®
200 Series is a complete, self-contained handheld bar code
verifier. The top panel features include a “POWER” button a “SELECT” button
[0], a “SCROLL” [<>] button, a red and a green colored LED and a custom, multi-
function, liquid crystal display (LCD). On the bottom of the instrument is the
Serial Number label as well as two of the three case screws that must be
removed for access to the internal battery. (WARNING: DO NOT attempt to
replace the battery pack without first contacting Hand Held Products’ Service
Department!) A port on the end allows connection to a recharger or optional
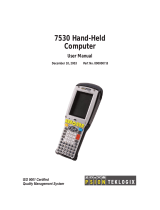
printer. The following figures show the unit’s layout.
Figure A

8
Quick Check
®
200 Control Buttons

9
Using the QC200
Before you turn the unit on and select a mode of operation, you should review
the following to learn how to properly scan a bar code with it.
To scan a bar code:
1. Hold the QC200 as you would a pen or pencil. The raised “finger grip
ridges” on each side of the case near the optics/scanning tip are guides for
finger placement.
2. Press the optics tip lightly against the surface to be scanned in the clear
area (quiet zone) on either side of the bar code symbol. To maintain a
proper scanning angle, be sure both the optics tip and the “reflectance
guide” are flat on the surface to be scanned.
3. At about the same speed with which you would quickly underline one of the
sentences in this text, and without interruption, move the QC200 evenly
across the center (or approximate center) of the bar code.
4. Listen for a long beep tone quickly followed by a short beep tone signifying a
good read. Note that a long beep followed by three short beeps indicates an
error condition exists in the symbol scanned.
NOTE: Practice your scanning technique until you can successfully scan each of
the supplied test symbols on each attempt. Some of the supplied test symbols
have “intentional errors” in them to show the user how error conditions are
reported.
Power ON/OFF
The Quick Check
®
200 Series is turned on by pressing the POWER button, to
which it responds by emitting four quick beeps and first displays:
[QC2xx aa/lll]
where “xx” identifies the model number, “aa” is the aperture size designation in
“mils” (one thousandths of an inch) and “lll” is the spectral response or
wavelength of illumination in nanometers. If there are stored print records (and
the unit is connected to a Quick Check
®
AC Charger or Printer interface cable),
the display then changes to:
[BUF xx% Ful>]
or it may read “LOW BATTERY!” or “RECALIBRATE!” if charging or reflectance
calibration is needed.

10
The Quick Check
®
200 Series shuts itself off after about a minute of inactivity.
Alternately, the operator can shut the instrument off by pressing the button for
about two seconds, until it beeps and clears the display.
Reflectance Scale Calibration
The first time you use the unit or charge the battery pack and periodically during
normal operation, the Quick Check
®
200 Series reflectance scale should be
calibrated. Remove the QC200 Reflection Calibration Page (QCRFPG) from the
manual and, with the unit at the proper scanning angle (so it rests on its
“reflectance guide”), CAREFULLY scan the reference target symbol 10 times.
Note that your first scan will yield a “triple” beep (one long, two short) as well as
your tenth scan.
NOTE: TO INSURE MAXIMUM REFLECTANCE-SCALE ACCURACY FOR THE
HIGHEST ACCURACY IN DATA COLLECTION, YOUR QUICK CHECK
PERFORMS A CONSISTENCY TEST WHILE THE TEN CALIBRATION SCANS
ARE MADE. IF, DURING THOSE SCANS, IT DETECTS REFLECTANCE
READINGS SIGNIFICANTLY DIFFERENT FROM THE PREVIOUS ONES
RECORDED, IT WILL AGAIN “BEEP” THREE (3) TIMES AND THE LCD WILL
PROMPT YOU TO AGAIN BEGIN THE REFLECTANCE CALIBRATION
PROCEDURE. IF DURING THE MEASUREMENT OF A SAMPLE SYMBOL AN
“XX” or “- -“ IS DISPLAYED OR PRINTED A REFLECTANCE VALUE, AND
OUT OF RANGE READING HAS BEEN MADE. THE UNIT SHOULD BE
RECALIBRATED AND THE SAMPLE SHOULD BE RESCANNED.
Initial Power Up Default Settings
The Quick Check
®
200 Series powers up in whatever operating mode it was last
left in. To facilitate “getting started”, we have programmed the QC200 so that it
will default, the first time it is powered up and calibrated, to the settings listed.
The many possible variations available to the QC200 user will be outlined in later
sections of this guide.
All codes Active (Auto-discrimination)
Those Codes are:
Code 39
Interleaved 2 of 5
EAN/UPC 100% Magnification
Codabar
Code 128
MSI
16K

11
Other Configuration Settings:
“NormalAccur” – Normal Accuracy
“Trad’l P/F” – Traditional Tolerance Testing
“Avg DMargin” – Hand Held Products Averaged Decodability Margin
“Ltr. Grades” – If ANSI is invoked, Letter Grades used
“Right Handed” – LCD Right Hand Orientation
“HS Printer” – Printer Interface set for Hand Held Products QCHSP
An explanation of each of the above default settings can be found in the
CONFIGURATION/PROGRAMMING section.

12

13
4. Configuration/Programming
The Quick Check
®
200 Series auto-recognizes or “autodiscriminates” seven bar
code symbologies - - Codabar, Code 39, Interleaved 2/5, EAN/UPC, Code 128,
MSI Code and Code 16K - - or alternately can check that symbols conform under
any or all of several applications specifications; AIAG, BOOKLAND, CCBBA,
Comp Tia/CTIA, SCC, SISAC, U.P.C.-COUPON CODE, dependent upon the
QC200 Model. The QC200 also has a number of operator selectable test and
configuration options. The QC200 user can program their unit for all of these
options in two distinct ways. One is by simply scanning a specialized Code 128
called a Command Code. Predetermined Command Codes were used in the
QC200 Quick Start section of this manual and are explained in a later section.
The QC200’s options can also be programmed manually.
The “heart” of the operation and manual programming of the Quick Check
®
200
Series is centered around its “Select” and “Scroll” buttons. All functions with the
QC200 are controlled by their use. Generally, pressing the Select [0] Button
moves the user from menu “level” to menu “level”. Pressing of the Scroll [<>]
Button allows the user to pick an option within these levels. At the end of the
manual are menu “flow charts” of the QC200 menu sequences. An explanation
of what programmable selections are available follows.
Codes/Symbology Options
The Quick Check
®
200 Series symbology selection configuration is set and
controlled from within the QC200’s programming menu structure, this is entered
after power up by pressing the Select [0] Button two times as demonstrated
through the next steps:
On power up, [Qc2xx aa/lll] is displayed.
If you press the Scroll [<>] Button the results of the last scan is displayed (the
QC200 always stores the last sample scan). If you press the Select [0] Button
the following is displayed:
[Reflectom’r>]
This is the QC200’s static Reflectometer option, which is described later in this
manual. Pressing the Select [0] Button again bypasses this and changes the
LCD to:

14
[- Specs - >]
The “>” indicates to the user that pressing the Scroll [<>] Button will allow them to
select between the different code “specifications” (generic symbologies vs.
applications) preprogrammed into the QC200. If you press Scroll [<>] here, you
are put into the “Codes” (generic symbologies) mode with a resulting LCD of:
[ - Codes - >]
Here you will be allowed to make certain modifications in the testing criteria used
for the generic symbologies. These choices are also accepted or by-passed
using the Select [0] and Scroll [<>] buttons. Pressing Select [0] will bring up the
first set of options:
Codabar Options displayed on the LCD are:
[USS – Codabr>] or [Trad Codabr>]
This choice is between the original constant character width Codabar font (with
Monarch’s original print tolerances applied) and the compatible “rationalized” font
described in AIM’s USS – Codabar specification (with the appropriate USS
tolerances applied). NOTE: An “x” shown during Codabar decoding indicates a
missing stop/start character.
Code 39 Options displayed on the LCD are:
[Cod39 no Ck>] or [Code39 w/Ck>]
This choice is whether to test for Code 39’s optional Mod 43 Check Character
(see AIM USS for Code 39).
Interleaved 2/5 Options displayed on the LCD are:
[Int25 no Ck>] or [Int25 w/Ck>]
This choice is again whether to test for an optional Interleaved 2/5 Mod Check
Character.
UPC/EAN/JAN Options displayed on the LCD are:
[UPC/EAN x.x>] where “x.x” represents a UPC/EAN magnification factor.
The possible choices are .80, .85, .90, .95, 1.0, 1.2, 1.4, 1.6, 1.8 or 2.0 and are
cycled through by repeatedly pressing the Scroll [<>] Button. The default setting
is 1.0 or 100%.
Code 128 Options displayed on the LCD are:
[Cd128 Modes>] or [Cd128 Messg>]
This choice is whether or not to have Special Extra Characters displayed and
printed within the encoded message that show Code 128’s Starting Mode, Mode
/