Page is loading ...

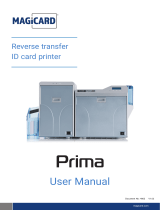
CR500™ Instant Issuance System
Quick Install Guide
O 1


CR500 Instant
Issuance System
Quick Install Guide
539970-001 Rev F
CR500 Instant Issuance System 1
1. Select a location for the
Printer.
• Install the printer in a location that
is clean and well ventilated, free of
vibration or shock.
• For venting and clearance, choose
an area 45 inches (1.143m) wide
and 19 inches (483mm) deep.
• Do not install the printer in direct
sunlight.
• Install the printer in a secure
location where it can be seen at all
times.
• Install the printer in a location that
has reachable access to 2 A/C
outlets and a network port.
2. Unpack and Secure the Printer
Do not cut the shipping straps.
a. Remove the printer from the
shipping carton.
Refer to the Datacard
®
CR500 Instant
Issuance System Installation and
User Guide found on the CR500
Owner’s Library CD for detailed
installation instructions.
Carton B:
Carton A:
2
1
2
X 4
1
3
4
5
6
6

2 CR500 Instant Issuance System
CR500 Instant Issuance System Quick Install Guide
English
b. Secure the printer to the work
surface (if required).
Fordetailedspecications
and instructions, refer to the
CR500 Instant Issuance System
Installation and User Guide.
c. Attach the concealed output
stacker to the printer.
3. Connect the Power Source
a. Connect the power cord to the
print unit (A).
b. Connect the power supply to the
security enclosure (B)
c. Connect the power cord to the
power supply (C).
d. Connect the power cords (D and
E) to the power source.
e. Power on the printer to release
transport mode. The printer will
beep several times. The release
takes approximately 30 seconds.
f. Power off the printer.
On/Off
O 1
Printer Base
Spacer
Work Surface
Washer
Bolt

CR500 Instant Issuance System 3
CR500 Instant Issuance System Quick Install Guide
English
4. Load Supplies
Supplies are ordered separately.
a. Unlock the printer.
b. Open the security enclosure and
the print unit.
c. Remove the orange ink ribbon
cartridge.
d. Load the ink ribbon cartridge.
Make sure that you position the
yellow (Y) panel as shown.
A
B
A
B
A
C
B
A
B
Ribbon Guides
Supply Roll
C

4 CR500 Instant Issuance System
CR500 Instant Issuance System Quick Install Guide
English
f. Loadtheretransferlmcartridge
Donotreturntheretransferlm
cartridge until after the cleaning card
is run.
5. Run the Cleaning Card
Do not run the cleaning card if the
heat roller is hot. Allow the printer to
coolrst.
a. Close the Print Unit door.
e. Removethegreenretransferlm
cartridge.
b. Keep the Security Enclosure
cover open.
c. Slide the Exception Slide out.
d. Insert the cleaning card.
i. Remove the protective paper
from the cleaning card (A).
ii. Insert the cleaning card into
the Exception slide with the
sticky side facing up. Push
it in until the end of the card
rests in the slot (B).
iii. Push the Exception Slide in,
past the resistance until it
reaches the stop position (C).
iv. Push the card to the Print
Unit card feed roller (D). Stop
when the card is just under
the roller (E).
A
B
2 frames
D
A
B
Film Guides Supply Roll
C

CR500 Instant Issuance System 5
CR500 Instant Issuance System Quick Install Guide
English
e. Power on the printer. The Film
Search A1 message displays.
f. At the Print Unit front panel, run
the cleaning card:
i. Press Menu to display
Cleaning.
ii. Press Enter to display Rollers
OK.
iii. Press Return to display
Film checking followed by
Cleaning Start OK.
iv. Press Return.
The Print Unit pulls the cleaning
card into the Print Unit and
cleaning begins. The card is
discharged and Cleaning Start
OK displays.
g. Run the card a second time
i. Turn the cleaning card over
and place it in the Exception
slide with the sticky side
facing down. Follow step 5d
to position the card correctly.
ii. Repeat step 5f to run the
card.
The Print Unit pulls the cleaning
card into the Print Unit and
cleaning resumes.
iii. When the cleaning card is
discharged, press Exit to end
the cleaning process.
Use a cleaning card one time only.
Using a dirty one can damage the
rollers.
h. Reinstalltheretransferlm
cartridge.
i. Close the Print Unit.
j. On the Print Unit front panel,
press Exit to return to the top
level of the menu system.

6 CR500 Instant Issuance System
CR500 Instant Issuance System Quick Install Guide
English
c. Close and lock the printer security
enclosure.
7. Power On the Printer
a. Connect the network data cable
(ordered separately).
6. Load the cards.
a. With the security enclosure door
open, load blank cards in one or
all of the three hoppers. If you are
using only one hopper, load cards
in hopper 3.
NOTE:
Make sure that you wear the
provided white gloves when
handling cards.
b. Place the card weight on top of
the cards.
A
C
B
B
B
A

CR500 Instant Issuance System 7
CR500 Instant Issuance System Quick Install Guide
English
The touch screen shows the following
sequence as the printer powers
up. This takes approximately 2 to 3
minutes.
b. Power on the printer.
8. Activate the Printer
Using the touch screen, enter the
activation code, obtained from
Datacard Technical Support at
1-800-328-3996. Please have your
printer’s serial number ready when
you call.
Ready EnUs
Menu Available
Suspended
3x
Maintenance
Main Menu
Activate
Main Menu
Enable
Activate
123_
Enable
12345678_
Enable
>Apply
“12345678”
Request Success
Activate
3x
xx.xx.xx-xx
Ready EnUs
O 1

8 CR500 Instant Issuance System
CR500 Instant Issuance System Quick Install Guide
English
9. Retrieve or Set IP Address
Printers using DHCP only
• Retrieve IP Address
a. Usingthetouchscreen,ndthe
printer IP address, subnet mask,
and gateway IP address.
b. Write them down.
IP Address ______________________
Subnet Mask ____________________
Gateway Address _________________
Ready EnUs
Menu Available
Suspended
Maintenance
Main Menu
Status
Main Menu
Serial Number
Status
3x
Network Status
Status
Address Mode
Network Status
IP Address
Network Status
xxx.xxx.xxx.xxx
IP Address
Subnet Mask
xxx.xxx.xxx.xxx
Gateway Address
xxx.xxx.xxx.xxx
Gateway Address
xxx.xxx.xxx.xxx
4x
Ready EnUs
Menu Available
Suspended
3x
Maintenance
Main Menu
Activate
Main Menu
Enable
Activate
123_
Enable
12345678_
Enable
>Apply
“12345678”
Request Success
Activate
3x
xx.xx.xx-xx
Ready EnUs

CR500 Instant Issuance System 9
CR500 Instant Issuance System Quick Install Guide
English
• Set a Static IP Address
a. Make sure that you have the
following information.
• IP Address
• Subnet Mask
• Gateway Address
Ready EnUs
Menu Available
Suspended
Maintenance
Main Menu
Status
Main Menu
Serial Number
Status
3x
Network Status
Status
Address Mode
Network Status
IP Address
Network Status
xxx.xxx.xxx.xxx
IP Address
Subnet Mask
xxx.xxx.xxx.xxx
Gateway Address
xxx.xxx.xxx.xxx
Gateway Address
xxx.xxx.xxx.xxx
4x
Ready EnUs
Menu Available
Suspended
Maintenance
Main Menu
Status
Main Menu
Serial Number
Status
3x
Network Status
Status
Address Mode
Network Status
IP Address
Network Status
xxx.xxx.xxx.xxx
IP Address
Subnet Mask
xxx.xxx.xxx.xxx
Gateway Address
xxx.xxx.xxx.xxx
Gateway Address
xxx.xxx.xxx.xxx
4x
Ready EnUs
Menu Available
Suspended
Maintenance
Main Menu
Status
Main Menu
Serial Number
Status
3x
Network Status
Status
Address Mode
Network Status
IP Address
Network Status
xxx.xxx.xxx.xxx
IP Address
Subnet Mask
xxx.xxx.xxx.xxx
Gateway Address
xxx.xxx.xxx.xxx
Gateway Address
xxx.xxx.xxx.xxx
4x
Ready EnUs
Menu Available
Suspended
Maintenance
Main Menu
Status
Main Menu
Serial Number
Status
3x
Network Status
Status
Address Mode
Network Status
IP Address
Network Status
xxx.xxx.xxx.xxx
IP Address
Subnet Mask
xxx.xxx.xxx.xxx
Gateway Address
xxx.xxx.xxx.xxx
Gateway Address
xxx.xxx.xxx.xxx
4x

10 CR500 Instant Issuance System
CR500 Instant Issuance System Quick Install Guide
English
b. Using the touch screen, enter the
menu structure and change the IP
address.
Ready EnUs
Menu Available
Suspended
2x
Maintenance
Main Menu
Configuration
Main Menu
Network
Configuration
DHCP/Static IP
Network
DHCP
Network
Static IP
DHCP/Static IP
IP Address
Network
xx_.
IP Address
xxx.
IP Address
4x
Subnet Mask
Network
xx_.
Subnet Mask
xxx.
Subnet Mask
4x
xxx.
Gateway Address
4x
2x
xx_.
Gateway Address
Gateway Address
Network
Apply
Network
Network
Configuration

CR500 Instant Issuance System 11
CR500 Instant Issuance System Quick Install Guide
English
10. Print a Test Card
a. Using an Internet browser, enter
https://xxx.xxx.xxx.xxx, where
xxx.xxx.xxx.xxx is the printer
IP address. Refer to Step 9,
Retrieve IP Address, tondyour
IP address.
The Printer Manager opens.
b. Log into Printer Manager as
WebAdmin.
Ready EnUs
Menu Available
Suspended
2x
Maintenance
Main Menu
Configuration
Main Menu
Network
Configuration
DHCP/Static IP
Network
DHCP
Network
Static IP
DHCP/Static IP
IP Address
Network
xx_.
IP Address
xxx.
IP Address
4x
Subnet Mask
Network
xx_.
Subnet Mask
xxx.
Subnet Mask
4x
xxx.
Gateway Address
4x
2x
xx_.
Gateway Address
Gateway Address
Network
Apply
Network
Network
Configuration

12 CR500 Instant Issuance System
CR500 Instant Issuance System Quick Install Guide
English
WARNING: This product contains
chemicals, including lead, known
to the State of California to cause
cancer, and birth defects or other
reproductive harm. Wash hands after
handling.
c. Select Troubleshooting >Test
Card.
d. Print a one-sided test card with
color printing.
Next Steps
• Denetheprintertothecard
application. Contact your System
Administrator to set up the rest
of the system. For CardWizard
software, refer your system
administrator to the CardWizard
Administrator User Manual.
• Set up security, including network
authorization to the printer.
• Refer to the Datacard® CR500
Instant Issuance System
Installation and User Guide for
detailed installation instructions.


539970-001 Rev F
11111 Bren Road West
Minnetonka, Minnesota 55343
952.933.1223•952.933.7971Fax
www.datacard.com/id
© 2012, 2013 DataCard Corporation. All rights reserved.
August 2013

/