Page is loading ...

1 EM-T1000..LU.092013.IM
PLEASE READ THESE INSTRUCTIONS CAREFULLY AND KEEP FOR FUTURE REFERENCE! IF
YOU DO NOT UNDERSTAND THE INSTRUCTIONS, OR DO NOT FEEL THAT YOU CAN
FOLLOW THEM SAFELY, CONTACT A QUALIFIED CONTRACTOR. THE WARRANTY WILL BE
HONOURED IF ACCOMPANIED BY AN ORIGINAL SALES RECEIPT, AND ONLY IF THE
INSTRUCTIONS HAVE BEEN FOLLOWED EXACTLY. To acquire missing parts please visit
http://www.everik.com/en-CA/Parts-Request.html or call 1-866-604-6966.
• These mounts are designed to mount a panel onto a vertical wall. Hardware for mounting to a
wood stud is included. For mounting to any other surface, it is recommended you contact a
qualified contractor.
• The wall or mounting surface must be capable of supporting the combined weight of the mount
and the flat panel, otherwise the structure must be reinforced.
• Safety gear and proper tools must be used. A minimum of two people are required for this
installation. Failure to use safety gear and/or attempting this installation alone can result in
property damage, serious injury, or death.
• Follow all instructions and recommendations regarding adequate ventilation and suitable locations
for mounting your flat panel. Consult the owner’s manual of your flat panel for more information.
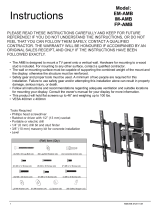
• This product will hold flat panels up to 70” and weighing up to 88 lbs.
• VESA 600mm x 400mm
Tools Required
• Phillips head screwdriver
• M6 socket and wrench
• Electric drill and 10mm masonry bit for concrete wall installation
• Pencil
• Hammer
• Stud finder
INSTRUCTIONS
EM-T2000

2 EM-T1000..LU.092013.IM
PARTS LIST
Package M
M-A M-B M-C M-D
M5x14 M6x14 M8x20 M6x30
x4 x4 x4 x4
M-E M-F M-G M-H
M8x30 Washer Small spacer Large spacer
x4 x4 x8 x4
Package W
W-A W-B W-C
ST6.3x55 Concrete anchor D6 washer
x6 x6 x6
Wall Mount (1)
A
Decorative Covers (2)
F
Bubble Level (1)
E
ST2.9 x 6.5 (4)
G
Safety Bar (1)
B
Left Adapter Bracket (2)
C
Right Adapter Bracket (2)
D

3 EM-T1000..LU.092013.IM
1. Installing the Decorative Covers
2a. Mounting the wall plate into wooden studs
Attach the decorative covers to the
wall plate using screws (G) x4.
Note: The gap on the decorative
covers should be facing downwards.
* Make sure that the mounting screws are anchored into the center of the studs. The use of a stud finder is highly
recommended.
* It is recommended to use a drill driver to tighten bolts. Tighten bolts so that the wall plate is firmly attached to
the wall, but DO NOT over-tighten. The bolts can be damaged by over-tightening which will strip their
threading.

4 EM-T1000..LU.092013.IM
2b. Mounting the wall plate into concrete
* When installing wall mounts on cinder block, verify the actual concrete thickness is at least 1-3/8” (35mm) for
using the concrete anchors. Do not drill into mortar joints! Be sure to mount in a solid part of the block,
generally 1” (25mm) minimum from the side of the block. It is suggested to use an electric drill on slow setting to
drill the hole instead of a hammer drill to avoid breaking out the back of the hole when entering a void or cavity.
* It is recommended to use a drill driver to tighten bolts. Tighten bolts so that the wall plate is firmly attached to
the wall, but DO NOT over-tighten. The bolts can be damaged by over-tightening which will strip their
threading.

5 EM-T1000..LU.092013.IM
3. Installing the Adaptor Arms
Top of TV
Note: Choose the appropriate screws, washers and spacers according to the type of panel.
Using two people, lay your flat panel down on a
clean, soft surface and install the Adaptor Arms
3a. For flat back panels
C D
Tighten all screws, but do not over tighten.

6 EM-T1000..LU.092013.IM
Tighten all screws, but do not over tighten.
3b. For recessed back panels or to access A/V inputs.
Note: Choose the appropriate screws, washers and spacers according to the type of panel.
4. Hanging your panel onto the Wall Plate
*Using two people, lift panel slowly and hook the Adaptor Arms (C & D)
onto the head of the Wall Plate (A)

7 EM-T1000..LU.092013.IM
4. Hanging your panel onto the Wall Plate
Insert the safety bar
*Use a padlock to prevent theft. (The padlock is not included)
5. Final Adjustments
Push or pull from the top or bottom of the screen to obtain the desired angle.
/