Page is loading ...

Thank you for choosing Rough Country for all your vehicle needs.
Please read instructions before beginning installation. Check the kit hardware against the kit contents shown below. Be
sure you have all needed parts and know where they go.
If question exist, please call us @1-800-222-7023. We will be happy to answer any questions concerning this product.
Check all fasteners for proper torque.
Periodically check all hardware for tightness.
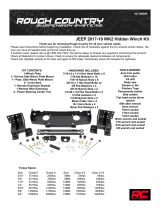
KIT CONTENTS:
1-Right Side Panel with Logo
1– Left Side Panel with Logo
1– Front Panel
1-Rear Panel
4-Cross Bars
1– Cross Brace
2– Rear Roof mounts
2-Roof Rack Mounts
TOOLS NEEDED:
5mm allen wrench
10mm Wrench / Socket
13mm Wrench / Socket
Torque Specs:
Size Grade 5 Grade 8 Size Class 8.8 Class 10.9
5/16” 15 ft/lbs 20ft/lbs 6MM 5ft/lbs 9ft/lbs
3/8” 30 ft/lbs 35ft/lbs 8MM 18ft/lbs 23ft/lbs
7/16” 45 ft/lbs 60ft/lbs 10MM 32ft/lbs 45ft/lbs
1/2” 65 ft/lbs 90ft/lbs 12MM 55ft/lbs 75ft/lbs
9/16” 95 ft/lbs 130ft/lbs 14MM 85ft/lbs 120ft/lbs
5/8” 135ft/lbs 175ft/lbs 16MM 130ft/lbs 165ft/lbs
3/4” 185ft/lbs 280ft/lbs 18MM 170ft/lbs 240ft/lbs
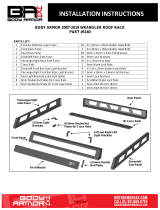
JEEP 2007-18 JK Unlimited Roof Rack
921106050
HARDWARE INCLUDED:
8mm x 50mm Hex Bolt x2
8mm x 25mm Hex Bolt x16
8mm x 25mm Button Head x32
8mm x 24mm Flat Washer x28
8mm x 16mm Flat Washer x54
8mm Lock Washer x26
8mm Nylock Nut x26
8mm Hex Nut x6
Foam Pads x2
Cable Ties-12
RC LED Lights Sold Separately:
50” LED Light Kit
2” Flush Mount Light Kit

1. Assemble the roof clamp pieces using (2) of the supplied 8mm x 25mm Button Head Bolt and 8mm x 16mm Flat
Washers and lock washers into the welded nut on the side of the bracket. For the stud on top of the mount use (1) of
the supplied 8mm x 16mm Flat Washers, 8mm lock washers, lock washers and an 8mm hex nut. Install the foam
pad on the bottom of the mount as it will sit on the roof of the vehicle. See Photo 1.
2. Install the roof clamp down inside the gutter, resting the foam pad on top of the roof. See Photo 2.
3. Measure 9 inches from the front side of the top, back over the rear doors toward the rear of the roof.
4. Set the roof clamp at a measurement of 9 inches from the front edge of the roof to the front edge of the roof clamp.
See Photo 3. Tighten the nut on top, locking the clamp in place using a 13MM wrench. Tighten the 2 button head
bolts on the side using a 5mm Allen wrench.
5. Locate the 2 rear roof mounts shown in Photo 4.
6. Unclip the cover on the rear window hinge, loosen the 2 bolts on one side of the window using a 10mm socket. See
Photo 5. NOTE : Only loosen, Do not remove the bolts from the window.
7. Install the rear roof mount by sliding the roof mount in between the hinge and the roof. See Photo 5.
8. Locate the 2 roof rack mounting brackets shown in Photo 6.
Photo 1 Photo 2
Photo 3 Photo 4
Photo 5 Photo 6
Roof Clamp. Install the roof rack clamp.
9” from the front of the roof to the rear. Rear Roof mount.
Install the roof mount. Roof rack mounting bracket.
INSTALLATION INSTRUCTONS
Foam Pad.
Install Foam Pad.

9. Install the roof rack mounting bracket onto the installed roof mount on the back window using (2) of the supplied
8mm x 25mm button head bolts and (4) 8mm x 16mm washer and (2) nylock nuts on each mount. See Photo 7.
10. Install the cross brace on each side of the roof clamp. See Photo 8.
11. Secure the cross brace on each side to the roof clamp, using (2) of the supplied 8mm x 25mm button head bolts, (2)
lock washers (4) 8mm x 16mm washers and (2) hex nuts. Tighten using a 5mm allen wrench and a 13mm wrench.
See Photo 9.
12. Assemble the rear panel onto the right side panel using the supplied 8mm x 25mm button head allen bolts and the
8mm x 16mm washers and nylock nuts. NOTE : The RC logo will be located at the forward side of the side
panel on both sides of the roof rack. See Photo 10. Do not tighten at this time.
13. Install the front of the roof rack into the right side panel. Install the left side panel onto the front and the rear of the
roof rack and secure using the supplied 8mm x 25mm button head allen bolts and the 8mm x 16mm washers and
nylock nuts. See Photo 11. Do not tighten at this time. NOTE : Do not install the bottom 2 bolts into the front panel,
they will be installed in a later step.
14. Place the 4 cross bars into the roof rack. See Photo 12.
Photo 7 Photo 8
Photo 9 Photo 10
Photo 11 Photo 12
Install the roof rack mount. Install cross brace.
Secure cross brace onto roof clamp. Assemble the rear and right side.
Assemble the front and right side. Install the 4 cross bars into roof rack.
RC Logo

15. Install the roof rack on top of the rear mounts and the cross brace in the front. See Photo 13.
16. Install the 8mm x 50mm hex head bolts, 8mm x 25mm washers and 8mm nylock nuts into the roof rack and the
cross brace on each side of the roof rack. See Photo 14. Tighten using a 13mm wrench and socket.
17. Install the 8mm x 25mm button head bolts, 8mm x 25mm washers and 8mm nylock nuts into the roof rack and the
rear mounts on each side of the roof rack. See Photo 15. Tighten using a 5mm allen wrench and a 13mm wrench.
18. Install the 8mm x 25mm Hex head bolts (16) 8mm lock washers and (16) 8mm x 25mm washers in the cross bars.
Tighten the bolts in the (4) cross bars on the roof rack, use a 13mm wrench. See Photo 16 & 17.
19. Install the (2) flush mount LED lights, using their corresponding instruction sheets.
20. Install the (2) 50” LED light brackets on the front of the roof rack, one on each side, using (2) 8mm x 25mm button
head bolts, (2) 8mm x 16mm washers on bottom, securing the bracket on the inside, using (2) 8mm x 16mm flat
washers and (2) 8mm nylock nuts. See Photo 18. Tighten using a 5mm allen and a 13mm wrench.
Photo 13 Photo 14
Photo 15 Photo 16
Photo 17 Photo 18
Install the roof rack onto the mounts. Tighten the front mount on the clamp.
Tighten rear mount. Install bolts in cross bars.
Tighten cross bar hardware. Install the front LED light.

21. Install the LED light bar into the brackets installed on the front of the roof rack, secure with supplied hardware in the-
light kit . See Photo 19.
22. Secure the wiring along the slots to the back of the roof rack using supplied cable ties. See Photo 20.
23. Run the wiring inside of the window track to the bottom of the roof and inside of the vehicle under the seal as shown
in Photos 20 and 21.
24. Make sure the wiring is by the opening in the hinge when the window is closed. See Photo 22.
25. Adjust the light to the desired angle. Tighten using a 13mm wrench. See Photo 23.
By purchasing any item sold by Rough Country, LLC, the buyer expressly warrants that he/she is in compliance with all
applicable , State, and Local laws and regulations regarding the purchase, ownership, and use of the item. It shall be
the buyers responsibility to comply with all Federal, State and Local laws governing the sales of any
items listed, illustrated or sold. The buyer expressly agrees to indemnify and hold harmless Rough
Country, LLC for all claims resulting directly or indirectly from the purchase, ownership, or use of the
items.
Photo 19 Photo 20
Photo 21 Photo 22
Photo 23
Secure the wiring to the slots in the panel. Run the wiring inside of the track.
Place the wiring under the seal. Secure the wiring in the hinge.
/