Page is loading ...

Thank you for choosing Rough Country for all your vehicle needs.
Please read instructions before beginning installation. Check the kit hardware against the kit contents shown below. Be
sure you have all needed parts and know where they go.
If question exist, please call us @1-800-222-7023. We will be happy to answer any questions concerning this product.
Check all fasteners for proper torque. Check to ensure for adequate clearance between all components.
Periodically check all hardware for tightness.
IMPORTANT INFORMATION: PLEASE READ BEFORE BEGINNING INSTALLTION
The Rough Country Tent will mount to factory or after market roof rack configurations. Utilizing the adjustable mounting
rail hardware capturing all applications and other mounts other than the intended track mount could be needed depend-
ing on type of mounting desired and are not included.
Check manufacturer rack capacities before installing. Rough Country is not responsible for damage as a result of
mounting to factory rack that are not rated for the load intended when tent is installed.
It is recommended to erect tent in calm conditions. Mild to high winds can hinder deployment of the tent. Always use
caution when deploying tent in any conditions. Not for use when in motion. Always take into consideration the added
height of the tent on top of the vehicle concerning any low hanging obstacles and the added weight of the tent. It is im-
portant to check local and state laws regarding roof mounted load capacities. The Rough Country Tent weight is approx.
140 lbs. Always use caution near any open flame or heat source and do NOT use any open flames in side the tent.
Full install the protective cover before operating the vehicle.
The tent can be mounted either as a side deployment or rear deployment. Most applications will be a side setup as
shown.
Torque Specs:
Size Grade 5 Grade 8 Size Class 8.8 Class 10.9
5/16” 15 ft/lbs 20ft/lbs 6MM 5ft/lbs 9ft/lbs
3/8” 30 ft/lbs 35ft/lbs 8MM 18ft/lbs 23ft/lbs
7/16” 45 ft/lbs 60ft/lbs 10MM 32ft/lbs 45ft/lbs
1/2” 65 ft/lbs 90ft/lbs 12MM 55ft/lbs 75ft/lbs
9/16” 95 ft/lbs 130ft/lbs 14MM 85ft/lbs 120ft/lbs
5/8” 135ft/lbs 175ft/lbs 16MM 130ft/lbs 165ft/lbs
3/4” 185ft/lbs 280ft/lbs 18MM 170ft/lbs 240ft/lbs
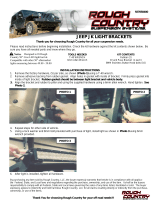
ROUGH COUNTRY ROOFTOP TENT
921990500
Ladder Extension
Part # 99051 is
available from
Rough Country if
needed for lifted
applications.
Generally this
extension is
needed for vehi-
cles with 35” tires
and above.

KIT CONTENTS:
Storage Cover x1
Rough Country Tent x1
Rain Fly Cover x1
Mounting Rails x2
Mounting Rail End Caps x4
Rail Mount Sliders x8
Lower Straps x4
Collapsible Ladder x1
Window Prop Rods x8
Accessory Pack
12 Volt Vehicle Adaptor x1
12 Volt Extension Wire x1
12 Volt USB Port x1
LED Light Strip x1
Shoe Storage Bag x1
TOOLS NEEDED:
10mm Wrench or Socket
13mm Wrench or Socket
Thread locker
HARDWARE INCLUDED:
8mm x 55mm Bolts x8
8mm Nuts x8
6mm x 40 Hex Head Bolts x10
6mm x 20 Hex Head Bolts x2
6mm Nylock Nuts x10
6mm Flat Washer x22
Spring Washer x2
Plastic Washer x2
MOUNTING DIRECTION
OFF THE BACK
• Determine the direction the tent will open before installation.
• Mounting off of the back will be best for multi door vehicles.
• The mounting of the tent opening to the rear of the vehicle is optimal for weather protec-
tion.
• Provides clearance for luggage and roof rack mounting points.
• Full Opening of the Rear tail gate and use of the tail gate table and more Rough Country
accessories can be accessed from this position.
OFF THE SIDE
• For two door and shorter wheel base vehicles, the tent will be centered better on the top of
the vehicle.
• The mounting of the tent opening to the side will have better wind resistance. Generally
Jeep Vehicles will be a side mount install.
• Full Opening of the Rear tail gate and use of the tail gate table and more Rough Country
accessories can be accessed from this position.
PROPER DEPLOYING OF THE TENT
• Fully extend the ladder, excessive force will damage the tent floor.
• Use the ladder as leverage to open the ten, pushing down while pulling straight back.
• Carefully guide the ladder to the ground.
• Install ladder extension if needed at this time. Generally 25-30 degrees is needed for safe
(Part # 99051 ladder extension is available for lifted vehicles with 35” tires and above
• Install the window flap rods.
• Part # 99050 includes added feature of sunroof panel. This feature will be used when the
tent rain fly is removed. Rain fly is to be used for wet conditions.
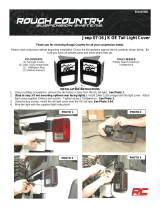
OUTLANDER ROOFTOP TENT MOUNTING OPTIONS:

1. Place the tent onto a large flat table. Remove the packaging and then remove the cover from the tent. See Photo 1.
2. Remove the (6) straps from the tent and place the ladder and the mounting rails to the side. See Photo 2.
3. Using caution, open the tent and locate the supplied bag of hardware and remove from the tent. See Photos 3 and
4.
4. Using care, close the tent bottom side up exposing the mounting holes. See Photo 5.
5. Place the mounting rails over the (3) holes in each rail. See Photo 6.
Photo 1 Photo 2
Photo 3 Photo 4
Photo 5 Photo 6
Remove the cover from the tent. Remove the straps.
Open the tent. Locate the hardware.
Close the tent bottom up. Place the rails onto the holes.
INSTALLATION INSTRUCTONS

6. Locate the (4) mounting rail end caps and (6) 6mm Nylock nuts.
7. Install (3) of the 6mm nuts into (1) of the mounting rails. See Photo 7.
8. Place (3) of the 6mm bolts and 6mm washers through the bottom of the tent floor leaving the threads exposed to the
out side of the tent. See Photo 8.
9. Secure the rail, aligning the nuts into the slot and threading the (3) bolts into the (3) nuts. Tighten using a 10mm
socket. See Photo 9.
10. Install the second mounting rail using the supplied (3) 6mm bolts (3) 6mm washers and (3) 6mm nuts.
11. Place the 8mm x 55mm bolts into the sliding brackets. See Photo 10.
12. Install (4) of the sliding brackets and bolts into the mounting rail. Place (2) on each side and secure the end cap onto
the mounting rail. See Photos 11 and 12.
13. The next steps may vary depending on mounting preference or additional hardware used to mount the assembly to
your vehicle. Mounting is shown on the Rough Country roof rack kit.
14. Measure the roof rack mounting area. Then set the tent sliding mounts to accommodate this area.
Photo 7 Photo 8
Photo 9 Photo 10
Photo 11 Photo 12
Install (3) nuts into the mounting rail. Place the bolts through the tent floor
Center the nuts over the slot in rail. Lock the bolts into the sliding brackets.
Place the sliding brackets into the rail. Place (2) on each side of one rail.

15. Connect the straps and with assistance, place the tent on top of the roof rack. See Photo 13.
16. Locate (1) of the supplied lower plate (2) 8mm flat washers and (2) 8mm nylock nuts. See Photo 14.
17. Place the sliding brackets and bolts snug to the outside of the roof rack mounting point. Then install the lower plate
onto the bolts and secure using (2) of the supplied 8mm flat washers and (2) 8mm nylock nuts. Use a 12mm wrench
or socket to tighten the hardware. See Photo 15.
18. Repeat step 16 for the remaining (3) roof rack mounts. See Photo 16.
19. Remove the straps and open the tent.
20. Locate the ladder hinge and ladder hardware. Thread locker is highly recommended when installing. See Photo 17.
21. Install the (2) 6mm bolts and (2) 6mm flat washers into the outer holes of the tent then place the ladder hinge onto
the bolts. Secure the hinge using (2) of the 6mm flat washers and (2) 6mm nylock nuts. See Photo 18.
22. Place the ladder onto the hinge using (2) 6mm hex head bolts, (4) 6mm flat washers and (2) 6mm nylock nuts (2)
plastic nuts on each side of the ladder hinge. Tighten using a 10mm socket and wrench.
Photo 13 Photo 14
Photo 15 Photo 16
Photo 17 Photo 18
Place the tent onto the roof rack. Locate the supplied hardware.
Secure the tent onto the roof rack. Secure the remaining (3) mounts.
Locate hardware. Install the hinge and ladder.

23. Fully extend the ladder to the ground supporting the bottom of the tent making sure that the spring loaded knob/pins
are fully engaged in the ladder rail See Photo 19. NOTE: Rough Country offers a ladder extension for lifted vehicles
Part # 99051. It is important that the ladder have an angle up to the tent to have a safe accent and decent from the
tent. If not, then the 12” ladder extension is required. 25-30 Degree ladder angle is recommended.
24. Locate the supplied rods. See Photo 20.
25. Insert the rods in the holes of the tent window opening. Then insert the rod into the holes located in the slot of the
tent cover in the frame under the window openings. Please note that these hole are drilled at an angle, Please en-
sure that the prop rods are positioned correctly. See Photos 21 and 22.
26. Place the rods in the remaining desired window openings. See Photo 23.
27. Once inside the tent secure the window openings can the rolled and secured in the up position. Using the supplied
straps. See Photo 24.
Photo 19 Photo 20
Photo 21 Photo 22
Photo 23 Photo 24
Extend the ladder to the ground. Locate the Window Flap rods.
Install the window opening rod. Secure the tent in the lower opening.
Place the rods in the remaining window opening. Window covers shown in the up position.

28. Locate the rain flap and the (2) rain flap rods and install them into the outer sleeve of the bottom of the rain flap on
each side. See Photo 25.
29. Place the rain fly flat on the tent. See Photo 26.
30. Insert the end of each rod into the pouch in the upper corner of the tent. See Photo 27.
31. Secure the rain fly using in the buckles on each side of the tent. See Photo 28.
32. Locate the 12 volt accessory items and install into vehicle. See Photo 29.
33. Secure the LED light strip to the top center bar on the hook and loop portion of the tent. See Photo 30.
Photo 25 Photo 26
Insert the rods into the rain fly. Lay the rain fly flat onto the tent.
Photo 27 Photo 28
Insert the end of each rod into the pouch. Secure the rain fly using in the buckles.
Photo 29 Photo 30
Locate the 12 volt Accessory Kit. Secure the light to the tent above the door

By purchasing any item sold by Rough Country, LLC, the buyer expressly warrants that he/she is in compliance with all
applicable, State, and Local laws and regulations regarding the purchase, ownership, and use of the item. It shall be the
buyers responsibility to comply with all Federal, State and Local laws governing the sales of any items listed, illustrated
or sold. The buyer expressly agrees to indemnify and hold harmless Rough Country, LLC for all claims resulting directly
or indirectly from the purchase, ownership, or use of the items.
/