INSTALLATION INSTRUCTIONS
For Model 1433
READ AND SAVE THESE INSTRUCTIONS
HANGING THE MIRROR
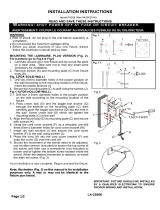
1. Carefully unpack the new mirror and lay out all
the parts on a clear area. Take care not to lose
any small parts necessary for installation. Fig.
1
2. Take out the two arms and unscrew the
decorative knob(C), then Install the two arms
to the frame with the Allen wrench (included.)
(PART#WRH-L-M8).and screw back the
decorative knob(C).Fig 2
3. Locate a suitable place for the mirror on the
wall.
4. Unscrew the two set screws (D) and lift up the
decorative cover (E) Fig 3.
5. Position the decorative cover (E) on the wall
and mark the locations for the hollow wall
anchors. Pre-drill the holes for the hollow wall
anchors and insert them into the wall as Fig. 4.
6. Place the mirror on the wall and secure it with
the mounting screws (F) Fig 5. Note: IF
NEEDED, REMOVE THE DECORATIVE
KNOB(C) FOR ACCESSING TO THE
MOUNTING SCREW AND PUT IT BACK
WHEN IS DONE.
7. Put back the decorative cover (E) and secure
by screwing the two set screws (D) as Fig 6.
8. The angle of the mirror is adjustable.
Unscrew the decorative knob(C) and loosen
the allen screw inside of the mirror stand offs
with the allen wrench and adjust the angle
you want. Then tighten the allen screw using
the allen wrench, and screw back the
decorative knob(C). Fig.2
Your installation is now complete
Fig.3
Fig.5
Fig.6
Fig.1
Fig.4
Fig.2
1/1


