Page is loading ...

Allen Wrench Wall Anchor Screw
Installation
Plate
Stem
Base
Mirror Clamp
WARNING: Always wear safety goggles and gloves when
handling glass. Handle mirror carefully. Do not bump against
hard surfaces; place on towel or soft surface like carpet when
mounting clamps. Read entire directions carefully before starting.
Tools Needed
Parts List
• Pencil and Eraser • Level • 3/16” Drill Bit and Drill • Screw Gun or Screwdriver with Phillips Head.
• Tape Measure • Small Screw Driver • Friend to Help - Two People needed for mounting
• 1 - 24”x36” Polished Edge Oval Mirror
• 2 - Brass or Chrome Swivel Mounting
Brackets w/ Installation Plate
• 4 - Plastic Wall Anchors
• 4- Screws
• 1- Allen Wrench
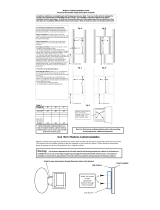
1- Measure the desired location where the mirror will be
installed. Make sure mirror will clear faucets, lighting, and towel
bars ect.
2 - Remove Mirror Clamps from Base. (Fig.1). Loosen Screws on
Mirror Clamps and carefully place one of each on the horizontal
centerline of the Oval Mirror. This is approximately 24” across
the sides on center for the 24” x 36” Oval (Fig.2). With the screws
on the Clamp facing the same side of the back of the mirror,
carefully tighten the clamps to the mirror. BE CAREFUL NOT TO
OVERTIGHTEN-
Too much pressure may cause the mirror to crack.
The clamp should fit snuggly, but is designed with a little play
for ease of installation. Set mirror aside on towel or soft surface.
3-Using a tape measure find the center (Middle) of the wall
where the mirror is to be located. (Fig.3). At this center point,
take a level held horizontally and level against the Wall and draw
a 34” horizontal line for the 24” x 36” Oval. On this line find the
center location where the mirror should be (Fig 4). At the center
point draw a vertical line to reference the center point. From this
center point measure 13 5/8” across in each direction for the 24”
x 36” and mark a dot or line for location of the installation plates.
Position the installation plates on the wall at each location with
the center hole in the plate over each of the dots marked on the
vertical line. When positioned, the center holes on the
installation plates should be 27 ¼” apart for the 24” x 36” Mark
the locations for the screw Holes through the center of the two
slots in each plate making sure the plate is straight and level.
(Fig 5)
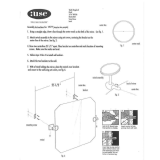
4-Using the drill and 3/16” Drill bit, pre-drill 4 holes for the plastic
wall anchors. With hammer lightly tap the anchors into place.
Secure the mounting plates to the wall with the screws
provided. Check plates with level to make sure plates are
straight and level and in the correct position. Center holes on
installation plate are 33” apart. Using an eraser clean off pencil
lines.
Congratulations on your purchase of this functional and decorative mirror! These instructions are for use with a 24” x 36” Beveled Oval
Mirror. For this oval mirror a wall space of approximately 31” Wide x 38” High is needed.
INSTRUCTIONS FOR:
24”x36” Oval Mirror
With Swivel Hardware
Model #’s 8380 and 8381
6-TWO PEOPLE ARE REQUIRED TO SECURE THE MIRROR TO THE WALL.
Carefully position the mirror with attached bases on to the installation plates. Slight up and down adjustments can be made by moving
the clamp stem through the base. With the mounting brackets in proper position over the installation plates and with the back of the
base flush to the wall; tighten the setscrews with small screwdriver or Allen wrench.
5- With the base of the hardware to the backside of the mirror, re-attach the bases to the clamps by sliding the clamp stem back through
the hole in the base. The stem should be centered in the base. Approximately ¾” of the stem should be showing on each side of the
base. THE SET SCREWS SHOULD BE AT THE BOTTOM OF THE SWIVEL BASE. (Fig 6)
CONGRATULATIONS INSTALLATION COMPLETE-You Look Marvelous!
Fig.1
Fig.5
Fig.3
Wall
APPOX.
34”
Fig.4
Wall
27 1/4”
13 5/8” 13 5/8”
Fig.2
APPOX.
18”
APPOX.
18”
24”
Fig.6
3/4”
3/4”
Setscrew
/