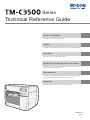
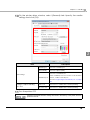
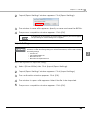
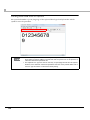
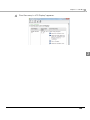
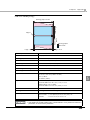
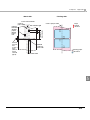
Epson ColorWorks C3500 User manual
- Category
- Label printers
- Type
- User manual
This manual is also suitable for

Technical Reference Guide
Describes features for the product.
Describes setup and installation of the product and peripherals.
Describes how to control the printer and necessary information
when you develop applications.
Describes how to handle the product.
Describes the efficient management method of multiple printers
and client computers, targeted at the administrators.
Series
Describes general specifications for the product.
M00066606
Rev.G
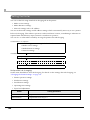
Setup
Handling
Application Development Information
Product Overview
Maintenance
Appendix

2
Cautions
• No part of this document may be reproduced, stored in a retrieval system, or transmitted in any form
or by any means, electronic, mechanical, photocopying, recording, or otherwise, without the prior
written permission of Seiko Epson Corporation.
• The contents of this document are subject to change without notice. Please contact us for the latest
information.
• While every precaution has taken in the preparation of this document, Seiko Epson Corporation
assumes no responsibility for errors or omissions.
• Neither is any liability assumed for damages resulting from the use of the information contained
herein.
• Neither Seiko Epson Corporation nor its affiliates shall be liable to the purchaser of this product or third
parties for damages, losses, costs, or expenses incurred by the purchaser or third parties as a result of:
accident, misuse, or abuse of this product or unauthorized modifications, repairs, or alterations to this
product, or (excluding the U.S.) failure to strictly comply with Seiko Epson Corporation’s operating
and maintenance instructions.
• Seiko Epson Corporation shall not be liable against any damages or problems arising from the use of
any options or any consumable products other than those designated as Original Epson Products or
Epson Approved Products by Seiko Epson Corporation.
Trademarks
Microsoft
®
, Windows
®
, Windows Vista
®
, Windows Server
®
, Win32
®
, Visual Basic
®
, Visual C++
®
, and
Visual C#
®
are registered trademarks of Microsoft Corporation in the United States and other countries.
EPSON is a registered trademark of Seiko Epson Corporation.
Exceed Your Vision is a registered trademark or trademark of Seiko Epson Corporation.
All other trademarks are the property of their respective owners and used for identification purpose
only.
Copyright
This product includes software developed by the University of California, Berkeley, and its contributors.
© Seiko Epson Corporation 2013-2015. All rights reserved.

3
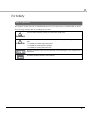
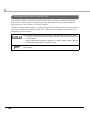
For Safety
Key to Symbols
The symbols in this manual are identified by their level of importance, as defined below. Read
the following carefully before handling the product.
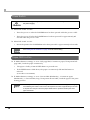
WARNING
You must follow warnings carefully to avoid serious bodily injury.
CAUTION
Provides information that must be observed to prevent damage to the equipment or loss of
data.
Possibility of sustaining physical injuries.
Possibility of causing physical damage.
Possibility of causing information loss.
Provides information that must be observed to avoid damage to your equipment or a
malfunction.
Provides important information and useful tips.

4
Warnings
WARNING
Shut down your equipment immediately if it produces smoke, a strange odor, or
unusual noise.
Continued use may lead to fire. Immediately unplug the equipment and contact your
dealer or a Seiko Epson service center for advice.
Never attempt to repair this product yourself. Improper repair work can be
dangerous.
Never disassemble or modify this product. Tampering with this product may result
in injury or fire.
Use the specified AC Adapter, K (Model: M248A) only.
Connection to an improper power source may cause fire.
Be sure your power cable meets the relevant safety standards and includes a
power-system ground terminal (PE terminal).
Otherwise electric shock may result. If you acquire a system with different safety
standards, use an AC cable that meets the acquired safety standards.
Do not allow foreign matter to fall into the equipment. Penetration by foreign
objects may lead to fire.
If water or other liquid spills into this equipment, unplug the power cord
immediately, and then contact your dealer or a Seiko Epson service center for
advice. Continued usage may lead to fire.
Do not use aerosol sprayers containing flammable gas inside or around this
product. Doing so may cause fire.

5
Cautions
Restriction of Use
When this product is used for applications requiring high reliability/safety such as
transportation devices related to aviation, rail, marine, automotive etc.; disaster prevention
devices; various safety devices etc.; or functional/precision
devices etc., you should use this
product only after giving consideration to including fail-safes and redundancies into your
design to maintain safety and total system reliability.
CAUTION
Do not connect cables in ways other than those mentioned in this manual. Different
connections may cause equipment damage and burning.
Be sure to set this equipment on a firm, stable, horizontal surface. The product may
break or cause injury if it falls.
Do not use in locations subject to high humidity or dust levels. Excessive humidity and
dust may cause equipment damage or fire.
Do not place heavy objects on top of this product. Never stand or lean on this product.
Equipment may fall or collapse, causing breakage and possible injury.
Protect the printer from heavy impacts. They may cause defective print.
To ensure safety, unplug this product before leaving it unused for an extended period.
Do not remove the ink cartridge from the product when you ship it.
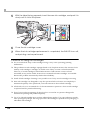
Be sure to note the following when using the ink cartridge:
Do not turn off the product or open the ink cartridge cover while charging ink (Power
light is flashing). Opening the cover may cause the ink to be recharged, resulting in
more ink being consumed. Also, it may cause printing malfunction.
Do not disassemble the ink cartridge. Doing so may cause ink to adhere eyes and
skin.
Do not disassemble and remodel the ink cartridge. Doing so may cause printing mal-
function.
Keep ink cartridges out of the reach of children.
If ink contacts your skin, eyes, or mouth, take the following actions.
When ink gets onto your skin, immediately wash the area with soap and water.
When ink gets into your eyes, immediately flush them with water.
Leaving the ink as is may result in bloodshot eyes or mild inflammation. If something is
wrong, immediately consult with a doctor.
When ink gets into your mouth, immediately spit it and consult with a doctor.
Be sure to note the following when using the maintenance box:
Do not dismantle the Maintenance box.
Do not touch the IC chip on the cartridge.
Keep out of reach of children, and do not drink.
Do not reuse a maintenance box which was removed and detached for a long period.

6
About this Manual
Aim of the Manual
This manual was created to provide information on development, design, and installation of
systems and development and design of printer applications for developers.
The specifications of the supported paper sizes are different for the firmware covered in this
manual and the firmware that has been upg
raded.
Manual Content
The manual is made up of the following sections:
Chapter 1
Product Overview
Chapter 2 Setup
Chapter 3 Handling
Chapter 4 Application Development Information
Chapter 5 Maintenance
Chapter 6 Appendix

7
Contents
■ For Safety...............................................................................................................................3
Key to Symbols ....................................................................................................................................... 3
Warnings ................................................................................................................................................. 4
Cautions.................................................................................................................................................. 5
■ Restriction of Use ..................................................................................................................5
■ About this Manual ................................................................................................................6
Aim of the Manual................................................................................................................................. 6
Manual Content .................................................................................................................................... 6
■ Contents ................................................................................................................................7
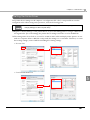
Product Overview ........................................................................11
■ Features ...............................................................................................................................11
Easy Setup ............................................................................................................................................ 13
How to Print .......................................................................................................................................... 13
Other Features ..................................................................................................................................... 13
■ Parts Name and Function ..................................................................................................14
Power Switch ........................................................................................................................................ 16
Paper FEED button............................................................................................................................... 16
CUT button............................................................................................................................................ 17
Cleaning button .................................................................................................................................. 17
STATUS SHEET button ............................................................................................................................ 17
LCD contrast adjustment button ....................................................................................................... 18
Connectors........................................................................................................................................... 18
■ Status/Error Indications ......................................................................................................19
Ink Cartridge and Maintenance Box Status ..................................................................................... 21
Beeper .................................................................................................................................................. 22
■ Auto nozzle check system.................................................................................................23
■ Drivers, Utilities ....................................................................................................................26
Drivers.................................................................................................................................................... 26
Utilities.................................................................................................................................................... 26
■ Restrictions ..........................................................................................................................28
Setup .............................................................................................29
■ Work Flow ............................................................................................................................29
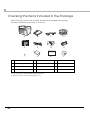
■ Checking the Items Included in the Package ................................................................30
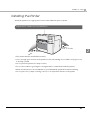
■ Installing the Printer ............................................................................................................31
Important Notes on Installation.......................................................................................................... 31

8
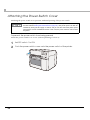
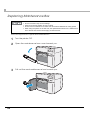
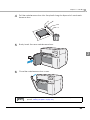
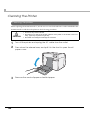
■ Attaching the Power Switch Cover................................................................................... 32
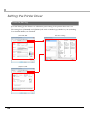
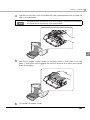
■ Setting Up the Printer..........................................................................................................34
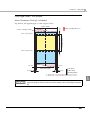
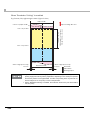
Media Layout Creation .......................................................................................................................36
Shutter Adjustment...............................................................................................................................40
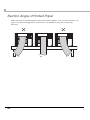
■ Ejection Angle of Printed Paper........................................................................................ 42
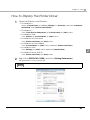
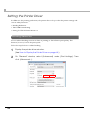
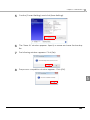
■ How to Display the Printer Driver....................................................................................... 43
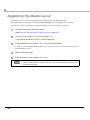
■ Registering the Media Layout ........................................................................................... 44
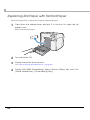
■ Attaching the Paper Ejection Tray .................................................................................... 46
■ Setting the DIP Switches..................................................................................................... 48
Setting Procedure.................................................................................................................................48
Function of the DIP Switches...............................................................................................................49
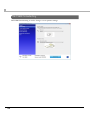
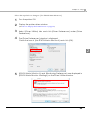
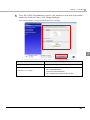
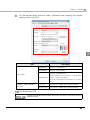
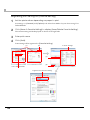
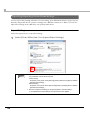
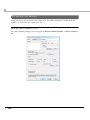
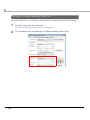
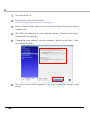
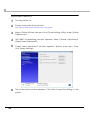
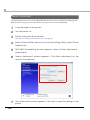
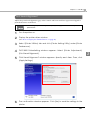
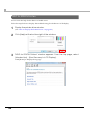
■ Setting the Printer Driver .................................................................................................... 50
Banding Reduction ..............................................................................................................................50
TM-C3500 PrinterSetting .......................................................................................................................52
Setting EPSON Status Monitor 3...........................................................................................................54
Handling .......................................................................................61
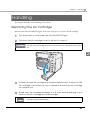
■ Replacing the Ink Cartridge ............................................................................................. 61
■ Replacing Maintenance Box ............................................................................................ 64
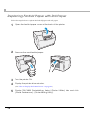
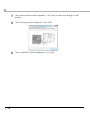
■ Replacing Roll Paper with Fanfold Paper......................................................................... 66
■ Replacing Fanfold Paper with Roll Paper......................................................................... 76
■ Setting the Printer Driver .................................................................................................... 84
Favorite Setting.....................................................................................................................................84
Information for User Definition .............................................................................................................87
Exporting/Importing Printer Driver Settings ........................................................................................88
Barcode Printing...................................................................................................................................90
2D Symbol Font Settings.....................................................................................................................102
Barcode and 2D Symbol Font Printing on .NET Environment.........................................................109
Print Preview........................................................................................................................................111
Settings For Paper Handling After Print ............................................................................................112
Beeper .................................................................................................................................................114
■ Setting the Printer ............................................................................................................. 115
Media detection settings ..................................................................................................................115
Nozzle Check Mode Settings ............................................................................................................118
Paper Loading Settings......................................................................................................................120
Notification Settings ...........................................................................................................................123
Panel Button Settings .........................................................................................................................125
Operating Time Settings ....................................................................................................................127
Paper Feed Adjustment.....................................................................................................................129
Sensor Adjustment..............................................................................................................................136
Print Head Alignment.........................................................................................................................137
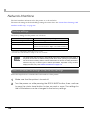
■ Network Interface ............................................................................................................ 138

9
Factory settings.................................................................................................................................. 138
How to initialize the settings to the factory settings....................................................................... 138
■ Troubleshooting ................................................................................................................139
Trouble Recovery Method ................................................................................................................ 139
Error Recovery Method ..................................................................................................................... 152
When the print result is faint or white lines or black lines are printed .......................................... 155
When the printer is not found even if EpsonNet Config is started................................................ 157
HELP for EPSON Printers ..................................................................................................................... 158
■ Setting Check Modes.......................................................................................................160
Self-test Mode .................................................................................................................................... 160
Status Sheet Printing (LAN interface model only) .......................................................................... 162
■ Reset ..................................................................................................................................163
■ Cleaning the Printer..........................................................................................................164
Cleaning the platen.......................................................................................................................... 164
Cleaning the Autocutter................................................................................................................... 166
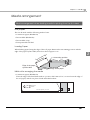
■ Media arrangement.........................................................................................................167
Media arrangement when feeding media for printing from the first sheet................................ 167
Media arrangement for printing on the last sheet ........................................................................ 169
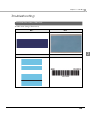
■ Setting the label size and paper layout for borderless printing ...................................172
Requirement....................................................................................................................................... 172
Setting example................................................................................................................................. 172
■ How to Make Media Settings...........................................................................................174
Application Development Information....................................175
■ Printer Control Method .....................................................................................................175
■ Printer Driver......................................................................................................................176
■ Using Epson Inkjet Label Printer SDK...............................................................................177
Operating environment .................................................................................................................... 177
Where to download .......................................................................................................................... 177
■ Utilities and Manuals ........................................................................................................178
Download........................................................................................................................................... 181
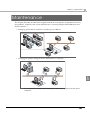
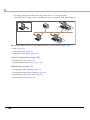
Maintenance..............................................................................183
■ Necessary Information for an Administrator of the Printer ...........................................185
Utility .................................................................................................................................................... 185
Setting the Printer............................................................................................................................... 186
Setting the Printer Driver.................................................................................................................... 187
■ System Configuration.......................................................................................................189
Installing the Printer............................................................................................................................ 189

10
Distributing the Printer Driver .............................................................................................................190
■ Maintenance .................................................................................................................... 191
Changing the Printer Settings ...........................................................................................................191
Changing the Printer Driver Settings ................................................................................................196
Monitoring the Network Printer .........................................................................................................197
Replacing the Printer .........................................................................................................................198
■ For Inquiries....................................................................................................................... 200
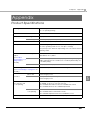
Appendix....................................................................................201
■ Product Specifications..................................................................................................... 201
Hardware Requirements....................................................................................................................203
Printing Specifications........................................................................................................................203
Paper Specifications ..........................................................................................................................204
Print Area and Cutting Position.........................................................................................................215
Paper Ejection Tray.............................................................................................................................236
Ink Cartridge .......................................................................................................................................236
Maintenance Box...............................................................................................................................237
Electrical Characteristics...................................................................................................................237
Environmental Conditions .................................................................................................................238
External Dimensions............................................................................................................................239
■ Restrictions........................................................................................................................ 240

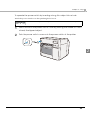
Chapter 1 Product Overview
11
1
Product Overview
This chapter describes features and specifications of the product.
Features
The TM-C3500 series (TM-C3500/ TM-C3510/ TM-C3520) are a 4-color ink jet printer that offers
high speed easy operability and high reliability required for on-demand label printing.
Printing
•High-speed printing
103 mm/s (printing width 56 mm, 360 dpi × 360 dpi, bidirectional printing)
52 mm/s (printing width 56 mm, 720 dpi × 360 dpi, bidirectional printing)
•Color printing
KCMY 4-color printing
Print resolution: Plain, Plain label 360 dpi × 360 dpi
: Others 360 dpi × 360 dpi, 720 dpi × 360 dpi
dpi: dots per 25.4 mm (dots per inch)
•Supports printing on various types of paper
Roll paper, Fanfold paper
Continuous paper, Continuous paper (Blackmark), Full-page label, Transparent full-page label, Die-cut
label, Transparent die-cut label
(Detects positions of black marks and gaps between labels)
Plain, Matte, Plain label, Matte label, Synthetic label, Glossy label
Wristband
•System to prevent ink from smearing out of the printable area such as on the backing paper of
Die-cut Label.
•System to prevent missing read or missing color caused by missing dots.
Handling
•Replacing the roll paper and the ink cartridge can be done only by operation in the front.
•Multiple printed sheets can be stored in the paper ejection tray. The paper ejection tray cannot
store multiple sheets of roll paper.
The print speed is different depending on the resolution and the printing width.

12
Reliability
Life Print head 6 billion shots/nozzle
Paper feed
mechanism
1,500,000 pages or the number of pages that reaches the
following paper length fed.
Plain Media: 150 km
Matte Media: 75 km
Wrist band (WB-S/M/L series): 30 km
Die-cut label (Plain Media): 150 km
Die-cut label (Matte Media): 150 km
Die-cut label (Synthetic Media): 100 km
Die-cut label (Glossy Media): 100 km
Continuous label paper (Plain Media): 100 km
Continuous label paper (Matte Media): 50 km
Continuous label paper (Synthetic Media): 10 km
Continuous label paper (Glossy Media): 30 km
Autocutter
mechanism
Plain Media: 1,500,000 cuts
Matte Media: 750,000 cuts
Wrist band (WB-S/M/L series): 200,000 cuts
Die-cut label backing paper (Plain Media): 1,500,000 cuts
Die-cut label backing paper (Matte Media): 1,500,000 cuts
Die-cut label backing paper (Synthetic Media): 500,000 cuts
Die-cut label backing paper (Glossy Media): 1,500,000 cuts
Continuous label paper (Plain Media): 750,000 cuts
(Add extra 250,000 cuts with cleaning the cutter blade)
Continuous label paper (Matte Media): 500,000 cuts
Continuous label paper (Synthetic Media): 100,000 cuts
Continuous label paper (Glossy Media): 300,000 cuts
Carriage
mechanism
6 million passes
(3 million carriage returns)
MTBF 88,000 hours
MCBF 9,800,000 passes

Chapter 1 Product Overview
13
1
Easy Setup
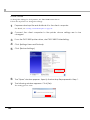
Using the CD-ROM that came with the product, you can follow the dialogic instructions on the
screen and easily setup a printer driver, install software, or perform media settings and settings
of this product.
How to Print
•Windows printer drivers that can be used from Windows applications (except for the above
label printing applications) are available.
•The printer driver has a built-in barcode font and can print high quality barcodes with supe-
rior readability. It can also be used from a .NET environment application.
•EPSON Inkjet Label Printer SDK (
using a Windows printer driver) that supports the cus-
tomer's printing application development is available.
Other Features
•USB interface and Ethernet interface are equipped by default. This product can be used as a
local printer of a computer or a network printer.
•The auto-cutter is equipped by default. Paper can be cut by a command from applications or
panel switch operations.
• A beeper is equipped by default. Notifications are available for no media or low ink, error, end
of printing, etc.
•When using a USB printer, becau se a new print queue is generated when the damaged printer
is replaced with another printer, you need to set the application or driver again. However for
this product, we provide the service (USB printer class device replacing service) to replace a
printer witho
ut changing the settings of a computer or printer driver.

14
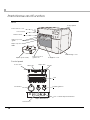
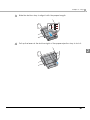
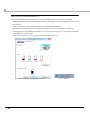
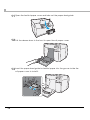
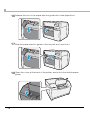
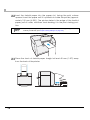
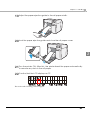
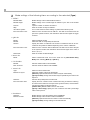
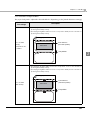
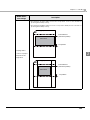
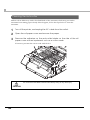
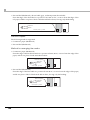
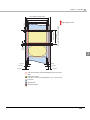
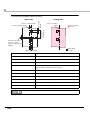
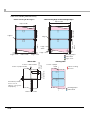
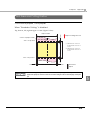
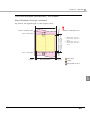
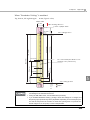
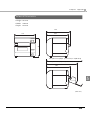
Parts Name and Function
Front
Control panel
Power switch cover
Power switch
Release lever
Paper ejection
guide
Ink cartridge cover
Control panel
Roll paper cover
Paper ejection
guide lock
Paper ejection tray
Paper ejection
table
Paper LED
Power LED
Paper FEED button
Status LED Ink LED
LCD
Cleaning button
LCD contrast adjustment button
DIP switches
CUT button

Chapter 1 Product Overview
15
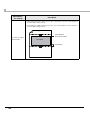
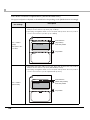
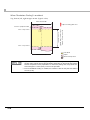
1
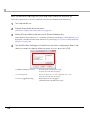
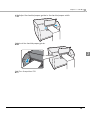
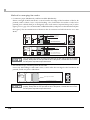
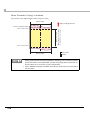
Back
Connector (lower rear)
Fanfold paper guide
Paper feed guide
Fanfold paper cover
Status sheet button
LAN Connector
Power connector
Cable hook
USB connector
Link LED

16
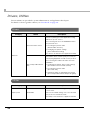
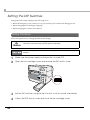
Power Switch
❏ When DIP switch 1 is OFF:
•Turns the power on after the POWER button has been pressed while the power is OFF.
•Turns the power off after the POWER button has been pressed for approximately 0.5
seconds while the power is ON.
❏ When DIP switch 1 is ON:
•Resets the printer after POWER button has been pressed for approximately 0.5 seconds.
Paper FEED button
❏ If "Media detection settings" is set to "Full-page label/Continuous paper/Transparent full-
page label", feeds the paper continuously.
• The paper is fed by 15 mm if FEED button is pressed once.
• If the FEED button is held down, the paper is continuously fed until the button is
released.
(6 seconds at a maximum)
❏ If "Media detection settings" is set to "Die-cut label (Blackmark)", "Continuous paper
(Blackmark)", or "Die-cut label (Gap)/Transparent die-cut label", feeds the paper to the print
starting position.
CAUTION
Before turning on the printer, be sure to check that the AC adapter is connected to
the power supply.
See
"Setting the DIP Switches" on page 48 for DIP switch setting.
When the printer is in the power saving mode when its vacuum fan is stopped, starting up
and stabilizing the rotation of the vacuum fan requires some time. Approximately 2 seconds
is required from the point when the paper FEED button is pressed until the point when
paper feed starts.

Chapter 1 Product Overview
17
1
CUT button
❏ If "Media detection settings" is set to "Full-page label/Continuous paper/Transparent full-
page label", feeds the paper to the autocutting position for the top of the next page, and
performs autocutting.
❏ If "Media detection settings" is set to "Die-cut label (Blackmark)", "Continuous paper
(Blackmark)", or "Die-cut label (Gap)/Transparent die-cut label", feeds the paper to the
autocutting position
according to the black mark or the gap between labels, and performs
autocutting.
Cleaning button
If the cleaning button is held down for approximately 3 seconds, head cleaning is performed.
The following settings are possible from the driver regarding cleaning operations when the
cleaning button is held down.
STATUS SHEET button
Press the status sheet button to print the status sheet.
If you turn on the power while holding the status sheet button, and continue to hold it for 10
seconds or more, you can return the LAN interface settings to factory default settings.
However, in order to prevent errors due to pieces of paper, even if you press the cut but-
ton again, cutting is not performed in a position where cutting was already performed.
Approximately 2 seconds is required from the point when the CUT button is pressed
until the point when paper cut starts.
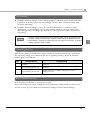
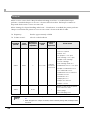
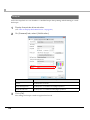
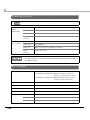
No. During stand-by During printing
1 Disabled Disabled
2 Head cleaning performed Disabled
3 Head cleaning performed
Printing canceled -> head cleaning performed ->
printing resumed

18
LCD contrast adjustment button
Adjusts the LCD contrast.
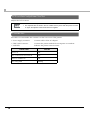
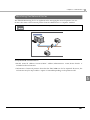
Connectors
All cables are connected to the connector on the lower rear of the printer.
•Power supply connector: Connects cable of the AC adapter.
•USB/LAN Connector: Connects the printer with the host computer via interface.
•Link LED: Indicates the printer network status.
The LCD contrast adjustment button is located under the ink cartridge cover.
The adjusted value is saved in the non-volatile memory. Even after the power is turned
on again, the adjusted value saved last time is applied.
Printer status Link LED
Power off Off
Not connected to the network Off
Network established On
Receiving data Blinking

Chapter 1 Product Overview
19
1
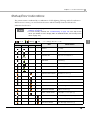
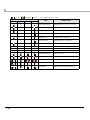
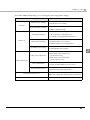
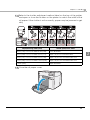
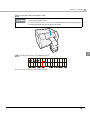
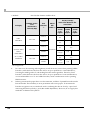
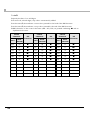
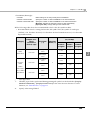
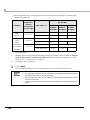
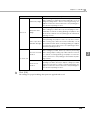
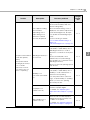
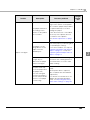
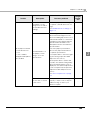
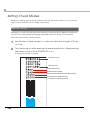
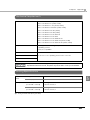
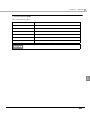
Status/Error Indications
The printer status is indicated by a combination of LED lighting/flashing and LCD indication.
When an error occurs, you can find out the cause and the remedy from the LED & LCD
indication for the error.
The LCD display language can be switched with the DIP switches. See "Setting the DIP
Switches" on page 48.
For error recovery methods, see
"Troubleshooting" on page 139 or the help for the
driver. (For details on how to display HELP for EPSON Printers, see the help for the
driver on page 144.)
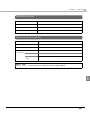
LED
LCD Printer Status
Status Power Paper Ink
——
READY In ready
——
INITIALIZING In initializing
(Fast)
——
POWER OFF In power off sequence
——
PRINTING In printing
——
INK CHARGING In ink charging
——
WORKING In working
——
HEAD MAINTENANCE In print head maintenance state
——
MEDIA FORM ERROR Media form error (*)
——
MEDIA SIZE ERROR Media size error (*)
——
PAPER JAM ERR ## Paper jam error (*)
——
PAPER REMOVAL ER Paper removal error (*)
—— —
PAPE R O UT Pa pe r ou t (* )
——
PAPER OUT ERROR Paper out error (*)
——
ROLL COVER OPEN Roll paper cover open (*)
——
INK COVER OPEN Ink cartridge cover open (*)
——
NO INK CARTRIDGE No ink cartridge (*)
——
INK READ ERROR Ink cartridge read error (*)
/ : Lit up / : Blinking : Off — : No change ## : Error code

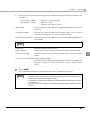
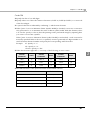
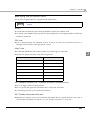
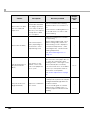
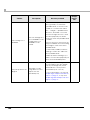
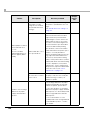
20
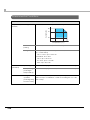
* Recovery method: See "Troubleshooting" on page 139.
——
M/B COVER OPEN Maintenance box cover open (*)
——
NO MAINT BOX No maintenance box (*)
——
M/B READ ERROR Maintenance box read error (*)
———
INK LOW Ink cartridge low
——
REPLACE INK Replace ink cartridge (*)
———
M/B NEAR FULL Maintenance box near full
——
REPLACE MAINT B Replace maintenance box (*)
————
NOZZLE CLOGGED Print head nozzle clogged (*)
————
CUT UNAVAILABLE In cutter unavailable state (*)
————
SERVICE SOON ## In service mode (*)
PRINTER ERROR ## Printer error (*)
SERVICE REQD. ## Service required (*)
UPDATING In firmware updating (*)
UPDATING Complete the firmware updating (*)
UPDATING Failure in firmware updating (*)
LED
LCD Printer Status
Status Power Paper Ink
/ : Lit up / : Blinking : Off — : No change ## : Error code
Page is loading ...
Page is loading ...
Page is loading ...
Page is loading ...
Page is loading ...
Page is loading ...
Page is loading ...
Page is loading ...
Page is loading ...
Page is loading ...
Page is loading ...
Page is loading ...
Page is loading ...
Page is loading ...
Page is loading ...
Page is loading ...
Page is loading ...
Page is loading ...
Page is loading ...
Page is loading ...
Page is loading ...
Page is loading ...
Page is loading ...
Page is loading ...
Page is loading ...
Page is loading ...
Page is loading ...
Page is loading ...
Page is loading ...
Page is loading ...
Page is loading ...
Page is loading ...
Page is loading ...
Page is loading ...
Page is loading ...
Page is loading ...
Page is loading ...
Page is loading ...
Page is loading ...
Page is loading ...
Page is loading ...
Page is loading ...
Page is loading ...
Page is loading ...
Page is loading ...
Page is loading ...
Page is loading ...
Page is loading ...
Page is loading ...
Page is loading ...
Page is loading ...
Page is loading ...
Page is loading ...
Page is loading ...
Page is loading ...
Page is loading ...
Page is loading ...
Page is loading ...
Page is loading ...
Page is loading ...
Page is loading ...
Page is loading ...
Page is loading ...
Page is loading ...
Page is loading ...
Page is loading ...
Page is loading ...
Page is loading ...
Page is loading ...
Page is loading ...
Page is loading ...
Page is loading ...
Page is loading ...
Page is loading ...
Page is loading ...
Page is loading ...
Page is loading ...
Page is loading ...
Page is loading ...
Page is loading ...
Page is loading ...
Page is loading ...
Page is loading ...
Page is loading ...
Page is loading ...
Page is loading ...
Page is loading ...
Page is loading ...
Page is loading ...
Page is loading ...
Page is loading ...
Page is loading ...
Page is loading ...
Page is loading ...
Page is loading ...
Page is loading ...
Page is loading ...
Page is loading ...
Page is loading ...
Page is loading ...
Page is loading ...
Page is loading ...
Page is loading ...
Page is loading ...
Page is loading ...
Page is loading ...
Page is loading ...
Page is loading ...
Page is loading ...
Page is loading ...
Page is loading ...
Page is loading ...
Page is loading ...
Page is loading ...
Page is loading ...
Page is loading ...
Page is loading ...
Page is loading ...
Page is loading ...
Page is loading ...
Page is loading ...
Page is loading ...
Page is loading ...
Page is loading ...
Page is loading ...
Page is loading ...
Page is loading ...
Page is loading ...
Page is loading ...
Page is loading ...
Page is loading ...
Page is loading ...
Page is loading ...
Page is loading ...
Page is loading ...
Page is loading ...
Page is loading ...
Page is loading ...
Page is loading ...
Page is loading ...
Page is loading ...
Page is loading ...
Page is loading ...
Page is loading ...
Page is loading ...
Page is loading ...
Page is loading ...
Page is loading ...
Page is loading ...
Page is loading ...
Page is loading ...
Page is loading ...
Page is loading ...
Page is loading ...
Page is loading ...
Page is loading ...
Page is loading ...
Page is loading ...
Page is loading ...
Page is loading ...
Page is loading ...
Page is loading ...
Page is loading ...
Page is loading ...
Page is loading ...
Page is loading ...
Page is loading ...
Page is loading ...
Page is loading ...
Page is loading ...
Page is loading ...
Page is loading ...
Page is loading ...
Page is loading ...
Page is loading ...
Page is loading ...
Page is loading ...
Page is loading ...
Page is loading ...
Page is loading ...
Page is loading ...
Page is loading ...
Page is loading ...
Page is loading ...
Page is loading ...
Page is loading ...
Page is loading ...
Page is loading ...
Page is loading ...
Page is loading ...
Page is loading ...
Page is loading ...
Page is loading ...
Page is loading ...
Page is loading ...
Page is loading ...
Page is loading ...
Page is loading ...
Page is loading ...
Page is loading ...
Page is loading ...
Page is loading ...
Page is loading ...
Page is loading ...
Page is loading ...
Page is loading ...
Page is loading ...
Page is loading ...
Page is loading ...
Page is loading ...
Page is loading ...
Page is loading ...
Page is loading ...
Page is loading ...
Page is loading ...
Page is loading ...
Page is loading ...
Page is loading ...
Page is loading ...
Page is loading ...
-
 1
1
-
 2
2
-
 3
3
-
 4
4
-
 5
5
-
 6
6
-
 7
7
-
 8
8
-
 9
9
-
 10
10
-
 11
11
-
 12
12
-
 13
13
-
 14
14
-
 15
15
-
 16
16
-
 17
17
-
 18
18
-
 19
19
-
 20
20
-
 21
21
-
 22
22
-
 23
23
-
 24
24
-
 25
25
-
 26
26
-
 27
27
-
 28
28
-
 29
29
-
 30
30
-
 31
31
-
 32
32
-
 33
33
-
 34
34
-
 35
35
-
 36
36
-
 37
37
-
 38
38
-
 39
39
-
 40
40
-
 41
41
-
 42
42
-
 43
43
-
 44
44
-
 45
45
-
 46
46
-
 47
47
-
 48
48
-
 49
49
-
 50
50
-
 51
51
-
 52
52
-
 53
53
-
 54
54
-
 55
55
-
 56
56
-
 57
57
-
 58
58
-
 59
59
-
 60
60
-
 61
61
-
 62
62
-
 63
63
-
 64
64
-
 65
65
-
 66
66
-
 67
67
-
 68
68
-
 69
69
-
 70
70
-
 71
71
-
 72
72
-
 73
73
-
 74
74
-
 75
75
-
 76
76
-
 77
77
-
 78
78
-
 79
79
-
 80
80
-
 81
81
-
 82
82
-
 83
83
-
 84
84
-
 85
85
-
 86
86
-
 87
87
-
 88
88
-
 89
89
-
 90
90
-
 91
91
-
 92
92
-
 93
93
-
 94
94
-
 95
95
-
 96
96
-
 97
97
-
 98
98
-
 99
99
-
 100
100
-
 101
101
-
 102
102
-
 103
103
-
 104
104
-
 105
105
-
 106
106
-
 107
107
-
 108
108
-
 109
109
-
 110
110
-
 111
111
-
 112
112
-
 113
113
-
 114
114
-
 115
115
-
 116
116
-
 117
117
-
 118
118
-
 119
119
-
 120
120
-
 121
121
-
 122
122
-
 123
123
-
 124
124
-
 125
125
-
 126
126
-
 127
127
-
 128
128
-
 129
129
-
 130
130
-
 131
131
-
 132
132
-
 133
133
-
 134
134
-
 135
135
-
 136
136
-
 137
137
-
 138
138
-
 139
139
-
 140
140
-
 141
141
-
 142
142
-
 143
143
-
 144
144
-
 145
145
-
 146
146
-
 147
147
-
 148
148
-
 149
149
-
 150
150
-
 151
151
-
 152
152
-
 153
153
-
 154
154
-
 155
155
-
 156
156
-
 157
157
-
 158
158
-
 159
159
-
 160
160
-
 161
161
-
 162
162
-
 163
163
-
 164
164
-
 165
165
-
 166
166
-
 167
167
-
 168
168
-
 169
169
-
 170
170
-
 171
171
-
 172
172
-
 173
173
-
 174
174
-
 175
175
-
 176
176
-
 177
177
-
 178
178
-
 179
179
-
 180
180
-
 181
181
-
 182
182
-
 183
183
-
 184
184
-
 185
185
-
 186
186
-
 187
187
-
 188
188
-
 189
189
-
 190
190
-
 191
191
-
 192
192
-
 193
193
-
 194
194
-
 195
195
-
 196
196
-
 197
197
-
 198
198
-
 199
199
-
 200
200
-
 201
201
-
 202
202
-
 203
203
-
 204
204
-
 205
205
-
 206
206
-
 207
207
-
 208
208
-
 209
209
-
 210
210
-
 211
211
-
 212
212
-
 213
213
-
 214
214
-
 215
215
-
 216
216
-
 217
217
-
 218
218
-
 219
219
-
 220
220
-
 221
221
-
 222
222
-
 223
223
-
 224
224
-
 225
225
-
 226
226
-
 227
227
-
 228
228
-
 229
229
-
 230
230
-
 231
231
-
 232
232
-
 233
233
-
 234
234
-
 235
235
-
 236
236
-
 237
237
-
 238
238
-
 239
239
-
 240
240


Epson ColorWorks C3500 User manual
- Category
- Label printers
- Type
- User manual
- This manual is also suitable for
Ask a question and I''ll find the answer in the document
Finding information in a document is now easier with AI
Related papers
-
Epson ColorWorks/SecurColor C3400 Technical Reference
-
-
Epson ColorWorks CW-C6500A Technical Reference
-
-
-
-
-
-
-
Other documents
-
Datexx DP-32AD Owner's manual
-
Allied Brass BSK-275LA-GYM Installation guide
-
Canon LX-D5500 User guide
-
SPRT SP-RMT9 BT User manual
-
 SPRT SP-T9 Owner's manual
-
 Alphacom 32 User manual
-
TSC CPX4 Series User manual
-
Seiko Instruments LTP F Series User manual
-
 Sojet Elfin IC User manual
-
 Morgana CT620Exa User manual


