Page is loading ...

Model 27-1
Multi-Level First-Call Cot
July, 2001
Users’ Manual
Pub. No. 234-1862-03
®

© Ferno-Washington, Inc. 234-1862-03 July, 2001
2
Users’ Manual Model 27-1 First-Call Cot
Disclaimer
This manual contains general instructions for the use, operation
and care of this product. The instructions are not all-inclusive.
Safe and proper use of this product is solely at the discretion of
the user. Safety information is included as a service to the user.
All other safety measures taken by the user should be within
and under consideration of applicable regulations. It is
recommended that training on the proper use of this product
be provided before using this product in an actual situation.
Retain this manual for future reference. Include it with the product
in the event of transfer to new users. Additional free copies are
available upon request from Customer Service.
Proprietary Notice
The information disclosed in this manual is the property of Ferno-
Washington, Inc., Wilmington, Ohio, USA. Ferno-Washington,
Inc. reserves all patent rights, proprietary design rights,
manufacturing rights, reproduction use rights, and sales use
rights thereto, and to any article disclosed therein except to the
extent those rights are expressly granted to others or where not
applicable to vendor proprietary parts.
© Copyright Ferno-Washington, Inc. All Rights Reserved.
Ferno-Washington, Inc.
70 Weil Way
Wilmington, OH 45177-9371
U.S.A.
Telephone (U.S.A. and Canada). 800.733.3766
Telephone (Worldwide) ............... 937.382.1451
Fax (United States) ...................... 937.382.1191
Fax (Outside U.S.A.) .................... 937.382.6569
Internet .....................................www.ferno.com
EuropEan rEprEsEntativE
Ferno (UK) Limited, Stubs Beck Lane, Cleckheaton
West Yorkshire BD19 4TZ, United Kingdom
Telephone +44 (0) 1274 851999
Fax +44 (0) 1274 851111
Internet www.ferno.co.uk
234-3468-00

3
© Ferno-Washington, Inc. 234-1862-03 July, 2001
Model 27-1 First-Call Cot Users’ Manual
TABLE OF CONTENTS
Page
1 - Safety Information ..................................................................... 4
2 - About the Cot............................................................................. 4
3 - Operator Skills and Training ..................................................... 6
4 - Using the Cot............................................................................. 7
5 - Maintaining the Cot ................................................................. 13
6 - Repair Parts and Service ........................................................ 16
7 - Setting Up the Cot ................................................................... 18
8 - Limited Warranty..................................................................... 19
9 - Ferno Customer Service.......................................................... 19
Illustrations
Components .............................................................................................5
Height and Strength Considerations........................................................6
Figure 1 - Operating Fold-Down Frame Control Handle .........................7
Figure 2 - Changing Cot Height with Two Operators...............................8
Figure 3 - One Operator Lowering Cot.....................................................9
Figure 4 - One Operator Raising Cot........................................................9
Figure 5 - Operating Swivel Locks............................................................9
Figure 6 - Fold-Down Frame in Lowered Position..................................10
Figure 7 - Rolling Cot in Confined Areas................................................10
Figure 8 - Loading Cot ...........................................................................11
Figure 9 - Unloading Cot .......................................................................11
Using Additional Help.............................................................................12
Lubrication Diagram...............................................................................15
Parts Diagram .........................................................................................17
Figure 10 - Attaching Pull Handle..........................................................18
Figure 11 - Attaching Mattress ...............................................................18
Figure 12 - Restraints..............................................................................18
Figure 13 - Attaching Restraint ..............................................................18
Serial Number Location ..........................................................................19
Section

© Ferno-Washington, Inc. 234-1862-03 July, 2001
4
Users’ Manual Model 27-1 First-Call Cot
1 - SAFETY INFORMATION
1.1 Warning
The following warnings appear in this manual.
1.2 Important
Boxes like the one below emphasize important
information.
2 - ABOUT THE COT
2.1 Model 27-1 First-Call Cot
Description
The Model 27-1 First-Call Cot (cot) is a mortuary-
service product designed to transport the
deceased. The cot is for professional use by one
or more trained operators.
Cot features include 6-level positioning, 4 swivel
wheels (2 with locks), fold-down frame for shortening
cot, tapered operator end, and a pull handle.
Anodized tubing is used on the main frame to
help keep hands clean. A mattress and a set of
chest and leg restraints are included with the cot.
Important
Change cot levels only with the fold-down
frame locked in the raised position. Changing
cot levels with the fold-down frame lowered
can damage the cot.
Improper use of the cot can cause injury.
Use the cot only for the purpose described
in this manual.
Untrained operators can cause injury or be
injured. Permit only trained personnel to
operate the cot.
Improper operation can cause injury. Operate
the cot only as described in this manual.
An unrestrained body can fall off the cot. Use
restraints to secure the body on the cot.
Helpers can cause injury or be injured.
Maintain control of the cot, operate the
controls, and direct any helpers.
Improper maintenance can cause injury.
Maintain the cot only as described in this
manual.
Improper parts and service can cause
injury. Use only Ferno parts and Ferno-
approved service on the cot.
WARNING
!
1.3 Bloodborne Disease Notice
OSHA (Occupational Safety and Health
Administration) requires employers to protect
workers from workplace exposure to bloodborne
diseases such as HIV-1 and hepatitis. To reduce
the risk of exposure when using the cot, follow the
disinfecting and cleaning instructions in this manual.
For more information, visit www.osha.gov on the
Internet or write to:
U.S. Department of Labor, OSHA
Office of Public Affairs, Room N-3647
200 Constitution Ave., NW
Washington, DC 20210
Improper use of the cot can cause injury.
Use the cot only for the purpose described
in this manual.
WARNING
!

5
© Ferno-Washington, Inc. 234-1862-03 July, 2001
Model 27-1 First-Call Cot Users’ Manual
2.3 Components
2.2 General Specifications
Height*
Level 6.................................................34 in.
Level 5.................................................29 in.
Level 4.................................................25 in.
Level 3.................................................21 in.
Level 2.................................................16 in.
Level 1.................................................10 in.
Loading Level **.................................25 in.
Length Overall .......................................79 in.
with Fold-Down Frame Lowered .......71 in.
Width Overall .........................................24 in.
Weight....................................................62 lb.
Maximum Load Limit...........................400 lb.
The vehicle bumper extension should not exceed
14 inches. The patient compartment should have
a level floor large enough for the folded cot, and
a cot fastener installed.
General specifications are rounded to the nearest
whole number. For detailed specifications,
contact Ferno Customer Service (page 19).
Ferno reserves the right to change specifications
without notice.
* To include pull-handle height, add 6 inches.
** Measured from ground to bottom of loading
wheel.
OPERATOR
END
LOADING
END
Pull
Handle
Loading Wheel (2)
Fold-Down
Frame
Undercarriage
Control Handle
Undercarriage
Control Handle Swivel Locks (2)
Main Frame
Post (2)
Undercarriage
Fold-Down Frame
Control Handle
Swivel Transport
Wheels (4)
LOAD LIMIT
Inspect the cot if the load
limit has been exceeded
(see Inspecting the Cot,
page 14).
400 lb
Load Limit

© Ferno-Washington, Inc. 234-1862-03 July, 2001
6
Users’ Manual Model 27-1 First-Call Cot
3 - OPERATOR SKILLS AND TRAINING
3.1 Skills
Operators using the cot need:
❑a working knowledge of mortuary-service
procedures
❑a complete understanding of the
procedures described in this manual.
3.3 Height and Strength Considerations
When unloading the cot from a vehicle, the
operator must be able to hold the cot high
enough for each set of undercarriage legs to
remain clear of the ground until they have
unfolded completely and locked into place.
Supporting the weight of the cot can require
greater strength from a short person than from a
tall person.
For example, a short operator must raise and hold
his/her arms higher than a tall operator to permit
the cot undercarriage to unfold and lock.
Note: Use additional help as needed to lift the
weight of the cot and body (see Using Additional
Help, page 12).
Untrained operators can cause injury or be
injured. Permit only trained personnel to
operate the cot.
WARNING
!
3.2 Training
Trainees need to:
❑read this manual.
❑practice with the cot before using it in regular
service.
❑record their training information.

7
© Ferno-Washington, Inc. 234-1862-03 July, 2001
Model 27-1 First-Call Cot Users’ Manual
4 - USING THE COT
4.1 Before Placing the Cot
in Service
1. Personnel who will work with the cot need
to read this manual.
2. Set up the cot, following instructions in
Setting up the Cot, page 18.
3. Confirm that cot operates properly. Follow
instructions in Inspecting the Cot, page 14.
4.2 General Guidelines for Use
1. The cot can be operated and maneuvered
by one person if necessary, but operates
and maneuvers more easily when controlled
by two operators.
2. Operator(s) may need help when working
with heavy loads. For information about
placement and direction of helpers, see
Using Additional Help, page 12.
3. Follow standard mortuary service proced-
ures when operating the cot.
4. Always use restraints.
5. Stay with the cot at all times.
4.3 Operating the Fold-Down Frame
The loading end of the main frame folds down
to shorten the cot for use in confined areas such
as hallways and elevators. To operate the fold-
down frame:
1. With one hand, grasp corner of frame and
slightly lift upward, then with other hand,
squeeze fold-down-frame control handle
(Figure 1).
An unrestrained body can fall off the
cot. Use restraints to secure the body
on the cot.
WARNING
!
Improper operation can cause injury.
Operate the cot only as described in
this manual.
WARNING
!
2. Use both hands to swing the frame down.
3. To return the frame to the extended position,
grasp the frame with one or both hands and
swing it upward until it locks.
Figure 1 - Operating Fold-Down Frame
Control Handle
4.4 Changing Cot Levels
Using Two Operators
LOWERING THE COT WITH
TWO OPERATORS
1. Operators position themselves at opposite
ends of the cot, facing each other.
Important
To avoid damaging the cot, always raise the
fold-down frame to the extended position
before changing cot levels.
Fold-Down Frame
Control Handle

© Ferno-Washington, Inc. 234-1862-03 July, 2001
8
Users’ Manual Model 27-1 First-Call Cot
Figure 2 - Changing Cot Height with
Two Operators
2. If fold-down frame has been lowered,
loading-end operator raises frame and locks
it in the extended position.
3. Both operators grasp corners of main frame,
using an underhand grip (Figure 2).
4. Loading-end operator squeezes under-
carriage control handle and lowers his/her
end of the cot until it nears the desired height,
then releases control handle and continues
lowering until undercarriage locks in place.
5. Operator-end operator squeezes control
handle and lowers his/her end of the cot
until it nears the desired height, then releases
control handle and continues lowering until
undercarriage locks in place.
4.5 Changing Cot Levels Using
One Operator
When changing cot levels without assistance,
raise or lower the cot in stages. Placing the cot at
too great a tilt can cause the body to slide off.
The proper procedure for changing levels with a
body on the cot is to raise or lower the
appropriate end of the cot a small amount, then
raise or lower the other end a small amount,
repeating until the cot is at the desired height and
level.
LOWERING THE COT WITH
ONE OPERATOR
1. Stand at loading end of cot and grasp main
frame corners with an underhand grip
(Figure 3).
Important
Always lower the loading end of the cot
before lowering the operator end.
Important
Always lower the loading end of the cot
before lowering the operator end.
RAISING THE COT WITH
TWO OPERATORS
1. Operators position themselves at opposite
ends of the cot, facing each other and
grasping corners of main frame using an
underhand grip (Figure 2).
Important
Always raise the operator end of the cot
before raising the loading end.
2. Operator-end operator squeezes control
handle and raises his/her end of the cot until
it nears the desired height, then releases
control handle and continues raising until
undercarriage locks in place.
3. Loading-end operator squeezes under-
carriage control handle and raises his/her end
of cot until it nears desired height, then
releases control handle and continues raising
until undercarriage locks in place.

9
© Ferno-Washington, Inc. 234-1862-03 July, 2001
Model 27-1 First-Call Cot Users’ Manual
Figure 3 - One Operator Lowering Cot
2. Squeeze undercarriage control handle and
lower loading end of cot until it nears desired
height.
3. Release control handle and continue
lowering cot until undercarriage locks into
position.
4. Move to operator end of cot.
5. Grasp corners of cot main frame, squeeze
control handle, and lower operator end of
cot until it is nearly level with loading end.
6. Release control handle and continue
lowering operator end of cot until
undercarriage locks into place.
Figure 4 - One Operator Raising Cot
3. Release control handle and continue raising
operator end of cot until undercarriage locks
into position.
4. Move to loading end of cot.
5. Grasp corners of main frame with an
underhand grip, squeeze undercarriage
control handle, and raise loading end of cot
until nearly level with operator end.
6. Release control handle and continue raising
until undercarriage locks into place.
RAISING THE COT
WITH ONE OPERATOR
1. Stand at operator end of cot and grasp main
frame with an underhand grip.
2. Squeeze control handle, and raise operator
end of cot until it nears desired height.
Important
Always raise the operator end of the cot
before raising the loading end.
Loading
End Operator
End
4.6 Transferring Body to Cot
1. Roll cot to body.
2. Position cot at height level with body.
3. Lock swivel wheels at loading end of cot.
To engage locks, raise levers to the vertical.
To disengage, lower levers to the horizontal
(Figure 5).
Figure 5 - Operating Swivel Locks

© Ferno-Washington, Inc. 234-1862-03 July, 2001
10
Users’ Manual Model 27-1 First-Call Cot
4.8 Maneuvering Cot in
Confined Areas
Lower the fold-down frame for easier
maneuvering in confined areas such as hallways
and elevators (Figure 6).
1. Fasten restraints.
2. Raise fold-down frame and lock in the
extended position.
3. Lower cot to lowest position.
4. Stand at operator end of cot, grasp corners
of main frame, tilt cot onto loading wheels,
and roll (Figure 7).
If lowering the fold-down frame does not shorten
the cot sufficiently, you can roll the cot in the tilted
position, as follows:
4.7 Rolling the Cot
Use help as needed to safely control the weight
of the body and cot (see Using Additional Help,
page 12).
Roll cot on smooth, unobstructed surfaces
whenever possible. Cross low obstacles such as
door sills squarely and carefully by lifting and
pulling the cot wheels over the obstacle.
Avoid high obstacles such as curbs whenever
possible. If you cannot avoid such obstacles, use
help to lift and carry the cot across them.
Roll the cot as follows:
1. Make sure restraints are fastened and cot is
in highest position.
2. Push or pull the cot from either end.
Note: Pushing the cot up an incline will be easier
if you engage the swivel locks on the loading-end
wheels and push from the operator end of the cot.
4. Unfasten restraints.
5. Transfer body onto cot.
6. Fasten restraints.
7. Raise cot to highest position before rolling.
Figure 6 - Fold-Down Frame Lowered
Fold-Down
Frame
Figure 7 - Rolling Cot in Confined Areas

11
© Ferno-Washington, Inc. 234-1862-03 July, 2001
Model 27-1 First-Call Cot Users’ Manual
4.10 Loading Cot
1. Roll cot squarely to rear of vehicle.
2. Grasp corners of main frame with an
underhand grip and roll both loading wheels
onto vehicle floor (Figure 8).
Figure 8 - Loading Cot
3. Push cot forward until loading-end legs
contact vehicle bumper.
4. While supporting cot, squeeze and hold
control handle and push forward. Both legs
will fold as cot enters vehicle.
5. Continue supporting and pushing until cot
is completely inside vehicle and you can
rest operator end of cot on posts. Release
control handle.
6. If cot must be repositioned, lift operator end
of cot and move it. Do not drag cot posts
on vehicle floor.
7. Secure cot in vehicle with Ferno-approved
cot fastener.
4.11 Unloading Cot
1. Disengage cot fastener.
2. Grasp corners of main frame with an under
hand grip. Supporting cot, squeeze and
hold control handle and begin pulling cot
from vehicle.
3. Hold cot high enough to allow operator-end
legs to unfold completely and lock into
place.
4. Release control handle as soon as operator-
end legs have locked.
5. Continue pulling cot from vehicle, holding it
high enough to allow loading-end legs to
unfold completely and lock into place.
If the vehicle is parked facing downhill, you
will need to hold the cot higher than normal
to provide sufficient ground clearance for the
legs to unfold completely and lock into
place.
6. Always keep loading wheels on vehicle floor
(Figure 9) until loading-end legs have locked
into place. Then, lower cot until all four
transport wheels are on ground.
7. Roll cot away from vehicle.
Figure 9 - Unloading Cot
Loading
Wheels

© Ferno-Washington, Inc. 234-1862-03 July, 2001
12
Users’ Manual Model 27-1 First-Call Cot
4.12 Using Additional Help
Operating the cot requires a minimum of one
trained operator. He/she may need help when
working with heavy loads.
Operator should maintain control of the cot,
operate the controls, and direct helpers.
The chart below shows suggested placement for
operator and helpers.
Key: O = Operator H = Helper D = Deceased
Changing Levels
Helpers Loading/UnloadingRolling
One
Operator
+
Three
Helpers
One
Operator
+
Five
Helpers
Helpers can cause injury or be injured.
Maintain control of the cot, operate the
controls, and direct any helpers.
WARNING
!
H
DH
H
O
H
D
H
H
O
H
H
D
H
O
H
O
H
H
D
H
H
HH
HH
H
O
D
H
H
H
O
H
D
H
LOAD LIMIT
Inspect the cot if the load
limit has been exceeded
(see Inspecting the Cot,
page 14).
400 lb
Load Limit

13
© Ferno-Washington, Inc. 234-1862-03 July, 2001
Model 27-1 First-Call Cot Users’ Manual
5 - MAINTAINING THE COT
5.1 Maintenance Schedule
The cot requires regular maintenance. Set up
and follow a maintenance schedule. The
following chart represents minimum
maintenance.
When using maintenance products, follow the
manufacturers’ directions and read the
manufacturers’ material safety data sheets.
Contact Ferno Customer Service to order Ferno
disinfectants and cleaners (see page 19).
Improper maintenance can cause injury.
Maintain the cot only as described in this
manual.
WARNING
!
5.2 Disinfecting, Cleaning, and
Waxing the Cot
1. Remove restraints and mattress from cot.
2. Wipe all surfaces of cot with disinfectant.
Follow disinfectant manufacturer’s directions.
Ferno recommends inspecting the cot for
obvious damage as you disinfect it.
3. Clean all surfaces of cot with warm water and
a mild detergent. Use a stiff-bristled brush if
necessary.
4. Rinse cot with warm water.
5. Dry cot with towel, or allow to air dry.
6. To help protect appearance of cot,
periodically apply a coat of automotive wax
to clean, dry metal surfaces.
Important
Water under high pressure penetrates joints,
flushes away lubricant, and causes
corrosion. Do not use a high-pressure
washer, or steam, to clean the cot.
Important
Disinfectants and cleaners containing bleach,
phenolics, or iodines can cause damage.
Disinfect and clean only with products that
do not contain these chemicals.
Important
This cot contains anodized tubing. Using
abrasive cleaning compounds or applicators
will remove the anodization and will damage
the cot’s appearance. Do not use abrasive
materials to clean the cot.
•
Each Month
•
As Needed
Disinfecting (this page )
Cleaning (this page)
Waxing (this page)
Inspecting (page 14)
Lubricating (page 15)
•
•
Each Use
••

© Ferno-Washington, Inc. 234-1862-03 July, 2001
14
Users’ Manual Model 27-1 First-Call Cot
5.5 Inspecting the Cot
Have your service’s equipment maintenance
personnel follow the instructions in Using the Cot,
pages 7-12, and check the following:
❑Are all components present?
❑Is the cot free of excessive wear?
❑Do all moving parts operate smoothly and
properly?
❑Does the cot roll smoothly?
❑Is restraint webbing in good condition with
no cuts or frayed edges?
❑Are restraint buckles free of visible damage
and do they operate properly?
❑Is mattress in good condition?
If inspection shows damage or excessive wear,
remove the cot from service until repair is made
(see Repair Parts and Service, page 16).
5.4 Disinfecting/Cleaning Restraints
1. Remove restraints from cot.
2. Spray metal buckles with disinfectant
cleaner and wipe with clean cloth, following
disinfectant manufacturer’s instructions. Do
not immerse buckles in liquid.
3. Add a disinfectant cleaner to warm water,
following instructions on container.
4. Grasp buckles and immerse restraint
webbing in disinfectant solution for time
directed in disinfectant manufacturer’s
instructions. Do not immerse buckles.
5. Grasp buckles and repeatedly dip restraint
webbing in clear water to rinse. Do not
immerse buckles.
6. Hang restraints to air dry.
5.3 Disinfecting/Cleaning Mattress
1. Remove mattress from cot.
2. Wipe mattress with disinfectant, following
disinfectant manufacturer’s instructions.
3. Wash the mattress with warm, soapy water
and a soft cloth.
4. Rinse the mattress with clear water.
5. Hang to dry or dry with a towel.

15
© Ferno-Washington, Inc. 234-1862-03 July, 2001
Model 27-1 First-Call Cot Users’ Manual
X = Do Not Lubricate
10X - Stationary T-Castings
11X - Delrin Bearings
12X - I-Beam Channel
N/S - Sidearm Bearings (if equipped)
5.6 Lubricating the Cot
Lubricate the cot using WRL-191-S lubricant, EZ-
1 lubricant, 30-weight oil, and the diagram below.
Lubricate right and the left sides.
A = WRL-191-S or EZ-1 Lubricant
1A - Fold-Down Frame Hinges (2)
2A - Leg Return Spring (1)
3A - Release Linkage (4)
4A - Release Handle Mount Hdwre. (2)
5A - Drop Frame Sliding Bars (3)
N/S - I-Beam Plunger-Pin Assy. (3)
B = SAE 30-Weight Oil
6B - Loading Wheel Bearings (2)
7B - Transport Wheel Bearings (4)
8B - Under Release Handle Sleeves (2)
9B - Undercarriage Frame Joints (6)
Legend
1A
The number (1)
corresponds to the
name of the part
requiring lubrication.
N/S = Not Shown
The letter (A) indicates
the type of lubricant to
be used on the part.
Parts that should not
be lubricated are
indicated by an X.
7B
1A
11X
2A
9B
7B
11X 9B
11X
3A
12X
3A
10X
8B
3A
4A
6B
5A

© Ferno-Washington, Inc. 234-1862-03 July, 2001
16
Users’ Manual Model 27-1 First-Call Cot
6 - REPAIR PARTS AND SERVICE
800.73EMSAR (Phone)
937.383.1051 (Fax)
www.EMSAR.com (Internet)
6.1 General Information
To order parts or for professional cot repair,
contact EMSAR®.
EMSAR is the only agent authorized by Ferno to
manage, service, and repair Ferno products.
EMSAR factory-trained technicians use Ferno-
approved parts and repair procedures.
EMSAR has a franchise location serving you.
Phone, fax or visit EMSAR’s web site for details.
Improper parts and service can cause
injury. Use only Ferno parts and Ferno-
approved service on the cot.
WARNING
!
1 ...... Sidearm pin w/knob & spring....... 090-0032
2 ...... 5” Wheel w/3/8” bearings,
axle, bolt, and nut .......................... 090-0060
3 ...... Fork w/bearings & shank pin ...... 090-0070
4 ...... 5” Swivel caster assy. complete.... 090-0080
5 ...... Axle bolt w/nut for 5” wheel ........ 090-0180
6 ...... #20 Crutch tip (pr.) inserts ............ 090-0560
7 ...... Load-end release handle ............... 090-0953
8 ...... 5” Load wheel with bearing
(old style - black) ........................... 090-0960
9 ...... 1/2” Bearing (pr.) ........................... 090-1259
10.... 3/8” Bearing (pr.) ........................... 090-1266
11.... Leg return spring............................ 090-2856
12.... Lock lever pin and spring ............. 090-2905
13.....Load-end scuff strips (4) .............. 090-4017
6.2 Model 27-1 Parts List
Ref. # Description Part # Ref. # Description Part #
14.....Op.-end scuff strips (2)................. 090-4018
15.....Load-end swivel caster complete.... 090-4019
16.....Load-end fork w/bearings ............ 090-4020
17.....5” Load wheel with sleeve,
bearing (new style - grey) ............ 090-4054
18.....Drilled shank pin with nut............ 090-4122
19.....Loading-end axle, 27-1/27-2 kit.. 090-4197
20.....27-1 Split footrest assy. ................ 090-5582
21.....Op.-end release handle ................. 090-4074
n/s ....New 5” Ultra Glide wheel kit....... 090-5522
n/s ....I-Beam cover ................................. 039-0266
n/s ....5/16” Bearing (pr.) for wheel
with brake ...................................... 090-4278
n/s ....5” Swivel caster with lock
assembly, complete ....................... 090-0081

17
© Ferno-Washington, Inc. 234-1862-03 July, 2001
Model 27-1 First-Call Cot Users’ Manual
20
7
8.17
19
13
9, 18
16
2
15
11 1
14
21
6
4
9, 18
2
3
5,10
12
5,10

© Ferno-Washington, Inc. 234-1862-03 July, 2001
18
Users’ Manual Model 27-1 First-Call Cot
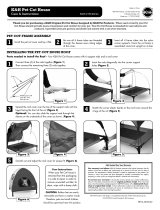
7.1 Attaching Pull Handle to Foot
End of Cot
1. Insert pull handle into pull-handle castings,
matching taped end of pull handle with taped
casting.
2. Use a hammer to insert the roll pins
(supplied) in pre-drilled holes in the pull-
handle castings (Figure 11).
Figure 14 - Attaching Restraint
7 - SETTING UP THE COT
Pull Handle
Roll Pin
Pull-Handle
Casting
Figure 11 - Attaching Pull Handle
7.2 Attaching Mattress to Cot
There are six hook-and-loop tabs on the
underside of the mattress (Figure 12). Lay the
mattress on the cot and fasten the tabs around
the adjacent frame tubes.
Figure 12 - Attaching Mattress
Tabs
(6)
Mattress
Restraints
(2)
7.3 Attaching Restraints to Cot
Two-piece chest and leg restraints are supplied
with the cot. To attach them to the cot:
1. Separate restraint halves by pushing release
button on receiver and pulling the halves
away from each other (Figure 13).
2. Position restraints at points on cot frame
appropriate for securing torso and legs.
3. Wrap a restraint piece around main frame
and pull tang or receiver through loop at end
of restraint (Figure 14).
Figure 13 - Restraints
Receiver
Release
Button Tab
Tang
4. Pull the strap until the loop is tight on the
frame.
5. Attach the other half of the restraint to the
opposite side of the cot.
6. Fasten restraints by inserting tangs into
receivers.
7. Pull tab to tighten restraints.

19
© Ferno-Washington, Inc. 234-1862-03 July, 2001
Model 27-1 First-Call Cot Users’ Manual
9 - FERNO CUSTOMER SERVICE
Customer service and product support are
important aspects of each Ferno product.
For assistance with the cot, contact Ferno
Customer Service.
Please have the serial number of your Ferno cot
available when calling Customer Service, and
include it in all written communications.
Ferno-Washington, Inc.
70 Weil Way
Wilmington, OH 45177-9371
U.S.A.
Telephone .... 800.733.3766
Fax ............... 937.382.1191
8 - LIMITED WARRANTY
Limited Warranty Summary
Ferno-Washington, Inc. (Ferno), warrants the products we manufacture to be free from defects in material
and workmanship for one year except as follows:
(A) External finishes (gelcoat, decals, paint, etc.) are warranted for 90 days.
(B) Soft goods (webbing, vinyl, fabric, foam, etc.) are warranted for 90 days.
(C) Repairs and services are warranted for 90 days or until the end of the time period(s) above, whichever
comes last.
This limited warranty applies when you use and care for the product properly. If the product is not used and cared
for properly, the warranty is void. The warranty period begins the day the product is shipped from Ferno or the day
you receive it if you have proof of the delivery date. Shipping charges are not covered by the limited warranty. We
are not liable for shipping damages or damages sustained through using the product.
Limited Warranty Obligation
If a product or part is proven to be defective, Ferno will repair or replace it. At our option, we will refund the product’s
purchase price. The purchaser accepts these terms in lieu of all damages.
This is a summary of the limited warranty. The actual terms and conditions of the limited warranty,
and the limitations of liability and disclaimers, are available upon request by calling 800.733.3766
or 937.382.1451.
Serial Number ________________________
/