Page is loading ...

IMPORTANT
Keep manual
on file at all
times.
Model 6080 MX–PROt
Ambulance Cot
OPERATIONS/MAINTENANCE MANUAL
For Parts or Technical Assistance
1–800–327–0770

Table of Contents
Introduction
Specifications 3. . . . . . . . . . . . . . . . . . . . . . . . . . . . . . . . . . . . . . . . . . . . . . . . . . . . . . . . . . . . . . . . . . . . . . . . . .
Warning / Caution / Note Definition 3. . . . . . . . . . . . . . . . . . . . . . . . . . . . . . . . . . . . . . . . . . . . . . . . . . . . . . . .
Warranty
Obtaining Parts and Service 4. . . . . . . . . . . . . . . . . . . . . . . . . . . . . . . . . . . . . . . . . . . . . . . . . . . . . . . . . . . . . .
Supplemental Warranty Coverage 4. . . . . . . . . . . . . . . . . . . . . . . . . . . . . . . . . . . . . . . . . . . . . . . . . . . . . . . . .
Return Authorization 5. . . . . . . . . . . . . . . . . . . . . . . . . . . . . . . . . . . . . . . . . . . . . . . . . . . . . . . . . . . . . . . . . . . .
Freight Damage Claims 5. . . . . . . . . . . . . . . . . . . . . . . . . . . . . . . . . . . . . . . . . . . . . . . . . . . . . . . . . . . . . . . . . .
Summary of Safety Precautions 6. . . . . . . . . . . . . . . . . . . . . . . . . . . . . . . . . . . . . . . . . . . . . . . . . . . . . . . . . . . . . .
Set–Up Procedures 7. . . . . . . . . . . . . . . . . . . . . . . . . . . . . . . . . . . . . . . . . . . . . . . . . . . . . . . . . . . . . . . . . . . . . . . . .
Component Identification 8. . . . . . . . . . . . . . . . . . . . . . . . . . . . . . . . . . . . . . . . . . . . . . . . . . . . . . . . . . . . . . . . . . . .
Vehicle Safety Hook Installation 9. . . . . . . . . . . . . . . . . . . . . . . . . . . . . . . . . . . . . . . . . . . . . . . . . . . . . . . . . . . . . .
Cot Fastener Installation 10, 11. . . . . . . . . . . . . . . . . . . . . . . . . . . . . . . . . . . . . . . . . . . . . . . . . . . . . . . . . . . . . . . .
Cot Positions 12. . . . . . . . . . . . . . . . . . . . . . . . . . . . . . . . . . . . . . . . . . . . . . . . . . . . . . . . . . . . . . . . . . . . . . . . . . . . .
Using Restraint Straps 13, 14. . . . . . . . . . . . . . . . . . . . . . . . . . . . . . . . . . . . . . . . . . . . . . . . . . . . . . . . . . . . . . . . . .
Transferring the Patient to the Cot 15. . . . . . . . . . . . . . . . . . . . . . . . . . . . . . . . . . . . . . . . . . . . . . . . . . . . . . . . . . .
Rolling the Cot 15. . . . . . . . . . . . . . . . . . . . . . . . . . . . . . . . . . . . . . . . . . . . . . . . . . . . . . . . . . . . . . . . . . . . . . . . . . . .
Loading the Cot into a Vehicle 16. . . . . . . . . . . . . . . . . . . . . . . . . . . . . . . . . . . . . . . . . . . . . . . . . . . . . . . . . . . . . . .
Unloading the Cot from a Vehicle 17. . . . . . . . . . . . . . . . . . . . . . . . . . . . . . . . . . . . . . . . . . . . . . . . . . . . . . . . . . . .
Operating Optional Wheel Lock 18. . . . . . . . . . . . . . . . . . . . . . . . . . . . . . . . . . . . . . . . . . . . . . . . . . . . . . . . . . . . .
Changing Cot Height 19. . . . . . . . . . . . . . . . . . . . . . . . . . . . . . . . . . . . . . . . . . . . . . . . . . . . . . . . . . . . . . . . . . . . . . .
Adjusting Leg Rest 20. . . . . . . . . . . . . . . . . . . . . . . . . . . . . . . . . . . . . . . . . . . . . . . . . . . . . . . . . . . . . . . . . . . . . . . .
Operating Backrest 21. . . . . . . . . . . . . . . . . . . . . . . . . . . . . . . . . . . . . . . . . . . . . . . . . . . . . . . . . . . . . . . . . . . . . . . .
Operating Siderails 21. . . . . . . . . . . . . . . . . . . . . . . . . . . . . . . . . . . . . . . . . . . . . . . . . . . . . . . . . . . . . . . . . . . . . . . .
Operating Break–away Head Section 22. . . . . . . . . . . . . . . . . . . . . . . . . . . . . . . . . . . . . . . . . . . . . . . . . . . . . . . .
Operating I.V. Poles 23, 24. . . . . . . . . . . . . . . . . . . . . . . . . . . . . . . . . . . . . . . . . . . . . . . . . . . . . . . . . . . . . . . . . . . .
Preventative Maintenance
Cleaning 25. . . . . . . . . . . . . . . . . . . . . . . . . . . . . . . . . . . . . . . . . . . . . . . . . . . . . . . . . . . . . . . . . . . . . . . . . . . . .
Preventative Maintenance Schedule & Checklist 26. . . . . . . . . . . . . . . . . . . . . . . . . . . . . . . . . . . . . . . . . . .
Pneumatic Fowler Adjustment 27. . . . . . . . . . . . . . . . . . . . . . . . . . . . . . . . . . . . . . . . . . . . . . . . . . . . . . . . . . .
Maintenance Record 28. . . . . . . . . . . . . . . . . . . . . . . . . . . . . . . . . . . . . . . . . . . . . . . . . . . . . . . . . . . . . . . . . . .
Training Record 29. . . . . . . . . . . . . . . . . . . . . . . . . . . . . . . . . . . . . . . . . . . . . . . . . . . . . . . . . . . . . . . . . . . . . . .
Assembly Drawings and Parts Lists
Cot Assembly 30–32. . . . . . . . . . . . . . . . . . . . . . . . . . . . . . . . . . . . . . . . . . . . . . . . . . . . . . . . . . . . . . . . . . . . . .
Litter/Base Adapter Assembly, Right 33. . . . . . . . . . . . . . . . . . . . . . . . . . . . . . . . . . . . . . . . . . . . . . . . . . . . . .
Litter/Base Adapter Assembly, Left 34. . . . . . . . . . . . . . . . . . . . . . . . . . . . . . . . . . . . . . . . . . . . . . . . . . . . . . .
Base Assembly 35–38. . . . . . . . . . . . . . . . . . . . . . . . . . . . . . . . . . . . . . . . . . . . . . . . . . . . . . . . . . . . . . . . . . . . .
Base Pivot Outer Lift Tube Assembly 39. . . . . . . . . . . . . . . . . . . . . . . . . . . . . . . . . . . . . . . . . . . . . . . . . . . . .
Base Pivot Inner Lift Tube Assembly 40. . . . . . . . . . . . . . . . . . . . . . . . . . . . . . . . . . . . . . . . . . . . . . . . . . . . .
Wheel Assembly 41. . . . . . . . . . . . . . . . . . . . . . . . . . . . . . . . . . . . . . . . . . . . . . . . . . . . . . . . . . . . . . . . . . . . . . .
Lock Bar Assembly 42. . . . . . . . . . . . . . . . . . . . . . . . . . . . . . . . . . . . . . . . . . . . . . . . . . . . . . . . . . . . . . . . . . . .
Wheel Lock Assembly 43. . . . . . . . . . . . . . . . . . . . . . . . . . . . . . . . . . . . . . . . . . . . . . . . . . . . . . . . . . . . . . . . . .
Litter Assembly 44–47. . . . . . . . . . . . . . . . . . . . . . . . . . . . . . . . . . . . . . . . . . . . . . . . . . . . . . . . . . . . . . . . . . . . .

Table of Contents
Assembly Drawings and Parts Lists (Continued)
Siderail Assembly 48. . . . . . . . . . . . . . . . . . . . . . . . . . . . . . . . . . . . . . . . . . . . . . . . . . . . . . . . . . . . . . . . . . . . . .
Upper Lift Tube Assembly 49. . . . . . . . . . . . . . . . . . . . . . . . . . . . . . . . . . . . . . . . . . . . . . . . . . . . . . . . . . . . . . .
Lower Lift Tube Assembly 50. . . . . . . . . . . . . . . . . . . . . . . . . . . . . . . . . . . . . . . . . . . . . . . . . . . . . . . . . . . . . . .
Release Handle Assembly 51. . . . . . . . . . . . . . . . . . . . . . . . . . . . . . . . . . . . . . . . . . . . . . . . . . . . . . . . . . . . . .
Breakaway Head Assembly 52–54. . . . . . . . . . . . . . . . . . . . . . . . . . . . . . . . . . . . . . . . . . . . . . . . . . . . . . . . . .
I.V. Pole Mounting Assembly, Right 55. . . . . . . . . . . . . . . . . . . . . . . . . . . . . . . . . . . . . . . . . . . . . . . . . . . . . . .
2–Stage I.V. Assembly, Right 56. . . . . . . . . . . . . . . . . . . . . . . . . . . . . . . . . . . . . . . . . . . . . . . . . . . . . . . . . . . .
3–Stage I.V. Assembly, Right 57. . . . . . . . . . . . . . . . . . . . . . . . . . . . . . . . . . . . . . . . . . . . . . . . . . . . . . . . . . . .
I.V. Pole Mounting Assembly, Left 58. . . . . . . . . . . . . . . . . . . . . . . . . . . . . . . . . . . . . . . . . . . . . . . . . . . . . . . .
2–Stage I.V. Assembly, Left 59. . . . . . . . . . . . . . . . . . . . . . . . . . . . . . . . . . . . . . . . . . . . . . . . . . . . . . . . . . . . .
3–Stage I.V. Assembly, Left 60. . . . . . . . . . . . . . . . . . . . . . . . . . . . . . . . . . . . . . . . . . . . . . . . . . . . . . . . . . . . .
2–Stage I.V. Pole Assembly 61. . . . . . . . . . . . . . . . . . . . . . . . . . . . . . . . . . . . . . . . . . . . . . . . . . . . . . . . . . . . .
3–Stage I.V. Pole Assembly 62. . . . . . . . . . . . . . . . . . . . . . . . . . . . . . . . . . . . . . . . . . . . . . . . . . . . . . . . . . . . .
3rd Stage Assembly 63. . . . . . . . . . . . . . . . . . . . . . . . . . . . . . . . . . . . . . . . . . . . . . . . . . . . . . . . . . . . . . . . . . . .
Oxygen Bottle Holder Assembly 64, 65. . . . . . . . . . . . . . . . . . . . . . . . . . . . . . . . . . . . . . . . . . . . . . . . . . . . . .
Bottle Holder Tray Assembly 66. . . . . . . . . . . . . . . . . . . . . . . . . . . . . . . . . . . . . . . . . . . . . . . . . . . . . . . . . . . .
Pull Handle Assembly 67. . . . . . . . . . . . . . . . . . . . . . . . . . . . . . . . . . . . . . . . . . . . . . . . . . . . . . . . . . . . . . . . . .
Base Lift Bar Assembly 68. . . . . . . . . . . . . . . . . . . . . . . . . . . . . . . . . . . . . . . . . . . . . . . . . . . . . . . . . . . . . . . . .
Quick Reference Parts List 69. . . . . . . . . . . . . . . . . . . . . . . . . . . . . . . . . . . . . . . . . . . . . . . . . . . . . . . . . . . . . . . . .

Introduction
3
INTRODUCTION
This manual is designed to assist you with the operation and maintenance of the 6080 MX–
PRO Ambulance Cot. Read it thoroughly before using the equipment or beginning any maintenance on it.
SPECIFICATIONS
Overall Length/Minimum Length/Width 80”/62”/23”
Height! – Position 1
Position 2
Position 3
Position 4
Position 5
Position 6
Position 7
Position 8
12”
19.5”
23.5”
26.5”
29.5”
32.0”
34.5”
37”
Backrest Articulation/Shock Position 0_ to 75°/+14_
Weight@ 84 pounds
Maximum Weight Capacity 600 pounds
Caster Diameter/Width 6”/2”
Minimum Operators Required for Loading/Unloading 2
Recommended Fastener Systems Model 6370/6374 Floor Mount Type
Model 6371/6375 Wall Mount Type
Recommended Floor Height Up to 33”
Roll–In Style Yes
Wheel Lock Optional
! Height measured from bottom of mattress at seat section to ground level.
@ Cot is weighed without mattress and restraints.
Stryker reserves the right to change specifications without notice.
The MX–PRO is designed to conform to the Federal Specification for the Star–of–Life Ambulance KKK–A–1822–D.
WARNING / CAUTION / NOTE DEFINITION
The words WARNING, CAUTION and NOTE carry special meanings and should be carefully reviewed.
WARNING
The personal safety of the patient or user may be involved. Disregarding this information could result in injury
to the patient or user.
CAUTION
These instructions point out special procedures or precautions that must be followed to avoid damaging the
equipment.
NOTE
This provides special information to make maintenance easier or important instructions clearer.

4
Warranty
Limited Warranty:
Stryker Medical Division, a division of Stryker Corporation, warrants to the original purchaser that its products
should be free from defects in material and workmanship for a period of one (1) year after date of delivery.
Stryker’s obligation under this warranty is expressly limited to supplying replacement parts and labor for, or
replacing, at its option, any product which is, in the sole discretion of Stryker, found to be defective. Stryker
warrants to the original purchaser that the frame and welds on its beds will be free from structural defects
for as long as the original purchaser owns the bed. If requested by Stryker, products or parts for which a
warranty claim is made shall be returned prepaid to Stryker’s factory. Any improper use or any alteration or
repair by others in such manner as in Stryker’s judgement affects the product materially and adversely shall
void this warranty. Any repair of Stryker products using parts not provided or authorized by Stryker shall void
this warranty. No employee or representative of Stryker is authorized to change this warranty in any way.
Stryker Medical ambulance cots are designed for a 5 year expected life under normal use conditions and ap-
propriate periodic maintenance as described in the maintenance manual for each device.
This statement constitutes Stryker’s entire warranty with respect to the aforesaid equipment. STRYKER
MAKES NO OTHER WARRANTY OR REPRESENTATION, EITHER EXPRESSED OR IMPLIED, EXCEPT
AS SET FORTH HEREIN. THERE IS NO WARRANTY OF MERCHANTABILITY AND THERE ARE NO
WARRANTIES OF FITNESS FOR ANY PARTICULAR PURPOSE. IN NO EVENT SHALL STRYKER BE
LIABLE HEREUNDER FOR INCIDENTAL OR CONSEQUENTIAL DAMAGES ARISING FROM OR IN ANY
MANNER RELATED TO SALES OR USE OF ANY SUCH EQUIPMENT.
To Obtain Parts and Service:
Stryker products are supported by a nationwide network of dedicated Stryker Field Service Representatives.
These representatives are factory trained, available locally, and carry a substantial spare parts inventory to
minimize repair time. Simply call your local representative, or call Stryker Customer Service at (800)
327–0770.
Service Contract Coverage:
Stryker has developed a comprehensive program of service contract options designed to keep your equip-
ment operating at peak performance at the same time it eliminates unexpected costs. We recommend that
these programs be activated before the expiration of the new product warranty to eliminate the potential of
additional equipment upgrade charges.
A SERVICE CONTRACT HELPS TO:
S Ensure equipment reliability
S Stabilize maintenance budgets
S Diminish downtime
S Establish documentation for JCAHO
S Increase product life
S Enhance trade–in value
S Address risk management and safety

5
Warranty
Stryker offers the following service contract programs:
Program Levels:
S PLATINUM – Preventive Maintenance Inspection Three Times Annually (includes free annual mat-
tress upgrade)
S GOLD – Preventive Maintenance Inspection Twice Annually
S SILVER – Preventive Maintenance Inspection Annually
All Program Levels Include the Following:
S Unlimited Emergency Service Calls
S Priority Contact – Two Hour Phone Response
S Most Repairs Will Be Completed Within Three Business Days
S JCAHO Documentation
S On–Site Maintenance Log Book with Preventative Maintenance & Emergency Service Records
S Factory Trained Stryker Service Technicians with Fully Stocked Vans
S Stryker Authorized Parts
S End of Year Summary
Not included:
S Any disposable items
S I.V. Poles
S Mattresses
S Damage resulting from abuse
For more information on our service contracts,
please call your local representative or call (800) 327–0770 (option #2).
Return Authorization:
Merchandise cannot be returned without approval from the Stryker Customer Service Department. An autho-
rization number will be provided which must be printed on the returned merchandise. Stryker reserves the
right to charge shipping and restocking fees on returned items.
SPECIAL, MODIFIED, OR DISCONTINUED ITEMS NOT SUBJECT TO RETURN.
Damaged Merchandise:
ICC Regulations require that claims for damaged merchandise must be made with the carrier within fifteen
(15) days of receipt of merchandise. DO NOT ACCEPT DAMAGED SHIPMENTS UNLESS SUCH DAMAGE
IS NOTED ON THE DELIVERY RECEIPT AT THE TIME OF RECEIPT. Upon prompt notification, Stryker
will file a freight claim with the appropriate carrier for damages incurred. Claim will be limited in amount to
the actual replacement cost. In the event that this information is not received by Stryker within the fifteen
(15) day period following the delivery of the merchandise, or the damage was not noted on the delivery receipt
at the time of receipt, the customer will be responsible for payment of the original invoice in full.
Claims for any short shipment must be made within thirty (30) days of invoice.
International Warranty Clause:
This warranty reflects U.S. domestic policy. Warranty outside the U.S. may vary by country. Please contact
your local Stryker Medical representative for additional information.
Patent Information
Rugged Products are manufactured under the following patents:
United States 5,575,026
5,537,700
Other Patents Pending

Summary of Safety Precautions
6
The following is a list of safety precautions that must be observed when operating or servicing this unit. The
precautions are repeated throughout the manual, where applicable. Carefully read this list before using or
servicing the unit.
WARNING
S Improper usage of the Cot can cause injury to the patient or operator. Operate the cot
only as described in this manual.
S Always use all restraint straps to secure the patient on the cot. An unrestrained patient may fall from the
cot and be injured.
S Never leave a patient unattended on the cot or injury could result. Hold the cot securely while a patient
is on the cot.
S Never apply the optional wheel lock while a patient is on the cot. Tipping could occur if the cot is moved
while the wheel lock is applied, resulting in injury to the patient or operator and/or damage to the cot.
S The wheel lock is only intended to help prevent the cot from rolling while unattended. The wheel lock may
not provide sufficient resistance on all surfaces or under loads.
S Never install or use the wheel lock on a cot with excessively worn wheels. Installing or using the wheel
lock on a wheel with less than a 6” diameter could compromise the holding ability of the wheel lock, result-
ing in injury to the patient or operator and/or damage to the cot or other equipment.
S Be sure the undercarriage has engaged and locked before removing the loading wheels from the patient
compartment floor of the vehicle. An unlocked undercarriage will not support the cot and injury to the pa-
tient and/or operator could result.
S Do not allow untrained helpers to assist in the operation of the cot. Untrained technicians/helpers can
cause injury to the patient or themselves.
S Grasping the Cot improperly can cause injury. Grasp only the lifting bars to lift the cot.
Keep hands, fingers and feet away from moving parts. To avoid injury, use extreme caution when placing
your feet near the base tubes while raising and lowering the cot.
S Do not modify the Cot. Modifying the cot can cause unpredictable operation resulting
in injury to the patient or operator. Modifying the cot will also void its warranty (see page 4).
S Have the vehicle safety hook installed by a certified mechanic. Improper safety hook installation can
cause injury to the patient or operator or damage to the unit.
S Failure to use the vehicle safety hook can cause injury to the patient or operator. Install and use the safety
hook as described in this manual.
S When the optional head end storage pouch is being used, ensure it does not interfere with the operation
of the safety bar and safety hook. Injury to the patient or operator could occur.
S Do not pull or lift on the safety bar when unloading the cot. Damage to the safety bar could result and injury
to the patient or operator could occur.
S Improper maintenance can cause injury or damage to the unit. Maintain the cot as described in this manu-
al. Use only Stryker approved parts and maintenance procedures. Using unapproved parts and proce-
dures could cause unpredictable operation and/or injury and will void the product warranty.
S Do not step or ride on the base of the cot. Damage to the cot could occur, resulting in
injury to the patient or operator.
S Failure to properly clean or dispose of contaminated mattress or cot components will increase the risk of
exposure to bloodborne pathogens and may cause injury to the patient or the operator.
S To avoid accidental release of the Pedi–Matet, and possible injury to the infant, ensure the buckle is lo-
cated away from obstructions on the cot or head end storage pouch.
CAUTION
S Damage to the cot can occur if the cot is lowered in the shortened position. Use only positions 5–8 (see
page 12) when the cot is shortened.
S Lifting the cot by the safety bar can cause damage to the cot. Lift the cot only by the lifting bars.
S Do not allow the cot undercarriage to drop unassisted (commonly known as a “hot drop”) when removing
the cot from the vehicle. Repeated hot dropping will cause premature wear or damage to the cot.

Set–Up Procedures
7
Unpack the cartons and check all items for proper operation. It is important that the Cot is
working properly before it is put into service. Have a qualified service person use the following list and the
operation instructions to check the cot before it is put into service.
S All fasteners secure (reference all assembly prints)
S All welds intact, not cracked or broken
S No bent or broken tubing or sheet metal
S No debris in wheels
S All wheels secure, rolling and swivelling properly
S Siderails move and latch properly
S Backrest operating properly
S Optional accessories intact and operating properly
S Height positioning latch functioning properly
S Cot secure in each height position
S Undercarriage folds properly
S Break–away head section operating properly
S Safety bar operating properly
S Foot rest operating properly
S No rips or cracks in mattress cover
S Body restraints intact and working properly
S Wheel lock operating properly (optional equipment)
S Does the vehicle safety hook engage the safety bar so that the cot loads and unloads easily from the ve-
hicle?
S Is there an approved crash–stable fastener (Stryker part number 6370/6374 or 6371/6375 – not included)
installed in the vehicle?
The patient compartment of the vehicle in which the Cot will be used must have:
S A smooth rear edge for cot loading.
S A level floor large enough for the folded cot.
S Stryker 6370/6374 or 6371/6375 crash stable cot fastener (not included).
S 33” (84 cm.) maximum loading height.
S Space to install the safety hook.
When necessary, modify the vehicle to fit the cot. Do not modify the cot.
WARNING
Do not modify the Cot. Modifying the cot can cause unpredictable operation resulting in inju-
ry to the patient or operator. Modifying the cot will also void its warranty (see page 4).

Component Identification
8
Foot Rest
Siderail Release Handles
Backrest (Head Section)
Loading Wheels
Lifting Bar
Break–away
Head Section
Release Handle
Break–away
Head Section
(1 of 2)
Backrest Adjustment
Release Handle
Height Adjustment
Release Handle
(1 of 3)
(1 of 2)
Release
Handle
Foot Rest
LONG SAFETY HOOK
(For installation instructions, see page 9)
SHORT SAFETY HOOK
Wheel Lock
(Optional)

9
Vehicle Safety Hook Installation
The vehicle safety hook is a device shipped with the
cot. The safety hook activates the safety bar and pre-
vents the cot from being removed from the vehicle ac-
cidently.
Installation of the safety hook should be done by a cer-
tified mechanic familiar with ambulance construction.
Consult the vehicle manufacturer before installing the
safety hook and be sure the installation of the safety
hook does not damage or intefere with the brake lines,
oxygen lines, fuel lines, fuel tank or the electrical wiring
of the vehicle.
Required Hardware for Installation of the Safety
Hook (Not Supplied)
(2) Grade 5, 1/4”–20 Socket Head Cap Screws*
(2) Flat Washers
(2) Lock Washers
(2) 1/4”–20 Nuts
* The length of the socket head cap screws depends
on the thickness of the vehicle floor. Use screws long
enough to go completely through the patient
compartment floor, washer and nut by at least two full
threads.
Place the cot in the cot fastener. Remove the cot from
the fastener and unload it from the vehicle. While the
cot is being removed from the vehicle, note the position
of the unloading wheels and the safety bar.
NOTE 1. Center the safety hook on the cot safety bar
with the hook facing the front of the vehicle. Be sure
the safety hook will always engage the safety bar when
the cot is unloaded from the vehicle.
NOTE 2. The safety hook should be installed as close
to the rear of the vehicle as possible while allowing the
vehicle doors to close (see Figures 1 & 2). Be sure the
bumper and the bumper step do not interfere with the
folding and unfolding of the cot’s undercarriage.
Mark the desired position of the safety hook on the pa-
tient compartment floor. Drill the holes for the socket
head cap screws. Attach the safety hook to the patient
compartment floor.
WARNING
Improper safety hook installation can cause injury to
the patient and/or operator or damage to the cot. Have
a certified mechanic install the safety hook.
Failure to install the safety hook can cause injury to the
patient or operator. Install and use the safety hook as
described in this manual.

Cot Fastener Installation
10
The Stryker Model 6370/6374 and 6371/6375 Cot Fastener systems are designed to be compatible only with
cots which conform to the installation specifications listed on page 11. Ambulance cots which currently meet
these specifications are:
Stryker
Model 6060 DX Emergency Transport
Model 6070 LX Emergency Transport
Model 6080 MX–PRO
Model 6081 MX–PRO Incubator Transporter
Model 6090 EZ–PRO
Model 6091 EZ–PRO2
Ferno–Washington
Model 29–M Three Level Roll–In Cot*
Model 93 ES Squadmatet*
Model 93 EX Squadmatet*
Model 35–A Mobile Transportert*
Model 35 A+ Mobile Transporter Plust
Model 35–IT Incubator Transporter*
WARNING
It is the responsibility of the cot operator to ensure that the cot being used in the Stryker Model 6370/6374
or 6371/6375 Cot Fastener Systems meets the installation specifications listed on page 11. Injury may result
if a non–compatible cot is used in the Stryker Model 6370/6374 or 6371/6375 Fastener System.
NOTE
Adjustment of the rail clamp assembly may be required in order to compensate for any variation in cot retain-
ing post position depending on the ambulance cot manufacturer and model number.
For more detailed installation and operation instructions for the Stryker Model 6370/6374 and 6371/6375 Cot
Fastener systems, refer to part number 6370–90–10 Ruggedt Cot Fastener Installation/Operation Instruc-
tions.
* 1999 model year or earlier. Stryker is not responsible for changes in specifications to other manufacturer’s
cots.

Cot Fastener Installation
11
INSTALLATION SPECIFICATIONS – FLOOR MOUNT FASTENER (MODEL 6370/6374)
INSTALLATION SPECIFICATIONS – WALL MOUNT FASTENER (MODEL 6371/6375)

12
Cot Positions
Position 1 – Use for patient transfer.
Position 2 – Use for patient transfer/cot rolling.
Position 3 – Use for patient transfer/cot rolling.
Position 4 – use for patient transfer/cot rolling.
Use for cot rolling in position 5–8 when space is limited.
Position 5 – use for patient transfer/cot rolling.
Position 6 – Use for patient transfer/cot rolling.
Position 7 – Use for patient transfer/cot rolling/
Position 8 – Use for patient transfer/cot rolling/
vehicle loading.
vehicle loading.

Cot Operation
13
Using Restraint Straps
View 1
View 2 (Head Section)
View 3 (Foot Section)
WARNING
Always use all restraint straps to secure the patient on the cot. An unrestrained patient may fall from the cot
and be injured.
Always secure the patient on the cot with all the restraint straps. Buckle the restraints across the patient’s
chest/shoulders, waist and legs (View 1). Keep the restraint straps buckled when the cot is not being used
with a patient to avoid damage to the buckles and straps.
When attaching the restraint straps to the cot, keep in mind the attachment points should provide strong an-
chorage and proper restraint position while not interfering with equipment and accessories. Wrap the strap
around the cot frame and back through the loop on the end of the strap as shown in views 2 and 3. The arrows
indicate alternate attachment areas.

Cot Operation
14
Using Restraint Straps (Continued)
View 5
View 4
A
B
View 6
C
C
When the cot is put into service, the restraints are opened and placed to either side of the cot until the patient
is positioned on the cot mattress. The restraint is lengthened, buckled around the patient and shortened until
the required tightness is achieved.
To open the restraint, press the red button (A) on the front of the buckle ”receiver”. This releases the buckle
”tang” (B) which can then be pulled out of the receiver (View 4).
To close the restraint, push the tang into the receiver until a ”click” is heard. When fastening the chest restraint
be sure the tang passes through both links (C) on the shoulder strap (View 4).
To lengthen the restraint, grasp the buckle tang, turn it at an angle to the webbing, then pull out (View 5).
A hemmed tab at the end of the webbing prevents the tang from coming off the strap.
To shorten the restraint, grasp the hemmed tab and pull the webbing back through the tang until the required
tightness is achieved (View 6) .
Whenever a restraint is buckled on a patient, the attendant should check to be sure the tang is fully engaged
and that the extra webbing is not tangled in the cot or hanging loose.
Inspection of the restraints should be done at least once a month (more frequently if used heavily). Inspection
should include checking for a bent or broken receiver or tang, torn or frayed webbing, etc. Any restraint show-
ing wear or not operating properly must be replaced immediately.

Cot Operation
15
Operating Guidelines
S Use the Cot only as described in this manual.
S Read all labels and instructions on the cot before using the cot.
S Use a minimum of two operators to manipulate the cot.
S Do not adjust, roll or load the cot without advising the patient. Stay with the patient and control the cot
at all times.
S Never apply the optional wheel lock while a patient is on the cot.
S Always use the restraint straps and keep the siderails up when a patient is on the cot.
S Use properly trained helpers when necessary to control the cot and patient.
Transferring the Patient to the Cot
Roll the cot to the patient. Place the cot beside the patient and raise/lower the cot to the patient’s level. Lower
the siderails and open the restraint straps. Transfer the patient to the cot using accepted EMS procedures.
Use all the restraints to secure the patient to the cot (see page 13 for restraint strap usage instructions). Raise
the siderails and adjust the backrest and leg rest as necessary.
WARNING
Always use all restraint straps to secure the patient on the cot. An unrestrained patient may fall from the cot
and be injured.
Never apply the optional wheel lock while a patient is on the cot. Tipping could occur if the cot is moved while
the wheel lock is applied, resulting in injury to the patient or operator and/or damage to the cot.
Rolling the Cot
Make sure all the restraint straps are securely buckled around the patient (see page 13 & 14 for restraint strap
usage instructions). Place the cot in positions 2–8 for rolling (see page 12 for cot positions). When rolling
the cot, position an operator at the foot end and one at the head end at all times.

Cot Operation
16
Loading the Cot into a Vehicle
When loading the cot into a vehicle, an operator should remember the following important issues:
S There must be a safety hook properly installed in the vehicle so that the bumper does not interfere with
the front legs of the base frame. (See page 9 for safety hook installation instructions.)
S The operator(s) must be able to lift the total weight of the patient, cot and any other items on the cot.
S The higher the operator must lift the cot, the more difficult it becomes to hold the weight. The operator
may need help loading the cot into a vehicle if he/she is too short or if the patient is too heavy for the opera-
tor to lift safely.
The operator must be able to lift the cot high enough for the cot’s legs to unfold completely and lock when
the cot is unloaded. A shorter operator will have to raise his/her arms higher to enable the undercarriage
to unfold.
Place the cot in a loading position (position 7 or 8 – see page 12). Roll the cot to the open door of the patient
compartment. Fold vehicle bumper to raised position (if available).
Push the cot forward until the loading wheels are on the patient compartment floor and the safety bar passes
the safety hook.
WARNING
Failure to use the safety hook can cause injury to the patient or operator. Install and use the safety hook as
described in this manual.
Operator 1 – Grasp the cot frame at the foot end. Lift the foot end of the cot until the weight is off the latching
mechanism. Squeeze and hold the release handle (location A or B).
Operator 2 – Grasp the base frame where indicated (location C). Raise and hold the undercarriage until it
stops in its uppermost position.
Both operators – Push the cot into the patient compartment, engaging the cot fastener (not included).
NOTE
Loose items or debris on the patient compartment floor can interfere with the operation of the safety hook
and cot fastener. Keep the patient compartment floor clear.
A
B
C

Cot Operation
17
Unloading the Cot from a Vehicle
Disengage the cot from the cot fastener. (For more detailed instructions, reference the cot fastener installa-
tion/operation instruction manual – Stryker part number 6370–90–10.)
Operator 1 – Grasp the cot frame. Pull the cot from the patient compartment until the safety bar engages
the safety hook.
WARNING
Failure to use the safety hook can cause injury to the patient or operator. Install and use the safety hook as
described in this manual.
Operator 2 – Grasp the base frame where indicated, lift slightly, and lower the base frame to its fully extended
position while operator 1 squeezes and holds the release handle.
Operator 1 – Let go of the release handle and be sure the undercarriage locks into place.
Operator 2 – Disengage the safety bar from the safety hook by pushing the safety release lever forward.
WARNING
Do not pull or lift on the safety bar when unloading the cot. Damage to the safety bar could result and injury
to the patient or operator could occur.
Remove the cot from the vehicle. Place the cot in a rolling position (positions 2–8 – see page 12).
CAUTION
Do not allow the cot undercarriage to drop unassisted (commonly known as a “hot drop”) when removing the
cot from the vehicle. Repeated hot dropping will cause premature wear or damage to the cot.
WARNING
Be sure the undercarriage has engaged before removing the loading wheels from the patient compartment
floor of the vehicle. An unlocked undercarriage will not support the cot and injury to the patient or operator
could result.

Cot Operation
18
OPERATING THE OPTIONAL WHEEL LOCK
A
1. To activate the optional wheel lock, press fully down on the pedal (A) until it stops.
2. To release the optional wheel lock, depress the upper face of the pedal with your foot or lift up with your
toe under the pedal. The upper portion of the pedal will rest against the caster frame when the wheel
lock is released.
ADJUSTING THE WHEEL LOCKING FORCE
MINIMUM MAXIMUM
1. To adjust the wheel locking force, remove the hex socket screw from the center of the lock pedal. The
wheel lock is initially assembled with the pedal set at the minimum locking force. The marker on the pedal
(item A) is aligned with the marker on the octagonal sleeve (item B).
2. Remove the sleeve (B). Rotate the sleeve counterclockwise to increase the pedal locking force and
clockwise to decrease the locking force. Insert the sleeve into the pedal. Reinstall the hex socket screw.
3. Test the pedal locking force before returning the cot to service.
WARNING
Never apply the optional wheel lock while a patient is on the cot. Tipping could occur if the cot is moved while
the wheel lock is applied, resulting in injury to the patient or operator and/or damage to the cot.
The wheel lock is only intended to help prevent the cot from rolling while unattended. The wheel lock may
not provide sufficient resistance on all surfaces or under loads.
Never leave a patient unattended on the cot or injury could result. Hold the cot securely while a patient is
on the cot.
Never install or use the wheel lock on a cot with excessively worn wheels. Installing or using the wheel lock
on a wheel with less than a 6” diameter could compromise the holding ability of the wheel lock, resulting in
injury to the patient or operator and/or damage to the cot or other equipment.

Cot Operation
19
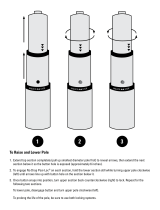
Changing Cot Height
A
FOOT END
B
C
C
A
B
NOTE
Changing the cot height requires a minimum of two operators, positioned at both ends or on each side of the
cot. Each operator must grasp the cot frame securely.
To lower the cot from the ends, the operator at the foot end of the cot positions his/her hands so the release
handle (A or B) can be squeezed while a secure grip is maintained on the lifting bars. Both operators must
lift the cot until the weight is off the latching mechanism (approximately 1/4”). The operator at the foot end
squeezes and holds the release handle and both operators then raise or lower the cot together. The handle
is released when the desired position is reached. Both operators should maintain a secure grip on the litter
frame until the latching mechanism is securely locked into position.
To lower the cot from the sides, the operator on the patient’s right positions his/her hands so he/she can
reach the release handle at the midpoint of the litter (C). Both operators must lift the cot until the weight is
off the latching mechanism (approximately 1/4”). The operator at the patient’s right squeezes and holds the
release handle. Both operators then raise or lower the cot together. The handle is released when the desired
position is reached. Both operators should maintain a secure grip on the litter frame until the latching mecha-
nism is securely locked into position.
WARNING
Grasping the Cot improperly can cause injury. Grasp only the litter frame or the lifting bar
to lift the cot. Keep hands, fingers and feet away from moving parts. To avoid injury, use extreme caution
when placing your feet near the base tubes while raising and lowering the cot.
/