Page is loading ...

Adapter Box G2
320101049901
User Manual
Solax Power Network Technology (Zhejiang) Co.,Ltd.

Contents
1 Overview of Adapter Box G2 .......................................
1.1 Introduction ..........................................................................................................
1.2 Dimension.............................................................................................................
1.3 Diagram ...............................................................................................................
2 Installation......................................................................
2.1 Packing List ............................................................................................................
2.2 Tool Preparation ...................................................................................................
2.3 Wall Mounting .......................................................................................................
3 Electrical Connection ...................................................
3.1 Connection of the RS485_INV Port ...................................................................
3.2 Connection of the RS485 Port...........................................................................
3.3 Connection of the Power Adapter Port ............................................................
3.4 Connection of the AO Port..................................................................................
3.5 Connection of the DO Port .................................................................................
4 Configuration of APP ...................................................
4.1 APP Login ...............................................................................................................
4.2 Settings for the Adapter Box G2 ........................................................................
5 Technical Specifications ..............................................
6 Safety..............................................................................
6.1 Certification mark................................................................................................
6.2 Safety ................................................................................................
7 Contact us ......................................................................
01
01
01
02
02
02
03
04
05
08
09
10
08
11
11
15
22
23
23
23
25
01

1.1 Introduction
1.2 Dimension
An Adapter Box G2 is a heat pump controller. It communicates with Solax inverters through the RS485
and controls a heat pump with the dry contact or the analog output. Users can control the Adapter Box
G2 to make use of the surplus solar energy of the inverter and battery storage capacity.
Note: A heat pump can only be connected to a Adapter Box G2.
01
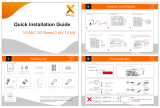
1.3 Diagram
125 mm
125 mm
Front view
75 mm
Top view
Left view Right view
A1-HYB-G2 inverter and battery
Utility Grid
BI
App
PV1
PV2 PV3
Generator
Load
Main panel
Meter
SolaX Cloud
DC Power
AC Power
Communication
Cloud
RSD RSD RSD
Utility Grid
Indoor Outdoor
DC Power
AC Power
Communication
1 Overview of the Adapter Box G2

2.1 Packing List
Check if there is any distortion or damage during transportation. If there is any damage or items missing,
please contact the dealer.
2.2 Tool Preparation
2 Installation
02
Self-tapping
screws × 4
Expansion
tubes × 4
2 pin male
pluggable
terminal block × 1
1 mm² tube pre-
insulated terminals
× 7
Marking
Cardboard × 1 Documents
Power Adapter × 1
(optional)
5 pin male
pluggable
terminal block × 1
RJ45 terminals × 2
Adapter Box G2 × 1
Drill
(Bit Φ 6)
Cross-shaped
screwdriver Crimping plier
Cable stripper
Flat-shaped
screwdriver
Network cable
crimping plier Diagonal plier Rubber hammer Marker

2.3 Wall Mounting
Step1. Use a marking cardboard to locatethe holes and drill them on the wall.
Drill holes with a Φ 6 drill.
Depth: at least 30 mm.
Step4. Pass self-tapping screws through the channels in the four corners of the box and screw them
tightly.
• Choose a place where the Adapter Box G2 is not directly exposed to the sun and close to the heat pump.
• The Adapter Box G2 needs to be installed horizontally. Please refer to picture in step 4 for the right installation
method of the adapter box.
Note!
Step2. Put the expansion tubes in the holes and
tighten them with a hammer.
Step3. Dismantle the top cover of the
Adapter Box G2.
03
self-tapping screws
Torque: 1.5±0.1 N·m
Heat pump
105 mm
105 mm
hammer drill
a Φ 6 drill
(depth: 30 mm)
cross-shaped
screwdriver
torque:1 N·m

The figure below introduces the ports the Adapter Box G2, which shall be connected to the ports of a
heat pump and an inverter.
Name of ports
Dry Contact(DO)
Analog output(AO)
RS485_INV
RS485
Power Adapter
Functions of ports
4 channel dry contact
0-10 Vdc analog output
Pin 4 and pin 5 are for RS485 communication with the inverter.
Pin 3 and pin 6 are for 11-15 Vdc power supply input to the
Adapter Box G2.
a branch port of the RS485_INV port for RS485 communication
(Pin 4 and Pin 5)
9- 14 Vdc power supply input to the Adapter Box G2
• Functions of the ports of the Adapter Box G2
Note!
Pin 3 and pin 6 of RS485_INV port and a power adapter both can supply power for the Adapter Box G2,
and users can choose one to get Adapter Box G2 powered.
04
DO4
DO3
DO2
DO1
COM
AO1
GND
RS485_INV
RS485
power
adapter
Heat Pump
Analog output
Dry contact
Adapter Box G2
Inverter
other devices
3 Electrical Connection

3.1 Connection of the RS485_INV port
Step1. Unscrew the waterproof connector of the box, pull out one plug in the rubber stopper and thread
a cable through the waterproof connector, the rubber stopper and insert it into the box.
1
8
1 2 345678
GND
X
+13V
XRS485-A X
X
RS485-B
•RS485_INV Pin Definition
By introducing ports of the Adapter Box G2, the specific connection methods of ports among the box
and a heat pump and an inverter shall be illustrated below.
• Functions of the RS485_INV port:
a) communication between the Adapter Box G2 and the inverter.
b) power supply from the inverter to the Adapter Box G2.
①. Cable connection of RS485_INV port (Adapter Box G2 side)
Step2. Make a cable: strip 15 mm layer off the end of the cable in the box and plug the end into a RJ45
terminal according to the pin definition with a plier crimped. Connect the cable with the terminal to the
RS485_INV port in the box, ensure rubber stoppers without cable threading are with plugs and then
screw the waterproof cover tightly.
• Cable connection between an inverter and the Adapter Box G2
05
pull out
rubber stopper
plug
waterproof connector
inside the box
inside the box
RJ45
terminal
Network cable
crimping plier
15 mm
Cable stripper
RS485_INV port
inside the box

The Adapter Box G2 can be connected with different inverters to achieve communication between devices.
With matching tests, X1-Hybrid G4, X3-Hybrid G4 and X3-MIC G2 series inverters can be matched to supply
power for the Adapter Box G2. For further matching questions of other Solax inverters, please contact us
for help before installation.
Here is an introduction to the port of inverters supplying power for the Adapter Box G2.
a) X1-Hybrid G4 and X3-Hybrid G4 series inverters
X1-Hybrid G4 and X3-Hybrid G4 series inverters support power for the Adapter Box G2 through
COM/LCD port or COM port of the inverter respectively.
CAN
Meter /CT
COM/L CD
DRM
BMS
Upgra de
Meter/CT
COM/LCD
X1-Hybrid G4 inverter for example
b) X3-MIC G2 series inverters
X3-MIC G2 inverter for example
X3-MIC G2 series inverters support power for the Adapter Box G2 through RS485 port of the
inverter.
06
①.
②.Cable connection of the inverter side
•COM Pin Definition of X1/X3-Hybrid G4 series
1
8
12345 6 78
GND
+13V
RS485_A X
X
RS485_B
X X
•RS485 Pin Definition of X3-MIC G2 series
1
8
12345 6 78
RS485_A X
X
RS485_B
X X +12V GND
A splitter can be used if the communication port of the inverter is occupied.
Notice!
When the inverter and the Adapter Box G2 are well connected, users need to enable the RS485
communication with the Adapter Box G2 in the settings of the inverter.

LCD setting on the inverter
When the cables are well connected, users need to set the LCD on the inverter to enable the RS485
communication between the inverter and the Adapter Box G2.
a) Setting steps on X1/X3-Hybrid G4 series inverters
b) Setting steps on X3-MIC G2 series inverters
Power 0W
Grid Lost Fault
>Status
Language
>Language
Date time
> DateTime
Settings
>
0 0 0 0
> Safety
Export Control
> Export Control
DRM Function
1 0 0 0
> Grid Serices
Grid Protection
> Grid Protection
New Password
> DRM Function
Grid Services
> RS485 CommAddr
Parallel Setting
> Parallel Setting
MpptScanMode
> New Password
RS485 CommAddr
> Reset Energy
Reset Meter
> Reset Meter
Reset ErrorLogs
> MpptScanMode
Reset Energy
> Reset Wifi
Machine Type
> Machine Type
PvConnection
> Reset ErrorLogs
Reset Wifi
> DryContact
Modbus Function
> Modbus Function
Adapter Box G2
> PvConnection
DryContact
07
===User Settings===
>Advance Setting
===Advance===
>Modbus
===Modbus===
Function Select:
>Adapter Box G2
===Modbus===
>Baud Rate:
9600
> Settings
Meter Energy > Mode Select
Enable
> Adapter Box G2

3.3 Connection of the power adapter port (optional)
3.2 Connection of the RS485 port
• Function of the RS485 port:
a branch port of RS485_INV port for RS485 communication with other devices.
•RS485 Pin Definition
1
8
1 2 345 6 78
XX485-A X
X
485-B X
X
Notice: refer to the communication cable connection method of the RS485_INV port.
•Function of a power adapter
A power adapter is optional for the power supply of the Adapter Box G2. If the inverter matched cannot
supply power for the Adapter Box G2, a power adapter is needed.
•Cable connection of a power adapter
Step1. Pull out one plug in the rubber stopper, thread the cable of the power adapter through the
waterproof connector, the rubber stopper and then insert the cable into the power adapter port.
Step2. Check the rubber stopper without cable threading through are with plugs and then screw the
waterproof connector tightly.
08
rubber stopper
pull out
plug
waterproof
connector
power
adapter

3.4 Connection of the AO port
Step1. Prepare a two-core cable, remove 30 mm layer off from one end, pull the waterproof plug out
and thread the cable through the waterproof connector into the box.
Note: open ports without cable threading through must be plugged to prevent water. And reserve a
proper length of all connected cables in the box to reduce its pulling force for connected terminals.
Step4. Plug the male pluggable terminal block with cables into the female pluggable terminal block fixed
in the Adapter Box G2 and screw them tightly.
Step3. Insert the cables with terminals into the male pluggable terminal block and screw them tightly.
2
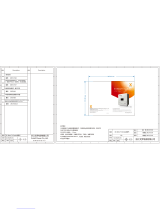
剥1mm 2芯线,其余部分维持原样
e)部分修改内容
Step2. Strip 7 mm layer off the peeled cables and insert them into 1 mm² tube pre-insulated terminal and
crimp them tightly.
Step5. Screw the waterproof connector tightly, align the recessed part of the top cover with the
protrusion of the box and lock the top cover.
09
Please refer to the manual of a heat pump for how the other end of the cable is connected to the heat pump.
recessed part
of the top cover
protrusion of
the box cross-shaped
screwdriver
Torque: 1 N·m
cable stripper
inside the box
7 mm
1 mm² tube
pre-insulated
terminal
crimping plier
2 pin male
pluggable
terminal block
flat-blade screwdriver
blade width: 2.5 mm
Torque: 0.2 N·m
flat-blade screwdriver
blade width: 3 mm
Torque: 0.4 N·m
female pluggable
terminal block
pull out
waterproof
plug
waterproof
connector
1 mm² cable
inside the box
diagonal plier
30 mm
two-core cable
diameter:5-10 mm

3.5 Connection of the DO port
Step1. Prepare a five-core cable, remove 50 mm layer off from one end, pull the waterproof plug out
and thread the cable through the waterproof connector.
Note: open ports without cable threading through must be plugged to prevent water. And reserve a
proper length of all connected cables in the box to reduce its pulling force for connected terminals.
Step2. Strip 7 mm off the peeled cables and insert them into 1 mm² tube pre-insulated terminal.
Step3. Insert the cables with terminals into the male pluggable terminal block, screw them tightly. Insert
the male pluggable terminal block with cables into the female pluggable terminal block fixed in the
Adapter Box G2.
Step4. Screw the waterproof connector tightly, align the recessed part of the top cover with the
protrusion of the box and lock the top cover.
10
crimping plier
1 mm² tube
pre-insulated
terminal
cable stripper
inside the box
7 mm
a) DO port connection under the control of dry contact
female pluggable
terminal block
5 pin male
pluggable
terminal block
flat-shaped screwdriver
blade width: 3 mm
Torque: 0.5 N·m
pull out
waterproof
plug
five-core cable
diameter: 5-10 mm
diagonal
plier
50 mm
1 mm² cable
inside the box
waterproof
connector
protrusion of
the box recessed part
of the top cover cross-shaped
screwdriver
Torque: 1 N·m

b) DO port connection under the control of SG Ready
Step1. Prepare a two-core cable, then strip, crimp and threading the cable through connectors and then
make the cable as the way you have been done in a).
Step2. Insert the cables with terminals into the male pluggable terminal block, screw them tightly. Insert
the male pluggable terminal block with cables into the DO1 and COM port if the female pluggable
terminal block fixed in the Adapter Box G2.
Step3. After step 2 is finished, screw tight the waterproof connecter and lock the top cover as the
method in a).
Please refer to the manual of a heat pump for how the other end of the cable is connected to the heat pump.
11
flat-shaped screwdriver
blade width: 3 mm
Torque: 0.5 N·m

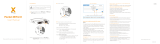
Monitoring Cloud Registration
Ø
4.1 APP Login
The APP “SolaxCloud” is used to control the Adapter Box G2.
The screen shots here are for reference only and the actual interfaces may differ. Users can update their
APP as needed.
ØAPP account login
• If you don’t have the app or monitoring cloud’s account yet, you can operate as below:
Step 1: Use your smart phone to scan below QR code or search for the keyword “SolaXCloud” in
Appstore to download the Monitoring App.
IOS Google
Step 2: Touch the setting button at the upper left corner of the Monitoring App to choose language.
Step 3: Touch “Create a new account” at the bottom of Monitoring App and fill in the information to
create the account.
12
4 Configuration of APP

Step 4: For the first login, click “+” to create site. Fill in site information and type in or scan the
Registration No. and follow the instructions to complete the site creation and WiFi connection.
QR
code
Sxxxxxxxxx
Registration
No.
Login account
13

Add Device
Ø
Wi-Fi Connection
Ø
• If you already have the account, you can operate as below:
Step 1: Login your account and turn to “Device” page in the app.
Step 2: Touch the “+” icon on the upper right corner and fill in the information to add the Adapter Box G2.
Step 1: Login your account and turn to “Account” page in the app.
Step 2: Click “Wifi Connection”.
Step 3: Type in or scan the Registration No. of the Adapter Box G2. Then touch “Next” and agree to join
the network of the Adapter Box G2.
R
code
Sxxxxxxxxx
14

Local Mode
Ø
Step 4: Type in or choose your home Wi-Fi SSID and password, then touch “Next”.
*Only 2.4GHz Wi-Fi is available.
Step 5: Follow the instructions to complete Wi-Fi setting, there will be a note when the setting
successes.
*Check more Wi-Fi setting information on www.solaxcloud.com/wifiSetting/
Use your smart phone to connect the SolaX Wi-Fi signal (Wifi_Sxxxxxxxx).
Then touch Local and type in password (initially same as the Registration No.) to access the Local Mode
in the Monitoring App.
*Visit the local password setting instruction on www.solaxcloud.com/wifiSetting/
* Users can visit the IP address http://192.168.10.10/ in a browser to configure WiFi if necessary. (The
password is the Registration No.)
15

4.2 Settings for the Adapter Box G2
ØMonitoring interface
Step 1. Click “Device” at the bottom of the interface. Select “Adapter Box” from the drop-down list on the
top left corner to enter the monitoring interface.
Step2. Choose the user’s online device. The status, analog output and the present step of dry contact
are as below.
16
* Green points indicate the dry contact relay is closed and grey
points mean the relay is open.
* “Analog output” indicates the analog output voltage which is at
the range of 0 ~ 10 V.
* “Step” indicates the present step of the Adapter Box.
2
1

ØSetting interface
Click the icon below to enter the setting interface.
Users choose “Automatic” and can control a heat pump with the following methods (selecting in the
drop-down list of “Control type”) in accordance with the actual cable connection.
17
①. Dry Contact
Step1. The Adapter Box G2 offers 15 steps. Users set the “Max step” as needed according to the max step
of the heat pump connected. Also, the step range of “Step setting” in the setting interface shall change
with the parameter of the “Max step” users set.
Dry contact setting page
1
1

Step2. Click “Step setting” to set the rate of each step of the Adapter Box in accordance with the rate of
the heat pump connected.
Step3. Set the “Fallback step” as needed. That is the step of the Adapter Box when the communication
between the inverter and the Adapter Box is disconnected.
Step4. Set the “Load capacity” in accordance with the rated power of the heat pump connected to finish
settings under dry contact.
4
Step5. Set effective time periods on the “Schedule” setting page to enable the settings of the Adapter
Box.
18
2
2
Adapter Box G2 heat pump for example
Step for capacity setting
3
/