Page is loading ...

User Manual
Three-phase Hybrid Inverter
XD5-12KTR

Three-phase Hybrid Solar Inverter Contents
i
Contents
Chapter 1 Introduction ..................................................................................................................................................1
Chapter 2 Safety Precautions ....................................................................................................................................... 2
2.1 Safety Symbols ............................................................................................................................................2
2.2 Precautions for Operation ........................................................................................................................... 2
Chapter 3 Product Introduction ....................................................................................................................................4
3.1 Intended User ...............................................................................................................................................4
3.2 Product Overview ........................................................................................................................................4
3.3 Safety Instructions .......................................................................................................................................6
3.4 Schematic Diagram of the Basic System ...................................................................................................7
3.5 Product Features .......................................................................................................................................... 7
Chapter 4 Installation ................................................................................................................................................... 9
4.1 Unpacking Inspection ..................................................................................................................................9
4.2 Before Installation ..................................................................................................................................... 10
4.3 Space Requirements .................................................................................................................................. 11
4.4 Dimension of Mounting Bracket ..............................................................................................................13
4.5 Product Dimension and Weight ................................................................................................................13
4.6 Wall Mounting ...........................................................................................................................................14
4.7 Installation of Inverter ...............................................................................................................................15
Chapter 5 Electrical Connection ................................................................................................................................ 16
5.1 Electrical Connection Overview .............................................................................................................. 16
5.2 PV Wiring .................................................................................................................................................. 18
5.3 AC Wiring ..................................................................................................................................................18
5.4 BAT Wiring ................................................................................................................................................19
5.5 Communication Connection ..................................................................................................................... 20
5.6 Connection of Grounding Wire ................................................................................................................ 21
Chapter 6 Commissioning ..........................................................................................................................................22
6.1 Startup ........................................................................................................................................................ 22
6.2 Connection of Smart Meter ...................................................................................................................... 22
6.3 Shutdown ................................................................................................................................................... 22
Chapter 7 Parameter Settings .....................................................................................................................................23
7.1 Menu Information ..................................................................................................................................... 23
7.2 "Setting Info" Page ....................................................................................................................................28
Chapter 8 System Debugging .................................................................................................................................... 51

Three-phase Hybrid Solar Inverter Contents
ii
8.1 LCD Screen and Keys ...............................................................................................................................51
8.2 Working Mode ...........................................................................................................................................53
8.3 Setting Parameters in Solarman App ........................................................................................................54
Chapter 9 System Maintenance ................................................................................................................................. 56
9.1 Regular Maintenance of Inverter ..............................................................................................................56
9.2 Powering Off the Inverter ......................................................................................................................... 57
9.3 Removing the Inverter .............................................................................................................................. 57
9.4 Scrapping the Inverter ...............................................................................................................................57
Chapter 10 Troubleshooting ...................................................................................................................................58
Chapter 11 Product Specifications .........................................................................................................................65

Three-phase Hybrid Solar Inverter Introduction
1
Chapter 1 Introduction
This Manual describes the specification, installation, operations and maintenance of the hybrid inverter.
Please read this Manual carefully to understand the safety information, functions and features of the product
before installing and using it. The information provided in this Manual is subject to update from time to time due to
product improvements. The latest version and more product information are available on our official website.

Three-phase Hybrid Solar Inverter Safety Precautions
2
Chapter 2 Safety Precautions
Improper use may result in risk of electric shock or burns. This Manual provides important instructions for
installation and maintenance of the product. Please read this Manual carefully before using the product, and keep it
for future reference.
2.1 Safety Symbols
The following are the safety symbols used in this Manual to indicate potential safety risks and important
safety instructions.
WARNING!
The warning symbol indicates important safety information that, if not followed properly,
could result in serious personal injury or even death.
RISK OF ELECTRIC SHOCK!
The electric shock hazard symbol indicates important safety information that, if not
followed, could result in electric shock.
SAFETY TIPS!
This symbol indicates important safety information that, if not followed, could result in
serious personal injury or even death.
HIGH TEMPERATURE!
This symbol indicates safety information that, if not strictly followed, could result in
burns.
WARNING!
When performing maintenance on the input and output of the inverter after disconnecting
it, wait at least 5 minutes for the inverter to discharge any remaining electrical charge.
2.2 Precautions for Operation
The XD5-12K series hybrid inverter has been designed and tested according to the applicable safety
regulations. This ensures the personal safety of the user. However, as an electrical equipment, the inverter could
cause electric shock or other injuries if not operated properly. Please operate the inverter in accordance with the
following requirements:
1. The wiring, installation and commissioning work should be carried out by professionals.
2. Be sure to read this Manual before operating the product. We shall not be held liable for any failure or loss
caused by improper operation.
3. Before starting the installation or maintenance work, please break the connections at the AC side, DC side

Three-phase Hybrid Solar Inverter Safety Precautions
3
and battery side, and then wait at least 5 minutes before proceeding to avoid electric shock.
4. When the inverter is running, the temperature of the housing is high. Do not touch it to avoid getting
burned.
5. All electrical installations must conform to local electrical standards. The inverter should be connected to
the power grid by professionals with the permission of the local power provider.
6. During the installation, insulated tools and personal protective equipment should be used to ensure
personal safety. To touch the electronic components of the inverter, please wear anti-static gloves, anti-static wrist
strap or anti-static clothing so as to protect the inverter against electrostatic discharge.
7. Please install the inverter at a position that is out of the reach of children.
8. Do not plug or remove the AC/DC terminal during normal operation of the inverter.
9. The actual DC input voltage should not exceed the maximum allowable DC input voltage of the inverter.
10. Select an appropriate battery that matches the system, and set the battery type correctly. If you select a
battery that does not match the hybrid inverter, the system cannot run.
11. If the battery has been completely discharged, please strictly follow the User Manual of the battery to
charge the battery.
12. For system maintenance service, please contact our local authorized service personnel or our after-sales
personnel.
13. The hybrid inverter system should be connected to the power grid only after getting permission.
14. Turn off the PV switch before installing a solar PV panel during the sunny daytime, or there could be a
serious risk of electric shock.
15. Do not connect a PV string to more than one inverter, as this could cause damage to the inverters.
16. Do not connect a device that relies on continuous and stable power supply (such as a life-sustaining
medical device), to the emergency power supply (EPS) port.

Three-phase Hybrid Solar Inverter Product Introduction
4
Chapter 3 Product Introduction
3.1 Intended User
The hybrid inverter in XD series should be installed only by trained professionals who are familiar with local
regulations, standards and electrical systems and have a good knowledge of this product.
It is highly recommended that the installer read this Manual carefully, so as to learn about product installation,
troubleshooting and communication networking.
3.2 Product Overview
The inverter in XD series is intended to store the energy generated in the PV system or provided by the public
power grid into the battery, and also output energy to the power grid. In the case of electric power failure, the
hybrid inverter can provide energy to the load as a backup power supply.
This Manual applies to the following hybrid inverter models:
XD5KTR\XD6KTR\XD8KTR\XD10KTR\XD12KTR
Overview:

Three-phase Hybrid Solar Inverter Product Introduction
5
No.
Description
No.
Description
1
PV Input DC Switch
2
PV Input Terminal
3
Battery Terminal
4
RJ45 interface of DRMs (For
Australia)
5
USB Port (Software Upgrade)
6
Dry Contact & NTC
7
BMS Lithium Battery
Communication
8
CAN1 (Parallel Communication)
9
CAN2 (Parallel Communication)
10
Battery Cold Start Switch
11
COM-1 (RS485 / Wi-Fi / GPRS
communication)
12
COM-2 (smart meter RS485
communication)
13
Breather Valve
14
Grid Terminal
15
EPS Output Terminal
16
LCD Screen
17
Function Keys
18
LED Indicator Light
19
PE Grounding Point

Three-phase Hybrid Solar Inverter Product Introduction
6
3.3 Safety Instructions
1. Be sure to read this Manual before operating the product. We shall not be held liable for any failure or loss
caused by improper operation.
2. Select an appropriate battery that matches the system, and set the battery type correctly. If you select a
battery that does not match the hybrid inverter, the system cannot run.
3. If the battery has been completely discharged, please strictly follow the User Manual of the battery to
charge the battery.
4. The wiring, installation and commissioning work should be carried out by professionals.
5. During the installation, insulated tools and personal protective equipment should be used to ensure
personal safety. To touch the electronic components of the inverter, please wear anti-static gloves, anti-static wrist
strap or anti-static clothing so as to protect the inverter against electrostatic discharge.
6. All electrical connections must comply with the safety regulations of the local power provider.
7. For system maintenance service, please contact our local authorized service personnel or our after-sales
personnel.
8. The hybrid inverter system should be connected to the power grid only after getting permission.
9. Turn off the PV switch before installing a solar PV panel during the sunny daytime, or there could be a
serious risk of electric shock.
10. Do not connect a PV string to more than one inverter, as this could cause damage to the inverters.

Three-phase Hybrid Solar Inverter Product Introduction
7
3.4 Schematic Diagram of the Basic System
As shown in the diagram above, a complete hybrid inverter system in XD series consists mainly of the solar
PV panels, hybrid inverter, battery, and power grid.
Note: The battery is an integral part of the hybrid inverter system. Please keep the installation environment
well-ventilated and take necessary measures to control the ambient temperature, so as to prevent the risk of
explosion caused by high temperature.
Battery characteristics:
Ingress protection: ≥IP65; pollution degree: PD2; indoor temperature: 0℃~40℃; RH: 5%~85%
3.5 Product Features
1. Intelligent management system and multiple working modes, meeting different customer needs.
2. Allowing you to set the priority of grid connection, battery type and other inverter information on the
LCD screen.
3. Dual MPPT, supporting 20A high current input, flexible module configuration.
4. Supporting 50A battery charge and discharge capability.

Three-phase Hybrid Solar Inverter Product Introduction
8
5. Ultra-wide battery voltage range of 120-600V, with good adaptability with batteries.
6. All-in-one design, providing backup power and peak-shaving function.
7. With a battery safety management system, supporting remote upgrade of BMS system.
8. Supporting anti-reflux prevention.
9. Supporting over-temperature / over-current / short-circuit protection, ensuring safe, stable and reliable
operation of the system.
10. Providing a variety of user-friendly communication modules (RS485, GPRS, Wi-Fi), supporting
monitoring and remote operations through computer, mobile phone or Internet.
11. Supporting parallel configuration of a maximum of six inverters.
12. Supporting 100% unbalanced load.
13. UPS-level uninterrupted switching capability (<10ms).
14. A maximum conversion efficiency of up to 98.4%.
15. IP66 rating, low weight, small size, easy installation.

Three-phase Hybrid Solar Inverter Installation
9
Chapter 4 Installation
4.1 Unpacking Inspection
The inverter has been fully tested and strictly inspected before delivery, but damage may still occur during
transportation. Before unpacking, carefully check whether the product information indicated on the carton is
consistent with that indicated in the Purchase Order, and whether the product package is in good condition. If any
damage is detected, contact the carrier or your dealer and provide photos of the damaged area, so as to receive the
fastest and best service.
To keep the inverter idle for a long time, please place it in the original carton and protect it against moisture
and dust.
After taking the inverter out of the carton, please check the following:
(1) Whether the inverter remains in good condition;
(2) Whether you have received the User Manual and all of the connection parts and mounting parts;
(3) Whether the items you have received are free from damage and shortage;
(4) Whether the product information indicated in the nameplate on the inverter is consistent with that
indicated in the Purchase Order;
(5) Check with the List of Standard Deliverables below.
Standard deliverables for the hybrid inverter:
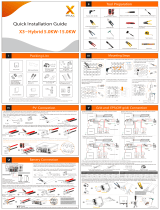
Fig. 4.1 Deliverables for Hybrid Inverter XD5~12KTR

Three-phase Hybrid Solar Inverter Installation
10
Table 4-1 List of Deliverables for Hybrid Inverter
No.
Name
Quantity
1
Inverter
1
2
Wall-mounting Bracket
1
3
AC Connector (pcs)
2
4
Waterproof Junction Box
1
5
RS485 Communication Cable
2
6
DC Connector (pair)
2
7
Accompanying Documents (set)
1
8
M6*50 Expansion Bolts
3
9
M6×16 Bolt Assemblies
3
10
M4×12 Bolt Assemblies
6
11
M6 Flange Nuts
3
12
M6 Stainless Steel Flat Washers
3
Please check the above items carefully, and contact your dealer immediately if you have any questions.
4.2 Before Installation
4.2.1 Installation Tools
Table 4-2 List of Installation Tools
No.
Installation Tools
Description
1
Marker
Mark mounting holes
2
Electric Drill
Drill holes in the mounting bracket or wall
3
Hammer
Drive expansion bolts
4
Adjustable Wrench
Fix the mounting bracket
5
Screwdriver
Fix the inverter and tighten the junction box
6
Slotted Screwdriver or Phillips
Screwdriver
For AC wiring use
7
Megger
Measure the insulation performance and
resistance to ground
8
Multimeter
Test circuits and measure AC/DC voltage
9
Electric Soldering Iron
Weld the communication cable
10
Wire Crimper
Crimp the DC terminal
11
Hydraulic Crimper
Crimp the AC O-terminal

Three-phase Hybrid Solar Inverter Installation
11
4.2.2 Installation Conditions
(1) The inverter can be installed in an indoor or outdoor environment.
(2) During operation of the inverter, the housing and heat sinks will heat up. Do not install the inverter
where it can be accessed easily.
(3) Do not install the inverter in an area where flammable or explosive materials are stored.
(4) Install the inverter in a well-ventilated environment, so as to facilitate heat dissipation.
(5) It is recommended to choose an installation position with shade, or build a sunshade.
Fig. 4.2 Sunshade
(6) The ambient temperature should be between -25℃~60℃.
(7) Install the inverter away from electronic devices with strong electromagnetic interference.
(8) The product should be installed on a fixed and solid object surface, such as a wall or metal bracket.
(9) The installation position must provide reliable grounding for the inverter, and the grounding metal
conductor must be made of the same material as the reserved grounding metal conductor of the inverter.
4.3 Space Requirements
(1) Install the inverter at such a height that allows the operator to observe the LCD indicator lights of the
inverter easily.

Three-phase Hybrid Solar Inverter Installation
12
Fig. 4.3 Best Mounting Height
(2) Leave adequate space around the inverter to facilitate air circulation and future handling of the
inverter. See Fig. 4.4.
Fig. 4.4 Installation Spacing of Inverter
(3) To install more than one inverter, please keep a certain distance between the inverters and at the
top/bottom of the inverters (see Fig. 4.5), so as to facilitate heat dissipation.
Fig. 4.5 Installation Dimension of Side-by-side Inverters
(4) The mounting surface should be upright (see Fig. 4.6). Install the inverter vertically or at a backward
tilt of ≤15° so as to facilitate heat dissipation. Forward tilt, horizontal installation, upside-down installation,
backward tilt of >15° and sideways tilt are not allowed.

Three-phase Hybrid Solar Inverter Installation
13
Fig. 4.6 Installation Location of Inverter
4.4 Dimension of Mounting Bracket
Fig. 4.7 Dimension of Mounting Bracket
4.5 Product Dimension and Weight
Fig. 4.8 Overall Dimension of Inverter
Dimension and net weight of Hybrid Inverter:
Model No.
Height (H)
(mm)
Width (W)
(mm)
Depth (D)
(mm)
Net Weight
(kg)
XD5-12KTR
440
524
220
24
Hole 8*12

Three-phase Hybrid Solar Inverter Installation
14
4.6 Wall Mounting
Step 1: The thickness of the wall for wall-mounted installation should be greater than or equal to 60mm.
Using a marker and a spirit level, mark the points where you need to drill the holes.
Step 2: Drill the holes (diameter: φ8; depth: ≥55mm) using a hammer drill, and then install M6×50
stainless-steel expansion bolts.
Step 3: Fix the mounting bracket. Clean the holes, drive expansion bolts into the holes using a rubber hammer.
Tighten the nut to fix the tail of the bolt using a wrench, and then remove the nut, spring washer and flat washer.
Fix the wall mount bracket to the wall with the nuts using a tightening torque of 5N•m.

Three-phase Hybrid Solar Inverter Installation
15
4.7 Installation of Inverter
Step 1: Take the inverter out of the carton.
Step 2: If the installation position is high, you can lift up the inverter to install it to the mounting bracket. Use
a hoisting device to lift the inverter off the ground by 100mm, then pause and check the fastening of the lifting ring
and ropes. After confirming the inverter is fastened reliably, continue to lift it to its destination.
Step 3: Snap the bayonets of the inverter into the mounting bracket, and then press the inverter down to
ensure that its radiator groove fits well with the mounting bracket.
Step 4: Tighten M6×16 screws into the left and right holes of the radiator with a torque of 5 N•m so as to fix
the inverter onto the mounting bracket.

Three-phase Hybrid Solar Inverter Electrical Connection
16
Chapter 5 Electrical Connection
5.1 Electrical Connection Overview
This product supports the following power grid systems.
Note: if the power grid system contains a N wire, the neutral to ground voltage should be lower than 10V.
NOTE
The connection modes between the N wire and PE wire at the GRID port and EPS port of the inverter
may vary in different regions. Please consult your local regulatory requirements.
The GRID port and EPS AC port of the inverter have built-in relays. When the inverter works in
off-grid state, the built-in GRID relay will be open; when the inverter works in on-grid state, the
built-in GRID relay will be closed.
When the inverter is powered on, the EPS AC port will be charged; if you need to perform
maintenance of the EPS load, please power off the inverter first in order to avoid electric shock.
NOTE
The following wiring method is applicable for Australia, New Zealand and South Africa.
Inverter
Inverter
Inverter
Inverter

Three-phase Hybrid Solar Inverter Electrical Connection
17
NOTE
Make sure the BACK-UP grounding wire is properly connected and secured; otherwise, the
BACK-UP function may fail in the case of power grid failure.
The following wiring method is applicable for regions other than Australia, New Zealand and South
Africa.
/