Page is loading ...

NB7 Series
User Guide

NB7 Series User Guide YML901 Rev1
2 www.netcomm.com.au
Contents
About the Router ................................................................................................................................................................5
Requirements .........................................................................................................................................................................................6
Package Contents ..................................................................................................................................................................................6
Device Design
Front .............................................................................................................................................................................................7
Back .............................................................................................................................................................................................8
Getting Started ................................................................................................................................................................10
Planning Your Network ..........................................................................................................................................................................10
Configuring TCP/IP Settings ...................................................................................................................................................................11
Setup the Device ..................................................................................................................................................................................12
Connecting to the Internet .....................................................................................................................................................................13
Connecting Via Quick Setup ..........................................................................................................................................................13
Connecting Wireless Devices ........................................................................................................................................................14
Web User Interface ...............................................................................................................................................................................15
Accessing the Web User Interface .................................................................................................................................................15
Menus .........................................................................................................................................................................................15
Device Info .......................................................................................................................................................................17
Device Info > Summary ........................................................................................................................................................................17
Device Info > WAN ...............................................................................................................................................................................17
Device Info > Statistics .........................................................................................................................................................................18
Device Info > Statistics > LAN ......................................................................................................................................................18
Device Info > Statistics > WAN .....................................................................................................................................................18
Device Info > Statistics > ATM ......................................................................................................................................................19
Device Info > Statistics > ADSL ....................................................................................................................................................19
Device Info > Route ..............................................................................................................................................................................20
Device Info > ARP ................................................................................................................................................................................20
Device Info > DHCP ..............................................................................................................................................................................20
Quick Setup .....................................................................................................................................................................22
Advanced Setup ...............................................................................................................................................................25
Advanced Setup > WAN ........................................................................................................................................................................26
Advanced Setup > LAN .........................................................................................................................................................................28
Advanced Setup > NAT .........................................................................................................................................................................28
Advanced Setup > NAT > Virtual Servers .......................................................................................................................................29
Advanced Setup > NAT > Port Triggering ......................................................................................................................................29
Advanced Setup > NAT > DMZ Host .............................................................................................................................................29
Advanced Setup > NAT > ALG ......................................................................................................................................................29
Advanced Setup > Security ...................................................................................................................................................................29
Advanced Setup > Security > IP Filtering.......................................................................................................................................30
Outgoing IP Filtering.............................................................................................................................................................30
Incoming IP Filtering ............................................................................................................................................................32
Advanced Setup > Security > Parental Control ..............................................................................................................................32

YML901 Rev1 NB7 Series User GuideNB7 Series User Guide
www.netcomm.com.au 3
NB7 Series
Advanced Setup > Quality of Service .....................................................................................................................................................33
Advanced Setup > Quality of Service > Queue Configuration ..........................................................................................................33
Advanced Setup > Quality of Service > QoS Classification ..............................................................................................................34
Advanced Setup > Routing....................................................................................................................................................................35
Advanced Setup > Routing > Default Gateway ...............................................................................................................................35
Advanced Setup > Routing > Static Route .....................................................................................................................................35
Advanced Setup > Routing > RIP ..................................................................................................................................................35
Advanced Setup > DNS ........................................................................................................................................................................36
Advanced Setup > DNS > DNS Server ..........................................................................................................................................36
Advanced Setup > DNS > Dynamic DNS .......................................................................................................................................36
Using DynDNS.org ...............................................................................................................................................................37
Using TZO ...........................................................................................................................................................................37
Advanced Setup > DSL .........................................................................................................................................................................38
Advanced Setup > Port Mapping ...........................................................................................................................................................38
Wireless (NB7Plus4W only) ..............................................................................................................................................40
Wireless > Basic ..................................................................................................................................................................................41
Wireless > Security ..............................................................................................................................................................................41
Wireless > MAC Filter ...........................................................................................................................................................................42
Wireless > Wireless Bridge ...................................................................................................................................................................42
Wireless > Advanced ............................................................................................................................................................................43
Wireless > Station Info..........................................................................................................................................................................43
Diagnostics ......................................................................................................................................................................45
Management ....................................................................................................................................................................47
Management > Settings .......................................................................................................................................................................47
Management > Settings > Backup ...............................................................................................................................................48
Management > Settings > Update ................................................................................................................................................48
Management > Settings > Restore Default ....................................................................................................................................48
Management > System Log ..................................................................................................................................................................49
Management > TR-069 Client (NB7Plus4W only) ...................................................................................................................................49
Management > Internet Time ................................................................................................................................................................50
Management > Access Control .............................................................................................................................................................51
Management > Access Control > Services ....................................................................................................................................51
Management > Access Control > IP Addresses..............................................................................................................................51
Management > Access Control > Passwords .................................................................................................................................52
Management > Update Software ...........................................................................................................................................................53
Management > Save/Reboot .................................................................................................................................................................53
Safety Precautions ................................................................................................................................................................................53
Appendix
How to change the security on the NB7Plus4W ......................................................................................................................................55
WEP encryption ...........................................................................................................................................................................56
WPA2 encryption .........................................................................................................................................................................56
How to Bridge my NB7 Series Modem....................................................................................................................................................57

About the Router

YML901 Rev1 NB7 Series User GuideNB7 Series User Guide
www.netcomm.com.au 5
NB7 Series
About the Router
Your router offers an easy way of integrating your computer and other network devices into a single network. Here
are some of the benefits you can obtain from using the router in your home or office:
Integrated Modem Feature: Your router is an ideal solution for high speed Internet connectivity. It is capable of
handling the fastest data transfer speed from your Internet provider and sharing this within your local network devices.
Strong Security: Your router utilizes built-in firewall security to block service attacks. For added flexibility, it can
be modified to allow specific applications to pass through while blocking intrusive threats at the same time.
Intuitive User Interface: Applying changes on the router settings can be done easily using a Web browser. The
router uses a simplified user interface that allows you to apply the configurations you want for the various features
of the router.
Your router will serve as the central figure in establishing your local area network (LAN) by using a combination of
hardware and software. The hardware includes the cables, wireless access points, and Ethernet ports that create
the path to connect your devices. The software part includes the applications that manage the flow of information
in these devices.
You can complete the basic installation and Internet connection within 8 minutes. Some more time is needed if you
intend to utilize more advanced functions but it can be worth it. Advanced features like port forwarding will help
you create your own web server to store your Web site, Dynamic DNS allows you to access your network from the
Internet, and remote access enables you to configure your router settings from different locations.
Once installation is complete, it will be much easier for you to enjoy voice communication, high speed Internet, and
data/audio/video sharing within your network.

NB7 Series User Guide YML901 Rev1
6 www.netcomm.com.au
Requirements
Your computer must meet the following minimum requirements.
• Any operating system can be used
• Internet Explorer 6.0 or Firefox 2.0
• Ethernet network adapter
• An active DSL Internet account
Package Contents
Package contents are listed below. For any missing items, please contact your dealer immediately. Product contents
vary for different models.
• Router
• Ethernet cable
• Telephone cable
• 12V 1A DC Power Adapter
• Easy Start Guide

YML901 Rev1 NB7 Series User GuideNB7 Series User Guide
www.netcomm.com.au 7
NB7 Series
Device Design – Front
Label Action Description
POWER
Off No power is supplied to the device
Steady light Connected to an AC power supply
ETHERNET 1-4
Off No Ethernet connection
Steady light Connected to an Ethernet port
Blinking light Transmitting/Receiving data
Wireless
Off Access point is disabled
Steady light Access point is enabled
Blinking light Transmitting/Receiving data
DSL
Off No DSL signal
Blinking light Establishing DSL signal
Steady light DSL signal is established
INTERNET
Off No Internet connection
Green light Connected to the Internet
Green Blinking light Transmitting/Receiving data
Red Blinking light Cannot establish Internet connection

NB7 Series User Guide YML901 Rev1
8 www.netcomm.com.au
Device Design – Back
Label Description
DSL
Connecting the telephone cable
ETHERNET 1-4
Connecting with computers/devices through Ethernet cable
RESET
Resetting the device. Press for 10 seconds to reset.
POWER (12V 1A DC)
Connecting with the 12V 1A DC power adapter
ON/OFF
Switching the device on/off
Antenna
Sending/receiving wireless signals

Getting Started

NB7 Series User Guide YML901 Rev1
10 www.netcomm.com.au
Getting Started
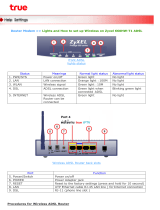
Setting up the device is easy. The diagram below provides an outline of the steps needed to complete the
installation. Brief descriptions appear beside each step. Detailed instructions are provided in the subsequent pages.
Setup the Device
When installing the router, find an area where there are enough electrical outlets for the router, the main computer,
and your other computer devices.
To setup the router:
1. Plug one end of the Ethernet cable from the router’s ETHERNET port and then plug the other end into the
Ethernet port in your computer.
2. If you have another device you need to connect to the router, use another Ethernet cable. Plug one end
of the Ethernet cable from the computer’s Ethernet port and then plug the other end into an available
Ethernet port in the router.
3. Plug one end of the telephone cable from the ADSL Filter’s ADSL port and then plug the other end into
the router’s DSL port. (see Do I need a Microfilter on page 12)
4. Connect the power adapter from the router’s 12V 1A DC port into the electrical outlet.
5. Push the power button into the on position.

YML901 Rev1 NB7 Series User GuideNB7 Series User Guide
www.netcomm.com.au 11
NB7 Series
To LINE/DSL port
Telephone
Wall Socket
Wireless
Broadband Modem
Splitter with
Microfilter
Home
Telephone
Internet
To 12V DC
POWER port
Computer with
Ethernet Card
To ETHERNET port
(1, 2, 3, 4 on
Plus4 models)

NB7 Series User Guide YML901 Rev1
12 www.netcomm.com.au
Do I need a Microfilter?
An ADSL Microfilter filters out ADSL signals to allow ADSL and regular Voice Calls to share a single telephone line.
Any equipment sharing your ADSL telephone line, other than an ADSL modem must be connected to a telephone
jackpoint via a microfilter. Examples of such non-ADSL equipment that MUST connect through a microfilter are :
• Telephone Handset
• Fax Machine
• Foxtel digital set
• Back to base alarm
• Modem (non adsl)
• Caller display unit
• Other devices that have an integral modem
Failure to connect ALL non-ADSL equipment via a microfilter may result in loss of the data link whenever a call is
made or answered. In many cases the link will also be lost when a call is received even if it is not answered.
NetComm Recommends our EM1550 ADSL2+ Microfilter to get the most out of your ADSL2+ connection
How do I connect a Microfilter?

YML901 Rev1 NB7 Series User GuideNB7 Series User Guide
www.netcomm.com.au 13
NB7 Series
If you are connecting the modem to a wall socket where there is already a phone, you will need to use an ADSL
Microfilter. Connect the Modem and Phone into the Microfilter as shown bellow. All other phones will need a
Microfilter attached between the phone and the wall socket.
Microfilter
Telephone
Telephone
Wall Socket
ADSL Jack
Phone Jack
Microfilter
Telephone
Telephone
Wall Socket
Phone Jack
Telephone
Wall Socket
Modem Router
Modem Router
If you are connecting the modem to one phone socket and the telephone to another socket. You will not need a
Microfilter for the modem but you will need one for ALL the telephone sockets.
Microfilter
Telephone
Telephone
Wall Socket
ADSL Jack
Phone Jack
Microfilter
Telephone
Telephone
Wall Socket
Phone Jack
Telephone
Wall Socket
Modem Router
Modem Router

NB7 Series User Guide YML901 Rev1
14 www.netcomm.com.au
Web User Interface
The Web Interface is used to configure the router settings.
Accessing the Web User Interface
To access the Web User Interface:
1. Open your browser.
2. Enter 192.168.1.1 and then press Enter.
3. Enter the User name and Password, and then click OK. The default User name and Password is admin.

YML901 Rev1 NB7 Series User GuideNB7 Series User Guide
www.netcomm.com.au 15
NB7 Series
Menus
The Web User Interface includes the following menus:
• Device Info
• Quick Setup
• Advanced Setup
• Wireless
• Diagnostics
• Management

Device Info

YML901 Rev1 NB7 Series User GuideNB7 Series User Guide
www.netcomm.com.au 17
NB7 Series
Device Info
Device Info > Summary
Summary provides an overview of the operating parameters used in your device.
To view Summary:
1. Select Device Info.
2. Click Summary.
Device Info > WAN
WAN displays a summary of the WAN connection settings.
To view WAN:
1. Select Device Info.
2. Click WAN.

NB7 Series User Guide YML901 Rev1
18 www.netcomm.com.au
Device Info > Statistics
Statistical information is provided and displayed by LAN, WAN, ATM, and ADSL.
Device Info > Statistics > LAN
LAN displays a statistical summary of the data transaction for each interface.
To view LAN statistics:
1. Select Device Info.
2. Click Statistics > LAN.
Device Info > Statistics > WAN
WAN displays a statistical summary of the data transaction for each connection.
To view LAN statistics:
1. Select Device Info.
2. Click Statistics > WAN.

YML901 Rev1 NB7 Series User GuideNB7 Series User Guide
www.netcomm.com.au 19
NB7 Series
Device Info > Statistics > ATM
Asynchronous Transfer Mode (ATM) displays a statistical summary of the data transaction for the ATM interface.
To view ATM statistics:
1. Select Device Info.
2. Click Statistics > ATM.
Device Info > Statistics > ADSL
ADSL displays a statistical summary of the ADSL connection.
To view ADSL statistics:
1. Select Device Info.
2. Click Statistics > ADSL.

NB7 Series User Guide YML901 Rev1
20 www.netcomm.com.au
Device Info > Route
Route displays the routing rules implemented in the router.
To view Route:
1. Select Device Info.
2. Click Router.
Device Info > ARP
Address Resolution Protocol (ARP) displays the HW address of each IP device.
To view ARP:
1. Select Device Info.
2. Click ARP.
Device Info > DHCP
DHCP displays all the DHCP clients connected to the router.
To view DHCP:
1. Select Device Info.
2. Click DHCP.
/