Home Decorators Collection EN000166-BBO Installation guide

Type
Installation guide
Closet System Installation Manual
CUSTOM ASSEMBLED CLOSETS
SHIPS IN 7-10 DAYS
STEP 3
tools &
materials
required
wall prep
Tape measure
Pencil
Level
Stud Finder
Hammer
Screw Driver
#
2 Flat Head and
#
2 Phillips
#10 x 3" Pan Head Screws
#8 x 1¼" Pan Head Screws
Cordless Drill – to pre-drill cabinets and mount
to wall and to each other
3
/
16",
3
/
32" Drill bits
Hacksaw – to cut 48" Closet Rods to size if needed
Circular Saw – to cut 48" Furniture shelves to size
if needed
1. Before you begin, make sure that your wall is smooth and plumb – remove any obstructions such as old closet
organizers, cabinets or baseboards that may interfere with the installation.
2. By using your tape measure and level mark the locations of your base cabinets on the wall - Note the type of
closet doors you have and plan accordingly, so that cabinet doors and drawers will open fully without obstruction!
3. Use your stud nder to locate the studs in your wall – mark either side of the stud and the center point, to show
where you need to hit with your installation screws. If necessary adjust the location of you cabinets slightly to
enable you to hit the required studs easily – adjust all your cabinet location marks.
INSTALLATION STEPS FOR WALLS WITH WOOD STUDS
STEP 3ASTEP 2A
Thank you for choosing Home Decorators Collection Closets for your all your needs.
Home Decorators Collection Closets come fully assembled to make your project an enjoyable and satisfying experience. With
quality Home Decorators Collection Closets, your satisfaction is guaranteed.
If individual shelves and/or closet rods are part of your design and order, you may need to cut them to the proper width.
Instructions for how to do that are included.
Before you begin, please read this manual completely so that that you will have a good understanding of the sequence
of events.
Please follow all the safety instructions for tools and procedures.
Once again, thank you for choosing Home Decorators Collection Closets.
Note: Attachment to any
other surface material such
as metal studs, concrete
block, brick, stucco or poured
concrete require special
fasteners. Consult with your
local home center, hardware
store or installation specialist
for recommended fasteners.
Got questions?
Call Customer Service at 1-866-373-9131
or email us at:
3
42 in. Base
cabinet
installation
4. Before you start, make installation easier, remove all doors and drawers from the cabinets to be
installed. If you’ve purchased base cabinets with legs, attach them before you start your installation.
(See page 7.)
5. Measure the distance from the outer edge of the rst base cabinet to the center of the studs you wish to
attach to.
6. Transfer these measurements to the horizontal installation rail, along the back of the base cabinet.
7. Once you place the base cabinet and level, drill pilot holes thru the horizontal installation rail with a 3/32" drill bit.
NOTE: If you can only hit one stud, use a drywall toggle bolt to create a second attachment point (consult your local
hardware store for the correct toggle for your wall construction).
**BASE CABINET MUST HAVE TWO ATTACHMENT POINTS!
STEP 6STEP 5
STEP 7A STEP 7B
42 in. Base
cabinet
installation
continued
8. Attach the base cabinet thru the drywall and into the studs using
#
10 x 3" pan head screws. Check to see that
it’s level and shim if it’s necessary.
(DO NOT FULLY TIGHTEN! Double check for shim and level and adjust if needed).
9. Now drill (2) attachment holes in both the front and back horizontal I-beams using a 3/32" drill bit.
STEP 8A STEP 8B STEP 9
5
42 in. Wall
cabinet
installation
1. Place the upper cabinet on the lower cabinet and mark the sides and top of the upper wall cabinet on the drywall,
remove the wall cabinet.
2. On the wall locate the studs and mark the center of each stud approximately 3" from the top and bottom of the
wall cabinet.
3. Transfer these measurements to the two horizontal installation rails, along the back of the wall cabinet at top
and bottom.
4. Drill (4) mounting holes thru the installation rails top and bottom of wall cabinet with a 3/32" drill bit.
STEP 5 STEP 6 STEP 7
STEP 2 STEP 4
NOTE: If you can only nd one stud,
use a drywall toggle bolt to create a
second attachment point. (Consult
your local hardware store for the
correct toggle for your wall construc-
tion).
**WALL CABINET MUST HAVE
FOUR ATTACHMENT POINTS!
5. Now place the wall cabinet on top of the base cabinet and align and make sure it’s level – hold in place with “Quick
Grips” or G-clamps.
6. Attach base cabinet to wall cabinet using #8 x 1¼" pan head screws.
7. Attach the wall cabinet thru the drywall and into the wood studs using
#
10 x 3" pan head screws or install drywall
toggle bolt if necessary - DO NOT FULLY TIGHTEN! Check the level and adjust as needed. Once you are happy with
the alignment and level of the two cabinets, fully tighten all the attachment screws.
Hanging wall
cabinet
installation
Tall, medium and short Hanging cabinets with rods and the double hanging cabinet with 2 rods are wall cabinets that
attach only to the wall and do not have a base cabinet located below them for attachment. These cabinets are hung at
the same hieght as the 42" wall cabinets or 72" wall cabinets in your conguration.
1. Mark a line at the same height as the 42" wall cabinets in your conguration. This will be approximately 84" off the
oor. If your conguration involves 72" wall cabinets make your line at the 84" height mark which will be the same
for the 72" wall cabinets.
2. On the wall, locate the studs and mark the center of each stud approximately 3" from the top of the line drawn in
step 1.
3. Measure the distance from the outer edge of the Hanging wall cabinet to the center of the studs you plan to
attach to.
4. Transfer this measurement to the horizontal installation rail along the back of the cabinet.
5. Drill (4) mounting holes thru each installation rail where the studs marks are with a 3/32" drill bit.
NOTE: If you can only hit one stud, use a drywall toggle bolt to create a second attachment point (consult your
local hardware store for the correct toggle for your wall construction. HANGING CABINETS MUST HAVE TWO
ATTACHMENT POINTS!
6. Attach the wall cabinet thru the drywall and into the wood studs using #10 x 3" pan head screws or install drywall
toggle bolts if necessary.
STEP 1-2 STEP 4-5 STEP 6
15" - 36"
19"
15"
15" - 36"
46"
15"
15" - 36"
34"
15"
15" - 36"
46"
15"
7
72 in. Wall
cabinet
installation
72" Cabinets are intended to attach to and hang from the wall only. The Cabinets have 3 attachment points: top, middle
& bottom to ensure a rm attachment. Follow these instructions to mount these larger cabinets to your wall.
1. Before you begin, make sure that your wall is smooth and plumb – remove any obstructions such as old closet
organizers or cabinets that may interfere with the installation.
2. By using your tape measure and level mark the locations of your cabinets on the wall – Note the type of closet
doors you have and plan accordingly, so that cabinet doors and drawers will open fully without obstruction!
3. Use your stud nder to locate the studs in your wall – mark either side of the stud and the center point, to show
where you need to hit with your installation screws. If necessary adjust the location of your cabinets slightly to
enable you to hit the required studs easily – adjust all your cabinet location marks.
4. Transfer these measurements to the three horizontal installation rails, along the back of the wall cabinet at top,
middle and bottom.
5. Drill (2) mounting holes thru each installation rail where the studs marks are with a 3/32" drill bit.
6. Next attach 1 x 2 furring strips directly below the “wall cabinet bottom level line” to the studs with wood screws
(ILLUSTRATION A). These temporary support strips will help to support the weight of the cabinets during
installation, and insure that the cabinets are level. You are now ready to begin the cabinetry installation and
it is recommended that you remove all doors, drawers and shelves from each cabinet prior to installing to
prevent damage.
7. Refer to your design layout to determine the location of the rst cabinet. Raise cabinet into place resting on the
furring strip and fasten the cabinet to the studs with #10 x 2½" pan head screws but do not fully tighten.
ILLUSTRATION A
Furring Strip
8. Determine the next wall cabinet to be installed and repeat the steps above but again do not fully tighten. If this
cabinet is adjacent to the rst cabinet carefully align the face frames of each cabinet and “C” clamp or “Quick-
grip” them together. Gang the cabinets together by drilling pilot holes and uses appropriate screws to secure them
together.
9. Once all your cabinets are in place tighten all the screws to lock the cabinets into place. Remove the furring strip
which is no longer needed to hold up the cabinets.
The shelf corner connector allows 2 shelves to be joined together to create a 90° corner condition.
Each corner condition requires a connector, 2 shelves, 2 installation rails to attach to the cabinets and either a 3rd
installation rail or closet panel (TCP84) which will be attached to the wall.
Multiple shelf levels will require duplicating the items above each level
except if a closet panel is used.
1. Install the closet panel or the installation rail to the wall.
2. Install installation rails on the cabinet sides at the desired shelf
height. Make sure the rail height matches the height of the rail in
step 1 or matches the pin hole locations in the closet panel.
3. Place the shelf A on the installation rails or pins if closet panel is
used.
4. Attach the corner connector to the front edge of Shelf A.
5. Place the side edge of Shelf B into the corner connector
and set otherend on the installation rail attached to
the cabinet.
72 in. Wall
cabinet
installation
continued
Shelf corner
connector
installation
9
Closet rail
and rod
installation
1. Closet rails can be mounted to the outside of the cabinets, or directly to the drywall of the closet space.
The Closet Rod Installation Rails have two specic purposes:
a. They are pre-drilled to accept the Closet Rod Brackets which hold the closet rod in place
b. They can also support a ¾" thick shelf above the closet rod
2. Decide on the location of your closet rods and Closet Rod Installation Rails – if you want a ¾" top shelf to align
with the top of the wall cabinet, set the Closet Rod Installation Rail ¾" down from the top edge of the wall cabinet
(as shown).
3. Use a level to mark a line where the top edge of the Closet Rod Installation Rail will be located.
4. Pre-drill two holes thru the side of the adjacent cabinet to attach the Closet Rod installation Rail.
5. With the pre-drilled holes through the cabinet, attach the Closet Rod Installation Rail using (2)
#
8 x 1¼"
pan head screws.
6. Alternatively, mark the location of the installation rail on the side drywall of the closet space and drill two
attachment holes thru the installation rail using 3/32" drill bit.
7. Place the installation rail on the drywall and mark the attachment points on the wall.
8. Screw the installation rails in place using a suitable drywall fastener.
9. Once the Closet Rod Installation Rails are installed, you can attach the Closet Rod Brackets.
10. Now measure and cut the closet rod to t the cups.
STEP 3-4 STEP 6-8 STEP 10
Determine next base cabinet to be installed and repeat measuring, pre-drilling and installation, but again DO NOT
FULLY TIGHTEN. Carefully align the face frames of each cabinet with each other and “G-clamp” together. Drill a
3/32" pilot hole in three places along hinge side of frame and secure with #8 x 1¼" drywall screws.
Tw o
cabinet
installation
Cabinet with
legs installation
STEP 1
STEP 2 STEP 3
Lay cabinet on it’s side and mount the
four adjustable legs to the underside
of the cabinet. Position a leg in each
corner and make sure the attachment
plate overlays the cabinet side panels
as shown.
Before standing cabinet upright,
twist adjustment glide to fully extend
the glide or extend it to the desired
approximate height.
Complete nal adjustments to height
of cabinet by turning glide to lower to
desired height.
11
Accessories such as valet rods, tie racks, belt racks and slide-out mirrors can be installed either on the interior side
wall of a cabinet or the exterior of the cabinet. Each item as it’s own installation instruction sheet that comes with the
unit. In general:
1. Installation to interior of cabinet
a. Each accessory is designed to attach using the pre-drilled holes that have been created in the side walls of
the cabinet.
b. Each accessory will have 1 or 2 rails (mirror has 2) that attach to the side wall using the screws that come with
the accessory.
c. For all units, except the mirror, you may choose the height that you wish to install the accessory at.
d. The mirror utilizes most of the side of a 42" high cabinet. It can be installed in a 42" hanging cabinet below
the hanging bar.
2. Installation on exterior of cabinet
a. The placement of an accessory on the exterior of a cabinet is completely up to the user. There are no pre-
drilled holes on the exterior.
b. Locate the accessory at the desired height.
c. Mark the attachment holes based on where the accessory rail(s) are placed.
d. Drill pilot holes into the cabinet side.
e. Attach the accessory using the screws provided in the accessory kit.
The 48" x 48" decorative panel is designed to provide a nished look for areas behind hanging clothing or areas wehre
shelving is going to be installed but not a cabinet. To install a decorative panel:
1. If needed, cut the panel to the correct size to t between two cabinets or a cabinet wall.
2. Choose between two methods of attachment:
a. Use a caulking adhesive to glue the panel to the wall.
b. Use screws to mechanically attach the panel to the wall.
SUGGESTION: Use inside corner molding to decoratively cover up the seam where the panel meetsthe wall.
See Spec Guide for details.
Accessories
installation
Decorative
back panel
installation
48"
48"
1/4"
HEIGHT SIDE TO SIDE DEPTH
Adjusting
doors
Attaching
decorative
hardware
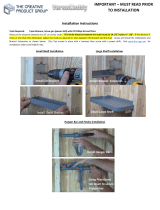
To insure a perfect spacing and alignment
of your doors after installation, Technik
Closets hinges are six-way adjustable.
The decoration hardware you select may vary in size. Do not drill holes until you have determined the dimensions match the
decorative hardware you have selected. Make sure that you or your contractor adjust the alignment of all doors and drawer
fronts prior to drilling them for pulls or knobs - once the decorative hardware is installed it will be difcult to adjust the doors and
drawer fronts.
1. Clamp a piece of wood to the front side of the door or drawer front, at handle location.
2. From the inside of the door use a
3
/
16" drill bit and be sure to drill completely through the door or drawer front into
the block this allow for a clear hole. Push the bolt through the hole and apply the hardware. Tighten from the inside
of the door or the drawer with a screwdriver.
We hope your Home Decorators Collection Closet project has been a pleasant and rewarding experience.
Loosen center screw on each hinge.
Move door to desired position. Re-tighten
each screw.
Using a Phillips screw driver, rotate
front screw moving the door to desired
position.
Using a Phillips screw driver, rotate
back screw moving the door to desired
position.
STEP 1
Partially open drawer
STEP 3
For slide on right side of drawer box
locate the black tab and push DOWN
to release. With both tabs released at
same time slide out the drawer.
STEP 4
To re-install drawer, simply align the
drawer slides on both sides and gently
push drawer closed and re-open.
Locking tabs do not need to be pressed.
STEP 2
For slide on the left side of drawer box
locate the black tab and push UP to
release.
STEP 5
Open and close drawer several times to
align the slides.
DRAWER FRONT ADJUSTMENT
If additional adjustment is required,
loosen screws and twist drawer front
for proper alignment. Tighten screws
securely.
NOTE: ADJUST DRAWER
FRONT
BEFORE INSTALLING
DECORATIVE HARDWARE!
Removing/
adjusting
drawers and
drawer fronts
  • Page 1 1
  • Page 2 2
  • Page 3 3
  • Page 4 4
  • Page 5 5
  • Page 6 6
  • Page 7 7
  • Page 8 8
  • Page 9 9
  • Page 10 10
  • Page 11 11
  • Page 12 12

Home Decorators Collection EN000166-BBO Installation guide

Type
Installation guide

Ask a question and I''ll find the answer in the document

Finding information in a document is now easier with AI