Page is loading ...

resound.com
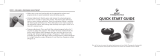
User guide
Custom hearing aids

Hearing aid information
Left hearing aid Right hearing aid
Serial number Serial number
Model number Model number
Battery type
£ CIC size 10A
£ ITE size 13
o ITC, ITE size 312
£ MIH size 13 £ MIH size 312
Program Beep Description
1 One beep
2 Two beeps
3 Three beeps
4 Four beeps
2

Table of Contents
Introduction 5
Your hearing aid 6
How to get your hearing aid ready for use 9
How to place the hearing aids in your ears 13
How to remove the hearing aids from your ears 15
How to use your hearing aids 16
Advanced options 24
How to clean and maintain your hearing aids 31
Wireless accessories 35
Tinnitus Management 37
General warnings 47
3


Introduction
Thank you for choosing our hearing aids. We recommend that you use your hearing aids every day -
that way you will fully benefit from them.
NOTE: Read this booklet carefully before you start using your hearing aids.
Intended use
Generic air-conduction hearing aids are wearable sound-amplifying devices intended to
compensate for impaired hearing.The fundamental operating principle of hearing aids is to
receive, amplify, and transfer sound to the eardrum of a hearing impaired person.
This hearing device is intended for use by users over 12 years of age.
For devices including a Tinnitus Sound Generator module:
The Tinnitus Sound Generator module is a tool to generate sounds to be used in a Tinnitus
Management Program to temporarily relieve patients suffering from Tinnitus.The target
population is primarily the adult population over 18 years of age.This product may also be used
with children 12 years of age or older.
5

Your hearing aid
Your hearing aid – Completely-In-the-Canal (CIC)
1. Push button (optional)
2
7
10
4
1
3
5
Manufac
turer
XXX X
8
9
3
6
10
2. Battery door and On/Off switch
3. Removal cord (optional)
4. Sound outlet
5. Wax filter
6. Vent
7. Microphone sound inlet(s)
8. Manufacturer
9. Serial number
10. Antenna
6

Your hearing aid – In-The-Canal (ITC)/In-The-Ear (ITE)
1. Microphone sound inlets
2
1
1
5
4
3
2. Push button (optional)
3. Battery door
4. Volume control (optional)
5. Vent
7

Your hearing aid – MIH (Microphone-In-Helix)
1. Push button (optional)
2
4
9
1
3
8
2. Battery compartment /On-Off switch
3. Removal cord (optional)
4. Sound outlet
5. Wax filter
6. Vent
8
6
7
4
5
2
7. Microphone sound inlet
8. Microphone in helix tubing
9. Volume control (optional)
10. Serial number
11
10
3
8
6
Manu
facturer
XX
XX
11. Manufacturer
8

How to get your hearing aid ready for use
Replacing the battery
1. Open the battery door completely by using your fingernail. Remove
the used battery if present.
2. Prepare the new battery. Remove the protective foil to activate the
battery. Wait for 2 minutes before inserting the battery into the
hearing aid.
3. Insert the new battery with the positive side in the correct position.
Always insert the battery in the door: never directly into the hearing
aid. Gently close the battery door.
9

NOTE: Always use new Zinc-Air batteries that have a minimum remaining shelf life of one
year.
At night, switch off the hearing aid and open the battery door completely to allow moisture to
evaporate and prolong the hearing aid’s lifespan.
If the hearing aid is experiencing frequent loss of connection to wireless accessories, contact your
hearing care professional for a list of low impedance batteries.
Keep spare batteries on hand.
Battery warnings
WARNING: Batteries contain dangerous substances and should be disposed of carefully in
the interest of your safety and for the environment. Please note:
1. Keep batteries away from pets, children and mentally challenged persons.
2. DO NOT place batteries in your mouth. Consult a physician immediately if a battery has
been swallowed, as they can be harmful to your health.
3. Do not attempt to recharge batteries (Zinc-Air) which are not specifically designated as
rechargeable because they may leak or explode.
4. DO NOT attempt to dispose of batteries by burning them.
10

5. Used batteries are harmful to the environment. Please dispose of them according to
local regulations or return them to your hearing care professional.
6. To save battery power, turn your hearing aids off when they are not in use.
WARNING: Batteries may leak. Remove the battery if you leave the hearing aids unused for
longer periods.
WARNING: If the batteries are not inserted correctly, the device will not work and the
batteries may build up heat. If this happens, please remove the batteries.
NOTE: Always use new Zinc-Air batteries that have a minimum remaining shelf life of one
year.
Low battery warning
When the batteries are low on power, your hearing aids reduce the volume, and play a melody
every 15 minutes until they are completely drained and turn off.
Low battery indicator when paired with wireless accessories (optional)
The batteries drain faster when you use wireless functionalities like direct streaming from your
smartphone or streaming sound from your TV with our TV Streamer. When the batteries deplete,
the support of some wireless accessories shuts down. Full functionality returns when you insert a
11

new battery. The table below shows how the functionality decreases with the depletion of the
batteries.
Battery level Signal Hearing aid Remote control Streaming
Fully charged
P P P
Low
P P
x
Depleted (change
battery)
P
x x
12

How to place the hearing aids in your ears
How to tell right from left
If you have two hearing aids, it is important that you can recognize one from the other.
Your right hearing aid will always have a red marking or shell, while your left hearing aid will have a
blue marking or shell.
Insert hearing aids
Insert Completely-In-The-Canal and In-The-Ear(ITE)
1. Hold the hearing aid between your thumb and index finger, either
above and below or on the sides.
2. Place the sound outlet portion into your ear canal. Turn the top part
of the hearing aid gently backwards and forwards so that it tucks
behind the fold of skin above your ear canal.
3. Insert the hearing aid into your ear canal. Opening and closing your
mouth may ease insertion.
13

By experimenting, you may discover an easier method. With proper insertion, hearing aids should
fit snugly but comfortably.
NOTE: It may be helpful to pull your ear up and outward with your opposite hand during
insertion.
Insert Mic-In-Helix
1. Hold the hearing aid between your thumb and index finger.
2. Place the sound outlet portion into your ear canal.
3. Gently twist and push the hearing aid into your ear. Opening and
closing your mouth can ease insertion.
4. Gently push the microphone into the creased area of the ear, and
make sure the tubing is in place.
14

How to remove the hearing aids from your ears
Remove Mic-In-Helix and Completely-In-Canal
1. Hold the removal cord with your thumb and index finger and pull
outward.
2. Hold the edges of the hearing aid with your thumb and forefinger
and pull outward while slightly rotating your hand forward.
Remove In-The-Canal and In-The-Ear (ITE)
1. Hold the edges of the hearing aid with your thumb and forefinger.
2. Pull outward while slightly rotating your hand forward.
CAUTION: Never attempt to modify the shape of the hearing aid or tubing yourself.
15

How to use your hearing aids
Operation of the hearing aid
The volume control (if present) allows you to adjust the volume of your hearing aids to your liking.
1. To increase the volume, turn the volume control up (+).
2. To decrease the volume, turn the volume control down (-).
When you change the volume, the hearing aid responds with a beep. When you reach the upper or
lower limits, the hearing aid responds with a low-pitched beep.
NOTE: If you have two hearing aids with the Synchronized Volume Control function enabled,
volume control adjustments to one hearing aid automatically repeats in the second hearing
aid. When you change volume on one of the hearing aids, it responds with one or more
beeps. A beep in the second hearing aid follows.
If your hearing aids support wireless Remote Control, you may use the supported Remote
Control or the smartphone app to adjust e.g. the volume.
16

Push button (optional)
Your hearing aid has a push button allowing you to use up to four different listening programs. The
list on page 2 tells which programs have been enabled.
1. Tap the program button to switch between programs.
2. You will then hear one or more beeps. The number of beeps indicates which program you have
selected (one beep = program one, two beeps = program two, etc.).
3. When you turn the hearing aids off and then back on, they always return to the default setting
(program one and preset volume).
NOTE: If you have two hearing aids with the Synchronized Push Button enabled, program
changes to one hearing aid automatically repeats in the second hearing aid. The same
number of confirmation beeps will follow in the second hearing aid. This Synchronized Push
Button can also be configured to allow one side to control volume increase and the other to
control volume decrease. The volume changes to one hearing aid are repeated on the other
side to keep levels the same.
Telecoil
(Optional for ITC-DWT, ITE-DWT, MIH-WT models only)
Your hearing aid may have a telecoil. The Telecoil program may help to improve speech
understanding with Hearing Aid Compatible (HAC) telephones and in theaters, cinemas, houses of
17

worship, etc. that have a hearing loop installed.
When you select the Telecoil program, your hearing aid picks up signals from the hearing loop or
HAC telephone. Your hearing care professional can activate the Telecoil program.
NOTE: The telecoil cannot work without a hearing loop (aka induction-loop) or a HAC
telephone.
NOTE: If you are having trouble hearing with the hearing loop, ask you hearing care
professional to adjust the program.
NOTE: If there is no sound from the hearing aids in a hearing loop system and an active
Telecoil program, the hearing loop system may not be turned on or is not operating
correctly.
NOTE: The sound from the hearing loop and the hearing aids' microphones can be mixed to
your preference. Ask your hearing care professional if this could be useful for you.
Hearing loop systems
To use tele loop systems, follow these steps:
1. Switch your hearing aid to the telecoil program.
18

2. Find a good spot. Reception is not clear in all locations, it depends on the induction loop. Look
for signs or find another spot.
3. If needed, adjust the volume.
4. When you leave, switch to Program 1.
How to use the telecoil program
To use your telecoil program with hearing loop systems, follow these steps:
1. Switch your hearing aids to the telecoil program.
2. Find a good spot. Reception is not clear in all locations, as it depends on the hearing loop. Look
for signals or find another spot.
3. If needed, adjust the volume.
4. When you leave, switch to your preferred program.
HAC telephone
Some smartphones are hearing aid compatible (HAC). The HACphone establishes a small
hearing loop that your hearing aids can connect to. The telecoil picks up the HAC phone's signal
and converts it to sound.
19

To use a HAC phone, follow these steps:
1. Switch your hearing aid to the Telecoil program.
2. Pick up the phone and make a call or answer a call.
3. Hold the phone close to the hearing aid and tilt it slightly outwards.
4. Listen to the dial tone and move the telephone to get the best reception.
5. If needed, adjust the volume.
6. When you hang up, switch to your preferred program.
20
/