Page is loading ...

resound.com
User guide
Receiver-In-Ear hearing aids
400344011-US-16.11-Rev.E.indd 1 14-12-2016 22:41:06

2
Hearing instrument type designations for models included in this user guide are: BRIE, FCC ID: X26BRIE,
IC: 6941C-BRIE; VE312, FCC ID: X26VE312, IC: 6941C-VE312; MRIE, FCCID: X26MRIE, IC 6941C-MRIE.
Please see page 7 for list of models referring to all types.
Statement:
This device complies with part 15 of the FCC rules and ICES-003 of the IC rules.
Operation is subject to the following two conditions: (1) this device may not cause harmful inter ference,
and (2) this device must accept any interference received, including interference that may cause undesired
operation.
Note: This equipment has been tested and found to comply with the limits for a Class B digital device,
pursuant to part 15 of the FCC Rules and ICES-003 of the IC rules. These limits are designed to provide rea-
sonable protection against harmful interference in a residential installation. This equipment generates, uses
and can radiate radio frequency energy and, if not installed and used in accordance with the instructions,
may cause harmful interference to radio communications. However, there is no guarantee that interference
will not occur in a particular installation. If this equipment does cause harmful interference to radio or televi-
sion reception, which can be determined by turning the equipment off and on, the user is encouraged to try
to correct the interference by one or more of the following measures:
• Reorient or relocate the receiving antenna.
• Increase the separation between the equipment and receiver.
• Connect the equipment into an outlet on a circuit different from the one in which the receiver is con-
nected.
• Consult the dealer or an experienced radio/TV technician for help.
Changes or modifications can void the user´s authority to operate the equipment.
400344011-US-16.11-Rev.E.indd 2 14-12-2016 22:41:06

3
Intended use
Generic air-conduction hearing instruments are wearable sound-amplifying devices intended to compen-
sate for impaired hearing. The fundamental operating principle of hearing instruments is to receive, amplify,
and transfer sound to the ear drum of a hearing impaired person.
The products are in compliance with the following regulatory requirements:
• In US: FCC CFR 47 Part 15, subpart C.
• Other identified applicable international regulatory requirements in countries outside the US. Please refer
to local country requirements for these areas.
• In Canada: these hearing instruments are certified under the rules of IC.
• Japanese Radio Law and Japanese Telecommunications Business Law Compliance. This device is
granted pursuant to the Japanese Radio Law (電波法) and the Japanese telecommunications Business
Law (電気通信事業法) This device should not be modified (otherwise the granted designation number
will become invalid)
• Patents
US 7,593,537 US 8,00,849
400344011-US-16.11-Rev.E.indd 3 14-12-2016 22:41:06

4
Prescription use of a Tinnitus Sound Generator (TSG) hearing instrument
The TSG module should be used as prescribed by your doctor, audiologist or hearing healthcare profes-
sional. In order to avoid permanent hearing damages, the maximum daily usage depends on the level of
the generated sound.
Should you develop any side effects from using the sound generator, such as dizziness, nausea, head-
aches, perceived decrease in auditory function or increase in tinnitus perception, you should discontinue
use of sound generator and seek medical evaluation.
The target population is primarily the adult population over 18 years of age. This product may also be used
with children 5 years of age or older. However, children and physically or mentally challenged users will re-
quire training by a doctor, audiologist, hearing healthcare professional or the guardian for the insertion and
removal of the hearing instrument containing the TSG module.
Important notice for prospective sound generator users
A tinnitus sound generator is an electronic device intended to generate noise of sufficient intensity and
bandwidth to mask internal noises. It is also used as an aid in hearing external noises and speech.
Good health practice requires that a person with a tinnitus condition have a medical evaluation by a licensed
physician (preferably a physician who specializes in diseases of the ear) before using a sound generator.
Licensed physicians who specialize in diseases of the ear are often referred to as otolaryngologists, otolo-
gists or otorhinolaryngologists.
The purpose of medical evaluation is to assure that all medically treatable conditions that may affect tinnitus
are identified and treated before the sound generator instrument is used. The sound generator instrument
400344011-US-16.11-Rev.E.indd 4 14-12-2016 22:41:07

5
ReSound is a registred trade mark of ReSound A/S
is a tool to generate sounds to be used with appropriate counselling and/or in a tinnitus management pro-
gramme to relieve patients suffering from tinnitus.
Introduction
Congratulations on the purchase of your new hearing instruments. ReSound’s innovative sound technology
and design, combined with the customized device programming selected by your hearing care profes-
sional, will make hearing a more enjoyable experience. Hearing instruments will enable you to hear sounds
that you may not have heard in years because of your hearing loss. Practice and a positive attitude are
important in learning to use hearing instruments. Your ReSound instruments have been adjusted according
to your individual hearing loss and needs. Some people adjust quickly to wearing hearing instruments in
their ears and hearing new sounds; other people may need more time.
Please read this manual carefully in order to wholly benefit from the use of your hearing instruments. With
proper care, maintenance, and usage, your hearing instruments will aid you in better communication for
many years. Ask your hearing care professional if you have any questions.
400344011-US-16.11-Rev.E.indd 5 14-12-2016 22:41:07

6
Hearing instrument model:
Receiver tube length:
Dome size:
Left serial number:
Right serial number:
Model 61: Battery size 312
Model 62: Battery size 13
Model 62: battery size 312
400344011-US-16.11-Rev.E.indd 6 14-12-2016 22:41:07

7
Mini Receiver In-the-Ear (RIE) hear-
ing instruments of type VE312 with FCC ID:
X26VE312, IC number 6941C-VE312 and size
312 battery are available in the following vari-
ants:
LS961-DRW, LS761-DRW, LS561-DRW
Receiver-In-the-Ear (RIE) hearing instru-
ments of type BRIE with FCC ID X26BRIE, IC
number 6941-BRIE and size 13 battery are
available in the following variants:
LS962-DRW, LS762-DRW, LS562-DRW
Receiver-In-the-Ear (RIE) hearing instru-
ments of type MRIE, FCC ID: X26MRIE, IC:
6941C-MRIE. and size 312 battery are avail-
able in the following variants:
EY362-DWR
The identification number for the BRIE, MRIE and
VE312 device models can be found at location “13”
as indicated in the illustrations on page 10 and 11.
400344011-US-16.11-Rev.E.indd 7 14-12-2016 22:41:07

8
Contents
Statement: .............................2
Intended use ...........................3
Prescription use of a Tinnitus Sound Generator
(TSG) hearing instrument ..................4
Important notice for prospective sound
generator users..........................4
Introduction.............................5
Contents ...............................8
Getting started .........................12
SmartStart ............................12
Inserting/Replacing the battery.............12
Low battery indicator ....................13
Low battery indicator when paired with
wireless accessories only .................13
Sports lock ............................14
Inserting/Removing hearing instruments......14
Program and multi-function buttons .........16
Flight mode............................19
Telephone use..........................20
Listening to radio or TV ...................21
Using ReSound Hearing Instruments with
iPhone
®
, iPad
®
, and iPod touch
®
(ReSound LiNX
2
) ........................21
Cellular phones.........................21
PhoneNow ............................22
Telecoil (optional)........................24
Tele-loop systems.......................24
Direct audio input (optional) ...............24
Connecting/Disconnecting audio boots ......25
Care and maintenance ...................26
Daily maintenance.......................27
The receiver tube .......................28
Cleaning the receiver tubes and domes ......28
Cleaning RIE or molds (does not apply for
Ultra Power molds) ......................28
Changing wax guard for receiver tube .......29
400344011-US-16.11-Rev.E.indd 8 14-12-2016 22:41:07

9
How to apply domes.....................30
Using ReSound hearing instruments with
smart phone apps.......................31
General precautions .....................32
General warnings .......................32
Tinnitus Sound Generator (TSG) module .....34
User instructions for the TSG module ........34
Using TSG with smart phone apps ..........36
The scientific concepts that form the
basis for the device ......................37
Technical Specifications ..................37
TSG warnings ..........................38
TSG precautions........................38
TSG warning to hearing healthcare
professionals...........................39
Battery warning information ...............40
Hearing instrument expectations ...........40
Warning to hearing aid dispensers (US Only) ..41
Important notice for prospective hearing
aid users (US Only) . . . . . . . . . . . . . . . . . . . . . . 41
Children with hearing loss (US Only) ........42
Troubleshooting Guide ...................44
Technical data..........................48
Warranty and repairs ....................56
Temperature test, transport and storage
information ............................56
400344011-US-16.11-Rev.E.indd 9 14-12-2016 22:41:07

6
9
1
8
2
7
13
9
1
8
2
13
543
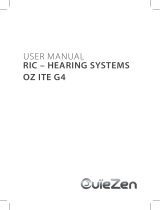
10
1. Receiver tube
2. Receiver Open Dome
3. Receiver Tulip Dome
4. Receiver Power Dome
5. RIE mold
6. Sports lock
7. Battery compartment
8. Receiver
9. Multi-functional push button
10. LP receiver tube
11. MP receiver tube
12. HP receiver tube
13. Model, and serial number (in battery chamber)
14. UP Receiver/Mold
15. Left/Right indicator
16. Direct audio input
ReSound LiNX
2
62 models
61 model (type VE312)
400344011-US-16.11-Rev.E.indd 10 14-12-2016 22:41:17

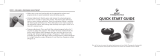
12 1410 11
9
1
8
2
7
13
16
15
11
61 model (type VE312)
ReSound Enya 62 models
400344011-US-16.11-Rev.E.indd 11 14-12-2016 22:41:31

2
1
3
12
Getting started
On/Off function
1. When the battery door is closed, the hearing instrument turns on,
and the default program will be activ ated.
2. To turn off the hearing instrument, open the battery door. Use your
fingernail/tip to pull it open.
SmartStart
Hearing instruments can be turned on once you have placed them on your ears. If you prefer to turn them on
just prior to placing them on your ear, your hearing care professional can activate a function called Smart-
Start. This function will delay the time in which the hearing instruments turn on after the battery compart-
ment is closed. With SmartStart, a beep will be heard for each second of the delay period.
Inserting/Replacing the battery
1. Open the battery door completely by using your fingernail/tip. Remove the
used battery if present.
2. Prepare the new battery (please refer to page 6 for information on appropriate
battery type/size for your hearing instrument). Remove the protective foil and
wait 2 minutes before inserting the battery into the hearing instrument to
allow activation of the battery.
3. Insert the new battery with the positive side in the correct position.
4. Gently close the battery door.
On
Off
400344011-US-16.11-Rev.E.indd 12 14-12-2016 22:41:38

13
i
Tip:
1. Always use new Zinc-Air batteries that have a minimum remaining shelf life of one year.
2. Whenever the hearing instruments are not in use, remember to turn them off to avoid unnecessary
battery consumption.
Low battery indicator
Your hearing care professional can set your hearing instrument to give an acoustical indication when the bat-
tery is reaching its end of life. The hearing instrument will reduce amplification and emit a melody if battery
power gets too low. This signal will recur every 15 minutes until the hearing instrument automatically switches
off. It is recommended that you keep spare batteries on hand.
Low battery indicator when paired with wireless accessories only
Active usage of the ReSound Unite accessories (Remote Control, Remote Control 2, Phone Clip, Phone
Clip+, TV Streamer, TV Streamer 2 and Mini Microphone) requires more battery power from the hearing
instruments than when these are working on their own meaning that battery life is highly dependent on
the amount of wireless accessory usage. When the battery in the hearing instrument has depleted to
a level at which use of the ReSound Unite TV Streamer, TV Streamer 2, Phone Clip, Phone Clip+ and
Mini Microphone cannot be supported, the hearing instrument will play two sets of descending tones.
After this, your hearing instrument and ReSound Unite Remote Control, Remote Control 2 will continue
to work as usual, but you will not be able to use your ReSound Unite TV Streamer, TV Streamer 2, Phone
Clip, Phone Clip+ and Mini Microphone. At some point the battery level will not support the remote control
either and you will once again hear the descending tones. The hearing instruments will continue to work as
usual. Once a new battery is inserted, full operation of the accessories will resume.
400344011-US-16.11-Rev.E.indd 13 14-12-2016 22:41:38

14
Sports lock
The sports lock will be applied or adjusted by your hearing care professional.
Inserting/Removing hearing instruments
Insertion (custom RIE and Ultra Power (UP) molds)
1. Hold the RIE mold between your thumb and index finger and position its sound
outlet in your ear canal.
2. Slide the RIE mold all the way into your ear with a gentle, twisting movement.
3. Move the RIE mold up and down and gently press to ensure it is positioned correctly
in the ear. Opening and closing your mouth can ease insertion.
4. Make sure the hearing instrument is seated behind the ear.
By experimenting, an easier method may be discovered. With proper insertion, hearing
instruments should fit snugly but comfortably. If hearing instruments cause irritation of
the ears, contact your hearing care professional.
i Never attempt to modify the shape of the hearing instrument, RIE molds, or tubing yourself.
i
Tip: It may be helpful to pull the top of your ear back with your opposite hand during insertion to open
the ear canal.
400344011-US-16.11-Rev.E.indd 14 14-12-2016 22:41:42

15
Insertion (domes)
1. Hold the receiver tube where it bends, and
gently place the dome into the ear canal.
Push the dome far enough into the ear canal
so that the receiver tube lies flush with the
side of the head.
2. It is important that the tube and the dome fit
correctly into your ear.
3. When the dome is placed correctly, you should not be able to see the receiver tube sticking out when
facing a mirror.
i Note: You should never attempt to bend or modify the shape of the receiver tube.
Removal (RIE molds)
1. Grasp the removal string and pull the RIE or UP mold outward.
2. Consult your hearing care professional if you have difficulties removing the hearing instrument.
Removal (domes)
1. Hold the receiver tube with your thumb and forefinger and remove the tube.
2. Consult your hearing care professional if you have difficulties removing the
hearing instrument.
400344011-US-16.11-Rev.E.indd 15 14-12-2016 22:41:47

16
Program and multi-function buttons
If you have a hearing aid with a program button or multi-function button, this will allow you to use up to four
different listening programs, each of them suitable for certain situations.
Program button (61 models only) Multi-function button (62 models only)
Your hearing care professional can fill out the following table for you.
Program Description of when to use
1
2
3
4
400344011-US-16.11-Rev.E.indd 16 14-12-2016 22:41:51

17
When using the program or multi-function buttons to switch programs, each press will move the instrument
to the next program. For example, if it was in program 1 it will switch to program 2, if it was in program 2 it
will switch to program 3 etc.
When you close the battery door and switch the instrument on, it will start in program 1. Press the program
or multi-function buttons if you want to move to a different listening program.
If you have two hearing instruments with the synchronization function enabled, program changes to one
instrument will automatically repeat in the second instrument. When a program change is made in one
instrument, you will hear the same amount of confirmation beeps in the second instrument.
Your instrument has a fully automatic volume control. Therefore, it should not be necessary to control the
volume manually.
However, in addition to controlling listening programs, the multi-function button (62 models only) provides
you with the ability to adjust the amplification to your liking.
400344011-US-16.11-Rev.E.indd 17 14-12-2016 22:41:51

18
If you have two hearing instruments with the synchronization function enabled and you have the multi-
function button set for volume control functionality, volume adjustments to one instrument will automatically
repeat in the second instrument. When a volume control adjustment is made in one instrument, you will hear
a confirmation beep. A beep in the second instrument will follow.
The multi-function button is designed to change the volume or listening programs of the hearing instrument,
based on different ways it is pressed.
If necessary, your hearing care practitioner can change these settings and fill in the following table to indi-
cate the new settings:
Multi-function button action Default setting New setting
Short press up Increases volume
Short press down Decreases volume
Long press up (3 seconds) Changes programs
Long press down (3 seconds Activates streaming
400344011-US-16.11-Rev.E.indd 18 14-12-2016 22:41:51

19
i Flight mode
When boarding a flight or entering an area where RF transmitters are prohibited, wireless functionality must
be deactivated, as it is not allowed to radiate radio signals during flights or in otherwise restricted areas.
It is possible to disable wireless operation by opening and closing the battery compartment three times
within a ten second period (open-close, open-close, open-close). Your instruments will now be in flight
mode.
If the hearing instrument is in flight mode, the hearing instrument must have been operating in flight mode
for at least 10 seconds before attempting to enable wireless again. It is possible to re-enable wireless
operation by opening and closing the battery door once. 10 seconds after this operation is completed,
wireless operation will begin again.
i
Note: It is important to wait an additional 15 seconds after wireless function resumes before open-
ing and closing the battery compartment again for any reason. If the battery compartment is opened and
closed during this 15 second window, flight mode will resume.
400344011-US-16.11-Rev.E.indd 19 14-12-2016 22:41:51

20
Telephone use
If your hearing instruments are fit with a receiver open dome or receiver tulip dome, you can probably use
the telephone as you normally would by holding it up to your ear canal opening. If your hearing instruments
are fit with a receiver power dome or RIE or UP mold, finding the optimal position for holding a telephone
while using a hearing instrument may require practice for some individuals, and one or more of the following
suggestions may be helpful.
1. Hold the telephone as you would normally.
2. Hold the telephone towards the top of the ear (closer to where the
microphones are located).
3. If whistling occurs, it may take a brief moment of holding the telephone in
the same position before the hearing instrument adapts and reduces the
feedback.
4. Any whistling may also be decreased by holding the telephone slightly away
from the ear.
5. Depending on your individual needs, your hearing care professional may
activate a program specifically for telephone use.
400344011-US-16.11-Rev.E.indd 20 14-12-2016 22:41:52
/