Page is loading ...


2 Copyright
Copyright
This documentation is protected by law. All rights, especially the right of
duplication, circulation, and translation, are reserved.
No part of this publication may be reproduced in the form of copies,
microfilms or other processes, or transmitted into a language used for
machines, especially data processing machines, without the express written
consent of the publisher.
All copyrights reserved.
All other product names are trademarks of the corresponding manufacturers.
Errors in and changes to the contents as well as program modifications
reserved.
Copyright © MAGIX AG, 2010 and copyright © 2006 - 2010, Image Line
Software. All rights reserved.
MAGIX is a registered trademark of MAGIX AG.
Deckadance Copyright © 2006 - 2010 Image Line Software. mufin is a
registered trademark.
MAGIX Digital DJ contains the mufin audiogen technology.
VST and ASIO are registered trademarks of Steinberg Media Technologies
GmbH.
Other mentioned product names may be registered trademarks of the
respective manufacturer.

Table of Contents 3
Table of Contents
Copyright 2
Support 4
MAGIX Digital DJ user interface 6
Quick start 1,2,3… 7
Features 8
Upgrade MAGIX Digital DJ 9
System requirements 10
Don’t lose the beat! 10
Tooltips 11
Toolbar 11
Browser 13
Track Window and Transport Controls 14
Track Display Colors 15
Upper controls 15
Waveform & Track Overview Windows 15
Lower Controls 16
Faders & Beat-phase Display 19
Controls 19
Beat-phase display 20
Faders & Mixing 20
Tool window 21
Peakscope 21
Spectroscope 22
About 22
Effects 23
Function Window 25
Playlist 26
Sampler 29
VST Host 31
MIDI Setup 32
Vinyl/External Control 33
Relooper 37
Database 39

4 Support
Recording 39
Settings 41
Audio settings 41
Audio (ASIO4ALL) PC Only 43
General, File & MIDI Controller settings 47
Shortcuts 50
Index 53
Support
If you experience any problems with your software, please contact our support
team:
Support website: http://support.magix.net
This website takes you to the MAGIX user service page; the following free
offers are also featured there:
• FAQs (frequently asked questions) and general tricks and tips. In most cases,
you’ll find the solution to your problem here. If not, use the email support
form.
• Email support form: Use the special form to inform our support staff about
your system. This information is used to solve your problems quickly and
competently. Simply fill it out and send it with a mouse click!
• Support forum: You are not alone. Perhaps other users had a similar problem
and can help you solve yours. Our support staff are also regular contributors.
• Download section: Updates, improvements, and patches are likewise offered
free of charge via download. Many problems you may experience are already
familiar to us, and they can often be solved by downloading the latest patch.
Besides patches, there are also wizards for checking and optimizing your
system.
• Links: The links list contains the contact addresses for all of the most
important hardware manufacturers.
Please note: To be able to use the support, you have to register your product
using the serial number provided. This number can be found on the CD case
of your installation CD or on the inside of the DVD box.
Europe
Sales Department: Monday - Friday, 09:00-16:00 GMT

Support 5
U.K.: 0203 3189218
Denmark: 699 18149
Sweden: 0852500858
Finland: 09 31581630
Norway: 0210 30665
Support request via email: http://support.magix.net/contact/uk
Here you can find a summary of our technical support telephone numbers:
http://support.magix.net/phone/uk
Mail: MAGIX Development Support, P.O. Box 20 09 14, 01194 Dresden,
Germany
North America
Sales Department: 9 am to 4 pm EST Mon-Fri
Phone: 1-305-722-5810
Support request via email: http://support.magix.net/contact/us
Here you can find a summary of our technical support telephone numbers:
http://support.magix.net/phone/us
Mail: MAGIX Customer Service, 1105 Terminal Way #302, Reno, NV 89502,
USA
Please have the following information at hand:
• Program version
• Configuration details (operating system, processor, memory, hard drive, etc.),
sound card configuration (type, driver)
• Information regarding other audio software installed

6 MAGIX Digital DJ user interface
MAGIX Digital DJ user interface
Welcome to MAGIX Digital DJ, powered by Deckadance, the well-known
reference product for DJ software by Image Line!
MAGIX Digital DJ was developed by DJs and for DJs. Real DJs were asked
about their wishes and requirements for such a program, and the lead
developer of MAGIX Digital DJ, L.S.D. (Luis Serrano), has significant
experience as a DJ. MAGIX Digital DJ is the DJ software that offers you
everything to take your DJ performance to the next level.
Here you can see the MAGIX Digital DJ user interface. Clicking on one of the
areas on the user interface will lead you to the topic associated with it.
The tool window and function windows will change their display depending
on the switches associated with them. The function window switches are

MAGIX Digital DJ user interface 7
located toward the top of the interface (as shown) while the Tool window
switches run along the top of the window itself.
Note: Pay attention to the tooltips! They will display a short description of the
interface features as your mouse is placed over them.
Quick start 1,2,3…
We know: No one likes to read the manual. So here are 8 easy steps to DJ
fame!
1. Load the 2 demo tracks (Deck A - ‘Step It Up' & Deck B - ‘Dance with
me’).
2. Note that Deck A is 134 BPM & Deck B is 130 BPM.
3. Click the SYNC button on Deck B (the tempo adjusts to match Deck A).
4. Slide the crossfader (X-fader) left to hear only Deck A.
5. Press play and start Deck A.
6. Wait until the two beat-indicators are in step (Deck A top, Deck B bottom).
7. Right-click (or Crtl+click) Deck B’s Play button. You won’t hear B because
the X-fader is fully left (Deck A).
1. Freely slide the X-fader and hear both songs perfectly beat-mapped.
It’s that easy with MAGIX Digital DJ, but there is still lot of power hidden away
behind the interface, so we encourage you to read the manual so that you get
the most out of the program and take your DJing to the next level.
This is how MAGIX Digital DJ starts...

8 MAGIX Digital DJ user interface
At the heart of MAGIX Digital DJ are the Decks, A and B as shown below. The
framed areas are constant and will remain unchanged by various settings. All
other areas & panels are dynamic and change to reflect the mode or settings
chosen.
Cue either deck by clicking and dragging on the wave displays. The center of
each display shows the playback position, so you can cue decks visually if you
don’t have a separate monitor mix set up. Beneath each wave display is a
song-length preview. You can click on the lower preview to jump to any point
in the track. The Play button beneath each deck will start playback of the
track. We will consider the transport functions in more detail later.
Features
• Two decks for playback of MP3 (ID3 V1 and V2), WAV, AIFF, WMA, FLAC,
M4A and OGG files
• 64-bit high-end signal processing
• Integrated browser with favorites and search function.
• Drag & drop from external application to decks and playlist.
• Playlist with unlimited entry number and automix function including crossfades
and automatic beat-synchronized transitions (DJ style), random play (shuffle)
• Twelve outputs (6x stereo, only after upgrade (view page 9)): master mix,
monitor, deck A + B and others. Monitoring via headphones for the decks
and samplers. Flexible monitoring options ("Additional settings"), for example,
pre-fader listener level, phone split. Flexible crossfader settings ("Additional
settings") and bass crossfader
• Precise pitch control (faster/slower) in each deck
• Automatic beat recognition, beat grid and beat mix, auto sync for perfect
synchronization with seamless loops and beatwise jumping inside the track.
• mufin technology: sound-based analysis of all songs on the hard drive, find
similar songs with one click; quick insertion into the playlist or to the decks.

MAGIX Digital DJ user interface 9
• Included effects (view page 23) (equalizer, filter, bit reduction, phaser/flanger,
etc.) and 3-band EQ with 3-band killer buttons, level controls for each band
-36dB +12dB, band killer -48dB.
• Relooper (view page 37) beat-slicing performance sampler.
• 8 Slot sampler with built-in samples
Upgrade MAGIX Digital DJ
MAGIX Digital DJ – powered by Deckadance, does
more! You can upgrade MAGIX Digital DJ to "bigger"
versions: Deckadance House Edition or Club Edition.
By upgrading to Deckadance House Edition, you will receive the following
additional functions:
• Native MIDI controller ("General, File & MIDI Controller settings") support as
well as user-configured MIDI mapping/remapping ("MIDI Setup").
• Editable relooper (view page 37) patterns
• In addition to being a free-standing program, Deckadance may be loaded as
a VST instrument in any VST compatible host (such as MAGIX Music Maker).
• VSTi plug-in hosts ("VST Host") for up to 8 VST effects or instruments, MIDI
file playback via VST instruments (hundreds of MIDI loops are included), VST
host MIDI-IN / THRU, to play loaded VST instruments using a controller.
• Load your own samples into the sampler (hundreds of samples and MIDIs are
included). Sample songs and trigger loops in time with the beat.
• ReCorder (view page 39) – record your DJ performance in realtime to your
hard drive!
By upgrading to Deckadance Club Edition, in addition to the
above-mentioned functions, you will also receive:
• External control via the record player (view page 33) (timecode vinyl) or CDJ
decks
• Supports all common timecode vinyl formats (Final Scratch, Torq,...),
learn-mode for total compatibility.
• Deckadance ultra accurate Control CDJ format.
• 6 inputs: 2x stereo input for decks for looping through and sampling of analog
sources.
You can find the link to upgrade options in the MAGIX Digital DJ "Help" menu.

10 MAGIX Digital DJ user interface
System requirements
Operating system
• Windows XP/Vista/7
• Mac OSX v10.4 (UB)
Minimum hardware requirements
• PC: Intel Pentium III (or similar), Athlon XP with DirectSound or ASIO
compatible sound card
• Mac: Intel Mac or G4 (1.25 GHz) with sound card with CoreAudio drivers,
• 512 MB RAM, 200 MB hard disk space.
• Graphics card with min. resolution 1024 x 768
Don’t lose the beat!
If you regularly DJ, your ears will be coping with some
pretty harsh treatment, so there is nothing wussy about
protecting your valuable hearing. If you have
experienced ringing in your ears after a gig, then that is
a sign you have pushed your ears too far. Fortunately,
you can buy earplugs specifically designed for DJs
(search Google for ‘music earplugs’).
These attenuate all frequencies evenly, so they don’t affect your ability to hear
the mix (as it sounds). In fact, you will find it easier to hear the music wearing a
pair of these. Take advice from thousands of musicians and DJs who have
gone before you and protect your most valuable asset - don’t lose the beat!

Toolbar 11
Tooltips
MAGIX Digital DJ offers realtime help
functions: To see the Help panel, click on
the HELP button just below the master
cross-fader and hold your mouse cursor
over anything that looks like a control,
including some that don’t. The tooltips will
explain the function of each control element
in short.
To activate or deactivate tooltips, click on
Show tooltips in the middle of the MAGIX
Digital DJ window. The language of tooltips
may be selected in the setup menu.
Please note that control elements for left- and right-clicking (Ctrl+Click) often
have different functions. Therefore, you should also try clicking on everything
you clicked on with the left mouse button using the right mouse button to see
what might happen.
You will see that a lot of things work automatically with a right-click, such as
right-clicking the play button on the second deck play while the first is playing,
that the second with be played synchronously.
Note: Trying out left and right clicks shouldn't be done during a live set. But
right-click functions of the relooper, the play button and the sampler play
button (when you know exactly what they do) are especially useful for live
sets.
Toolbar
If you wish to access File and General options use the [Setup] button among
the Function switches on the main interface. The Toolbar contains the
following:
• Audio Setup - Use to select Audio inputs/outputs. This is only available in
Stand-Alone mode. If you are running MAGIX Digital DJ as a VST then
these options are accessed through your host. The options in the Audio &

12 Toolbar
MIDI Setup dialog will depend on your sound card and attached
controllers. Use these options to select Audio and MIDI inputs/outputs.
• TAP - Tap tempo. Tap this button 4 to 8 times and the average tapping
speed will be set in the BPM window.
• Tempo - Displayed in BPM (32 to 256). Double-click the number display to
enter a specific BPM. The tempo can also be changed with the TAP button or
click on the 'fine-tune' +/- switches and drag up/down for fast changes.
Right-click on the +/- switches to select Velocity sensitive mode, where
mouse movement speed is used to accelerate the BPM change.
• Help – Opens a menu with access to the help, the electronic manual and
various online functions.
- Help/product manual (PDF) - Since you are reading this, you've
obviously already know what this is good for:)
- Online tutorial video opens an Internet page with tutorial videos for
the program
- Online update / Online registration / Online upgrade This menu will
lead you to the MAGIX Internet page for program updates, registration
and upgrades (view page 9).
- magix.info - the Multimedia Community connects you with
magix.info
- About MAGIX Digital DJ Displays copyright info and version number
of MAGIX Digital DJ.

Browser 13
Browser
Controls
• Browse files on your computer - Click on the line marked 'Browse
computer', noted above, to open a standard file browser. Once you have
navigated to the directory of choice you can click on thedown-arrow marked
'Add/Remove' (above) to add it to your list of favorites.
• Add/Remove Directories - Click on the down arrow at the top of the
browser. Directories currently selected in the Browser can be added or
deleted to a 'Favorites' list that shows at the bottom of the pop-upmenu
when the Add/Remove down-arrow is selected. Added directories will show
next time you click on the arrow.
• Load by dragging files - You can load a song by dragging a file from the
Browser and dropping it onto the Track Window of the desired deck. MAGIX
Digital DJ will start beat-detection automatically when a song is loaded. You
can start playing the song before the beat detection process is completed.
Note: There is also an independent file browser on each deck. To the right of
the Play button is the load icon (view page 14) for the deck.
• Search - Enter text into the search text line and click on the search icon or
press enter on your keyboard.
• Preview player - To preview a file double-click the item in the Browser. A
preview player window will open (as shown below) and the file will play on the
Headphone (monitor output) channel as selected in the Audio Settings (view
page 41).

14 Track Window and Transport Controls
Note: The font size in the Browser is controlled by the Playlist font size
("Playlist") [a, a, A] controls.
Track Window and Transport Controls
The track window contains a waveform display, which shows a part of the
track, together with beat and cue markers in high magnification. A lower
'Track Overview' window that displays the entire song (this can be clicked to
jump to the specified location). Below these windows are several different
controls for playback, cueing and mixing:

Track Window and Transport Controls 15
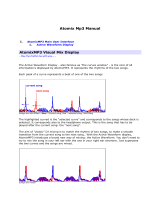
Track Display Colors
Ctrl+C will activate/deactivate the spectral analysis and display mode.
Beat analysis also includes frequency content, displaying the most prominent
frequencies in the mix. Red indicates low frequencies (bass, drums etc), yellow
through to green are mid frequencies (often associated with vocals), while blue
shades are high frequencies (cymbals, hats etc). With some practice, these
colors will help you identify breaks, vocals, bass, drums and other common
sounds in your tracks.
Upper controls
• Artist, Title & Album - Displays track information (if stored in meta data).
• Tempo - Detected tempo of the track.
• Pitch - The difference in BPM between the detected BPM and Master
Tempo.
• Key - When tempo is locked (see below), drag vertically on this field to
change the deck pitch (+/- 12 semi-tones) without affecting the tempo.
• Lock (symbol) - Locks the tempo of the track. Use the Pitch-lock function to
change playback speed and pitch independently.
Waveform & Track Overview Windows
• Cueing a track - To move the Playback Position marker at the desired part of
the track, left-click inside the Waveform Display window and move your
mouse (or transport controller) left-and right.
• Cue Markers - To set a cue marker, select cue position 1 to 4 (to the right of
the CUE button), position the Play Position marker over the part of the track
and left-click the CUE button. If the track is stopped, it will play from that

16 Track Window and Transport Controls
point onward each time you press the CUE button and stop when you release
it. If the track is playing, it will jump to the cue point when the CUE button is
pressed and then pause. Cue markers are overwritten by new ones if the
track is manually repositioned while stopped (as per 'Cueing a track'
procedure above). Each of the 4 numbered buttons to the right of theCUE
button corresponds to 4 separate cue positions.
• Quick jump - Left-click on the Track Overview window (this displays the
whole track) to jump the song to the point selected.
• A (Auto-gain button) - Above the 'Deck gain' slider, activates the auto-gain
control engine. This balances the perceived loudness of tracks.
• Deck gain - Extra gain trim control. Click and drag vertically.
• Play position - The red vertical line at the middle of the Waveform window
represents the play-head/stylus position.
Lower Controls
• Play - Left-click to start the song playing. Right-click to start in sync with the
other deck.
Note: When Automix ("Playlist") is selected, the Play button for the active deck
is disabled.
• Load - To the right of the Play button is the quick-load button, which will
open a file browser and dump the selected track into the deck.
• LOOP (Loop and continue) - Loops a section of the song when clicked.
Select the loop length using the arrows immediately to the right of the LEAP
button. On release, the song will continue playing from the end of the loop.
NOTE: The length indicator (right) can be clicked so that loops/leaps are
synced to the nearest beat/bar. The beat-shift arrows mayb be used to
position loops.
• LEAP (Leap after loop) - Loops a section of the song when clicked. Select
the loop length using the arrows immediately to the right of the LEAP button.
On release, the song will resume from the point it would have reached if
looping had not occurred. Keep an eye on the playback marker in the Track
Window and you will notice the leap position is shown as a dashed line
moving forward while the LEAP loop plays.
NOTE: The length indicator (right) can be clicked so that loops/leaps are
synced to the nearest beat/bar.
• Length Indicator & Length Arrows - To the right of the LOOP/LEAP buttons
there are three controls. The length indicator (right) can be clicked so that

Track Window and Transport Controls 17
loops/leaps are synced to the nearest beat/bar. The loop may be shortened
or made longer using the arrows.
• Pitch Slider - Move the slider to change the speed of the song (down is faster
and up slower). The range can be adjusted on the General Settings page
between +/- 6% and +/-50%.
NOTE: Hold down the [CTRL] key while moving the pitch fader to get a finer
resolution of 0.01%.
• TRACK - Opens a sub-window containing a number of tools for resolving
beat-sync & analysis issues:
• TAP - Tap the button in
time with the song to set
the tempo.
• 1/2 & 2/1 - Halves or
Doubles the detected
tempo (as selected).
• <<| & |>> – Nudge the
beat-markers forward or
backward as selected.
• A.BEATGRID - Auto beatgrid. The Beatgrid is used to sync all tempo
sensitive functions (sampler loops, beat-mixing etc) to the song's
tempo:
- Auto ON (button white) - MAGIX Digital DJ will set the Beat
marks automatically.
- Auto OFF (button grey) - Manual beat-grid settings is possible.
Hold Shift+Click anywhere on the waveform and drag OR click
on the nudge buttons below the A.BEATGRID button.
• Rescan - Forces a rescan of the beat and frequency analysis.
• Ready - Shows the progress of the analysis.
• OK - Accept settings and return to the standard interface controls.
• SLAVE - Slaves the tempo to the Master tempo (see the toolbar).
Note: The Pitch slider will be de-activated in slave mode.
• SYNC - Syncs the beat to the other Deck. Left-click is momentary, right-click
is a locking switch.
• Beat jump arrows - Upper arrows jumps one beat, lower jumps one bar,
forward/backward.

18 Track Window and Transport Controls
• Left and Right Pitch Seek Arrows - Nudge the track pitch in the direction of
the arrow (right is faster, left slower). A blue box will flash around the arrow to
indicate the required action for manual synchronization of the beat.
• DOWNBEAT - Left-click to set the downbeat position of a cued track. The
downbeat setting is critically important when automatic beat-synchronization
with other deck samplers, VST MIDI players is required.
• START - Left-click to set the track start position. Note that this will prevent
cueing to positions before that marker.
• Beat Indicator circle - Flashes on each beat.
• VST - Activates any VST plugins loaded into the VST Plugins ("VST Host")
page and associated with the deck.
Note: Record, sampler record, VST plugin/host, vinyl/external
control and MIDI controller functions are not included in MAGIX
Digital DJ. To activate these functions, you must upgrade (view
page 9) your version to Deckadance Home or Club Edition.
• (headphones) - Monitor the selected deck through the headphone buss. This
routing is selected in the Toolbar, Audio setup (view page 41).

Faders & Beat-phase Display 19
Faders & Beat-phase Display
Controls
This section is important for manual mixing/beatmixing of your tracks.
• <| & |>- Jump phase one beat.
Note: these buttons also jump the LOOP & LEAP (view page 16) functions.
• <<| & |>> - Jump phase one beat.
Note: these buttons also jump the LOOP & LEAP (view page 16) functions.
• Level - Individual deck A & B level faders.
• Beat-phase LEDs - Show the 4 beats of a bar (assuming the track is in 4/4).
• Fine beat-phase - A bar will grow toward the leading deck. No bar = perfect
phase.
• <- & -> - Auto-XFade start buttons.
• A & B - Transform deck A and B. Depending on the current state of the
X-Fader the switches will Punch / LMB (left-click) a faded/muted track or Cut
/ RMB (right-click) a playing track. The transformation is immediate.
• X-Fade - Master cross-fader control.

20 Faders & Beat-phase Display
Beat-phase display
Beat-phase - Above the main X-fader is a set of 4 LEDs. The LEDs blink on to
show beat currently playing in each deck. Deck A upper Deck B lower. The
down-beat is indicated below (1st LED as noted). It is important to pay
attention that the decks are in step, playing the same beat of each bar (they
aren’t in this example). Mixing tracks that are out of step often ends in tears.
The nudge buttons allow you to skip forward/backward a beat (top) or bar
(bottom), use these buttons to get the decks in phase.
Fine phase - Below the phase LEDs is a bar-display (shown above,
‘Fine–phase’) that grows in the direction of the leading deck (A left, B right).
When the bar disappears (or is small) in the middle, the decks are perfectly
aligned.
Faders & Mixing
Auto-mix - Toilet breaks and other emergencies are not a problem with the
Auto-mix function. See the Playlist panel ("Playlist"). You can set the tracks to
be played, X-fade time etc and take a break.
Auto-fade & Punch-in - Auto X-fade is very useful to free your hands during a
routine X-fade, leaving you to concentrate on more important matters (your
hair for instance). The auto X-fade buttons are the bent-arrow switches to
either side of the X-fade slider (left shown). Click to start an auto-X-fade.
Note: The X-fade speed is controlled by the time settings to the right of the
Auto-mix button on the Playlist panel ("Playlist"), select between 15 to 90
seconds. Below the auto-X-fade buttons are the Deck A and B punch-in
switches. Below the auto-X-fade buttons are the Deck A and B punch-in
switches. There are two options, Left click to momentarily pass a mix of the
selected deck to the outputs and Right click (Ctrl+click) to momentarily mute
the selected deck. Also shown is the Deck A volume trim slider.
Track selection for the perfect X-fade - Advice mode ON. You will find it a lot
easier to pull of perfect X-fades on tracks with long lead in/lead-outs. Those
are the start and end portions of tracks that have a beat and not much else
going on. This means there wont be any discordant melodies or sounds
producing negative interactions. Many songs are available in ‘club mix’ or
‘dance mix’ versions for this very reason. Seek them out. Another handy tool
is the Bass X-fade switch on the Playlist panel. This fades the bass along with
the deck volume and at the 50% mix point drops the bass on both decksto
compensate for the added energy of the two tracks. This will keep the
/