Page is loading ...

Page 1 of 15
Tools Required: Power screwdriver; Allen key set (provided)
2 persons required for installation
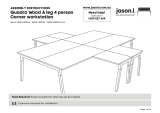
ASSEMBLY INSTRUCTIONS
Quadro A leg 4 person
Corner workstation
Sizes: 1400Lx1800W , 1600Lx1800W , 1800Lx1800W mm
Need help!
Call us on
1300 527 665
www.jasonl.com.au

Page 2 of 15
E
Table top x4
Table top Return x4
Legs Quadro A x2
Legs Quadro A Return x4
Connector frame x1
Beam: Main desk x4
Beam: Return x4
Plastic bracket x24
Joiner plates x8
A
B
C
D
E
F
G
H
I
Allen key x2O
M8x20MM CSK x12
M8x20MM Socket head x12
M6x20MM Socket head x24
M6x30MM Socket head x24
Join plates Screws x8
J
K
L
M
N
COMPONENTS
SCREWS
G
F
H
I
J K L M N
A
B
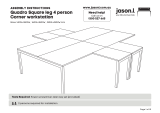
ASSEMBLY INSTRUCTIONS
Quadro A leg 4 person
Corner workstation
Sizes: 1400Lx1800W , 1600Lx1800W , 1800Lx1800W mm
Need help!
Call us on
1300 527 665
www.jasonl.com.au
C
D

Page 3 of 15
ASSEMBLY INSTRUCTIONS
Quadro A leg 4 person
Corner workstation
Sizes: 1400Lx1800W , 1600Lx1800W , 1800Lx1800W mm
www.jasonl.com.au
Need help!
Call us on
1300 527 665
The first step is to assemble the
workstation frame, without table tops
and without returns frames and tops.

Page 4 of 15
ASSEMBLY INSTRUCTIONS
Quadro A leg 4 person
Corner workstation
Sizes: 1400Lx1800W , 1600Lx1800W , 1800Lx1800W mm
Need help!
Call us on
1300 527 665
www.jasonl.com.au
Using Allen Key provided, attach 4 plastic brackets (H) per leg (C)
(as per picture above) using M6x20MM (L) Socket head screw. Do
the same with Connector frame (E).
Using Allen Key provided, attach M8x20MM Socket head (K)-
screw socket half way into leg for both legs (C) and into
Connector frame (E).
K
L
STEP 01 STEP 02
CEE
C

Page 5 of 15
ASSEMBLY INSTRUCTIONS
Quadro A leg 4 person
Corner workstation
Sizes: 1400Lx1800W , 1600Lx1800W , 1800Lx1800W mm
Need help!
Call us on
1300 527 665
www.jasonl.com.au
STEP 03
Adjust extendable main desk beans (F) to
desired length using markers and secure
beam at that length using screws provided
50
1200
1300
1400
1500
1600
1700
1800
1900
2000
50
F

Page 6 of 15
ASSEMBLY INSTRUCTIONS
Quadro A leg 4 person
Corner workstation
Sizes: 1400Lx1800W , 1600Lx1800W , 1800Lx1800W mm
Need help!
Call us on
1300 527 665
www.jasonl.com.au
Attach main desk beams (F) to legs (C) and Connector frame (E)
using nut insert in legs. See point attached
Frame looks like this. Using Allen Key, attach main desks beams (F)
with Socket (J)
STEP 05
J
J
J
J
J
J
J
J
STEP 04
TOP VIEW
CE

Page 7 of 15
ASSEMBLY INSTRUCTIONS
Quadro A leg 4 person
Corner workstation
Sizes: 1400Lx1800W , 1600Lx1800W , 1800Lx1800W mm
www.jasonl.com.au
Need help!
Call us on
1300 527 665
The next step is to assemble and
attach the return structures to the
main frame.

STEP 06
Attach the return beams (G) to return legs (D) using nut insert in legs. See point attached.
Then, connect the hook of the return beam to the beam of the main structure.
Repeat thsi step until the entire frame is complete. Page 8 of 15
ASSEMBLY INSTRUCTIONS
Quadro A leg 4 person
Corner workstation
Sizes: 1400Lx1800W , 1600Lx1800W , 1800Lx1800W mm
Need help!
Call us on
1300 527 665
www.jasonl.com.au
J
G
D

Page 9 of 15
ASSEMBLY INSTRUCTIONS
Quadro A leg 4 person
Corner workstation
Sizes: 1400Lx1800W , 1600Lx1800W , 1800Lx1800W mm
www.jasonl.com.au
Need help!
Call us on
1300 527 665
The next step is about to add both the
main and return table tops over the
entire frame.

N
I
B
STEP 07
Page 10 of 15
Attach Connector Plates (I) to Return Top (B) by tightening Screws (N)
ASSEMBLY INSTRUCTIONS
Quadro A leg 4 person
Corner workstation
Sizes: 1400Lx1800W , 1600Lx1800W , 1800Lx1800W mm
Need help!
Call us on
1300 527 665
www.jasonl.com.au

STEP 08
Page 11 of 15
Place table tops (A) on top of frame - with cutout at the back of the desk.
Using nut inserts in the desk, use M6x30mm socket (M) and attach desktop to the frame.
Using nut inserts in the desktop, use M6x30mm socket (M) and attach return desktops (B) to the frame.
Once desktop are attached and secure to the frame, use woods screws (N) and secure joiner plates (I) to the underside of desktop A.
nut insert nut insert
TABLE TOP
BOTTOM VIEW
M
I
N
B
A
nut insertnut insert
ASSEMBLY INSTRUCTIONS
Quadro A leg 4 person
Corner workstation
Sizes: 1400Lx1800W , 1600Lx1800W , 1800Lx1800W mm
Need help!
Call us on
1300 527 665
www.jasonl.com.au

Page 12 of 15
ASSEMBLY INSTRUCTIONS
Quadro A leg 4 person
Corner workstation
Sizes: 1400Lx1800W , 1600Lx1800W , 1800Lx1800W mm
Need help!
Call us on
1300 527 665
www.jasonl.com.au
If you have purchased with
desk mounted screens

Page 13 of 15
STEP 09
Please leave 25mm gap between 2 x table top (A) so we can drop the return desk mounted screen in between the two tops.
Please position the screen so that it sits at the same level as the bottom surface of the desktop. Please adjust the screen
position to make sure the screen end meet with the the desk end and please hold the screen.
Second person to insert single desk mounted rod brackets. The brackets rod goes inside the pre-drilled screens holes.
The screen holes are located around 300mm from the screen end each. First person to hold screen stand still.
ASSEMBLY INSTRUCTIONS
Quadro A leg 4 person
Corner workstation
Sizes: 1400Lx1800W , 1600Lx1800W , 1800Lx1800W mm
Need help!
Call us on
1300 527 665
www.jasonl.com.au
B
A

Page 14 of 15
STEP 10
Second person to drill 4 holes into the brackets holes with provided wood screws into the underneath desktop.
Please check the position of the rod brackets and bracket holes again before drilling the screws all the way
through. Please tighten all the wood screws.
side view
ASSEMBLY INSTRUCTIONS
Quadro A leg 4 person
Corner workstation
Sizes: 1400Lx1800W , 1600Lx1800W , 1800Lx1800W mm
Need help!
Call us on
1300 527 665
www.jasonl.com.au

Page 15 of 15
STEP 11
Using an Allen key remove top 4 caps from all screens uprights. Bring four partition towards one another and slide the 4 way
connector rod - down between the four screen uprights.
ASSEMBLY INSTRUCTIONS
Quadro A leg 4 person
Corner workstation
Sizes: 1400Lx1800W , 1600Lx1800W , 1800Lx1800W mm
Need help!
Call us on
1300 527 665
www.jasonl.com.au
/