Page is loading ...

DVD +/- Write /Re Writable
HARD DRIVE / DVD RECORDER
ASW8411-160
Customer Help Line 01422 203676
USER MANUAL

TABLE OF CONTENT
Safety information.........................................................................
.
Front Panel and Rear Panel..............................................................
.
Basi
c
Connections..........................................................................
Featur
e
Hightlights............................................................................
Dis
c
Types..........................................................................................
Remot
e
Control..................................................................................
On Screen Set-up.............................................................................
.
4.1.Setting the Time and Date................................................................................................................
4.2.Settin
g
the Language.......................................................................................................................
4.3.Settin
g the Video Preferences..........................................................................................................
4.4.Parenta
l Control.............................................................................................................................
4.5.Settin
g
the Digital Audio Output.......................................................................................................
4.6.T
V
Channel Set-up..........................................................................................................................
4.1.Settin
g
the Time and Date................................................................................................................
4.2.Settin
g the Language.......................................................................................................................
4.3.Settin
g
the Video Preferences..........................................................................................................
4.4.Parenta
l
Control.............................................................................................................................
4.5.Settin
g
the Digital Audio Output.......................................................................................................
4.6.T
V
Channel Set-up..........................................................................................................................
A
B
C
1
2
3
4
Pow
e
r On/Off..................................................................
Recording/Tim
e
Shifting..............................................
5
6
5
6
6.1.Save.............................................................................................................................................
6.2.Recodin
g
to DVD.............................................................................................................................
6.3.Recodin
g
Quality.............................................................................................................................
6.4.Recodin
g Source.............................................................................................................................
6.5.Chapte
r Markers.............................................................................................................................
6.1.Save...........................................................................................................................................
.
.
6.2.Recodin
g to DVD.............................................................................................................................
6.3.Recodin
g Quality.............................................................................................................................
6.4.Recodin
g
Source.............................................................................................................................
6.5.Chapte
r Markers.............................................................................................................................
Timer Recording.........................................................................
Dubbing..........................................................................................
.
.
DV
D
Disc Menu................................................................................
Dis
c
Edit Menu................................................................................
Titl
e
Edit Menu................................................................................
Palybac
k
from Optical Drive.......................................................
Hd
d
Title List..................................................................................
Sorting..........................................................................................
.
.
Playbac
k
from HDD....................................................................
7
8
9
10
11
12
13
14
15
15.1.Playback of Recorded Disc...........................................................................................................15.1.Playback of Recorded Disc...........................................................................................................
HDD Edit..........................................................................................
16
16.1.Delete............................................................................................ ...........................................
16.2.Split..........................................................................................
.. .................................................
16.3.Segment..........................................................................................
.. ............................................
16.4.Chang
e
Index Pivture....................................................................................................................
16.5.Rename..........................................................................................
.. ...........................................
16.6.Lock..........................................................................................
.
................................................
16.7.Protect..........................................................................................
.. ...........................................
16.1.Dele
t
e
16.2.Spl
i
t
16.3.Segme
n
t
16.4.Chang
e Index Pivture
16.5.Rena
m
e
16.6.Lo
ck
16.7.Prote
c
t
..........................................................................................
.
............................................
..........................................................................................
.. .................................................
..........................................................................................
.
.............................................
..........................................................................................
.. ........................
..........................................................................................
.. ...........................................
..........................................................................................
.
................................................
..........................................................................................
.
............................................
Concurrency Scenarios Summary........................................................
17
17.1.Basic DVD Recorder Operations..................................................................................................17.1.Basi DVD Recorder Operations..................................................................................................
Specifications.....................................................................
Troubl
e
Shooting.................................................................
Carin
g
for
discs...................................................................
Main
s
Plug Wiring.................................................................
18
19
20
21
1-
2
3
4-
5
6
7
8
9
10
11
11
12
13
13
14
14-
1
5
16
17
18
18
18
18-
1
9
20
20
20
21
22-
2
6
27
27
27-
2
8
28
29
29
29
30
31
31
32
33
33
33
34
35
36
36
1-
2
3
4-
5
6
7
8
9
10
11
11
12
13
13
14
14-
1
5
16
17
18
18
18
18-
1
9
20
20
20
21
22-
2
6
27
27
27-
2
8
28
29
29
29
30
31
31
32
33
33
33
34
35
36
36

Safety Information
CAUTION. PLEASE READ AND OBSERVE ALL WARNINGS AND INSTRUCTIONS GIVEN IN THIS USER
MANUAL AND MARKED ON THE APPLIANCE. RETAIN THIS BOOKLET FOR FUTURE USE.
This
set has been designed and manufactured to assure your personal safety. Improper use can result in
Ele
ctric shock or Fire hazard. The safeguards in this appliance will protect you if you observe the correct
pr
ocedures for installation, servicing and operation. There are NO user parts inside. DO NOT REMOVE
THE CASE OR OTHER COVERS OR YOU MAY BE EXPOSED TO DANGEROUS VOLTAGES OR LASER
RADIATION AND WILL INVALIDATE YOUR WARRANTY. REFER ALL SERVICING TO QUALIFIED SERVICE
PERSONNEL.
The lightning flash with arrowhead symbol, within an equilateral triangle,
is intended to alert the user to the presence of un-insulated “dangerous
voltage” within the products enclosure that may be of sufficient
ma
gnitude to constitute a risk of electric shock to the persons.
The exclamation point within an equilateral triangle is intend to alert the
user to the presence of important operating and maintenance (servicing)
instr
uctions in the literature accompanying the appliance.
Correct disposal of this Product
(Wast
e Electrical & Electronic Equipment (WEEE)
The crossed out “Wheelie bin” is intended to show that this appliance
must
not be placed with ordinary household waste at the end of its useful
life.
To prevent possible harm to the environment or human health from
uncontr
olled waste disposal, please keep separate from other household
waste and recycle it responsibly to promote the sustainable reuse of
material
resources.
Household users should contact either the retailer where you purchased
the product, or their local government office for details of where and how
you can take this item for environmentally safe re-cycling.
Business users should contact their supplier and check the terms and
conditions
of the purchase contract. This product must not be mixed with
other commercial wastes for disposal
CLA
SS 1 LASER PRODUCT
DANGER : INVISIBLE LASER RADIATION WHEN OPEN AND
INTERLOCKS DEFEATED, AVOID EXPOSURE TO BEAM
This appliance complies with European Safety and Electrical directives
WARNING. THIS APPLIANCE MUST BE EARTHED
A.

Location.
Do not plac
e
on an unstable surface loose shelves or
othe
r
similar place. Dropping this apparatus will severely
harm its functions.
Do not p
lace where ventilation is restricted, a good
airflow is necessary to maintain trouble free operation.
Thi
s apparatus contains a small ventilation fan, do NOT
obstruct its grill
Wa
ter and Moisture.
Do not use t
hi
s appliance near water, or in damp
locations such as basements.
Do not place vases or other
such containers on top of
the
ap
pliance
Object or Liquid entry
No not
a
ll
ow objects to be pushed into the ventilation
slots, they may touch live parts and cause an electric
shock. Do not spill any liquids into the appliance.
If e
ither should happen, disconnect from the mains
supply and contact a service engineer. DO NOT attempt
to repair yourself.
Ventilation.
Slots and openings in the cabinet are provided for
ventilation to ensure the correct operation of the
appliance.
Do NOT blo
ck
any slots or restrict any Fan opening.
Do NOT pl
ace
on fabric or soft furnishings, this will
restri
ct airflow.
Do not place
in
a cabinet without sufficient clearance. If
placing in a cabinet this apparatus should be at the
bo
tt
om of the appliance “Stack”
He
at
.
Do not plac
e
on or near appliances that radiate heat
such as radiators or in direct sunlight
Power cord protection.
Do not p
lace
wires where they may be tripped over or
stepped on. Do not pull the cord when removing the
mains plug, grip the plug body firmly.
Power cord protection.
Do not p
la
ce
wires where they may be tripped over or
stepped on. Do not pull the cord when removing the
mains plug, grip the plug body firmly.
Lig
htning.
During a th
understorm or when leaving the appliance for
long periods such as holidays, disconnect the aerial
input (if external aerial) and remove the mains plug, This
is to prevent power surges damaging the apparatus
Disc Tray.
Keep your fingers well clear of the DVD disc drawer
when it is closing, it may cause injury and damage to the
player. Do NOT push the disc drawer to close, use the
Open / Close button on the appliance.
Do NOT
allow children to operate this apparatus without
supervision.
Dama
ge
R
equiring Service.
Should any of the following happen, disconnect from the
mains supply and call an engineer or Technical Help
Centr
e. :-
Damage
the
mains cord or plug.
Liquid or other objects enter the casing.
The
a
pparatus has been exposed to rain or moisture.
If the
ap
pliance does not operate in accordance with the
no
rmal operation expected.
If
the
appliance has been dropped or the case damaged.
Sa fety Information
A.

3
1. STANDBY ON/OFF 8. DVD DOOR
2. VIDEO INPUT (CVBS) 9. DOOR OPEN / CLOSE
3. AUDIO IN LEFT 10. PLAY
4. AUDIO IN RIGHT 11.PAUSE
5. S-VIDEO INPUT 12. INPUT SOURCE
6. DV INPUT (Firewire) 13 PREV / NEXT
7. USB INPUT 14. CH + / -
1. TUNER RF INPUT 13. COAXIAL RF(AUDIO) OUTPUT
2. TUNER RF OUTPUT (Loop through) 14. Cr / Pr OUTPUT
3. VIDEO INPUT (CVBS) 15. AUDIO OUTPUT (OPTICAL)
4. S-VIDEO INPUT 16. SUB WOOFER OUTPUT
5. AUDIO LEFT INPUT 17. SURROUND RIGHT OUTPUT
6. AUDIO RIGHT INPUT 18. SURROUND CENTRE OUTPUT
7. VIDEO OUTPUT (CVBS) 19. SURROUND LEFT OUTPUT
9. MIXED AUDIO LEFT OUTPUT 21. FRONT RIGHT OUTPUT
10. Y (Luma) OUTPUT 22. SCART OUTPUT
11. MIXED AUDIO RIGHT OUTPUT 23. SCART INPUT
12. Cb / Pb OUTPUT 24. VENTILATION FAN
Note :- Do not have more than one Video output connected at any one time, picture degrading or interference may occ
ur.
B
FRONT PANEL

4
S-VIDEO/OUT
S-VIDEO/IN
SR SL
S-VIDEO/OUT
S-VIDEO/IN
SR SL
C.
BASIC
CONNECTIONS
To Record from an analog cable TV signal, connect the cable to the tuner IN jack.To Record from an analog cable TV signal, connect e I .
To connect devices that you will be recording from (such as DVD player VCR,etc)To connect devices that you will be recording from (such as DVD player VCR,etc)
Connectin
g
to a audio system and TV equipped with YUV video inputConnecting to a audio system and TV equipped with YUV video input

5

6
6
1. Feature Highlights
Program RecordingProgram Recording
Record
ing
from TV tuner or analog AV inputRecording from TV tuner or analog AV input
Manua
lly
set up timer recording for a TV program or a
recurr
ing
TV program
Manua
lly
set up timer recording for a TV program or a
recurr
ing
TV program
Personal
video copyingPersonal video copying
Ana
log
and DV camcorder tapesAnalog and DV camcorder tapes
Easily
control a DV camcorder using LSI Logic s
industry-lead
ing
Direct Digital Dub technology
Eas
ily
control a DV camcorder using LSI LogiLogic’c’
industry-lead
ing
Direct Digital Dub technology
TMTM
VCR tapesVCR tapes
Watch
a TV program(in tim shifting mode) while high-
sp
eed
dubbing is in progress
Wa
tch
a TV program(in timeme shifting mode) while high-
sp
eed
dubbing is in progress
Simp
le ,
easy video editing, easy video editing
Rename
programs, Delete programs, Split programs,
Segm
ent
programs
Ident
if
y
and keep the desired video and remove the Protions
yo
u
do not need-easily!
Ren
ame
programs, Delete programs, Split programs,
Segm
ent
programs
Ident
if
y
and keep the desired video and remove the Protions
yo
u
do not need-easily!
Overview
Time ShiftingTime Shifting
Simultane
ous
Video recording and playbackSimultaneous Video recording and playback
Pa
use
and resume live TV broadcast, Issue trick mode
comma
nds
like fast forward, fast rewind,jump,and instant
re
pla
y
Play
a previously recorded program while another
prog
ram
is being recorded simultaneously
Pa
use
and resume live TV broadcast, Issue trick mode
comma
nds
like fast forward, fast rewind,jump,and instant
re
pla
y
Play
a previously recorded program while another
prog
ram
is being recorded simultaneously
Featrues
Time Shifting
Program Record
ing
Man
ua
l
programming
VCR
Plus+,VideoPlus&
Show
Vie
w
VPS/PDC
(EU
)
Man
ual
programming
VCR
Plus+,VideoPlus&
Show
Vie
w
VPS/PDC
(EU
)
Personal Video Archiving
From
VCR, analog camcorder,
or
digital(IEEE input(1-Link))
camcor
der
with Direct Digital
Du
b
From
VCR, analog camcorder,
or
digital(IEEE input(1-Link))
camcor
der
with Direct Digital
Du
b
TMTM
DVD Playback
DVD,VCD,JP
EG,
MPEG
fil
e video
MP
EG-
1 Layer 2,
, WMA, CD stereo
audi
o Dolby Digital & DTS digital
audi
o output
DVD,VCD,JP
EG,
MPEG
fil
e video
MPEG-
1 Layer 2,
, WMA, CD stereo
audi
o Dolby Digital & DTS digital
Digi
tal Audio
Compressio
n
Visible Superior Video Qual
ity
DoMiN
oFX
noise reduction and
vi
deo encoding, progressive scan
ou
tp
u
t
DoMiN
oF
X
noise reduction and
vi
de
o
encoding, progressive scan
ou
tpu
t
R
USB Interface
JPEG picture slide show Digit
al JPEG picture slide show Digital AudioAudio
music playb
ac
k music playback
Copying pictures and music o
nt
oCopying pictures and music onto
recordable
DV
Drecordable DVD
Compress
ionCompression
Region C
ode
The
region code for this
Recorder
TWO
.
Th
e
region code for this
Reco
rd
e
r
is
HDD DVD

7
2. Disc Types
The DVD Recorder capable of recording on the following types of disc:
Lo
go
Disc type comments
Lo
go
Disc type comments
DV
D+R
DVD
+R
W
DVD
-R
W
DV
D-
R
DVD-R
The
DVD Recorder is capable of playing the following types of discs:
DVD-Vi
d
e
o
DV
D
+R
DVD+
RW
DVD
-R
DV
D
-R
DVD
-
RW
VC
D
Aud
io CD
CD-R/
-R
W
Vid
eo
recording in DVD+VR format
ISO-96
60
for Digital Audio Compression/WMA and
JPG
archiving
DVD-Vid
eo
format (disc must be finalized)
DVD+
VR
format
Vid
eo
CD, Super VCD
Fo r
playback of CD-DA, Digital Audio Compression,
JP
EG
files,WMA
NOT
E:
The DVD Recorder cannot play back the following type of discs:
DVD-
RA
M
SVCD(hi
gh
density layer)
DVD-Audio(M
LP
encoded tracks)

/FILE/FILE
Do not break open or throw on a fire exhausted batteries.
If batteries “leak” remove immediately, clean out any residue with warm soapy water, do
NOT allow water to enter the main body of the Remote Control, dry thoroughly before fitting
new batteries.
Do not throw old batteries in the domestic waste. Contact your local waste authority for
disposal instructions.

9
On-screen Set -up
The following Table provides the Setup options of the DVD Recorder(press
button on the remote)
Setup
System Set-up MenuSystem Set-up Menu Setup ItemSetup Item
OptionsOptions
DescriptionDescription
Record
Playback
Language
Clock

10
The time and date will need to be set before a timer recording can be set. There are two ways to set the clock
of
the recorder: Auto Clock or Manual Clock setting.
4.1.Sett
ing
the time and date
Auto
Clock Setting-If a Public Broadcasting Station (PBS channel in USA)is a available in your
ar
ea,
the clock may set itself automatically by tuning to this channel.
Make
sure the antenna or cable box connections are correct.
Cha
nge
the channel to the local PBS station.
Pres
s SETUP button on the remote control to display the SYSTEM SET-UP
MEN
U . Use CURSOR buttons on the remote control to move the highlight bar to
CLOC
K and press SELECT .
Man
ual
Clock Setting - If the clock does not autormatically set itself, the clock will need to be
manua
lly
set.
Press SETUP button on the remote control to display the SYSTEM SET-UP
MEN
U .
Use CURSOR buttons on the remote control to move
t
he highlight bar to CLOCK
and
press SELECT
Us
e CURSOR buttons on the remote control to move the highlight bar to DATE and
pres
s SELECT using the numeric keys to enter the correct date inmm/dd/yy/format
(Month/Day/Y
ear
)
Use
the CURSOR button on the remote control to move the highlight bar to TIME and
pres
s SELECT using the numeric keys to enter the correct time in hh:mm format
(Hour:Minute:Seco
nds
)
Af
ter
the date and time have been set press SETUP to exit
No
te:
-If the mains power is removed the clock and calendar will require require re setting before a timer
record
ing
can take place.
Us
e CURSOR buttons on the remote control to move the highlight bar to TIME and
pres
s SELECT .

11
4.2. Setting the language
Af
ter
the date and time have been set , press SETUP button again to exit.
Press SETUP button on the remote control to display the SYSTEM SET-UP MENU .
Us
e CURSOR buttons on the femote control to move the highlight bar to LANGUAGE and
pres
s SELECT .
Us
e CURSOR buttons on the remote control to move the highlight bar to the desired
language
and press SELECT .
OSD Language - Set the language of the DVD Recorder on -sereen display menus.
Men
u Language - Set the language of the DVD Video Disc menu.(NOTE:English will be
displa
yed
if the disc s menu has not been created in the language selected)
Subti
tle
Language -Set the language for subtitles when the subtitle feature is turned on
dur
ing
playback(NOTE:English subtitles will be displayed if the disc does not provide
subtit
les
in the language selected)
Audio Language - Set the soundtrack language for audio playback.
Us
e CURSOR buttons on the remote control to move the highlight bar to the desired language
and
press SELEC
SE
LE
CT
SE
LE
CT
SE
LE
CT
T button
Af
ter
the language has been set, press SETUP button again to exit.
NOT
E : The following languages are supported on the DVD Recorder. Some discs may not support the
desi
red
language for Meun, Subtitle or Audio . If a non-suppored language is selected, the DVD Recorder
will
default to English.
No
rth
Amercia - English, Spanish, French
Eur
ope - English, Spanish, French, German
4.3.
Setting the Video Preferences
Progressive/Interla
ced
-If you have a standand television, you will need to set the DVD Recorder
mode.
If your television supports
progressive scan, make sure the DVD
Recor
der
is connected to the television using a somponent video cable and set to
mode. Please refer to the progressive scan setting of your TV instructions
man
ua
l
.
Yo
u
can modify the default language settings of the DVD Recorder by using the following procedure.
INTERLACED
to
PROGRESS
IV
E
Press SETUP button on the remote control to display the SETUP MENU
Use the CURSOR buttons to select VIDEO and press
Use the CURSOR buttons to select VIDEO OUTPUT FORMAT and press
Use the CURSOR buttons to select INTERLACED or PROGRESSIVE and press
(do not select PROGRESSIVE unless your TV supports this mode).
(Note in PROGRESSIVE mode S-VIDEO and CVBS will be turned off)
To return to normal viewing press the SETUP button

12
To set the VIDEO OUTPUT FORMAT please follow the steps below to match the player to your TV.
Press SETUP on the remote control to display the SYSTEM SET-UP Menu
Use the CURSOR buttons to move the highlight bar to VIDEO and press SELECT
SELECT
Use the CURSOR buttons to select TV TYPE and press
Use the CURSOR buttons to select PAL or NTSC and press (PAL is default in UK)
To exit the menu press SETUP
4.4 Parental Control
You can use the PARENTAL CONTROL setting to control the type of discs the DVD Recorder plays, this can be
used to prevent children viewing unsuitable material. If a DVD disc is assigned a rating higher than the rating set a
password is required.
Press SETUP on the remote control to display the SETUP MENU
Use the CURSOR buttons to select PREFERENCES and press
Use the CURSOR buttons to select PARENTAL LEVEL and press
Use the CURSOR buttons to select the required level and press
You will be required to enter a PASSWORD. (3308) is the default password and then press
The display wil now show the selected parental level
Press SETUP to return to normal viewing.
4.4B PASSWORD EXCHANGE
In the menu above you may chose your own PASSWORD
Use the CURSOR buttons to select CHANGE PASSWORD and press
Enter the default PASSWORD. The cursor will automatically select the next box (Input New
Password)
Input you new password and confirm again.. The OK box will highlight. Press
.
The new PASSWORD is now set.
To return to normal viewing press SETUP
SEL
E
CT
SEL
E
CT
SELECT
SELECT
SELECT
SELECT
SELECT
NOTE : The VIDEO OUTPUT FORMAT can also be set alternatively by pressing to N/P button
on the rem ote control.
Us
e CURSOR buttons on the remote control to move the highlight bar to TV
ASPEC
T RATIO and press SELECT .
Use
CURSOR buttons on the remote control to move the highlight bar to either
one
of the following settings:
16:
9 - Select this option for a 16:9 wide screen TV monitor
Pa
n Scan - Select this option to display will show only the center protion of
mo
vie
on a standard television.The display will show only the center protion of
the
movie with protions of the left and right image cut off.
Lette
r Box - Select this option to display the entire image of a widescreen
mo
vie
on a standard telecision. The display will show the movie with black
bars
on the top and bottom of the screen.
has been set,press
VIDEO OUTPUT FORMAT
SETUP
After
button again to exit.
Press SETUP button on the remote control to display SETUP MENU
Use the CURSOR buttons to select TV DISPLAY and press
SE
LE
CT

13
Press
SE
TUP
on the remote control to enter the
SETU
P MENU
Use the
CURSOR
buttons to select
ANALOG AUDIO OUTPUT
and press
The DVD recorder is defaulted to
2C
H
(Normal Stereo) to set for Surround Sound select
5.
1
and press
Depending upon your type of AV amplifier you will need to select the type of output from
Use the
CURSOR buttons to select
SPDIF Output
and press
. There are two
LCPM
and
RAW
.
If your AV amplifier has a built in decoder select
RAW
if it has no built in decoder select
LCPM.
If LCPM is selected you may select two different “BIT” rates 48K bits /sec and 96 K
You will need
to check the specification of your AV amplifier to select the correct level.
4.6 TV Channel Setup.
Before you search and store TV channels on this appliance, ensure that a good aerial system is connected.
remembe
r the quality of the signal affects the quality of recordings.
AUTOSEARCH
Press the SETUP button to enter the SETUP MENU
Use the CURSOR buttons to select RECORDING menu and press
Us
e the CURSOR buttons to select COUNTRY SELECTION and press
Us
e the CURSOR buttons to select the correct country (United Kingdom) is default
Us
e the CURSOR buttons to select AUTO SCAN CHANNEL and press
A message will ask you if you wish to continue, use the buttons to select OK or
CANCEL
.
A Message SCAN CHANNELS will display “Default TV System”. It will display “PAL “I”
by default, select
continue and press
A display will show how many channels are found. Leave this to complete. If you wish
to STOP the search.
.
When search is complete the recorder should display BBC1, BBC2, ITV, CH4 and CH5
not the case, exit the AutoScan menu and enter the
MODIFY CHANNEL menu.
MODIFY CHANNEL
Exit all menu’s and select the programme you wish to edit (P002)
Press the SETUP button to enter the SETUP menu
Use the CURSOR buttons to select RECORDING menu and press
Use the CURSOR buttons to select MODIFY CHANNEL and press
Use the CURSOR buttons to select CHANNEL and press
The first item to be selected is “C”, this denotes an “Off air” channel , “S”
denotes a “Cable channel
”
Use the buttons to select the first Digit. To change the value use the buttons.
second digit repeat. Press and the Recorder will switch to the
If more than one channel is incorrectly numbered you will have to repeat from the start,
un
til the stations are
in the correct locations.
the DVD recorder.
options
,
bits /sec.
Please
and press
and press
to discontinue press
in
that order. If this is
To change the
chann
el number you selected.
SELECT
SELECT
SELECT
SELECT
SELECT
SELECT
SELECT
SELECT
SELECT
SELECT
SELECT
SELECT
SELECT
SELECT
4.5.Setting the Digital Audio Output
You can use this setting to modify the digital audio output to the AV receiver depending on whether
it includes its own digital multi-channel sound decoder.

14
STANDARD.
In the UK “PAL I” is used, this denotes the “Sound Standard”. If you wish to move to another country
you must reset the STANDARD. In Western Europe select PAL B/G, Eastern Europe PAL D/K, and France
SE
CAM B/G.
To select the STANDARD enter the SETUP menu and select RECORDING, press
Use the CURSOR buttons to select MODIFY CHANNEL INFORMATION and press
Use the CURSOR buttons to select STANDARD and press
Use the CURSOR buttons to select the required STANDARD and press
To exit the menu press SETUP
See the picture right to see a typical setting menu >
NAMING A STATION
Some
stations may not be named correctly or at all, to enter the
Nam
ing programme.
Enter the SETUP menu and select RECORDING
Use the CURSOR buttons to select MODIFY CHANNEL
INFORMATION and press
Use the CURSOR buttons to select NAME and press
Using the buttons Each letter will be highlighted in turn.
To change the letters use the buttons and when complete press
FINE TUNING.
Occasionally a station may not be tuned in correctly when using “AutoSearch”. To Fine Tune :-
Press the SETUP button, and select RECORDING
Use the CURSOR buttons to select MODIFY CHANNEL INFORMATION
Use the CURSOR buttons to select FINE TUNE
Use the buttons to move the Fine Tuning Cursor to improve the Sound or picture
To return to normal viewing press SETUP
DE
LETE.
After Auto search you may have some stations that are noisy or unwanted, to remove these follow
these instructions :
In TV mode select the channel not required and enter the SETUP Mode and select RECORDING
Use the CURSOR buttons to select MODIFY CHANNEL INFORMATION
Use the CURSOR buttons to select DELETE and press
The station will now be removed. If you have made a mistake, move the cursor down to Cancel and
pre
ss
.
The station will be restored.
To return to normal viewing press SETUP
The first time you power on the system you will be asked to go through the system setup. After the system has scanned and
stor
ed the channel information, language and other information to its default memory, the system will enter “Time Shifting Mode”,
displaying the first channel P001 (see time shifting section ) When you turn on the system and select TV the recorder will
automatically enter the Time shifting mode. Power OFF will switch the recorder to Stand By Mode and stop recording. The
system will be ready for “Timer” recordings.
When the Recorder is turned on or you press the TV button from other modes, the last viewed TV channel will be selected and
Time Shifting starts automatically. Time Shifting allows “pausing” the live TV broadcast for up to 60 minutes, at any time live viewing
can be resumed. Press PAUSE to pause the broadcast and PLAY to resume TV viewing. The system will automatically resume
playing if PAUSE has been over 60 minutes.
Note : At any time during time shifting you van press INFO to view help and status information> The INFO button can be pressed
r
epeatedly to view information according to the following chart
SELECT
SELECT
SELECT
SELECT
SELECT
SELECT
SELECT
SELECT
SELECT
Standby On/Off
Recording/Time shifting

15
Remotc control
On-Screen Display
Inf
o (pressed once)
Inf
o (pressed twice)
Inf
o (pressed three times)
Time
shifting buffer information. Current playback
time,
time of recording, time of recording minus 1
hour,
trick mode status, Saving status,
Channel/Source
information,Dubbing indicator(if
Dubbing
is on-going) - see time shifting figure
Hot
keys and navigation information
Removes
all On-screen Display
You
can navigate in Time shifting mode and control the audio output by using the following remote control
keys
:
Key
Resul
t
Not
e
Note: By default, changing the channel
will
erase all Time shifting required for
the
current channel. This option can be
reset
in the Setup ->HDD ->Time shift
Buffer
->Preserve
CH+/
-
Change the channel
Numeric
keys
Change
the channel
Fast
Forward. Press to
cycle
through4,8,16,32x
speeds
.
Fas
t Rewind. Press to cycle
throug
h 4,8,16,32x speeds.
FF
FR
Slo
w
Slow
forward. Press to
cycle
through 1/2,1/4 or
1/8x
speeds
Jump
back 10 seconds
Repla
y
Mut
e
VOIL+/
-
Mute
audio on/off
Decrease/increase
volume
(Arrow
Left Key)
If
you are using the default value of Setup->HDD->Timeshift Buffer->Refresh , and change Channels,
The
Time shifting buffer data will be lost, no message will be provided prior to doing so. However, if you
se
t Setup->HDD->Timeshift Buffr ->PRESERVE ,and change Channels, the Time shifting buffer data
will
be maintained.

16
Note:
Ifyou have change d the source of video,the time shofting buffer will be erasd.
Note
:
Durin
g
Time shifting,a Timer recording(programmed recording)may come up.Asyou can not watch
on
e
program in Time shifting and another channel,the DVD Recorder will prompt you to confirm if you want
to
keep the current channel or proceed with Timer recording.lf there is no response,the DVD Recorder
assume
s
Timer recording should be started.The message will appear 2 minutes before the timer recording is
du
e
.
Tim
e
shifting is stored in a buffer that contains 60 minutes of recording.After 60 minutes,the buf fer will
be
progressively overwritten.lf you need to keep the video contained in this buffer for future usage,you
ca
n
save all or part of the buffer.
6.1.Save
ln order to save from within Time shifting buffer,two options are available:
Sav
e
Option 1. While viewing a program, press Rec, this will start saving the segment you are watching,
yo
u
can navigate forward. During the saving operation, by pressing Rec, you will increase the length of the
progra
m
you are saving by 30 minutes up to a maximum of 3 hours. Press STOP to indicate the end of the
savin
g
operation. The saved part of the time shifting buffer will be tagged in red color.
is stored in
you need to buffer for
.
.
Sav
e
Option 2. While viewing a program,press and hold down for 2 seconds.This will save the entire
Tim
e
shifting buffer.If is pressed, the saving will terminate at that point in the buffer. During the
savin
g
operation,by pressing ,you will increase the length of the program you are saving by 30
minute
s
up to a maximum of 3 hors.press and hold for 2 seconds if you want to cancel the entire
savin
g
operation.
Y
o
u can not change the channel or the source if saving is on-going(the end of the recording segment
is
either not entered,or in case of long recording ,it has no been reached),saving has to be manually
stoppe
d
first (by pressing ). The DVD Recorder will prompt you to stop saving first, the segment
wil
l
be saved on HDD and then channel or source change will be performed.
Onl
y
one segment in the Time shifting buffer can be identified for saving,it is not possible to
identif
y
multiple segments.Once the segment has been saved and registered in Title list,then this segment
30
in the buffer can
(An
d
its preceding video part )will be removed from the Time shifting buffer.
l
f
you are using, you can only save a segment which is
entirel
y
from the same source and channel.ln other words,you can not save part of one channel and part of
a subsequent channel,in this case,Save option 2 is not supported.
If
you have defined a save segment and continue time shifting,you can still navigate inside the time
shiftin
g
buffer and view the segment that has been tagged for saving as long as the live recording has not
caugh
t
up the beginning of the segment to be saved. The saved program will be removed from the
.
of
the
Rec
Sto
p
Re
c
Sto
p
STOP
Note
:
Note:
Note:
Setup->HDD->Timeshift Buffer->Preserv
e

1817
Note :- When the source is DV, the recording will not be in Time Shift mode, press the DV button on
the remote control to select DV input mode.
You can use SETUP to Erase the HDD contents. Enter the SETUP menu and Use the cursor buttons
to select TIMESHIFT. Press and use the buttons to select EMPTY HARD DISC. Press
, you will be asked to
confirm your selection or CANCEL. Select which you require.
ALL DATA WILL BE LOST.
6.2 Recording to DVD.
This DVD recorder can record from different sources such as :-TV, Internal HDD and other external
media. Load a recordable disc (DVD+R, DVD+RW, DVD-R and DVD-RW) and press REC (OTR),
it starts recording and both source and recording media will be shown on the Tv screen, it also
Not
e. When OTR is in progress on a DVD disc, you cannot record to HDD simultaneously . Once
a DVD recording is halted you need to press HDD (or go to TV/Video mode to restart time shifting).
In
OTR mode you can select the length of recording by pressing the REC button, each press adds
30 minut
es to the recording time. The maximum recording time depends upon recording quality
e.
g. a 4.7GB DVD R/RW disc can record up to 6 Hrs if SLP (Super Long Play) is selected.
Th
e higher recording quality selected, the shorter the recording time. Both the elapsed time and
total recording times will be displayed on the Tv screen.
To Pause the recording, press PAUSE on the remote control or DVD Front Control panel. Press
PAUSE again or REC
to resume recording.
Recor
ding will continue until STOP is pressed on either the remote control or the
in
dicates a recording is taking place.
DVD Front Control panel
SELECT
SELECT
Time shifting buffer when it is about to be overwritten by Live recording. DVD Recorder will carry our save
immediatel
y
if the system is powered down, or if the buffer is about to be flushed.
While
in Time shifting mode, you can use the following keys for other operations:
Key
Resul
t
Note
HDD
DV
D
Ejec
t
Key
Powe
r
Key
Set
u
p
Time
r
Sour
c
e
P/
N
I/
P
HD
D
title list
Pla
y
disc
Open/clo
s
e the tray
Power off
Bri
n
g up Setup menu
Bri
n
g up Timer menu
Chang
e the video source
Chan
g
e video output
standa
rd to PAL/NTSCto
Chan
g
e the video output
mo
d
e to
Interlaced/Progressive Scan
(recording continues)
(recordin
g
continues unless if you
to
record to DVD)
(recordin
g
continues)
(recording
continues)
(recordin
g
continues)
want
:(option
:
,HDD,SPACE MANAGEMENT,AUTOMATIC) if the is not pressed
an
d
the recording takes all the available space on the hard disk drive, the DVD Recorder overwrites
un-protecte
d
titiles in the FIFO(First In First Out)scheme This rule will not affect titles that are selected to
be
copied to DVD, the selected titiles will be kept until copying operation is over If despite this procedure,
ther
e
is no space on the HDD to record, the DVD Recorder will provide the same message as if it was in
mode(see next)
ACE MANAGEMENT, MANUAL.) STOP
STOP
not pressed and
th
e
recording takes all the available space on the hard disk drive, the DVD Recorder will stop recording
an
d
prompt the user to erase some titles and create more room in the HDD.
, HDD, SP
is
NOTE
NOTE
MANUAL
SETUP
:(option:
SETUP
If the

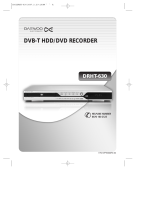
6.3 Recording Quality
You can select up to six settings of recording quality. This will determine the quality of recording on DVD disc and
capacity on HDD. Higher the quality, the less time for recording.
Record Quality Recording Time
4.7Gb DVD
Recording Time
160Gb HDD
Recording Time
250
Gb HDD
Video Quality
HQ (High quality) 1 Hour 34 Hrs 53 Hrs Best
SP (Standard play) 2 Hrs 68Hrs 106 Hrs Good
SP+ (Std play +) 2.5 Hrs 82 Hrs 128 Hrs Average
LP (Long play) 3 Hrs 100 Hrs 156 Hrs Fair
EP (Extended play) 4 Hrs 136 Hrs 212 Hrs Normal
SLP (Super Long
play)
6 Hrs 204 Hrs 318 Hrs Poor
6.4 Recording Source.
You can select the video source you wish to record from. The following options are available.
TV Tuner
Front CVBS (Video)
Front S-Video
Rear
CVBS (Video)
Rear
S-Video
DV
(Firewire)
SC
ART
Press the SOURCE button on either the Remote control or the button on the player, each press will change
the source input.
Note :- If you are using the Front Video input sockets, use the front Audio sockets also, this applies
co
nversely at the rear.
Press SE
TUP button on the remote control
Us
e the CURSOR buttons to select RECORDING and press
Us
e the CURSOR buttons to select AUTO CHAPTER MARKER and press
Us
e the CURSOR buttons to select from the list and press
Press SE
TUP to return to normal viewing
You can set the DVD recorder to schedule recordings to start and end at a specific time. The recording can be
to either DVD or HDD.
Press the TIMER button on the remote control, you will see a table as shown below
SELECT
SELECT
SELECT
6.5.Chapter Markers
7 Timer Recording
NOTE: You cannot record copy-protected video using the DVD Recorder.Copy-protected video includes
DVD-Video discs and some satellite broadcasts.
You can set the DVD Recorder to automatically insert chapters into each program recording
(titles) to allow faster navigation during playback.This feature will automatically insert chapters at 10
minutes intervals during recording.The interval can be programmed in Setup menu at OFF(no
marker),5 min,10 min(default),20 min,or 30 min.
/