Page is loading ...

For Research Use Only. Not for use in diagnostic procedures.
Axiom™ 2.0 Assay 96-Array Format Automated
Workflow
USER GUIDE
for Biomek FXP (Windows® 7 and XP)
Publication Number 702963
Revision 5

The information in this guide is subject to change without notice.
DISCLAIMER
TO THE EXTENT ALLOWED BY LAW, LIFE TECHNOLOGIES AND/OR ITS AFFILIATE(S) WILL NOT BE LIABLE FOR SPECIAL, INCIDENTAL, INDIRECT, PUNITIVE,
MULTIPLE, OR CONSEQUENTIAL DAMAGES IN CONNECTION WITH OR ARISING FROM THIS DOCUMENT, INCLUDING YOUR USE OF IT.
Revision history
Important Licensing Information
This product may be covered by one or more Limited Use Label Licenses. By use of this product, you accept the terms and conditions of all applicable Limited
Use Label Licenses.
Corporate entity
Life Technologies | Carlsbad, CA 92008 USA | Toll Free in USA 1 800 955 6288
TRADEMARKS
All trademarks are the property of Thermo Fisher Scientific and its subsidiaries unless otherwise specified.
Jitterbug is a trademark of Boekel Scientific. Microsoft, Excel, and Windows are either registered trademarks or trademarks of Microsoft Corporation in the United
States and/or other countries. QIAGEN and REPLI-g are registered or registration-pending trademarks of the QIAGEN Group. Beckman Coulter, and Biomek are
either registered trademarks or trademarks of Beckman Coulter, Inc. TRobot is a trademark of Biometra GmbH. DNA Engine Tetrad, Bio-Rad, Microseal, and
Hard-Shell are registered trademarks of Bio-Rad Laboratories, Inc.
©2018 Thermo Fisher Scientific Inc. All rights reserved.
Manufacturer:
Affymetrix Pte Ltd
7 Gul Circle #2M-01
Keppel Logistics Building
Singapore 629563
Products:
Axiom™ Array Plates
Manufacturer:
Thermo Fisher Scientific Baltics UAB
V.A. Graiciuno 8, LT-02241
Vilnius, Lithuania
Products:
Axiom™ 2.0 Reagent Kit
Table 1 Revision history of Pub. no. 702963
Revision Date Description
5 04 September 2018 Baseline for revision history.
Updated to the current document template, with associated updates to
trademarks, logos, licensing, and warranty.
Updated to reflect that Axiom™ Reference gDNA 103 has been removed from
the reagent kit and has been made available for purchase separately.

Axiom™ 2.0 Assay 96-Array Format Automated Workflow User Guide—Biomek FXP3
Contents
CHAPTER 1 The Axiom™ 2.0 Assay . . . . . . . . . . . . . . . . . . . . . . . . . . 10
About . . . . . . . . . . . . . . . . . . . . . . . . . . . . . . . . . . . . . . . . . . . . . . . . . . . . . . . . . . . . . . . . . . . 10
What’s new . . . . . . . . . . . . . . . . . . . . . . . . . . . . . . . . . . . . . . . . . . . . . . . . . . . . . . . . . . . . . . 11
Overview of the Axiom™ 2.0 Assay . . . . . . . . . . . . . . . . . . . . . . . . . . . . . . . . . . . . . . . . . . . . 11
Running multiple plate workflows . . . . . . . . . . . . . . . . . . . . . . . . . . . . . . . . . . . . . . . . . . . . 12
CHAPTER 2 Genomic DNA preparation and requirements. . . . . . . . . 13
Overview . . . . . . . . . . . . . . . . . . . . . . . . . . . . . . . . . . . . . . . . . . . . . . . . . . . . . . . . . . . . . . . . 13
Sources of genomic DNA . . . . . . . . . . . . . . . . . . . . . . . . . . . . . . . . . . . . . . . . . . . . . . . . . . . 14
General requirements . . . . . . . . . . . . . . . . . . . . . . . . . . . . . . . . . . . . . . . . . . . . . . . . . . . . . . 15
Special requirements . . . . . . . . . . . . . . . . . . . . . . . . . . . . . . . . . . . . . . . . . . . . . . . . . . . . . 15
Assessing the quality of genomic DNA using 1% Agarose E-gels . . . . . . . . . . . . . . . . . . 15
Genomic DNA extraction/purification methods . . . . . . . . . . . . . . . . . . . . . . . . . . . . . . . . . . . 17
Genomic DNA cleanup . . . . . . . . . . . . . . . . . . . . . . . . . . . . . . . . . . . . . . . . . . . . . . . . . . . . . 17
Genomic DNA preparation . . . . . . . . . . . . . . . . . . . . . . . . . . . . . . . . . . . . . . . . . . . . . . . . . . . 17
Duration . . . . . . . . . . . . . . . . . . . . . . . . . . . . . . . . . . . . . . . . . . . . . . . . . . . . . . . . . . . . . . . 18
Equipment, consumables and reagents required . . . . . . . . . . . . . . . . . . . . . . . . . . . . . . . 18
1. Thaw samples and control . . . . . . . . . . . . . . . . . . . . . . . . . . . . . . . . . . . . . . . . . . . . . . . 19
2. Quantitate and dilute gDNA . . . . . . . . . . . . . . . . . . . . . . . . . . . . . . . . . . . . . . . . . . . . . . 19
3. Aliquot the diluted samples and the control . . . . . . . . . . . . . . . . . . . . . . . . . . . . . . . . . . 20
4. Freeze or proceed . . . . . . . . . . . . . . . . . . . . . . . . . . . . . . . . . . . . . . . . . . . . . . . . . . . . . 20
5. Create a Batch Registration file . . . . . . . . . . . . . . . . . . . . . . . . . . . . . . . . . . . . . . . . . . . 20
CHAPTER 3 Target preparation on the Biomek FXP with
Windows® XP . . . . . . . . . . . . . . . . . . . . . . . . . . . . . . . . . . . . . . . . . . . . 22
Axiom™ 2.0 Assay . . . . . . . . . . . . . . . . . . . . . . . . . . . . . . . . . . . . . . . . . . . . . . . . . . . . . . . . . 22
Before using the Biomek workstation . . . . . . . . . . . . . . . . . . . . . . . . . . . . . . . . . . . . . . . . . . 23
Seal, vortex, and centrifuge . . . . . . . . . . . . . . . . . . . . . . . . . . . . . . . . . . . . . . . . . . . . . . . . 23
Breaking the light curtain . . . . . . . . . . . . . . . . . . . . . . . . . . . . . . . . . . . . . . . . . . . . . . . . . . 24
Pipette tip usage . . . . . . . . . . . . . . . . . . . . . . . . . . . . . . . . . . . . . . . . . . . . . . . . . . . . . . . . 24
Plate centrifuge . . . . . . . . . . . . . . . . . . . . . . . . . . . . . . . . . . . . . . . . . . . . . . . . . . . . . . . . . 25
Set the Biomek software default settings . . . . . . . . . . . . . . . . . . . . . . . . . . . . . . . . . . . . . 25

Contents
4Axiom™ 2.0 Assay 96-Array Format Automated Workflow User Guide—Biomek FXP
Equipment, consumables, labware, and reagents required . . . . . . . . . . . . . . . . . . . . . . . . . 29
Labware and materials used on the Biomek™ workstation deck . . . . . . . . . . . . . . . . . . . 29
Proper tray alignment and loading . . . . . . . . . . . . . . . . . . . . . . . . . . . . . . . . . . . . . . . . . . 40
Stain trays and covers . . . . . . . . . . . . . . . . . . . . . . . . . . . . . . . . . . . . . . . . . . . . . . . . . . . . 43
Loading tray consumables onto the GeneTitan™ MC Instrument . . . . . . . . . . . . . . . . . . . 46
Reagent block template . . . . . . . . . . . . . . . . . . . . . . . . . . . . . . . . . . . . . . . . . . . . . . . . . . . 48
Reservoir labels . . . . . . . . . . . . . . . . . . . . . . . . . . . . . . . . . . . . . . . . . . . . . . . . . . . . . . . . . 48
Related Biomek FXP Target Prep Express documentation . . . . . . . . . . . . . . . . . . . . . . . . 50
Stage 1: DNA Amplification . . . . . . . . . . . . . . . . . . . . . . . . . . . . . . . . . . . . . . . . . . . . . . . . . . 51
Duration . . . . . . . . . . . . . . . . . . . . . . . . . . . . . . . . . . . . . . . . . . . . . . . . . . . . . . . . . . . . . . . 51
Equipment, consumables, labware, and reagents required . . . . . . . . . . . . . . . . . . . . . . . 51
1. Perform the pre-run checklist . . . . . . . . . . . . . . . . . . . . . . . . . . . . . . . . . . . . . . . . . . . . . 53
2. Thaw and prepare the reagents and Sample Plate . . . . . . . . . . . . . . . . . . . . . . . . . . . . 57
3. Run the DNA Amplification step . . . . . . . . . . . . . . . . . . . . . . . . . . . . . . . . . . . . . . . . . . 57
Summary of DNA Amplification . . . . . . . . . . . . . . . . . . . . . . . . . . . . . . . . . . . . . . . . . . . . . 63
Stage 2: Fragmentation and Purification . . . . . . . . . . . . . . . . . . . . . . . . . . . . . . . . . . . . . . . . 65
Duration . . . . . . . . . . . . . . . . . . . . . . . . . . . . . . . . . . . . . . . . . . . . . . . . . . . . . . . . . . . . . . . 65
Equipment, consumables, labware, and reagents required . . . . . . . . . . . . . . . . . . . . . . . 65
1. Perform the pre-run checklist . . . . . . . . . . . . . . . . . . . . . . . . . . . . . . . . . . . . . . . . . . . . 66
2. Thaw and prepare the amplified DNA samples and reagents . . . . . . . . . . . . . . . . . . . . 67
3. Run the Fragmentation step . . . . . . . . . . . . . . . . . . . . . . . . . . . . . . . . . . . . . . . . . . . . . 67
Summary of Fragmentation . . . . . . . . . . . . . . . . . . . . . . . . . . . . . . . . . . . . . . . . . . . . . . . . 72
4. Precipitation . . . . . . . . . . . . . . . . . . . . . . . . . . . . . . . . . . . . . . . . . . . . . . . . . . . . . . . . . . 75
5. Centrifuge and dry pellets . . . . . . . . . . . . . . . . . . . . . . . . . . . . . . . . . . . . . . . . . . . . . . . 75
Stage 3: Resuspension and hybridization preparation . . . . . . . . . . . . . . . . . . . . . . . . . . . . . 76
Duration . . . . . . . . . . . . . . . . . . . . . . . . . . . . . . . . . . . . . . . . . . . . . . . . . . . . . . . . . . . . . . . 76
Equipment, consumables, labware, and reagents required . . . . . . . . . . . . . . . . . . . . . . . 76
1. Preparing frozen pellets and Axiom Resusp Buffer . . . . . . . . . . . . . . . . . . . . . . . . . . . . 77
2. Perform the pre-run checklist . . . . . . . . . . . . . . . . . . . . . . . . . . . . . . . . . . . . . . . . . . . . 78
3. Thaw and prepare the reagents . . . . . . . . . . . . . . . . . . . . . . . . . . . . . . . . . . . . . . . . . . . 78
4. Run the Resuspension and Hybridization Preparation step . . . . . . . . . . . . . . . . . . . . . 78
Summary of Resuspension and Hybridization Preparation . . . . . . . . . . . . . . . . . . . . . . . . 85
Stage 4: Preparation for the GeneTitan™ MC Instrument . . . . . . . . . . . . . . . . . . . . . . . . . . . 89
About Stage 4 . . . . . . . . . . . . . . . . . . . . . . . . . . . . . . . . . . . . . . . . . . . . . . . . . . . . . . . . . . 89
Duration of GeneTitan™ MC Instrument reagent preparation and sample preparation . . . 93
Equipment and consumables required . . . . . . . . . . . . . . . . . . . . . . . . . . . . . . . . . . . . . . . 94
1. Perform the pre-run checklist . . . . . . . . . . . . . . . . . . . . . . . . . . . . . . . . . . . . . . . . . . . . 95
2. Prepare the reagents for GeneTitan Reagent Tray Preparation . . . . . . . . . . . . . . . . . . . 96
3. Prepare the Sample Plate (if stored at –20°C) and the array plate . . . . . . . . . . . . . . . . 98
4. Prepare the GeneTitan™ MC Instrument. . . . . . . . . . . . . . . . . . . . . . . . . . . . . . . . . . . . . 99
5. Run the Preparation for GeneTitan™ step . . . . . . . . . . . . . . . . . . . . . . . . . . . . . . . . . . 100

Contents
Axiom™ 2.0 Assay 96-Array Format Automated Workflow User Guide—Biomek FXP5
6a. Complete Stage 4: Preparation for GeneTitan™ - Hybridization Trays . . . . . . . . . . . . 106
6b. Complete Stage 4: Preparation for GeneTitan™ - Reagent Trays. . . . . . . . . . . . . . . . 107
6c. Complete Stage 4: Preparation for GeneTitan™ - multiple plate workflow . . . . . . . . 107
Summary of Preparation for GeneTitan™ MC Instrument . . . . . . . . . . . . . . . . . . . . . . . . . 109
CHAPTER 4 Target preparation on the Biomek FXP with
Windows® 7 . . . . . . . . . . . . . . . . . . . . . . . . . . . . . . . . . . . . . . . . . . . . . 114
What's new for the Axiom™ 2.0 Target Preparation 96-Samples Biomek® FXP
Method for Windows® 7 . . . . . . . . . . . . . . . . . . . . . . . . . . . . . . . . . . . . . . . . . . . . . . . . . . . . 114
New features . . . . . . . . . . . . . . . . . . . . . . . . . . . . . . . . . . . . . . . . . . . . . . . . . . . . . . . . . . 114
Method changes . . . . . . . . . . . . . . . . . . . . . . . . . . . . . . . . . . . . . . . . . . . . . . . . . . . . . . . . 115
New off-deck step . . . . . . . . . . . . . . . . . . . . . . . . . . . . . . . . . . . . . . . . . . . . . . . . . . . . . . 115
Others . . . . . . . . . . . . . . . . . . . . . . . . . . . . . . . . . . . . . . . . . . . . . . . . . . . . . . . . . . . . . . . 115
Axiom™ 2.0 Assay . . . . . . . . . . . . . . . . . . . . . . . . . . . . . . . . . . . . . . . . . . . . . . . . . . . . . . . . 115
Before using the Biomek workstation . . . . . . . . . . . . . . . . . . . . . . . . . . . . . . . . . . . . . . . . . 117
Seal, vortex and centrifuge . . . . . . . . . . . . . . . . . . . . . . . . . . . . . . . . . . . . . . . . . . . . . . . 117
Breaking the light curtain . . . . . . . . . . . . . . . . . . . . . . . . . . . . . . . . . . . . . . . . . . . . . . . . . 118
Pipette tip usage . . . . . . . . . . . . . . . . . . . . . . . . . . . . . . . . . . . . . . . . . . . . . . . . . . . . . . . 118
Plate centrifuge . . . . . . . . . . . . . . . . . . . . . . . . . . . . . . . . . . . . . . . . . . . . . . . . . . . . . . . . 119
Setting method preferences . . . . . . . . . . . . . . . . . . . . . . . . . . . . . . . . . . . . . . . . . . . . . . 119
Equipment, consumables, labware, and reagents . . . . . . . . . . . . . . . . . . . . . . . . . . . . . . . . 123
Labware and materials used on the Biomek workstation deck . . . . . . . . . . . . . . . . . . . . 124
Proper tray alignment and loading . . . . . . . . . . . . . . . . . . . . . . . . . . . . . . . . . . . . . . . . . . 134
Stain trays and covers . . . . . . . . . . . . . . . . . . . . . . . . . . . . . . . . . . . . . . . . . . . . . . . . . . . 137
Loading tray consumables onto the GeneTitan™ MC Instrument. . . . . . . . . . . . . . . . . . . 140
Reagent block template . . . . . . . . . . . . . . . . . . . . . . . . . . . . . . . . . . . . . . . . . . . . . . . . . . 142
Reservoir stickers . . . . . . . . . . . . . . . . . . . . . . . . . . . . . . . . . . . . . . . . . . . . . . . . . . . . . . . 142
Related Biomek FXP Target Prep Express documentation . . . . . . . . . . . . . . . . . . . . . . . 144
Stage 1: DNA Amplification . . . . . . . . . . . . . . . . . . . . . . . . . . . . . . . . . . . . . . . . . . . . . . . . . 145
Duration . . . . . . . . . . . . . . . . . . . . . . . . . . . . . . . . . . . . . . . . . . . . . . . . . . . . . . . . . . . . . . 145
Equipment, consumables, labware and reagents required . . . . . . . . . . . . . . . . . . . . . . . 145
1. Perform the pre-run checklist . . . . . . . . . . . . . . . . . . . . . . . . . . . . . . . . . . . . . . . . . . . . 147
2. Thaw and prepare the reagents and Sample Plate . . . . . . . . . . . . . . . . . . . . . . . . . . . 148
3. Run the DNA Amplification step . . . . . . . . . . . . . . . . . . . . . . . . . . . . . . . . . . . . . . . . . 149
Summary of DNA Amplification . . . . . . . . . . . . . . . . . . . . . . . . . . . . . . . . . . . . . . . . . . . . 155
Stage 2: Fragmentation and Purification . . . . . . . . . . . . . . . . . . . . . . . . . . . . . . . . . . . . . . . 157
Duration . . . . . . . . . . . . . . . . . . . . . . . . . . . . . . . . . . . . . . . . . . . . . . . . . . . . . . . . . . . . . . 157
Equipment, consumables, labware and reagents required . . . . . . . . . . . . . . . . . . . . . . . 157
1. Perform the pre-run checklist . . . . . . . . . . . . . . . . . . . . . . . . . . . . . . . . . . . . . . . . . . . 158
2. Thaw and prepare the amplified DNA samples and reagents . . . . . . . . . . . . . . . . . . . 159

Contents
6Axiom™ 2.0 Assay 96-Array Format Automated Workflow User Guide—Biomek FXP
3. Run the Fragmentation step . . . . . . . . . . . . . . . . . . . . . . . . . . . . . . . . . . . . . . . . . . . . 159
4. Precipitation . . . . . . . . . . . . . . . . . . . . . . . . . . . . . . . . . . . . . . . . . . . . . . . . . . . . . . . . . 165
Summary of Fragmentation . . . . . . . . . . . . . . . . . . . . . . . . . . . . . . . . . . . . . . . . . . . . . . . 166
Stage 3: Centrifugation and drying pellets . . . . . . . . . . . . . . . . . . . . . . . . . . . . . . . . . . . . . 169
Duration . . . . . . . . . . . . . . . . . . . . . . . . . . . . . . . . . . . . . . . . . . . . . . . . . . . . . . . . . . . . . . 169
Equipment and consumables required . . . . . . . . . . . . . . . . . . . . . . . . . . . . . . . . . . . . . . 169
Stage 4: Resuspension, Hybridization Preparation, and QC . . . . . . . . . . . . . . . . . . . . . . . . 171
Duration . . . . . . . . . . . . . . . . . . . . . . . . . . . . . . . . . . . . . . . . . . . . . . . . . . . . . . . . . . . . . . 171
Equipment, consumables, labware and reagents required . . . . . . . . . . . . . . . . . . . . . . . 171
1. Preparing frozen pellets and Axiom Resusp Buffer . . . . . . . . . . . . . . . . . . . . . . . . . . . 173
2. Perform the pre-run checklist . . . . . . . . . . . . . . . . . . . . . . . . . . . . . . . . . . . . . . . . . . . 173
3. Thaw and prepare the reagents . . . . . . . . . . . . . . . . . . . . . . . . . . . . . . . . . . . . . . . . . . 173
4. Run the Resuspension, Hybridization Preparation, and QC step . . . . . . . . . . . . . . . . 173
Summary of Resuspension and Hybridization Preparation . . . . . . . . . . . . . . . . . . . . . . . 180
Stage 5: Preparation for the GeneTitan™ MC Instrument . . . . . . . . . . . . . . . . . . . . . . . . . . 184
About Stage 5 . . . . . . . . . . . . . . . . . . . . . . . . . . . . . . . . . . . . . . . . . . . . . . . . . . . . . . . . . 184
Duration of GeneTitan™ MC Instrument reagent preparation and sample preparation . . 188
Equipment and consumables required . . . . . . . . . . . . . . . . . . . . . . . . . . . . . . . . . . . . . . 189
1. Perform the pre-run checklist . . . . . . . . . . . . . . . . . . . . . . . . . . . . . . . . . . . . . . . . . . . 190
2. Prepare the reagents for GeneTitan Reagent Tray Preparation . . . . . . . . . . . . . . . . . . 191
3. Prepare the Sample Plate (if stored at –20°C) and the array plate . . . . . . . . . . . . . . . . 193
4. Prepare the GeneTitan™ MC Instrument . . . . . . . . . . . . . . . . . . . . . . . . . . . . . . . . . . . 193
5. Run the Preparation for GeneTitan™ step. . . . . . . . . . . . . . . . . . . . . . . . . . . . . . . . . . . 195
6a. Complete Stage 4: Preparation for GeneTitan™ - Hybridization Trays . . . . . . . . . . . . 201
6b. Complete Stage 4: Preparation for GeneTitan™ - Reagent Trays . . . . . . . . . . . . . . . 202
6c. Complete Stage 4: Preparation for GeneTitan™ - Multiple Plate Workflow . . . . . . . . 202
Summary of Preparation for GeneTitan MC™ Instrument . . . . . . . . . . . . . . . . . . . . . . . . 204
CHAPTER 5 Array processing with the GeneTitan™ MC Instrument. 209
Before using the GeneTitan™ MC Instrument . . . . . . . . . . . . . . . . . . . . . . . . . . . . . . . . . . . 209
Proper tray alignment and loading . . . . . . . . . . . . . . . . . . . . . . . . . . . . . . . . . . . . . . . . . 209
Stain trays and covers . . . . . . . . . . . . . . . . . . . . . . . . . . . . . . . . . . . . . . . . . . . . . . . . . . . 212
Email and telephone notifications from the GeneTitan™ MC Instrument . . . . . . . . . . . . . 214
GeneTitan™ MC Instrument lamp . . . . . . . . . . . . . . . . . . . . . . . . . . . . . . . . . . . . . . . . . . . 215
Setup options for array plate processing . . . . . . . . . . . . . . . . . . . . . . . . . . . . . . . . . . . . 215
Aborting a process . . . . . . . . . . . . . . . . . . . . . . . . . . . . . . . . . . . . . . . . . . . . . . . . . . . . . . 218
Stage 1: Create and upload Batch Registration file . . . . . . . . . . . . . . . . . . . . . . . . . . . . . . 219
Stage 2: Hybridization . . . . . . . . . . . . . . . . . . . . . . . . . . . . . . . . . . . . . . . . . . . . . . . . . . . . . 220
Reagents required . . . . . . . . . . . . . . . . . . . . . . . . . . . . . . . . . . . . . . . . . . . . . . . . . . . . . . 220
Setup the instrument . . . . . . . . . . . . . . . . . . . . . . . . . . . . . . . . . . . . . . . . . . . . . . . . . . . . 221

Contents
Axiom™ 2.0 Assay 96-Array Format Automated Workflow User Guide—Biomek FXP7
Load Axiom™ array plate and hybridization tray onto the GeneTitan™ MC Instrument . . 225
Load a second Axiom™ array plate and hybridization tray onto the
GeneTitan™ MC Instrument . . . . . . . . . . . . . . . . . . . . . . . . . . . . . . . . . . . . . . . . . . . . . . . 231
Status window prompts and actions required . . . . . . . . . . . . . . . . . . . . . . . . . . . . . . . . . . . 233
Stage 3: Ligate, Wash, Stain, and Scan . . . . . . . . . . . . . . . . . . . . . . . . . . . . . . . . . . . . . . . 235
Equipment, consumables, and reagents required . . . . . . . . . . . . . . . . . . . . . . . . . . . . . . 235
Proper installation of the GeneTitan™ tray consumables . . . . . . . . . . . . . . . . . . . . . . . . . 236
Load trays onto the GeneTitan™ MC Instrument . . . . . . . . . . . . . . . . . . . . . . . . . . . . . . . 237
Continuing the workflow . . . . . . . . . . . . . . . . . . . . . . . . . . . . . . . . . . . . . . . . . . . . . . . . . . . 244
Shutting down the GeneTitan™ MC Instrument . . . . . . . . . . . . . . . . . . . . . . . . . . . . . . . . . . 245
CHAPTER 6 Processing 8 Axiom™ array plates per week. . . . . . . . . 246
Overview of the 8-plate workflow . . . . . . . . . . . . . . . . . . . . . . . . . . . . . . . . . . . . . . . . . . . . 246
Plate numbering scheme . . . . . . . . . . . . . . . . . . . . . . . . . . . . . . . . . . . . . . . . . . . . . . . . . 246
Week 1 . . . . . . . . . . . . . . . . . . . . . . . . . . . . . . . . . . . . . . . . . . . . . . . . . . . . . . . . . . . . . . . 247
Week 2 . . . . . . . . . . . . . . . . . . . . . . . . . . . . . . . . . . . . . . . . . . . . . . . . . . . . . . . . . . . . . . . 248
Thawing frozen plates of amplified DNA . . . . . . . . . . . . . . . . . . . . . . . . . . . . . . . . . . . . . . . 249
Automated target preparation for processing 8 Axiom™ array plates per week . . . . . . . . . 249
Initial target prep week—Biomek FXP Target Prep Express . . . . . . . . . . . . . . . . . . . . . . . . 250
Initial target prep week—Day 1 . . . . . . . . . . . . . . . . . . . . . . . . . . . . . . . . . . . . . . . . . . . . 250
Initial target prep week—Day 2. . . . . . . . . . . . . . . . . . . . . . . . . . . . . . . . . . . . . . . . . . . . . 251
Initial target prep week—Day 3 . . . . . . . . . . . . . . . . . . . . . . . . . . . . . . . . . . . . . . . . . . . . 252
Initial target prep week—Day 4. . . . . . . . . . . . . . . . . . . . . . . . . . . . . . . . . . . . . . . . . . . . . 254
Initial target prep week—Day 5. . . . . . . . . . . . . . . . . . . . . . . . . . . . . . . . . . . . . . . . . . . . . 255
Simultaneous 8-plate workflow . . . . . . . . . . . . . . . . . . . . . . . . . . . . . . . . . . . . . . . . . . . . . . 257
Eight-plate workflow—Day 1 . . . . . . . . . . . . . . . . . . . . . . . . . . . . . . . . . . . . . . . . . . . . . . 257
Eight-plate workflow—Day 2 . . . . . . . . . . . . . . . . . . . . . . . . . . . . . . . . . . . . . . . . . . . . . . 259
Eight-plate workflow—Day 3 . . . . . . . . . . . . . . . . . . . . . . . . . . . . . . . . . . . . . . . . . . . . . . 262
Eight-plate workflow—Day 4 . . . . . . . . . . . . . . . . . . . . . . . . . . . . . . . . . . . . . . . . . . . . . . 265
Eight-plate workflow—Day 5 . . . . . . . . . . . . . . . . . . . . . . . . . . . . . . . . . . . . . . . . . . . . . . 268
CHAPTER 7 Processing 3 Axiom™ array plates per week. . . . . . . . . 271
Overview of the 3-plate workflow for automated target preparation . . . . . . . . . . . . . . . . . . 272
Thawing frozen plates of amplified DNA . . . . . . . . . . . . . . . . . . . . . . . . . . . . . . . . . . . . . . . 274
Target prep and array processing . . . . . . . . . . . . . . . . . . . . . . . . . . . . . . . . . . . . . . . . . . . . 275
Three plate/week workflow—Day 1 . . . . . . . . . . . . . . . . . . . . . . . . . . . . . . . . . . . . . . . . . 275
Three plate/week workflow—Day 2 . . . . . . . . . . . . . . . . . . . . . . . . . . . . . . . . . . . . . . . . . 276
Three plate/week workflow—Day 3 . . . . . . . . . . . . . . . . . . . . . . . . . . . . . . . . . . . . . . . . . 277
Three plate/week workflow—Day 4 . . . . . . . . . . . . . . . . . . . . . . . . . . . . . . . . . . . . . . . . . 278
Three plate/week workflow—Day 5 . . . . . . . . . . . . . . . . . . . . . . . . . . . . . . . . . . . . . . . . . 280

Contents
8Axiom™ 2.0 Assay 96-Array Format Automated Workflow User Guide—Biomek FXP
CHAPTER 8 Troubleshooting . . . . . . . . . . . . . . . . . . . . . . . . . . . . . . 281
Biomek FXP Target Prep Express . . . . . . . . . . . . . . . . . . . . . . . . . . . . . . . . . . . . . . . . . . . . 281
GeneTitan™ Multi-Channel Instrument . . . . . . . . . . . . . . . . . . . . . . . . . . . . . . . . . . . . . . . . 281
Miscellaneous messages . . . . . . . . . . . . . . . . . . . . . . . . . . . . . . . . . . . . . . . . . . . . . . . . . 282
Fluidic diagnostic messages . . . . . . . . . . . . . . . . . . . . . . . . . . . . . . . . . . . . . . . . . . . . . . 284
Wash/Scan Resume . . . . . . . . . . . . . . . . . . . . . . . . . . . . . . . . . . . . . . . . . . . . . . . . . . . . . 288
Aborting a run . . . . . . . . . . . . . . . . . . . . . . . . . . . . . . . . . . . . . . . . . . . . . . . . . . . . . . . . . 288
APPENDIX A Safety. . . . . . . . . . . . . . . . . . . . . . . . . . . . . . . . . . . . . . 289
General safety . . . . . . . . . . . . . . . . . . . . . . . . . . . . . . . . . . . . . . . . . . . . . . . . . . . . . . . . . . . 289
Chemical safety . . . . . . . . . . . . . . . . . . . . . . . . . . . . . . . . . . . . . . . . . . . . . . . . . . . . . . . . . . 290
Biological hazard safety . . . . . . . . . . . . . . . . . . . . . . . . . . . . . . . . . . . . . . . . . . . . . . . . . . . . 291
APPENDIX B Fragmentation quality control gel protocol . . . . . . . . . 292
Protocol for running a fragmentation quality control gel . . . . . . . . . . . . . . . . . . . . . . . . . . . 292
Equipment required . . . . . . . . . . . . . . . . . . . . . . . . . . . . . . . . . . . . . . . . . . . . . . . . . . . . . 292
E-Gels and reagents . . . . . . . . . . . . . . . . . . . . . . . . . . . . . . . . . . . . . . . . . . . . . . . . . . . . 292
Consumables . . . . . . . . . . . . . . . . . . . . . . . . . . . . . . . . . . . . . . . . . . . . . . . . . . . . . . . . . . 292
Diluting the TrackIt™ Cyan/Orange Loading Buffer . . . . . . . . . . . . . . . . . . . . . . . . . . . . . 293
Fragmentation QC gel protocol . . . . . . . . . . . . . . . . . . . . . . . . . . . . . . . . . . . . . . . . . . . . 293
APPENDIX C Sample quantitation after resuspension . . . . . . . . . . . 295
Protocol for sample quantitation after resuspension . . . . . . . . . . . . . . . . . . . . . . . . . . . . . . 295
Equipment required . . . . . . . . . . . . . . . . . . . . . . . . . . . . . . . . . . . . . . . . . . . . . . . . . . . . . 295
Quantitate the diluted samples . . . . . . . . . . . . . . . . . . . . . . . . . . . . . . . . . . . . . . . . . . . . 295
Assess the OD readings . . . . . . . . . . . . . . . . . . . . . . . . . . . . . . . . . . . . . . . . . . . . . . . . . . 296
Suggested protocol for OD quantitation using the DTX 880 . . . . . . . . . . . . . . . . . . . . . . . . 297
If performing sample quantitation on a plate reader other than the DTX880 . . . . . . . . . . . 303
APPENDIX D Registering samples in GeneChip™
Command Console™. . . . . . . . . . . . . . . . . . . . . . . . . . . . . . . . . . . . . . 304
Creating a GeneTitan™ Array Plate Registration file . . . . . . . . . . . . . . . . . . . . . . . . . . . . . . 304

Contents
Axiom™ 2.0 Assay 96-Array Format Automated Workflow User Guide—Biomek FXP9
APPENDIX E Deionization procedure for GeneTitan™
trays and covers . . . . . . . . . . . . . . . . . . . . . . . . . . . . . . . . . . . . . . . . . 307
Deionization procedure . . . . . . . . . . . . . . . . . . . . . . . . . . . . . . . . . . . . . . . . . . . . . . . . . . . . 308
Ion-indicator cap . . . . . . . . . . . . . . . . . . . . . . . . . . . . . . . . . . . . . . . . . . . . . . . . . . . . . . . . . 310
APPENDIX F GeneTitan™ Multi-Channel Instrument Care . . . . . . . . 311
Cleaning and maintenance . . . . . . . . . . . . . . . . . . . . . . . . . . . . . . . . . . . . . . . . . . . . . . . . . 311
Monthly . . . . . . . . . . . . . . . . . . . . . . . . . . . . . . . . . . . . . . . . . . . . . . . . . . . . . . . . . . . . . . 311
Every 6 months . . . . . . . . . . . . . . . . . . . . . . . . . . . . . . . . . . . . . . . . . . . . . . . . . . . . . . . . 311
Servicing the outer enclosure fan filters . . . . . . . . . . . . . . . . . . . . . . . . . . . . . . . . . . . . . . . 312
Cleaning schedule . . . . . . . . . . . . . . . . . . . . . . . . . . . . . . . . . . . . . . . . . . . . . . . . . . . . . . 312
Cleaning procedure . . . . . . . . . . . . . . . . . . . . . . . . . . . . . . . . . . . . . . . . . . . . . . . . . . . . . 312
Replacing the bottle filters . . . . . . . . . . . . . . . . . . . . . . . . . . . . . . . . . . . . . . . . . . . . . . . . . . 313
Removing and inspecting the filter . . . . . . . . . . . . . . . . . . . . . . . . . . . . . . . . . . . . . . . . . 314
Replacing the filter . . . . . . . . . . . . . . . . . . . . . . . . . . . . . . . . . . . . . . . . . . . . . . . . . . . . . . 314
Replacing the xenon lamp in the GeneTitan™ MC Instrument . . . . . . . . . . . . . . . . . . . . . . . 315
Lamp life/imaging device status notices . . . . . . . . . . . . . . . . . . . . . . . . . . . . . . . . . . . . . 315
Removing the xenon lamp . . . . . . . . . . . . . . . . . . . . . . . . . . . . . . . . . . . . . . . . . . . . . . . . 316
Replacing the lamp . . . . . . . . . . . . . . . . . . . . . . . . . . . . . . . . . . . . . . . . . . . . . . . . . . . . . 317
Resetting the lamp counter. . . . . . . . . . . . . . . . . . . . . . . . . . . . . . . . . . . . . . . . . . . . . . . . 319
Troubleshooting . . . . . . . . . . . . . . . . . . . . . . . . . . . . . . . . . . . . . . . . . . . . . . . . . . . . . . . . . . 320
Log files . . . . . . . . . . . . . . . . . . . . . . . . . . . . . . . . . . . . . . . . . . . . . . . . . . . . . . . . . . . . . . 320
GCC log files for GeneTitan™ MC Instrument Systems . . . . . . . . . . . . . . . . . . . . . . . . . . 321
Insufficient disk space notice . . . . . . . . . . . . . . . . . . . . . . . . . . . . . . . . . . . . . . . . . . . . . . 322
Documentation and support . . . . . . . . . . . . . . . . . . . . . . . . . . . . . . . . 323
Related documentation . . . . . . . . . . . . . . . . . . . . . . . . . . . . . . . . . . . . . . . . . . . . . . . . . . . . 323
Customer and technical support . . . . . . . . . . . . . . . . . . . . . . . . . . . . . . . . . . . . . . . . . . . . . 325
Limited product warranty . . . . . . . . . . . . . . . . . . . . . . . . . . . . . . . . . . . . . . . . . . . . . . . . . . . 325
References . . . . . . . . . . . . . . . . . . . . . . . . . . . . . . . . . . . . . . . . . . . . . 326

10 Axiom™ 2.0 Assay 96-Array Format Automated Workflow User Guide—Biomek FXP
1The Axiom™ 2.0 Assay
About
The first genome-wide association study (GWAS) was published in 2005 (Manolio and
Collins) when individuals carrying particular haplotypes of SNP rs380390
were found to
have increased risk of developing age-related macular degeneration, a study performed
with the Applied Biosystems GeneChip Mapping 100K Array Set (Klein et al.).
As of September, 2009, there have been over 400 peer-reviewed GWAS publications
and over 1774 SNPs have been implicated in human disease (Hindorff et al.). Initial
GWAS studies focused on the “common disease, common variant” hypothesis
(Manolio and Collins) that held that haplotypes with a minor allele frequency (MAF)
5% would show measurable contribution to human disease research.
Current research is shifting towards “complex disease, complex/rare variant” studies.
As such, these research projects require a broader catalog of human variation, such as
is being generated by the 1000 Genomes Project (http://www.1000genomes.org). This
project focuses on identifying alleles with a MAF 5% across a broader spectrum of
human ethnicities. In order to allow our customers to take advantage of this novel and
rare content for genome association and candidate gene studies in a cost effective and
timely manner, Thermo Fisher Scientific is introducing a new genotyping product line:
the Axiom™ Genotyping Solution.
The Axiom Genotyping Solution introduces a new genotyping technology platform
that includes novel assay biochemistry, array configuration and processing, and
automated target preparation. This solution has applications in human disease
research and basic and applied agriculture research.
For human disease research applications, Thermo Fisher Scientific conducted an
empirical screen of genomic content from dbSNP (http://www.ncbi.nlm.nih.gove/
projects/SNP/).
The screen included markers from HapMap and the 1000 Genomes
Project as well as other sources, using HapMap phase 3 samples and/or the original 270
HapMap samples. All of this information has gone into creating a proprietary Thermo
Fisher Scientific database of validated markers that can be interrogated using the
Axiom™ 2.0 Assay.
There are several arrays available for use with the Axiom 2.0 Assay which leverage the
content of this proprietary Thermo Fisher Scientific database. For a complete list of
supporting products visit www.thermofisher.com.

Axiom™ 2.0 Assay 96-Array Format Automated Workflow User Guide—Biomek FXP11
Chapter 1 The Axiom™ 2.0 Assay
What’s new 1
The Axiom 2.0 Assay interrogates biallelic SNPs and simple indels (human only) in a
single, fully automated assay workflow. Starting with genomic DNA, the samples are
processed by performing either an automatic or manual target preparation protocol
followed by automated processing of the array plates in the GeneTitan MC Instrument.
• Target preparation uses methods including DNA amplification, fragmentation,
purification and resuspension of the target in hybridization cocktail.
• The hybridization-ready targets are then transferred to the GeneTitan™ Multi-
Channel (MC) Instrument for automated, hands-free processing including
hybridization, staining, washing and imaging.
Cel files generated by the GeneTitan MC Instrument are processed using the Axiom™
Genotyping Algorithm version 1 (Axiom GT1) available through Applied Biosystems™
Microarray Power Tools or Genotyping Console™ v4.1.
In summary, the Axiom Genotyping Solution is a product line that provides catalog
arrays that:
• Are optimized for high genetic coverage of their population in question.
• Provide highly automated, reproducible results suitable for GWAS.
What’s new
In this version of the Axiom™ 2.0 Assay 96-Array Format Automated Workflow for Biomek
FXP User Guide instructions are provided for running the Biomek FXP Target Prep
Instrument using either Windows® XP or Windows 7 operating system. Instructions
for running Windows XP are provided in Chapter 3 and instructions for running
Windows 7 are provided in Chapter 4.
Overview of the Axiom™ 2.0 Assay
Running the Axiom 2.0 Assay requires the following sets of steps:
1. Genomic DNA preparation—Resulting in samples that meet requirements
spelled out in Chapter 2, ʺGenomic DNA preparation and requirementsʺ on
page 13.
2. Target Preparation of the samples:
•Chapter 3, ʺTarget preparation on the Biomek FXP with Windows® XPʺ on
page 22, or
•Chapter 4, ʺTarget preparation on the Biomek FXP with Windows® 7ʺ on
page 114
3. Array processing, done with:
• GeneTitan MC Instrument
• GeneTitan Instrument Control software
• Applied Biosystems™ GeneChip™ Command Console Portal software
See Chapter 5, ʺArray processing with the GeneTitan™ MC Instrumentʺ on
page 209.
A list of the required equipment and supplies for running the Axiom 2.0 Assay using
the Biomek FXP for automated target preparation can be found in the Axiom™ 2.0 Assay
96-Array Format Automated Workflow for Biomek FXP Site Preparation Guide, Pub. No.
702984.

Chapter 1 The Axiom™ 2.0 Assay
Overview of the Axiom™ 2.0 Assay
12 Axiom™ 2.0 Assay 96-Array Format Automated Workflow User Guide—Biomek FXP
1
Running multiple
plate workflows
Thermo Fisher Scientific provides workflows that allow you to run a set of samples and
array plates through the protocol using a minimum of personnel and a forty-hour
week. The timing of steps is critical because of the following constraints:
• Incubation after DNA Amplification is 23 hours.
• Hybridization in the GeneTitan MC Instrument is 23.5 hours.
• Reagent trays for wash/stain/imaging must be prepared as Hybridization
finishes.
• Limits to when a second hybridization tray and array plate can be loaded into the
GeneTitan MC Instrument.
These limitations require careful timing. The details are covered in:
•Chapter 6, ʺProcessing 8 Axiom™ array plates per weekʺ on page 246.
•Chapter 7, ʺProcessing 3 Axiom™ array plates per weekʺ on page 271.

Axiom™ 2.0 Assay 96-Array Format Automated Workflow User Guide—Biomek FXP13
2Genomic DNA preparation and
requirements
Overview . . . . . . . . . . . . . . . . . . . . . . . . . . . . . . . . . . . . . . . . . . . . . . . . . . . . . . . . . . . 13
Sources of genomic DNA. . . . . . . . . . . . . . . . . . . . . . . . . . . . . . . . . . . . . . . . . . . . . . 14
General requirements. . . . . . . . . . . . . . . . . . . . . . . . . . . . . . . . . . . . . . . . . . . . . . . . . 15
Genomic DNA extraction/purification methods . . . . . . . . . . . . . . . . . . . . . . . . . . 17
Genomic DNA cleanup . . . . . . . . . . . . . . . . . . . . . . . . . . . . . . . . . . . . . . . . . . . . . . . 17
Genomic DNA preparation . . . . . . . . . . . . . . . . . . . . . . . . . . . . . . . . . . . . . . . . . . . . 17
Overview
The general requirements for genomic DNA (gDNA) sources and extraction methods
are described in this chapter. The success of this assay requires uniform amplification
of the genome starting with relatively intact gDNA. To achieve this, the gDNA must
be of high quality, and must be free of contaminants that may affect the enzymatic
reactions to be performed.
For this protocol, you use the Axiom™ 2.0 Reagent Kit (96 reaction, Cat. No. 901758).
Axiom Reference Genomic DNA 103 (Cat. No. 951957) meets the requirements
outlined below, and is used as a control. The size and purity of sample gDNA can be
compared with those of the control DNA to assess sample quality. The control DNA
should also be used routinely as an experimental positive control and for
troubleshooting purposes.
Assay performance may vary for gDNA samples that do not meet the general
requirements described below. However, the reliability of any given result should be
assessed in the context of overall experimental design and goals.

Chapter 2 Genomic DNA preparation and requirements
Sources of genomic DNA
14 Axiom™ 2.0 Assay 96-Array Format Automated Workflow User Guide—Biomek FXP
2
Sources of genomic DNA
The following sources of human gDNA have been successfully tested in the
laboratories at Thermo Fisher Scientific and meet the requirements outlined under
ʺGeneral requirementsʺ on page 15.
• Blood
•Saliva
• Cell line
• WGA pre-amplified DNA: Genomic DNA amplified with the REPLI-g® Kit (a
whole genome amplification kit; QIAGEN, Cat. No. 150025) has been tested
successfully with the Axiom 2.0 Genome-Wide Human Reagent Kit Assay. The
REPLI-g Kit was used to amplify 20 ng genomic DNA, and the resulting yields
were quantitated by a PicoGreen® assay. The amplified products (either 100 or
200 ng amplified DNA as required according to the Axiom array type) were used
(without purification) as the input DNA sample in the subsequent Axiom 2.0
Assay steps. The stability of this amplified product to storage and repeated cycles
of freeze/thaw have not been evaluated by Thermo Fisher Scientific.
The following sources of animal gDNA have been successfully tested in the
laboratories at Thermo Fisher Scientific and meet the requirements outlined under
ʺGeneral requirementsʺ on page 15:
• Blood
• Semen
• Nasal swab
•Hair bulbs
• Ear punch tissue
The following sources of plant gDNA have been successfully tested in the laboratories
at Thermo Fisher Scientific and meet the above requirements:
• Seeds
•Leaves
Note: DNA derived from formalin-fixed paraffin-embedded (FFPE) blocks should not
be used with this assay.
Success with other types of samples will depend on quality (degree of degradation,
level of purity, etc.) and quantity of gDNA extracted.

Axiom™ 2.0 Assay 96-Array Format Automated Workflow User Guide—Biomek FXP15
Chapter 2 Genomic DNA preparation and requirements
General requirements 2
General requirements
• Starting DNA must be double-stranded for the purpose of accurate concentration
determination.
• DNA must be of high purity.
DNA should be free of DNA polymerase inhibitors. Examples of inhibitors
include high concentrations of heme (from blood) and high concentrations of
chelating agents (i.e., EDTA). The gDNA extraction/ purification method should
render DNA that is generally salt-free because high concentrations of particular
salts can also inhibit enzyme reactions. DNA purity is indicated by OD260/OD280
and OD260/OD230 ratios. The OD260/OD280 ratio should be between 1.8 and 2.0 and
the OD260/OD230 ratio should be greater than 1.5. We recommend that DNA
samples that do not meet these criteria be cleaned up as described under
ʺGenomic DNA cleanupʺ on page 17.
• DNA must not be degraded.
The approximate average size of gDNA may be assessed on a 1% agarose gel
using an appropriate size standard control. Approximately 90% of the DNA must
be greater than 10 Kb in size. Control DNA can be run on the same gel for side-
by-side comparison.
Special
requirements
Preamplification area
Precautions are required when manipulating genomic DNA to avoid contamination
with foreign DNA amplified in other reactions and procedures. It is recommended that
genomic DNA manipulations are performed in a dedicated preamplification room or
area separate from the main laboratory.
This preamplification area should have a dedicated set of pipettes and plasticware. If
no dedicated area is available, use of a dedicated bench or a dedicated biosafety hood
and dedicated pipettes is suggested. If no dedicated bench or biosafety hood is
available, a set of dedicated pipettes is recommended.
Assessing the
quality of genomic
DNA using 1%
Agarose E-gels
We recommend this quality control step to assess the quality of the gDNA prior to
starting the assay.
Equipment and reagents recommended
Table 1 E-Gel® and reagents required
Item Cat. No
Mother E-Base Device EB-M03
Daughter E-Base Device EB-D03
E-Gel® 48 1% agarose gels G8008-01
RediLoad™750026
E-Gel® 96 High Range DNA Marker 12352-019

Chapter 2 Genomic DNA preparation and requirements
General requirements
16 Axiom™ 2.0 Assay 96-Array Format Automated Workflow User Guide—Biomek FXP
2
Guidelines for preparing the Genomic DNA Plate for gel analysis
• Loading a DNA mass of 10 ng to 20 ng per well is recommended. If lower amounts
are loaded, omission of the loading dye is recommended in order to improve
visualization. Loading 25 ng gDNA per well can improve the image.
• Add 3 µL of 0.1X of RediLoad dye to each sample.
• Bring each sample to a total volume of 20 µL using H2O (for example, if the
volume of genomic DNA is 5 µL, add 3 µL of RediLoad, and bring to 20 µL total
by adding 12 µL of H2O).
• Seal, vortex and centrifuge.
Run a 48-lane 1% agarose e-gel
1. Power on for E-Base (red light).
2. Push the Power/Prg button to ensure that the program is at EG mode (not EP).
3. Insert the two 48-well 1% agarose e-gels into the slots.
4. Remove 2 combs.
5. Load 20 µL from the above plate onto two 48-well 1% agarose e-gels.
6. Load 15 µL of diluted High Range DNA Marker (1:3 dilution or ~0.34 X from
stock) into all marker wells (as needed).
7. Fill all empty wells with water.
8. Adjust the run time to ~27 minutes.
9. Push the Power/Prg button again (it will change from red to green).
When run time is reached (the ladder band reaches the end of the lane), the system will
automatically shut off. The gel is then ready for imaging.
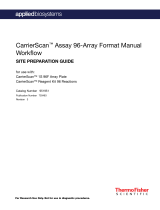
Figure 1 shows gel images of intact gDNA (that is suitable for use in the Axiom™ 2.0
Assay) and degraded gDNA samples. Customers whose gDNA is degraded (similar to
the image in Figure 1) should perform a test experiment to investigate the performance
of their samples in the Axiom Genotyping Assay prior to beginning any large scale
genotyping projects.
Figure 1 Gel images showing intact gDNA and degraded gDNA.

Axiom™ 2.0 Assay 96-Array Format Automated Workflow User Guide—Biomek FXP17
Chapter 2 Genomic DNA preparation and requirements
Genomic DNA extraction/purification methods 2
Genomic DNA extraction/purification methods
Genomic DNA extraction and purification methods that meet the general
requirements outlined above should yield successful results. Methods that include
boiling or strong denaturants are not acceptable because the DNA would be rendered
single-stranded and can no longer be accurately quantitated using a PicoGreen-based
assay.
Genomic DNA cleanup
If a gDNA preparation is suspected to contain inhibitors, the following cleanup
procedure can be used:
1. Add 0.5 volumes of 7.5 M NH4OAc, 2.5 volumes of absolute ethanol (stored at
–20°C), to gDNA.
2. Vortex and incubate at –20°C for 1 hour.
3. Centrifuge at 12,000 x g in a microcentrifuge at room temperature for 20 minutes.
4. Remove supernatant and wash pellet with 80% ethanol.
5. Centrifuge at 12,000 x g at room temperature for 5 minutes.
6. Remove the 80% ethanol and repeat the 80% ethanol wash 1 more time.
7. Resuspend the pellet in reduced EDTA TE Buffer (10 mM Tris-HCl pH 8.0,
0.1 mM EDTA).
(See the Axiom™ Assay 96-Array Format Automated Workflow for Biomek FXP Site
Preparation Guide, Pub. No. 702984 for reagents, equipment, labware and
consumables for Axiom 2.0 Assay).
Genomic DNA preparation
This step needs to be done before proceeding with the DNA amplification stages for
automated target preparation.
The genomic DNA (gDNA) you will process using the Axiom 2.0 Assay should meet
the general requirements listed earlier in this chapter. The amount of gDNA depends
on which Axiom array will be used in the downstream protocol. All human Axiom
arrays (except the Axiom™ Genome-Wide Pan-African Array Set) require a total of
100 ng. The Axiom Genome-Wide Pan-African Array Set requires a total of 300 ng, or
100 ng per array (there are 3 arrays in the Axiom Genome-Wide Pan-African Array
Set). Diploid plants and animals require 150 ng per array and polyploid plants and
animals require 200 ng per array.
Table 2 Input requirements for Axiom™ 2.0 Assay
Sample type Volume
per well
Input mass
per well
gDNA
concentration
Human 20 μL 100 ng 5 ng/μL
Diploid Plants and Animals 20 μL 150 ng 7.5 ng/μL
Polyploid Plants and Animals 20 μL 200 ng 10 ng/μL

Chapter 2 Genomic DNA preparation and requirements
Genomic DNA preparation
18 Axiom™ 2.0 Assay 96-Array Format Automated Workflow User Guide—Biomek FXP
2
To prepare gDNA
ʺ1. Thaw samples and controlʺ
ʺ2. Quantitate and dilute gDNAʺ.
ʺ3. Aliquot the diluted samples and the controlʺ
ʺ4. Freeze or proceedʺ
ʺ5. Create a Batch Registration fileʺ
Duration Thirty minutes to an hour for reagents to thaw and half an hour for setup.
Equipment,
consumables and
reagents required
Equipment and consumables
The equipment and consumables listed in Table 3 are required for this stage.
Table 3 Equipment and consumables required for genomic DNA preparation
Quantity Item
As required Adhesive seals for plates
1 Ice bucket, filled with ice
1 each Pipettes:
• Single channel P10 or P20 • Optional: multichannel P10 or P20
As required Pipette tips
1 Plate, deep well: Beckman Deep Well Titer, polypropylene; Cat. No.
2670071
1 Note that a different deep-well plate is used for each manual (96, 24, and Mini 96) and automated
(NIMBUS 96 and Biomek FXP 384HT) workflow versions of the Axiom 2.0 Assay. See Chapter 2 of the
specific Axiom™ 2.0 Assay user guide for each workflow for further details.
1 Plate centrifuge
1 Plate spectrophotometer (required only if no OD measurements
available for samples)
1 Vortexer

Axiom™ 2.0 Assay 96-Array Format Automated Workflow User Guide—Biomek FXP19
Chapter 2 Genomic DNA preparation and requirements
Genomic DNA preparation 2
Reagents
The reagents listed in Table 4 are required for this stage.
1. Thaw samples
and control
Thaw the components listed below to room temperature:
•gDNA samples
• Axiom Reference Genomic DNA 103
To thaw, either:
• Place items on benchtop for 1 hour
• Thaw in a water bath:
a. Fill a small plastic dish with Millipore water. Do not overfill as the level of the
water should not overflow when the sample tubes or plates are placed in the
bath.
b. Thaw the sealed Sample Plate and reference sample for 30 minutes.
c. Remove the Sample Plate and/or sample tube from the water bath and wipe
dry using laboratory tissues. Ensure the outside is completely dry before
opening the Sample Plate or tube to minimize any contamination, which can
lead to reaction failure.
2. Quantitate and
dilute gDNA
1. Gently vortex (50% maximum) and centrifuge the gDNA and Reference Genomic
DNA 103.
2. Recommendation: quantitate each sample (e.g., using the Quant-iT™ PicoGreen®
dsDNA Kit).
3. Using reduced EDTA TE buffer, dilute each sample to a concentration of:
• 5 ng/µL for Human DNA samples
• 7.5 ng/µL for diploid plant and animal DNA samples
• 10 ng/µL for polyploid plant and animal DNA samples
4. Seal, vortex and centrifuge.
Note: Do not dilute the Reference Genomic DNA 103 control. It is already at a working
concentration.
Table 4 Reagents required for genomic DNA preparation
Reagent Cat. No.
Axiom Reference Genomic DNA 103, –20°C
(use as a positive control if genotyping human samples)
951957
Reduced EDTA TE Buffer (10 mM Tris-HCl pH 8.0, 0.1 mM EDTA) 75793
Positive control gDNA (if genotyping non-human samples)

Chapter 2 Genomic DNA preparation and requirements
Genomic DNA preparation
20 Axiom™ 2.0 Assay 96-Array Format Automated Workflow User Guide—Biomek FXP
2
3. Aliquot the
diluted samples and
the control
Next, the samples and control are placed in the following deep well plate for target
preparation:
•For automated target preparation: Beckman Deep Well Titer, polypropylene;
Cat. No. 267007
1. 20 µL of each diluted gDNA sample (this should be the equivalent of 100 ng to
200 ng of gDNA, as required by the sample type).
2. 20 µL of control DNA.
We recommend including at least 1 positive control on each plate.
3. Seal and centrifuge.
Note: For samples to be processed on the Axiom Genome-Wide Pan-African Array
Set, 3 identical deep well plates of 100 ng gDNA per well should be made.
4. Freeze or
proceed
At this point you can:
• Store the Sample Plate at –20°C, or
• Proceed to DNA amplification (see Chapter 3, ʺTarget preparation on the Biomek
FXP with Windows® XPʺ on page 22).
Note: You can leave the gDNA Sample Plate at room temperature if proceeding
immediately to DNA Amplification.
5. Create a Batch
Registration file
GeneTitan Array Plate Registration files contain information that is critical for:
• Data file generation during imaging.
• Tracking the experimental results for each sample loaded onto an array plate.
Detailed instructions for creating this file are located in Appendix D, ʺRegistering
samples in GeneChip™ Command Console™ʺ on page 304. See also Figure 2 for a screen
shot showing an example of a batch registration file.
1. Open GCC Portal Samples, and select:
a. GeneTitan Array Plate Registration.
b. The array plate format.
c. Click Download.
2. Enter a unique name for each sample and any additional information.
3. Save the file.
The array plate barcode will not be scanned until you are ready to load the array plate
and samples onto the GeneTitan MC Instrument for processing.
IMPORTANT! It is very important to create and upload a GeneTitan™ Array Plate
Registration file with your sample information prior to loading the array plate and
hybridization tray into the GeneTitan MC Instrument. We recommend that you create
(but not upload) this file at the same time you prepare your plate of genomic DNA.
When your samples are ready for hybridization, you will scan the array plate barcode
and upload the file to Applied Biosystems™ GeneChip™ Command Console (GCC).
/