Page is loading ...

601 North Congress Ave., Suite 606, Delray Beach, FL 33445
www.EzShelf.com Toll Free: 888-399-2880 Local: 561-303-3615
Suggested Shelf Heights:
Single Hanging: 60-80” from floor to top of the shelf.
Double Hanging: 82-84” from floor to top of top shelf, and 40-42” from floor to top of bottom shelf.
Included Plastic Parts
2 Tube Receivers
(note right and left)
Center Support
End Bracket(s)
(If ordered)
End Brackets are used
ONLY
Shelf & Rod
Parts
When
(1) NOT mounting
to a side wall or
(2)Connecting shelves to
make longer shelves
Shelf (only)
Parts
When
(1) NOT mounting
to a side wall or
(2)Connecting shelves to
make longer shelves
For EZ Installation, read all instructions and watch installation videos BEFORE beginning installation.
Installation videos: www.ezshelf.com/install.
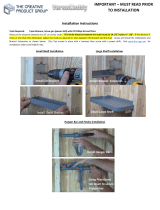
1. Measure from floor & tape Tube Receiver Template on sidewall. MUST be LEVEL - Larger holes on top &
Anchor/Screw holes underneath with TAB at back touching back wall.
2. Mark Anchor/Screw holes by marking with pen - poking through “X’ on paper.
\
3. Remove Tube Receiver Template from side wall
TAB should be
touching
against back of
wall
Large Holes
on Top
Anchor/Screw Hole
Left Tube Bracket –
has smaller tube
diameter than Right
Sidewall Installation
EZS-SCRW72
EZS-SCRW48

4. MAKE SURE THAT HOLES ARE LEVEL. Hold Tube Receiver to the screw holes & check with a level.
Important Note: If installing into a tight space where tubes will be barely extended or not extended, insert ALL
tubes into both Tube Receivers during this step. The tubes will NOT fit into a tight space once the brackets are
mounted to the wall.
5. Check for Studs - with 1 ¼” long nail/screw, push into the drywall to determine if you are hitting a stud. If
nail doesn’t go all the way you may be hitting a stud.
6. Drywall- Screw in plastic anchors into drywall (see anchor instructions on the bag). If needed, drill a small
“pilot” hole into the wall first. Use a screwdriver or electric drill (on LOW speed – do NOT over tighten).
Note: EZ Shelf will hold 200 lbs. WITHOUT securing to studs.
If you hit a stud poking nail through drywall, do not use plastic anchors - secure wood/metal screws
(not included) directly to stud.
For plaster walls – Do not use included plaster anchors/screws. Use plastic or lead anchors &
appropriate ¼” screws.
For Concrete walls – do not use included plaster anchors/screws. Use ¼” concrete anchors. You
will need to drill first (hammer drill is best).
7. Attach to the wall with appropriate screws, after lining up Tube Receiver smaller holes over the anchor
holes. Do NOT over-tighten screws as too much torque can put screw through the bracket. If using an
electric screw driver or drill, use on low setting.
8. Opposite Wall - Measure the same distance from the floor as the first Tube Receiver & tape the Template
to the wall. MAKE SURE THAT ALL HOLES ARE LEVEL with holes from 1
st
Tube Receiver.
9. Repeat steps 2 through 7 for second Tube Receiver on opposite wall.
10. Insert 5 TOP TUBES, twisting the tubes on both ends until fully seated.
Do NOT attach tube for HANGING ROD (for Shelf & Rod Unit) until after Center Support is mounted.
11. Place Center Support so the tubes rest in the slots (preferably large tubes) & mark holes on back wall.
12. Attach Center Support (see step 6 above) to back wall using anchors and screws. Note: 17”-27” products
do not include Center Supports. Additional Center Supports can be purchased if needed.
13. Insert Tube for Hanging Rod into both Tube Receivers. – DONE EZ!!
Note: DO NOT rest
Center Support on
tube extension
sleeves.
/