Page is loading ...

EZ Shelf Instructions – Closet Shelf & Rod
**WATCH 2 Installation videos BEFORE Installation: www.ezshelf.com/videos
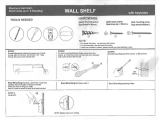
Included Plastic Parts
Tube Receivers – Left and Right
1 - Center Support
1 - End Bracket – NOT INCLUDED- For mounting to Back Wall, Corners &
Left shown
Joining Shelves together for longer Shelf & Rod Unit
End Bracket will NOT be needed if installing between two sidewalls (sides of a closet).
For 1 Side Wall you will need to purchase 1 End Bracket (EZS-EB-SCRW for Shelf & Rod) or (EZS-EB-SW for Shelf).
If you have NO Side Walls and want to attach only to Back Wall you will need to purchase 2 End Brackets.
40-44” Wide Closet - If installing in a tight space (40-44” wide) insert ALL tubes into both left and right Tube Receivers
BEFORE step 1 & either have someone help hold the Shelf or mount Center Support Bracket First.
The tubes will NOT fit into a tight space once the brackets are mounted to the wall.
Mounting Tube Receiver to Sidewall
1. Measure & Mark Sidewall from floor up
Suggested Shelf Heights: Single Hanging: 60” - 80” from floor to top of shelf.
Double Hanging: 80” - 84” from floor to top shelf & 40” - 42” for bottom shelf.
2. Tape Tube Receiver Template to sidewall – Must be Level.
3. Mark Four Screw Holes with Pencil.
Note: Tube Receiver Installation: Large Holes MUST be on Top & Small, Protruding TAB MUST touch back wall (see below).
Left Tube Receiver
4. CHECK FOR STUDS–Push nail/screw into drywall-If it doesn’t go all the way in you may be hitting a stud or other object.
5. Drywall Anchor Instructions- Drill/poke a small hole into wall. Push TIP ONLY of Anchor into drywall & Screw in plastic
anchors (see drywall anchor pictures below). Use screwdriver/electric drill (on LOW setting – do NOT over tighten).
Note: EZ Shelf will hold 200 lbs. WITHOUT securing to studs.
Do NOT use included anchors when:
You HIT A STUD: Drill “pilot” hole into stud & attach screw directly to stud.
PLASTER WALLS: Drill “pilot” hole - Use plastic or lead anchors & appropriate screws.
CONCRETE WALLS: Drill “pilot” hole (may need hammer drill) - Use concrete anchors/screws.
Drywall Anchor & Screw Installation Diagrams (see ezshelf.com/videos for more information):
TAB should be
touching against
back wall
Large Holes
on Top
Anchor/Screw Hole
Left Tube Receiver has SMALLER tube
diameter & holes than Right Tube Receiver
1. Press Tip of
SnapSkru anchor
into Drywall using
screwdriver or
screw gun. Screw
anchor clockwise
into drywall until
anchor stops flush
with wall.
2. Place
item over
anchor &
insert
screw.
3.Tighten
screw
until flush
with item.

6. Insert Back Tube (closest to back wall) into installed Tube Receiver (use hammer or mallet if necessary).
7. Attach Back Tube to other Tube Receiver and Extend to opposite sidewall.
8. Place Level on Back Tube & then also on Tube Receiver – Must be level - Mark Holes on wall with pencil.
9. Attach Tube Receiver to Wall (Repeat Steps 4 and 5 above from page 1)
10. Insert 4 other Top Tubes into both Tube Receivers. Do NOT insert Hanging Rod tube (Bottom of “L”) until after step 13.
11. Twist both ends of tubes until fully secured.
12. Place Center Support so the tubes rest in the slots (preferably thicker part of tubes). To make sure Center Support
contacts ALL Tubes - Push center support UP from Bottom. Then Mark Holes on Back Wall.
13. Attach Center Support using anchors and screws (see steps 4-5 on page 1).
14. Insert Tube for Hanging Rod into both Tube Receivers.
Note: DO NOT
rest Center
Support on
tube extension
sleeves.
/