Page is loading ...

If you have any questions, missing parts or need any
design or installation help, we are open 7 days/week
- please call our office 888-399-2880.
Or email or call David Jablow, President
djablow@ezshelf.com Cell 908-625-8882
We are a small company and take great pride in our products
and service. We care about our customers!
Please consider leaving a product review and let
us know how we are doing.
888-399-2880
601 N. Congress Ave., Unit 606
Delray Beach, FL 33445
www.EzShelf.com
Thank you for purchasing an Ez Shelf !
we hope you and your family
stays healthy and safe!
The Ez Shelf Team
If you have ANY issue, Please do NOT Return Product.
We Will Resolve ALL Problems.
David, Jill, Star and Michelle

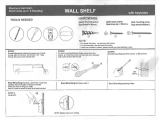
PLEASE CHECK ALL PARTS against Packing Slip PRIOR to Installing
Molded
Parts
TUBE RECEIVERS
LEFT Side - SMALL Hole
RIGHT Side - LARGE Hole
CENTER
SUPPORT
END
BRACKET(S)
End Brackets NOT included in
all kits.
May be bought separately.
Shelf
&
Rod
Use End Brackets ONLY When:
(1) NOT mounting to side wall
(2) Connecting shelves to
make Longer Shelves
Shelf
(only)
NO ROD
3) Making Corners
4) When Making a Floating Shelf
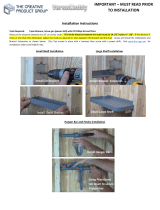
HELPFUL INSTALLATION HINTS:
BEFORE INSERTING TUBES IN RECEIVERS: If Tube Ends have Tight Fit in Receivers, Coat Ends
with a little WD40, Liquid Soap, or Vegetable Oil using paper towel/rag.
CENTER SUPPORTS: If Putting a Lot of Weight on Shelf & Rod (over 200 lbs, or if not evenly
distributing weight, or if drywall may be weak), Attach 1 side of Center Support to Stud with
Screws & other side use Anchors/Screws to attach to drywall.
LONGER SHELVES: Two Shelves can be joined to make a longer shelf
WATCH Install Videos
at www.EzShelf.com
BEFORE Installation
Make End Bracket Assembly:
Snap a Right Tube Receiver
into Left Side of End Bracket
& Left Tube Receiver into
Right Side of same End Bracket &
Secure with included Nuts/Bolts.
CORNERS: Install 1 Shelf Unit between 2 walls, Snap
Tube Receiver intoEnd Bracket & Secure with
Bolts/Nuts. Picture on left shows a
Left Tube Receiver snapped into
Right side of End Bracket (perpendicular to first shelf)
to make your Corner and start the next shelf.
WRONG
TUBE NOT INSERTED
CORRECTLY
MUST BE FULLY
INSERTED
CORRECT
TUBE
INSERTED
FULLY INTO
TUBE RECEIVER

METHOD 1 for Installation – WHEN EXPANDING TUBES AT LEAST 4”
(40 - 73” Tubes - expanding 40” to MORE than 44”, 28 - 48” – expanding 28” to MORE than 32”,
64 – 118” Tubes– expanding 64” to MORE than 68”, 17.5 - 27” - expanding to MORE than 21.5”)
1. MEASURE & MARK SIDE WALL FROM FLOOR UP
Shelf Heights: Measure longest shirt or another item from floor to top of Hanging Rod.
Single Hanging: 60” - 80” from floor to **Top of Hanging Rod** (NOT top of shelf).
Double Hanging: 80” - 84” from floor to **Top Hanging Rod** & 40” - 42” for Bottom Shelf.
2. TAPE TUBE RECEIVER TEMPLATE to SIDEWALL– MUST be LEVEL.
3. MARK FOUR SCREW HOLES & POKE through “X” on template - use Pen/Nail/Screw
Tube Receiver: Large Holes on Top - Small TAB on back MUST Touch Back Wall
4. REMOVE TUBE RECEIVER TEMPLATE from Side Wall
5. MAKE SURE THAT HOLES ARE LEVEL Hold Tube Receiver to Screw Holes & Check Level
6. CHECK for STUDS - Push Screw/Nail in drywall
Must go All the way in or you may have Hit Stud/Pipe
Note: EZ Shelf will hold 200 lbs. of evenly distributed weight Without securing to studs.
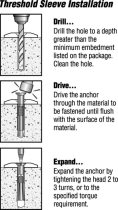
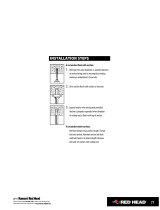
7. DRYWALL ANCHORS -Poke/Drill Small hole in wall, Push TIP Only of Anchor in Drywall
& Screw in Plastic Anchors (see Drywall & Anchor pictures below).
Use power screwdriver/electric drill (on LOW setting – do NOT over tighten).
Drywall Anchor & Screw Installation Diagrams
If you HIT STUD in drywall, do NOT use plastic anchors - Secure Screws Directly to Stud
TAB
MUST
TOUCH
BACK
WALL
1. Press Tip of anchor into
Drywall using screw gun
or screwdriver.
Screw anchor Clockwise
(USE LOW SETTING) into
drywall until anchor stops
flush with wall.
2.
Place item
over
anchor &
insert
screw.
3.
Tighten
screw
until
flush
with
item.
Large Holes
on Top
Anchor-Screw
Holes
**Top of
Hanging Rod**
Left Tube Receiver: SMALL diameter
Right Tube Receiver : LARGE diameter

• For PLASTER WALLS – Do NOT use included plaster anchors/screws.
Use plastic or lead anchors & appropriate 1/4 “ screws X 1 3/4 “
• For CONCRETE WALLS– Do NOT use included plaster anchors/screws.
Use 3/16” or 1/4” x 1 3/4“ Concrete Screws - drill first (hammer drill is best)
8. ATTACH to WALL with SCREWS - Position Tube Receiver on wall over anchors. Use
power screwdriver/drill on LOW to prevent damage to parts. DO NOT Over-Tighten Screws
9. OPPOSITE WALL- Measure same distance from floor as first Tube Receiver & tape
template to the wall. MAKE SURE ALL HOLES ARE LEVEL with Holes from 1
st
Tube Receiver.
10. CHECK FOR LEVEL-Install 1 Tube closest to wall into 1
st
Receiver,extend to opposite wall.
Put level on Extended Tube, check to make sure of alignment with template on opposite wall.
11. REPEAT STEPS 3 through 8 for Second Tube Receiver on Opposite Wall.
12. INSERT TUBES: use Mallet/Hammer Tap and Twist Tubes on both ends until fully seated.
If installing multiple shelves skip this step until after all Tube Receivers have been installed.
If Plugs on Tubes have Very Tight Fit into Tube Receivers:
Coat Plugs with a little WD40, Liquid Soap, or Vegetable Oil
13. ATTACH CENTER SUPPORT (see prior steps 6-8) to back wall using anchors and screws.
Note: 17.5”- 27” shelves Do Not include Center Supports. Buy Additional Supports if needed.
End Bracket Installation(Only use for corners, joining shelves, mounting to back wall)
14. MEASURE FROM FLOOR UP (see step 1), & PLACE END BRACKET TEMPLATE on BACK
WALL where shelf will end, or two shelves will be joined.
15. TAPE END BRACKET TEMPLATE TO BACK WALL - LEVEL & Mark Screw Holes
16. SNAP LEFT OR RIGHT TUBE RECEIVER into SIDE of END BRACKET
Tube Receiver Install: Large Holes MUST be on Top-Small Protruding TAB MUST touch Back Wall
17. SECURE TUBE RECEIVER to END BRACKET with NUTS & BOLTS
a. Put Bolt into End Bracket hole on Outside of End Bracket, and Flip End Bracket Over.
b. Place Nut in Hole in Receiver and onto Bolt, turn it a few times with your finger.
c. Use screwdriver to screw in bolt. Nut will begin to catch and move lower on bolt.
18. FOLLOW STEPS 5 - 8 ABOVE - Attach End Bracket to Wall.
13. PLACE CENTER SUPPORT
Tubes should TOUCH Center
Support
(preferably Large Tubes) & Mark Holes on Back Wall.
DO NOT Rest Center Support on Connector/Collar.

METHOD 2 for Installation – When Expanding Tubes LESS Than 4”
(40 -73” Tubes - expanding 40” to LESS than 44”, 28-48” Tubes–expanding 28” to LESS than 32”,
64–118” Tubes –expanding 64” to LESS than 68”, 17.5-27” Tubes-expanding to LESS than 21.5”)
May be Difficult to Insert Tubes if extending LESS than 4” after mounting receivers.
1. MEASURE & MARK SIDE WALL FROM FLOOR UP
Shelf Heights: measure longest shirt or another item from floor to top of Hanging Rod.
Single Hanging: 60” - 80” from floor to *Top of Hanging Rod (not top of shelf).
Double Hanging: 80” - 84” from floor to *Top Hanging Rod & 40” - 42” for bottom shelf.
2. INSERT ALL TUBES INTO LEFT & RIGHT TUBE RECEIVERS
If Plugs on Tubes have Very Tight Fit into Tube Receivers:
Coat Plugs with a little Liquid Soap, WD40, or Vegetable Oil using paper towel or rag.
3. TAKE COMPLETED SHELF UNIT AND TAP ONE SIDE ON FLOOR
-then turn Unit around & Tap Other Side on Floor–make sure All Tubes are Secure
MOUNT CENTER SUPPORT BRACKET
If Putting a Lot of Weight on Shelf and/or Rod
(or if not evenly distributing weight, or if drywall may be damaged or weak)
Attach 1 side of Center Support to Stud with Screws & other side use Anchors/Screws to drywall
4. TAPE CENTER/END BRACKET TEMPLATE TO BACK WALL - Must be LEVEL.
5. MARK 4 SCREW HOLES & POKE through “X” on Template
- use Nail/Screw and then remove template from Back Wall
6. REPEAT STEPS 5-8 ABOVE
7. ATTACH to WALL with SCREWS–Place Center Support over anchors on wall.
DO NOT Over-Tighten Screws - too much pressure may put screw through plastic
part. Use power screwdriver/drill on Low
8. PLACE COMPLETED UNIT ON CENTER SUPPORT & EXPAND
9. MAKE SURE UNIT IS LEVEL
10. MARK LOCATIONS on SIDE WALLS for TUBE RECEIVERS
11. INSTALL ANCHORS - as per above
12. MOUNT TUBE RECEIVERS and SECURE with SCREWS as per above
/