Page is loading ...

P-600AL-5S "Closet-Cyclist"
–
instructions manual
(ver.5.2 2015/5)
!
Features & Benets
• Save vast amounts of space by hanging the bicycles
vertically from the front wheel.
• Alloy pillar is durable, light weight and rust proof.
• You can choose from two different styles on the base
leg layout; K-style for more effective space saving by
placing just next to a wall, or X-style for added better
stability.
• Newly designed alloy clamp holds the attachment
securely and easily to adjust its height.
• Top hook is padded with soft plastic to prevent damage
to the rim
. Its unique dual hook design avoids
twisting the bike while hanging down.
• Holds a total of 40 kg (max 20 kg per side).
Cautions
• For normal 2-wheel bicycle only. Tandem,
recumbent, long tail bike and DH bike with super
long suspension fork may not be used on this stand
in the case if the rear wheel has reached the oor
even if you set the top hook at the highest position.
• Set the stand on an even and horizontal oor.
Adjust each foot precisely to insure each of the
foot's four points touch the oor evenly.
• Be sure to keep the weight on the stand balanced.
A heavy bike on one side without a similar weight
bike on the other side may cause the stand to tip.
• The clamp is made of strong but lightweight
material.
Do not overtighten or the bolt may come out of the
housing, ruining the clamping mechanism.
• Follow the correct order for tightening the screws.
Failure to do so may lead to improperly tightened
screws.
• Screw the bolt by your nger at least in the rst 3 –
4 rotations in order to prevent wrong screwing. After
conrming the bolt is screwed properly without any
problem, you can now use tool for tightening.
• To prevent the stand from tipping over backwards,
the stand should be placed next to a wall when you
choose K-style leg combination.
• The rear wheel hook is a guide, not a lock. It is there
to help maintain balance.
(Hanging 2 road bikes image
in K-style leg)
Contact
MINOURA JAPAN MINOURA NORTH AMERICAN TECH CENTER
(for ALL customers, including Canada) (for U.S. residents ONLY)
1197-1 Godo, Anpachi, Gifu 503-2305 Japan Mon - Fri, 9 am - 5 pm (PCT)
Fax +81-584-27-7505 Phone 1-510-538-8599 / Fax 1-510-538-5899
If you have question or problem on this product, please contact the shop where you originally purchase this product
or the distributor in your country first. The distributor information can be found on our web site. Only when you
cannot obtain enough service from them, you can contact Minoura directly.
Made in Japan

- 2 -
Upper Pillar
Top Hook
for front wheel
Clamp
Long Leg
Short Leg
Foot Adjuster
Part Name
Bottom Hook
for rear wheel
Required Tools
1 x M5 Hex Wrench
(included)
1 x Phillips Screwdriver
(not included)
1 x 13mm Spanner
(not included)
(We strongly recommend to use the fatter No.3
screwdriver instead of standard No.2)
How To Read Bolt Size
Length
Diameter
Ex) 6 x 30
Diameter Length
Assemble P-600 in K-style Leg
1
2
3
(Fig. B)
(Fig. C)
(Fig. D)
Setting up your P-600 in the K-Style leg conguration saves
valuable room because the stand can be placed next to a wall.
Attach two Leg Brackets to the
Pillar.
One is set directly, and another
one is set beyond the silver
Collars.
Do not tighten the M6x70 Bolts
firmly yet. (see Fig. B)
Pillar
Leg Bracket
(both are exactly same)
Collar (Silver)
M6x70 Bolt
Spring Washer
Screw the bolts to
these threaded slots
(Fig. A)
Put the black Collars to the designated holes (see Fig. D) on
both Long and Short Legs. Collar is put from the larger hole.
Collar (Black)
(Fig. E)
Place the legs as shown in Fig.E.
Long Leg
Short Leg
The collar works to prevent deforming the tube
by the bolt tightening power. You must set
the collar correctly.
Lower Pillar
Pillar Joint Clamp
(Unit: mm)

- 3 -
Inside layout is as shown in Fig.F.
You will install short Legs first, so you don't have to
set Long Leg at this moment.
(Fig. F)
4
Put the longer M6x70 Bolt to the end hole on the
Short Leg, then screw it into the Pillar.
(Fig. G)
M6x70 Bolt
Spring Washer
5
Put the shorter M6x45 Bolt into the corner hole to fix
the Long and Short Legs. M6x45 Bolt will be screwed
to the Dome Nut.
M6x45 Bolt
Spring Washer
Dome Nut
6
Tighten every bolt.
Over-tightening the M6x70 Bolt may cause serious
damage to the alloy Pillar. Do not overtighten.
(Fig. H)
(Fig. I)
Assemble P-600 in X-style Leg
Setting up the P-600 in the X-style allows the stand to
1
Put 4 black Collars to the designated holes on the
Long Leg. Sandwitch the Long Leg with 2 Leg
Brackets, then attach to the Pillar.
(Fig. J)
be placed anywhere due
to the larger footprint and
maximum stability of the X.
It also allows you to install
extra optional attachments
on the pillar.
Please note, setting the
stand up in the X-style does
require more oor space.
Pillar
Long Leg
Collar
(Black)
M6x45 Bolt
Spring Washer
M6x70 Bolt
Spring Washer
M6x45 Bolt
Spring Washer
Dome Nut
(Fig. K)
Use the longer M6x70 Bolts
to the center 2 holes for
screwing into the Pillar.
Use the shorter M6x45 Bolts
to the outer holes, then screw
to the Dome Nuts.
Every bolt should not be
tightened firmly yet.
This is the image after every bolt is screwed in.
(Fig. L)
(Fig. M)
Leg Bracket
(both are exactly same)
Screw the bolts to
these threaded slots

- 4 -
2
Put the black Collars to all holes on the Short Leg.
Collar must be inserted from the larger hole.
3
Set the Short Legs as they make "X" shape.
(Fig. N)
(Fig. O)
(Fig. P)
Inside layout is as shown in Fig. P.
Long Leg
Collar (Black)
Short Leg
4
Put the longer M6x70 Bolt to the end hole on the
Short Leg, then screw into the Pillar.
(Fig. Q)
M6x70 Bolt
Spring Washer
5
Put the shorter M6x45 Bolt to other hole, sandlwich
the Short Leg with two Leg Brackets, then screw to
the Dome Nut.
M6x45 Bolt
Spring Washer
Dome Nut
(Fig. R)
(Fig. S)
6
Tighten every bolt.
Over-tightening the M6x70 Bolt may cause serious
damage to the alloy Pillar. Do not overtighten.
Short Leg
Short Leg

- 5 -
Install Top & Bottom Hooks
1
Top Hook for front wheel
Bottom Hook for rear wheel
Install the top hook to the
upper clamp.
Make sure the clamp is
placed between the four
projections on the hook.
Screw the bolt using your
finger at least in the first 3–4
rotations. After confirming
the bolt threads without
any problem, use the tool to
tighten.
(Fig. U)
(Fig. V)
(Fig. W)
(Fig. X)
2
Install the bottom book to the lower clamp.
You don't have to fix the bottom hook. Adjust the tightening
as the hook won't come down by its own weight.
!
It's possible on any threaded mechanism that
the bolt can be forced on at an angle. If this
happens the bolt usually stops in one turn.
If you feel the bolt is threading incorrectly do
not continue or doing so will cause damage to
the thread, possibly destroying it.
Properly threaded bolts will turn easily so
using your ngers to get the bolt started
insures you'll know if the bolt is installed
correctly.
(Fig. T)
Pillar Joint Clamp
Upper Pillar
Lower Pillar
Pillar Joint
Joint the Pillars
The pillars on P-600AL-5S are separated, not a single piece like as
previous model.
Both pillars have same diameter, and the pillar joint fastens the pillars.
The pillar joint has already been installed on the upper pillar.
You insert it into the lower pillar, then tighten the clamps to fix.
1
At first, loosen the clamp on the lower pillar by M5 hex wrench.
2
Insert the pillar joint into the lower pillar.
3
While keeping both pillars are tightly attached, tighten the clamp firmly.
(tightening torque: 8 N.m)
!
Reguraly check if the clamp bolts are securely
tightened. If these bolts have been loosened, the
pillar could be apart and fall down.
8 N.m
Tighten
!
If you apply too much torque for tightening the bolt, the clamp may
be deformed. If the clamp ends touch each other, it no longer works
and you need to replace to a new clamp for your safety.

- 6 -
How To Reinstall Clamp Band
The clamp bands come pre-installed and they should not
need to be removed. However, there may come time when
adding options to P-600AL-5S that you will need to remove
them.
Install the clamp peoperly as instructed below. Failure to do
so may cause parts damage or allow the bike to come off the
stand..
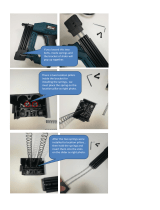
Wind the clamp arms around
the Pillar.
The following description is
set as the single side arm is on
YOUR right, and the double
side arm is on YOUR left.
Put the Pivot-Pin through all 3 holes
on the clamp band from bottom side,
and screw the Pivot-Pin Fixing Bolt
with a flat washer temporally.
!
Make sure to insert the
Pivot-Pin from the bottom.
If you don't, you will not
be able to tighten the bolt
using a hex wrench.
Pillar
Turn the Pivot-Pin to align the thread
hole to the side hole on the clamp
band.
Screw the Clamp Tightening Bolt into
the Pivot-Pin.
To fix the clamp band firmly, tighten
the Clamp Side Pin first then tighten
the Pivot-Pin Fixing Bolt later.
!
Do not tighten the Pivot-
Pin Fixing Bolt rmly yet.
The next job will become
difcult.
1
2
3
(Fig. Z)
(Fig. AB)
Using Black Round Decal
(Fig. AC)
If you wish to hide the holes beside the Leg Bracket when
setting up in K-style leg configuration, put the supplied
black round decal onto the hole.
You will not use the decal when setting up in X-style.
Black Round Decal
Move the clamp with hook to your desired position.
The hook can be positioned at anywhere you want, but
you must place it to just beside the pillar when you choose
K-style leg.
To move the clamp, loosen
①
clamp tighitening bolt and
②
pivot-pin fixing bolt together with M5 hex wrench, then
③
slide the clamp along the pillar.
!
The clamp may not move if you loosen the
side bolt only. You should loosen both bolts.
!
When you set the legs in K-style, you must
place the hooks just beside the pillar,
otherwise the stand may tip over due to
improper balance.
Adjust the bottom hooks clamp height as the bike becomes
vertical when hooking the rear tire in the deepest position.
After moving, firmly tighten both
①
and
②
bolts.
!
Be sure the clamp touches the pillar directly.
If you don't loosen the bolt enough, it may
cause scratching. You should loosen widely.
1
2
3
(Fig. Y)
3
Pivot-Pin Fixing Bolt
Clamp Tightening Bolt
Pivot-Pin
(Fig. AA)
/