Page is loading ...

Outdoor Light Installation Instructions
1. Please read all warnings and instructions before installation.
2. The fixture must be wired in accordance with the National Electric
Code and applicable local codes or ordinances.
3. To insure personal safety, proper grounding is required.
1.
2.
WARNING:
To avoid fire, shock, or death, disconnect power at circuit
breaker or fuse before the installation.
If you are unsure about the installation or maintenance of the
Outdoor Lights, please consult a qualified electrician.
SAFETY:
INSTALLATION LOCATION:
This fixture must only be wall-mounted. Be certain that the receiving
junction box is well secured and can support the weight of the lamp.
1. This fixture should not be used in areas with limited ventilation or
high ambient temperature exceeding 45°C.
2. Fixture cannot be used with a dimmer switch, motion sensor and
other electronic switching devices.
INSTALLATION NOTES:
PRODUCT SPECIFICATION:
Part Number: MEL-9125W
Input Voltage: 120 VAC
Amp Draw: 0.09 A
Frequency: 60 Hz
Rated Power: 9W
Suitable for: Wet Locations
1. Make sure POWER is turned OFF at the circuit breaker box or remov
e fuse.
2. Carefully disconnect and remove the old light fixture if applicable.
3. Using the (Qty. 2) CROSSBAR SCREWS provided, mount the CROSSBAR
BRACKET into the JUNCTION BOX.
4. Locate and retrieve the supply wires from the JUNCTION BOX.
a. Connect the white wire from the fixture to the NEUTRAL wire in the
JUNCTION BOX (typically white).
b. Connect the black wire from the fixture to the HOT wire in the JUNCTION
BOX (typically black).
c. Connect the bare copper wire to the GROUND wire in the JUNCTION BOX
(typically bare). If the GROUND wire is not present in the JUNCTION BOX,
connect the bare copper wire to the green GROUND SCREW on the
CROSSBAR BRACKET which must be connected to GROUND for safety.
5. Adjust the UPPER CROSSBAR to be in a horizontal position and securely
tighten both CROSSBAR SET SCREWS.
6. Insert the (Qty. 2) MACHINE SCREWS on the UPPER CROSSBAR through
the holes in the FIXTURE BASE and tighten by using the (Qty. 2) CAP NUTS.
Make sure that the fixture is tightly secured against the wall. If the fixture is
loosely mounted or if the CAP NUTS cannot be tightened completely, it can
be fixed as follows:
The (Qty. 2) MACHINE SCREWS on the UPPER CROSSBAR can be
adjusted by loosening their nuts (not seen in figures above) and then
screwing them in or out to alter the length of MACHINE SCREWS sticking out
from the UPPER CROSSBAR. Once the adjustment appears correct, lock the
MACHINE SCREWS in place with their nuts and then secure the fixture tightly
against the wall by using the (Qty. 2) CAP NUTS.
7. Turn power ON at circuit breaker (or replace fuse) and confirm that the fixture
is functioning properly. Completely cover the DUSK-TO-DAWN SENSOR
using the sensor cap provided and confirm that the fixture lights up.
8. Once functionality is confirmed, consider use of waterproof glue or silicone
caulk to seal the FIXTURE BASE to the wall surface to ensure that the fixture
is completely waterproof. If water enters the junction box, it may damage the
fixture and/or building/residence.
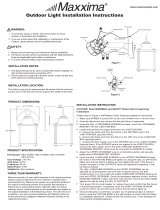
Junction Box
Crossbar Screw
Dusk-to Dawn
Sensor
Cap Nut
Figure 1
THREE YEAR WARRANTY:
Maxxima extends a 3 year limited warranty to the original purchase
that the products listed are free from defects in material and/or
workmanship only. Maxxima will replace any warrantied product to
the original consumer/purchaser if the product fails because of
defects due to workmanship and/or materials within the limited
warranty period. Limited warranty is not transferable and applies to
the original installation of the Maxxima product. This offer does not
constitute in any way a product guarantee and Maxxima does not
hereby assume any obligation whatsoever beyond sending a free
replacement product.
PRODUCT DIMENSIONS:
Machine Screw
Ground Screw
Crossbar Set
Screws
Crossbar
Bracket
Upper Crossbar
Figure 2
INSTALLATION INSTRUCTION:
CAUTION: Read
WARNING and SAFETY Notes before beginning
installation
Please refer to Figure 1 and Figure 2 while following installation instructions.
Bare Copper Wire
White Wire
Black Wire
Fixture Base
MEL-9125W
www.maxximastyle.com
5.9"
(196mm)
10.8" (274mm)
7.7 (1
96mm)
/