Page is loading ...

Instruction
Manual
KiDAQ Data Acquisition
Type 5500A
KiStudio Lab
Type 2910A
5500A_002-943e-09.21


Foreword
5500A_002-943e-09.21 Page 1
Foreword
This instruction manual applies to the data acquisition
system KiDAQ Type 5500A.
Keep this instruction manual for future reference. It
should be available at the point of use.
Information in this instruction manual is subject to change
any time, without notice. Kistler reserves the right to
improve and modify its products in the course of technical
advancement, without any obligation to inform any
persons or organizations of such changes.
Information in this document is subject to:
• KiStudio Lab software Type 2910A R5.0.1
• KiDAQ Data Acquisition Type 5500A with KiDAQ
Controller 5551A firmware R5.0.24
• LabAmp Type 5165A with firmware R2.1.1
(restricted release for use with KiStudio Lab only)
• LabAmp Type 5167A with firmware R2.1.1
(restricted release for use with KiStudio Lab only)
Last manual update 15.09.2021
© 2019 … 2021 Kistler Group. All rights reserved.
Kistler Group
Eulachstrasse 22
8408 Winterthur
Switzerland
Phone +41 52 224 11 11
www.kistler.com

Type 5500A and 2910A
Page 2 5500A_002-943e-09.21
Content
1. Introduction and Important Notes ............................................................................................. 4
1.1 Disposal Instructions for Electronic Devices ....................................................................... 4
1.2 Software Upgrades and Updates ........................................................................................ 4
1.3 Repairs at Kistler ................................................................................................................. 4
2. System Overview ......................................................................................................................... 5
2.1 Components ........................................................................................................................ 5
2.1.1 KiStudio Lab Software Package ............................................................................. 5
2.1.2 Connectivity with KiConnect ................................................................................... 6
2.1.3 KiDAQ and LabAmp Measurement Devices .......................................................... 6
2.1.4 KiDAQ Controller 5551A and Modules 55xxA........................................................ 7
2.1.5 KiDAQ Accessories .............................................................................................. 13
3. System Setup ............................................................................................................................. 14
3.1 System Requirements ....................................................................................................... 14
3.2 Software Installation .......................................................................................................... 14
3.2.1 Enable the Virtualization Technology ................................................................... 14
3.2.2 Installation of KiStudio Lab ................................................................................... 15
3.2.3 KiStudio Lab License Activation ........................................................................... 15
3.2.4 Uninstallation of KiStudio Lab .............................................................................. 16
3.3 Connection Setup for Measurement Devices ................................................................... 16
3.3.1 KiDAQ Point-to-Point Setup ................................................................................. 16
3.3.2 LabAmp Point-to-Point Setup ............................................................................... 16
3.3.3 Mixed Setup: KiDAQ and LabAmp ....................................................................... 17
4. KiStudio Lab Software Overview ............................................................................................. 19
4.1 Project Board – Main View ................................................................................................ 19
4.1.1 Project Devices .................................................................................................... 19
4.1.2 Measurement Setup ............................................................................................. 20
4.1.3 Channel Overview ................................................................................................ 21
4.1.4 Data Processing Definition ................................................................................... 21
4.1.5 Dashboard Definition ............................................................................................ 21
4.1.6 Signal Storage Selection ...................................................................................... 22
4.2 Dashboard ......................................................................................................................... 22
4.3 Project Browser ................................................................................................................. 23
4.4 System Settings ................................................................................................................ 23
5. KiStudio Lab Features in Detail ............................................................................................... 25
5.1 Add a new Measurement Device ...................................................................................... 25
5.2 Configure a KiDAQ Device ................................................................................................ 25
5.2.1 Use different Sampling Rates .............................................................................. 25
5.2.2 Use Tare Functionality ......................................................................................... 26
5.2.3 Time Settings ....................................................................................................... 26
5.2.4 Configure KiDAQ Channels.................................................................................. 26
6. Configuration Examples ........................................................................................................... 29
6.1 Torque Sensor 4503B with KiDAQ Module 5534A ........................................................... 29
6.1.1 Sensor Settings .................................................................................................... 29
6.1.2 Cabling ................................................................................................................. 30
6.1.3 Configuration of KiDAQ Module 5534A ................................................................ 30

Content
5500A_002-943e-09.21 Page 3
7. Hardware Setup with Multiple Measurement Devices ............................................................ 33
7.1 Connect Devices and PC with KiStudio Lab to Switch ...................................................... 33
7.2 Configure Hirschmann Switch to run as PTP Master ........................................................ 34
7.3 Set Switch to be DHCP Server .......................................................................................... 34
7.4 Set the Switch Address and Time and save the Settings .................................................. 35
7.5 Finalization ......................................................................................................................... 35
8. Maintenance ............................................................................................................................... 37
8.1 KiDAQ Device Factory Reset ............................................................................................ 37
8.2 KiStudio and KiDAQ Version Update ................................................................................. 37
8.2.1 KiDAQ Controller 5551A Firmware Update via USB ............................................ 38
8.2.2 KiDAQ Measurement Module Firmware Update .................................................. 39
8.2.3 KiStudio Lab Update Installation ........................................................................... 40
8.3 Change of Battery in KiDAQ Controller 5551A .................................................................. 40
9. Troubleshooting ......................................................................................................................... 41
9.1 KiDAQ LED Status ............................................................................................................. 41
9.2 No Connection from PC to KiDAQ Device ......................................................................... 42
9.3 Unstable Connection from PC to Measurement Devices .................................................. 42
9.4 KiStudio Lab runs unstable ................................................................................................ 43
10. Appendices ................................................................................................................................. 44
10.1 Safety Information for High Voltage Modules 5525A … 5528A ........................................ 44
10.2 Schematics of Accessories ................................................................................................ 45
10.2.1 Cold Junction Compensation Type 5582Ax .......................................................... 45
10.2.2 Bridge Completion Type 5583Ax .......................................................................... 46

Type 5500A and 2910A
Page 4 5500A_002-943e-09.21
1. Introduction and Important Notes
Thank you for choosing a quality product from Kistler.
Please read this instruction manual carefully, so that you
can put the many properties of your product to optimal
use.
Kistler declines any liability, to the extent permissible by
law, if action is taken contrary to this instruction manual,
or other products are used than those listed as
accessories.
For assistance with any special questions remaining after
studying these instructions, Kistler customer service is
available around the world with expert advice for
application-specific problems.
1.1 Disposal Instructions for Electronic Devices
Do not discard old electronic instruments in municipal
trash. For disposal at end of life, please return this
product to an authorized local electronic waste disposal
service or contact the nearest Kistler Instruments sales
office for return instructions.
1.2 Software Upgrades and Updates
Kistler may from time to time supply upgrades or updates
for PC software and firmware. Such upgrades or updates
must always be installed.
Kistler declines any liability whatsoever for any direct or
consequential damage caused by products running on
software and firmware, which has not been upgraded or
updated with the latest software supplied.
1.3 Repairs at Kistler
Repairs at the Kistler factory can be arranged via the
local sales company.
Information can be found at www.kistler.com

System Overview
5500A_002-943e-09.21 Page 5
2. System Overview
With the KiDAQ data acquisition system, Kistler offers
engineers, researchers, measurement technicians and
students the opportunity to combine everything they need
for their measurement task in one setup. Various
measurands and sensors can be used with different data
acquisition hardware and be combined to a unified logical
measurement system – just according the application
requirements.
The KiDAQ data acquisition system offers a wide
selection of modules for various sensor technologies and
more than 20 different measurands – from simple voltage
signals across measurement bridges and IEPE sensors
to charge signals from piezoelectric sensors.
2.1 Components
2.1.1 KiStudio Lab Software Package
The KiStudio Lab software package consists of two
applications to acquire data with KiDAQ or LabAmp and
for comprehensive data analysis.
Measurement devices are configured efficiently with the
intuitive KiStudio Lab software, which provides an
overview of the whole measurement setup and enables
quick navigation.
Acquired data can be easily exported for analysis with
jBEAM. This powerful post-processing and analysis

Type 5500A and 2910A
Page 6 5500A_002-943e-09.21
software provides both, a comprehensive toolbox for
standard analysis and customizable calculations.
The package is available in two editions ‘Starter’ or
‘Professional’. For details about the packages please see
the KiDAQ system datasheet 003-335e.
2.1.2 Connectivity with KiConnect
The intelligent KiConnect technology allows the user to
easily combine different measurement units to a logical
measurement setup and perform precise, time-
synchronized measurements thanks to the Precision
Time Protocol (PTP). KiConnect is built up on state-of-
the-art communications standards (TCP/IP and IoT-
principles) and is therefore ready for distributed setups
and cloud applications.
2.1.3 KiDAQ and LabAmp Measurement Devices
The KiDAQ hardware is designed in a modular way and
can be individually configured to match the required
measurement performance and channel count. The
Portable, Rack and DIN Rail models are designed so that
they can be optimally used in various applications.
Detail information, e.g. mechanical drawings, can be
found in the KiDAQ system datasheet 003-335e.
KiDAQ Rack
The 19" rack housing is 3 rack units high (3U) and can be
equipped with one controller and up to 13 selected
measurement modules. The housing is available in two
different versions: for standard 19” racks and with
carrying handle for desktop use.
KiDAQ Portable
The compact and scalable measurement system KiDAQ
Portable can be individually configured with one
controller and up to 13 measurement modules. It is
ideally suited for stationary and mobile measurement
tasks and thanks to the rugged aluminum enclosure it is
the ideal solution for various environments.
KiDAQ DIN Rail
The KiDAQ DIN Rail housing option provides simple
mounting on to standard rails according EN 60715. The
maximum number of modules depends on the required
data rate and the number of channels per module (e.g.
up to 16 channels with 100 kSps data rate or 256
channels with 10 kSps data rate or a combination).

System Overview
5500A_002-943e-09.21 Page 7
LabAmp family
The test setup can be extended as needed together with
other high-quality signal conditioning and data acquisition
systems from Kistler like LabAmp and – in future – with
selected devices from third-party manufacturers.
• LabAmp Type 5165A for dynamic charge measure-
ments (piezo-electric sensors), IEPE- or voltage-
measurements. 1 or 4 channels.
• LabAmp Type 5167A for quasi-static and dynamic
charge measurements (piezo-electric sensors). 4 or 8
channels.
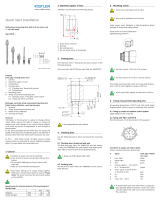
2.1.4 KiDAQ Controller 5551A and Modules 55xxA
Description
A
Connector for 24 V power supply
(e.g. Type 5567A0)
B
Input for digital signals
C
USB Ports
• 2x USB 2.0
D
Ethernet interfaces (RJ45) for connection to a network or
directly to a computer
E
Sensor inputs (for example 5509A):
• BNC neg.
• LEDs per input channel (module 5509A only)
F
Light emitting diodes (LEDs), which signify the status of the
corresponding measuring module (see description in chapter
9.1 below)
Controller Type 5551A
Every KiDAQ measurement device requires a controller
which provides power to the measurement modules and
ensures the proper configuration. The measurement data
is aggregated with a time-synchronized internal bus and
provided to the KiStudio Lab software with the KiConnect
protocol. This allows both local and remote setups over
standard networks.
For detail information and connector pinouts please refer
to KiDAQ system datasheet 003-335e.

Type 5500A and 2910A
Page 8 5500A_002-943e-09.21
Universal measurement module
Type 5501A
• 2 analog input signals
o Voltage till 60 V
o Current
o Resistance
o Potentiometer
o Resistance thermometer (Pt100, Pt1000)
o Thermocouples (types B,E,J,K,L,N,R,S,T,U)
o Strain gauges
o IEPE sensors (Piezotron)
• 2 digital input signals
o Status
• A/D conversion: 100 kSps (per channel), 24 bit
• Galvanic isolation (channel to channel to power supply
and to interface), isolation voltage: 500 VDC
For detail information and connector pinouts please refer
to KiDAQ system datasheet 003-335e.
Universal measurement module
Type 5502A
• 4 analog input signals
o Voltage till 10 V
o Current
o Resistance
o Potentiometer
o Resistance thermometer (Pt100, Pt1000)
o Thermocouples (types B,E,J,K,L,N,R,S,T,U)
o Strain gauges
o IEPE sensors (Piezotron)
• A/D conversion: 20 kSps (per channel), 24 bit
• Galvanic isolation (channel to channel to power supply
and to interface), isolation voltage: 500 VDC
For detail information and connector pinouts please refer
to KiDAQ system datasheet 003-335e.

System Overview
5500A_002-943e-09.21 Page 9
Measurement Module for voltage, current and status
Type 5505A
• 8 analog input signals
o Voltage till 10V
o Current
• 2 digital input signals
o Status
• A/D conversion: 20 kSps (per channel), 24 bit
• Galvanic isolation (channel to channel to power supply
and to interface), isolation voltage: 500 VDC
For detail information and connector pinouts please refer
to KiDAQ system datasheet 003-335e.
Measurement module for voltage and status
Type 5506A
• 8 analog input signals
o Voltage till 60V
• 2 digital input signals
o Status
• A/D conversion: 20 kSps (per channel), 24 bit
• Galvanic isolation (channel to channel to power supply
and to interface), isolation voltage: 500 VDC
For detail information and connector pinouts please refer
to KiDAQ system datasheet 003-335e.
Measurement module for piezoelectric sensors
Type 5509A
• 4 analog input signals
o Charge (piezoelectric sensors),
ranges: 1 000...1 000 000 pC
• A/D conversion: 100 kSps (per channel), 24 bit
• Galvanic isolation (channel to channel to power supply
and to interface), isolation voltage: 500 VDC
For detail information and connector pinouts please refer
to KiDAQ system datasheet 003-335e.

Type 5500A and 2910A
Page 10 5500A_002-943e-09.21
Measurement module for IEPE sensors and voltage
Type 5512A
• 4 analog input signals
o Voltage
o IEPE sensors (Piezotron)
• A/D conversion: 100 kSps (per channel), 24 bit
• Galvanic isolation (channel to channel to power supply
and to interface), isolation voltage: 500 VDC
For detail information and connector pinouts please refer
to KiDAQ system datasheet 003-335e.
Measurement module for MEMS capacitive sensors
Type 5514A
• Up to 8 analog input signals
o 4 single-axis or 2 triaxial MEMS capacitive
sensors (K-Beam)
o Temperature signals
o IEPE sensors (Piezotron)
• A/D conversion: 20 kSps (per channel), 24 bit
• Galvanic isolation (channel to channel to power supply
and to interface), isolation voltage: 500 VDC
For detail information and connector pinouts please refer
to KiDAQ system datasheet 003-335e.
Measurement module for strain gauges
Type 5517A
• 8 analog input signals
o Strain gauge bridges (full, half, quarter)
• A/D conversion: 20 kSps (per channel), 24 bit
• Galvanic isolation (channel to channel to power supply
and to interface), isolation voltage: 500 VDC
For detail information and connector pinouts please refer
to KiDAQ system datasheet 003-335e.

System Overview
5500A_002-943e-09.21 Page 11
Measurement module for strain gauges, inductive
bridges and LVDT
Type 5518A
• 2 analog input signals
o Strain gauges
o Inductive bridges
o LVDT, RVDT
• 4 digital input signals
o Status
• A/D conversion: 20 kSps (per channel), 24 bit
• Galvanic isolation (channel to channel to power supply
and to interface), isolation voltage: 500 VDC
For detail information and connector pinouts please refer
to KiDAQ system datasheet 003-335e.
Measurement module for thermocouples
Type 5521A
• 8 analog input signals
o Thermocouples (types B,E,J,K,L,N,R,S,T,U)
• A/D conversion: 100 Sps (per channel), 24 bit
• Galvanic isolation (channel to channel to power supply
and to interface), isolation voltage: 500 VDC
For detail information and connector pinouts please refer
to KiDAQ system datasheet 003-335e.
Measurement module for RTD or resistance
Type 5522A
• 4 analog input signals
o Resistance
o Resistance thermometer (Pt100, Pt1000)
• A/D conversion: 10 Sps (per channel), 24 bit
• Galvanic isolation (channel to channel to power supply
and to interface), isolation voltage: 500 VDC
For detail information and connector pinouts please refer
to KiDAQ system datasheet 003-335e.

Type 5500A and 2910A
Page 12 5500A_002-943e-09.21
Measurement module for non-insulated
thermocouples at high potential
Type 5525A
• 4 analog input signals
o For non-insulated thermocouples (types
B,E,J,K,L,N,R,S,T,U) at high potential (1200 V)
• A/D conversion: 20 kSps (per channel), 24 bit
• Galvanic isolation (channel to channel to power supply
and to interface), isolation voltage: 1200 VDC / 858
VACrms
For detail information and connector pinouts please refer
to KiDAQ system datasheet 003-335e. Please see also
safety instructions in chapter 10.1 below.
Measurement module for voltage and current at high
potential
Type 5526A
• 4 analog input signals
o Voltage till 10V at high potential (1200 V)
o Current (via shunt) at high potential (1200 V)
• A/D conversion: 100 kSps (per channel), 24 bit
• Galvanic isolation (channel to channel to power supply
and to interface), isolation voltage: 1200 VDC / 858
VACrms
For detail information and connector pinouts please refer
to KiDAQ system datasheet 003-335e. Please see also
safety instructions in chapter 10.1 below.
Measurement module for high voltage and current at
high potential
Type 5528A
• 4 analog input signals
o Voltage till 1200 V
o Current (via shunt) at high potential (1200 V)
• A/D conversion: 100 kSps (per channel), 24 bit
• Galvanic isolation (channel to channel to power supply
and to interface), isolation voltage: 1200 VDC / 858
VACrms
For detail information and connector pinouts please refer
to KiDAQ system datasheet 003-335e. Please see also
safety instructions in chapter 10.1 below.

System Overview
5500A_002-943e-09.21 Page 13
Measurement module for high voltage
Type 5529A
• 4 analog input signals
o Voltage till 1200 V
• A/D conversion: 100 kSps (per channel), 24 bit
• Galvanic isolation (channel to channel to power supply
and to interface), isolation voltage: 1200 VDC / 858
VACrms
For detail information and connector pinouts please refer
to KiDAQ system datasheet 003-335e. Please see also
safety instructions in chapter 10.1 below.
Measurement module for digital signals
Type 5534A
• 8 digital input signals
o Frequency
o Pulse width
o Counter signal
o Time
o Status
• Frequency measurement up to 1 MSps
• Galvanic isolation (channel to channel to power supply
and to interface), isolation voltage: 500 VDC
For detail information and connector pinouts please refer
to KiDAQ system datasheet 003-335e.
Measurement module for differential digital signals
Type 5535A
• Up to 6 digital input signals
o Frequency
o Pulse width
o Counter signal
o Time
o Status
• Frequency measurement up to 1 MSps
• Galvanic isolation (channel to channel to power supply
and to interface), isolation voltage: 500 VDC
For detail information and connector pinouts please refer
to KiDAQ system datasheet 003-335e.
2.1.5 KiDAQ Accessories
Various accessories for KiDAQ are available. For detail
information see KiDAQ system datasheet 003-335e.
Schematics of accessories can be found in chapter 10.2
below.

Type 5500A and 2910A
Page 14 5500A_002-943e-09.21
3. System Setup
3.1 System Requirements
The system requirements using the KiStudio Lab
Package for data acquisition and analysis very much
depends on your measurement needs.
System requirements and recommendations
Operating system
Windows 10 Professional or
Enterprise, 64 bit,
Version 1803 (Build 17134) or newer
with Hyper-V.
Windows 7 and older is not
supported.
Processor
Intel® Core™ i7-7500 with 2.7 GHz
or better (recommended)
Memory
16 GB (minimum)
Mass storage
SSD (recommended),
110 GB free space on system
partition C: (minimum, for installation
and measurement data)
Network
Spare USB interface for USB-to-
Gigabit-Ethernet adapter
Display resolution
1920 x 1080 / full HD (recommended)
KiStudio Lab Starter and Professional packages are
available as single seat license only.
3.2 Software Installation
3.2.1 Enable the Virtualization Technology
KiStudio Lab runs in a so-called virtual machine (VM).
This requires the ‘virtualization technology’ to be enabled
in the BIOS of the host computer. Unfortunately, there is
no general procedure, which applies for all
manufacturers.
Please refer to the manual of your computer how to
access to the BIOS and where to enable the
virtualization.
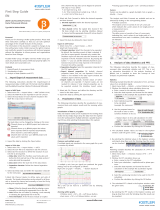
Here an example (names and keys may be different from
manufacturer to manufacturer):
1. While booting the computer, press ‘ESC’ or ‘F1’ to
access the BIOS setup (this is the trickiest part)
2. Navigate to » BIOS Setup » Advanced » Device
Configurations (or similar)
3. Enable the checkbox with ‘Virtualization Technology
(VTx)’ (or similar)

System Setup
5500A_002-943e-09.21 Page 15
4. Save and exit the BIOS setup
5. Check in ‘Windows Features’ if all 4 Hyper-V options
are enabled
3.2.2 Installation of KiStudio Lab
Ethernet is used as a connection from your computer to
the KiDAQ measurement device. Please plug-in the
delivered USB-to-Ethernet adapter prior installation. (The
physical Ethernet port remains free for other
applications).
Please make sure all other USB-Ethernet adapters are
disconnected, including docking stations which are
connected via USB-C. This applies only for the
installation process, afterwards they can be used
normally.
Installation steps
1. Extract the files ‘KiStudioLab.msi’ and
‘KiStudioLabServer.vhd’ from the .zip file
2. Plug-in the delivered USB-to-Ethernet converter
3. Execute the ‘.msi’ - file (local administrator rights are
required)
4. Accept the terms and conditions and press ‘Install’
5. Installation will ask for a reboot
6. After reboot the installation will continue automatically
(press » Next and » Install again) or continue the
installation manually (start ‘Initialize KiStudio Lab’ with
administrator rights)
7. KiStudio Lab can be found in the Windows start menu
under ‘Kistler’
Please note
• The first start after installation takes a little longer
(approx. 5 min)
• This installation process installs a virtual machine
(VM) on your computer in which the KiStudio Lab App
will run. After the installation, the VM and the software
services are initialized. As a result, the first start of the
software may take a little longer (up to 5 minutes).
• Please make sure that there are no other networks
with subnet 192.168.103.0 (mask 255.255.255.0).
3.2.3 KiStudio Lab License Activation
KiStudio Lab Starter edition does not require any
software license activation.
If you have bought KiStudio Lab Professional edition,
please ask your local sales representative for how to
activate the license.

Type 5500A and 2910A
Page 16 5500A_002-943e-09.21
3.2.4 Uninstallation of KiStudio Lab
1. Select ‘Uninstall’ from ‘Add or remove programs’ in
Windows system settings
2. For complete uninstallation including projects and
measurement data, delete also
‘c:\ProgramData\Kistler\KiStudio Lab Data\
KiStudioLabData.vhd’
(may be a hidden folder)
3.3 Connection Setup for Measurement Devices
3.3.1 KiDAQ Point-to-Point Setup
To connect a KiDAQ Type 5500A device with the
KiStudio Lab software just connect the device with
Ethernet cable via the delivered USB-to-Ethernet
converter to the PC.
The KiDAQ devices uses its default IP address
(192.168.103.30), nothing needs to be configured. It will
appear in the device list automatically.
If you use a different USB-to-Ethernet converter than
used during installation or if you have troubles to connect
to the KiDAQ device, please see section 9.2 below.
3.3.2 LabAmp Point-to-Point Setup
To connect a single LabAmp Type 5165A or 5167A
device with the KiStudio Lab software connect the device
with Ethernet cable via the delivered USB-to-Ethernet
converter to the PC.
Configure the LabAmp device to use a static IP address
either via the WebUI or the ‘Network Setup Wizard’
(available on www.kistler.com).
The IP address must be in the range of 192.168.103.xxx
(where xxx must not be .30, .31 or .32), subnet mask

System Setup
5500A_002-943e-09.21 Page 17
255.255.255.0 should be used. Using the ‘Network Setup
Wizard’, the gateway must be set 192.168.103.31.
After the address settings are saved, the device will
appear in the device list automatically.
Please Note
• If your LabAmp firmware was freshly updated, please
execute a factory reset before first use with KiStudio
Lab.
• Please make sure you have the required licenses
activated within the LabAmp WebUI before connecting
the device to KiStudio Lab.
(LabAmp Type 5165A may need the PTP license for
time synchronization; LabAmp Type 5167A requires a
DAQ license)
• If you use a different USB-to-Ethernet converter than
used during installation or if you have troubles to
connect to the LabAmp device, please see section 9.2
below.
3.3.3 Mixed Setup: KiDAQ and LabAmp
To connect a multiple LabAmp devices or a LabAmp with
a KiDAQ device with the KiStudio Lab software connect
the LabAmp device with Ethernet cable via the delivered
USB-to-Ethernet converter to the PC. The second device
can then be daisy-chained through the second Ethernet
interface of the LabAmp.
Configure the LabAmp device(s) to use a static IP
address either via the WebUI or the ‘Network Setup
Wizard’ (available on www.kistler.com).
The IP address must be in the range of 192.168.103.xxx
(where xxx must not be .30, .31 or .32), subnet mask
255.255.255.0 should be used. Using the ‘Network Setup
Wizard’, the gateway must be set 192.168.103.31.
After the address settings are saved, the devices will
appear in the device list automatically.
If you use a different USB-to-Ethernet converter than
used during installation or if you have troubles to connect
to the LabAmp device, please see section 9.2 below.

Type 5500A and 2910A
Page 18 5500A_002-943e-09.21
Please Note
• If your LabAmp firmware was freshly updated, please
execute a factory reset before first use with KiStudio
Lab.
• If you use a different USB-to-Ethernet converter than
used during installation or if you have troubles to
connect to the LabAmp device, please see section 9.2
below.
• The used 100 Mbps Ethernet interface can only
handle a limited number of channels at the same time.
This is very dependent on used sampling rates, so no
general rule is available. Please contact your local
Kistler sales or service representative to check if your
specific setup will work. Alternatively, an additional
(PTP-)Switch with Gigabit Ethernet interface can be
used, see chapter 7 below.
/